
2 Methods to Bypass FRP Huawei Nexus 6P Android 8,7
To Bypass FRP Huawei Nexus 6P Android 8, Android 7, you will have to follow steps from below, but before starting this process, do make sure you are aware of your device android version, because both methods are totally different, by the way, if you don’t know your device Nexus 6P android version, even then you can apply both methods 1 by 1.
Warning: Do not try this frp method on a stolen phone, this is a serious crime, if you are trying to bypass frp on a stolen phone, you may also be jailed, this process is for device owner and for educational purpose only.
| Method 1: Bypass FRP Nexus 6P Android 8 |
| Method 2: Bypass FRP Nexus 6P Android 7 |
Method 1: Bypass FRP Huawei Nexus 6P [Android 8]
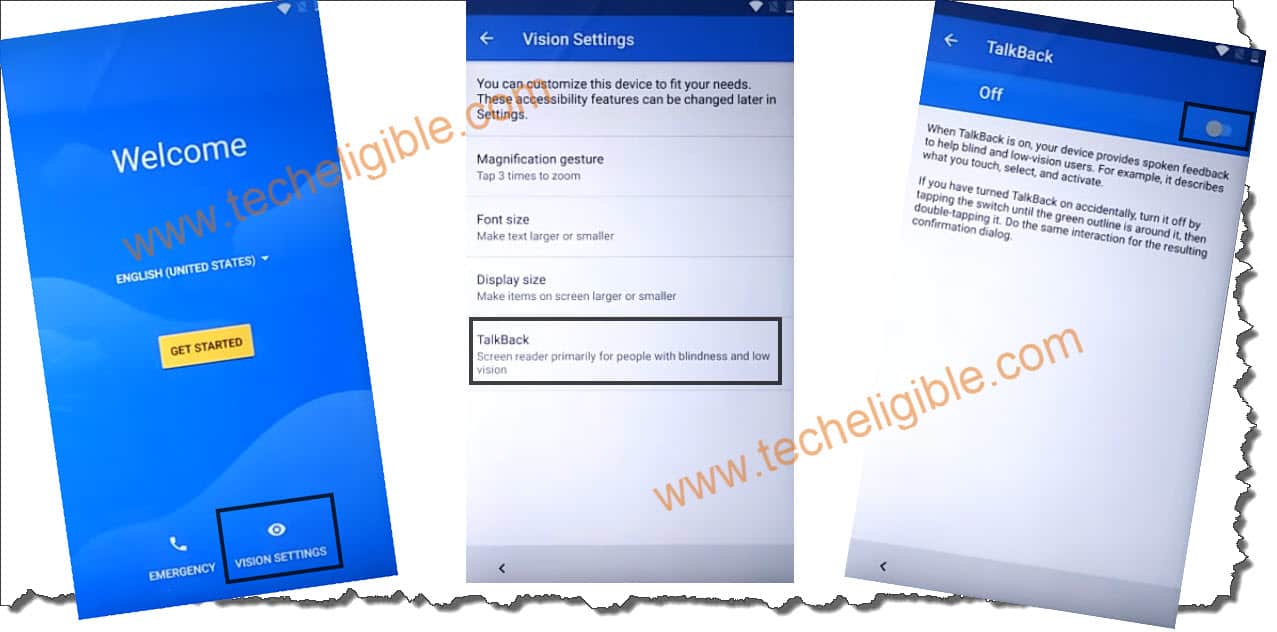
-Connect WiFi & Access back to “Hi there” screen.
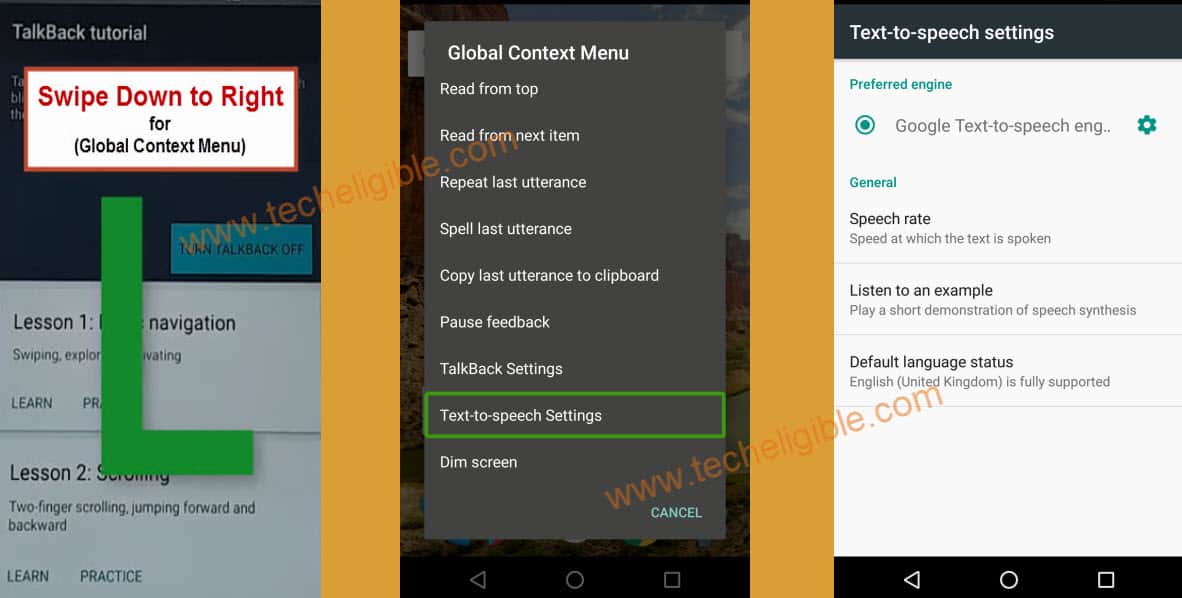
-Enable talkback feature by hitting on > Vision Settings > Talkback > Turn on.
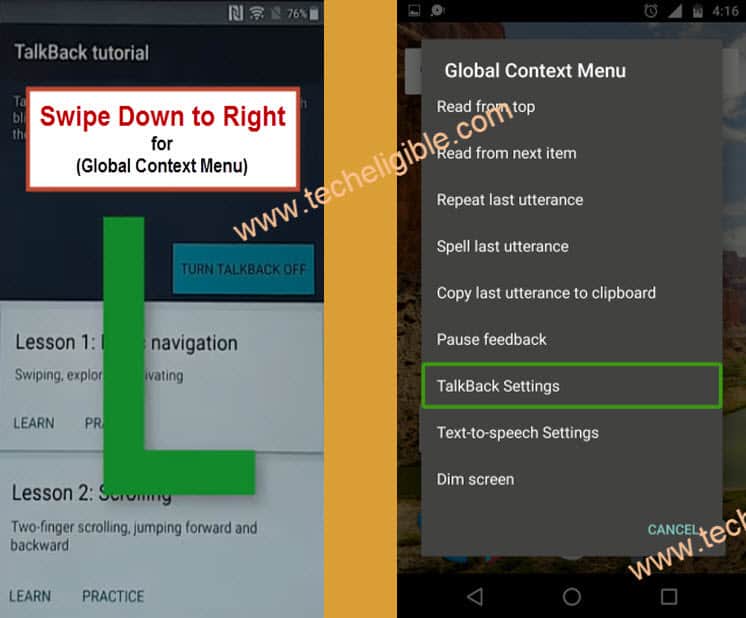
-Draw “L” by swiping down to right on talkback tutorial screen, and then double tap to “Talkback Settings”.
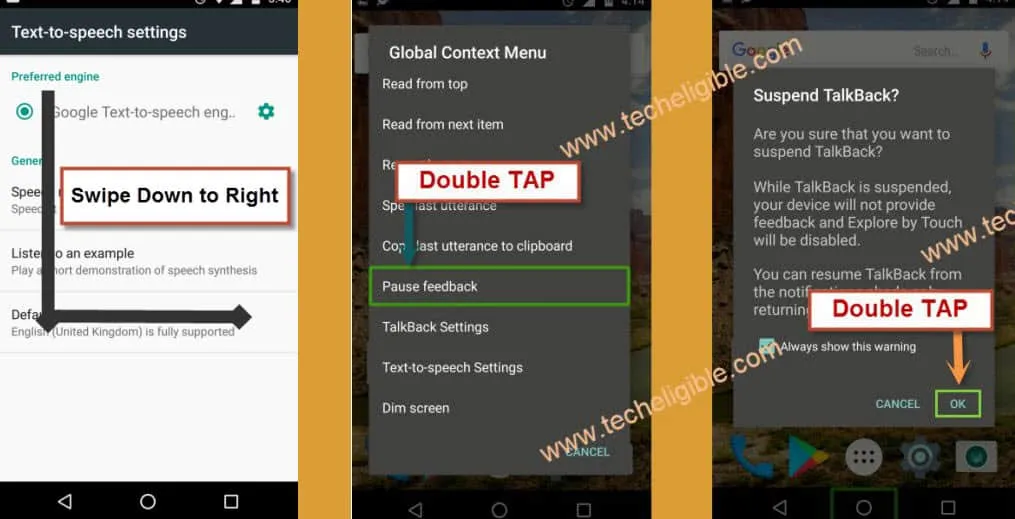
-Turn off talkback feature by holding and pressing both (Volume UP/DOWN) keys.
Access to Chrome Browser:
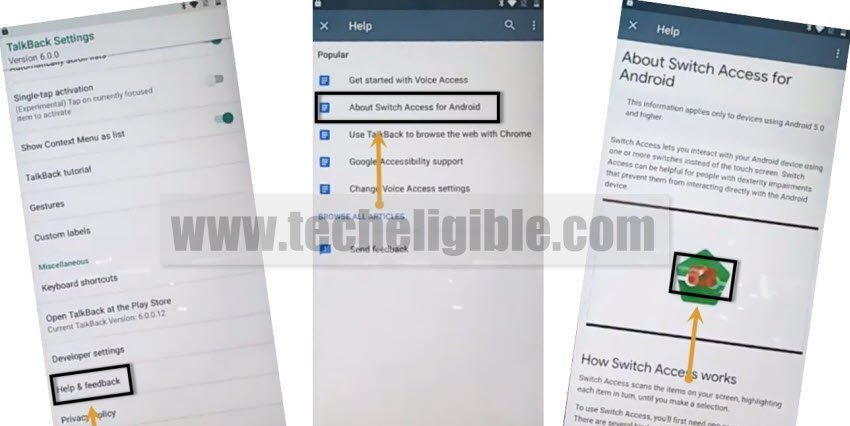
-Tap to “Help & Feedback”.
-Go to “Android Switch Access for android”.
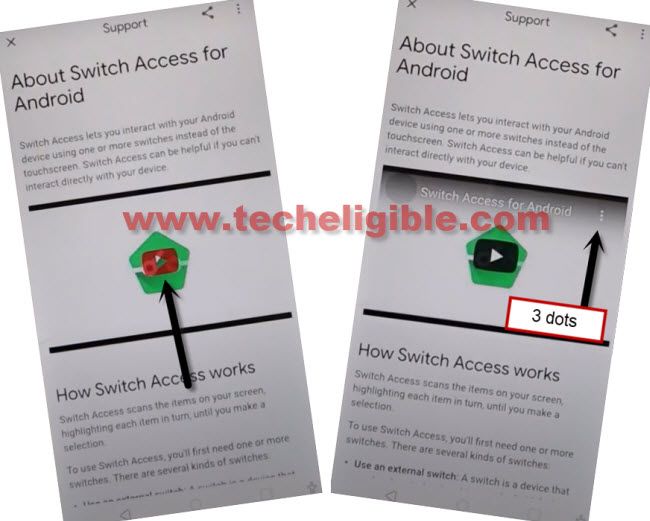
-Tap to “Video Play icon”, and wait few seconds.
-From the video top corner, hit on “3 dots”, and then tap to “Watch Later”.
-Hit on > Accept & Continue > No Thanks.
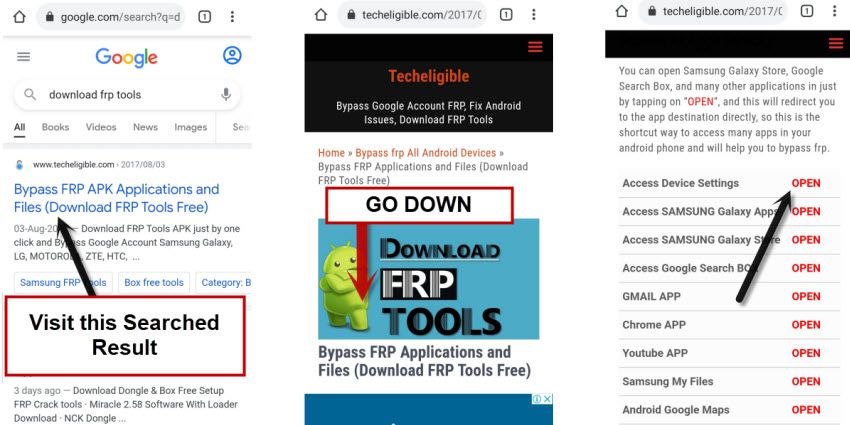
-Search “Google” in top address bar on google sign in screen.
-Search “Download FRP Tools” and access to our website by following below image.
-Swipe down and tap to “Access Device Settings“.
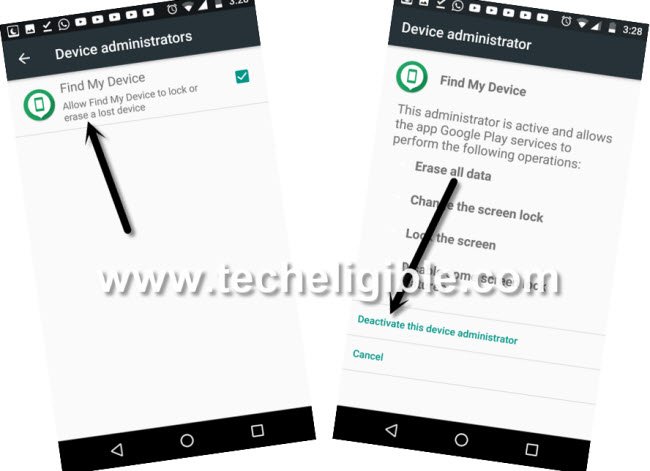
Disable Admin App:
-Go to “Security & Location”.
-Afterwards, tap to “Device Amin App”.
-Go to > Find My Device > Deactivate this device admin app.
Go back to Settings & Setup New Pattern:
-This would be our final step, we are now going to add new pattern to Bypass FRP Huawei Nexus 6P Android 8.
-Go back to “Settings”.
-Tap again on > Security & Location > Screen Pinning > Turn on.
![]()
-Hit also on “Lock Device when unpinning” option.
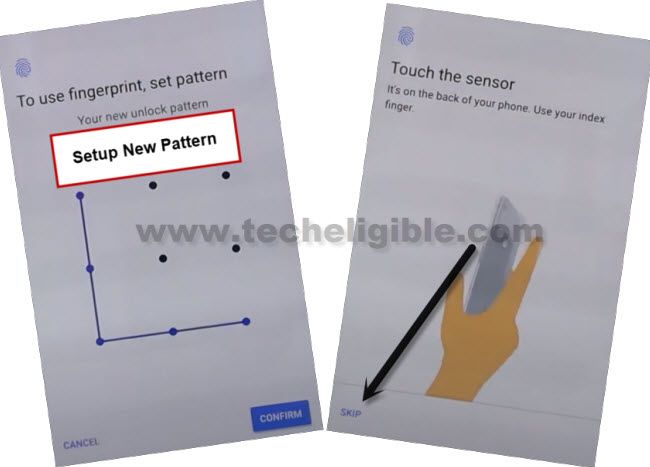
-Go to > Nexus imprint + Pattern > Yes.
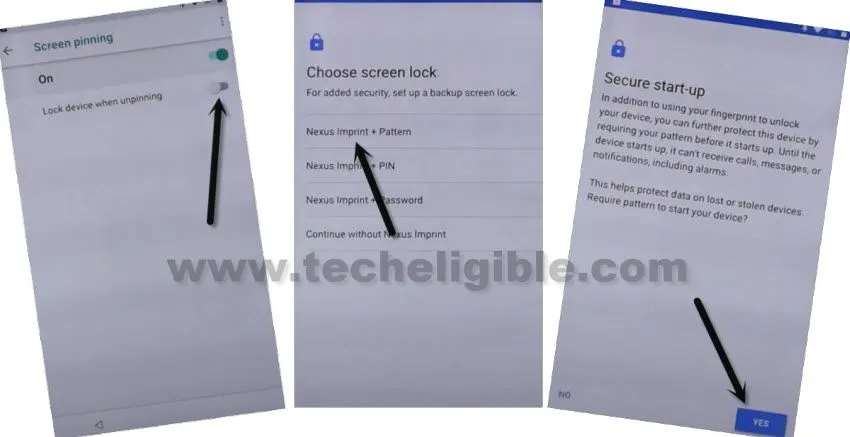
-Draw any one of your easy and desire (Pattern Lock), and then hit on “Confirm”.
-From (Touch the sensor) screen, hit on “Skip”.
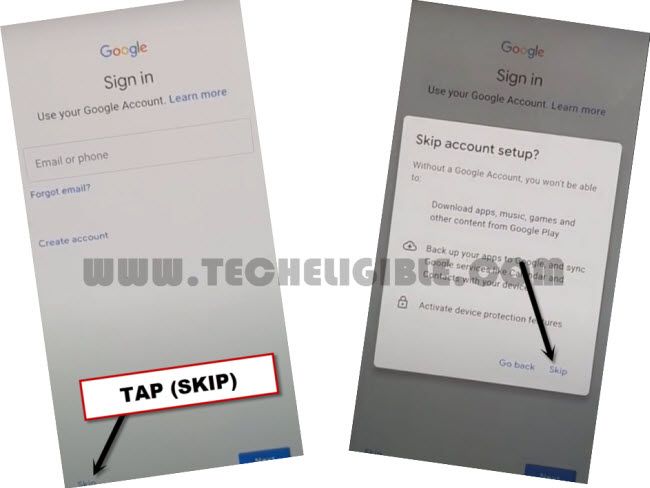
This is all till here, now go back to “Hi there” homescreen by tapping at back arrow for several times, and then finish up initial setup wizard, you will be asked for pattern lock, use your pattern lock which you have setup recently.
Note: You will also have “Google Sign in” screen, but don’t worry, you can skip this screen now, there is “SKIP” option on bottom left corner, just tap on that.
Method 2: Bypass FRP Huawei Nexus 6P [Android 7]
You can Bypass FRP Huawei Nexus 6P with dirtycow method, this is the most latest and useful method to bypass google account, this method is for all android devices those have Oct 5 2016 Security Patch or lower than that, except the device those have most updated security patch level December 5, 2016 security patches.
You can try this method with your any device whether it has android 7.0, or android 7.1.1 or android 7.1, but make sure your device security patch is not updated to December 5, 2016.
Worth to Note: This method is successfully tested with Nexus 6P, Android, Oct 5 2016 Security Patch, NBD90X, NRD90U
Let’s start to Bypass FRP Huawei Nexus 6P:
• Tap on “Vision Settings”, then “Talkback”, after that “Turn on” talkback.
• Swipe Down to Right to bring “Global Conext Menu”.
• Double tap on “Text-to-speech Settings”.
Suspend Talkback Option:
• Now again Swipe Down to Right on “Text-to-speech settings” screen.
• Double tap on “Pause feedback”, and then double tap on “OK”.
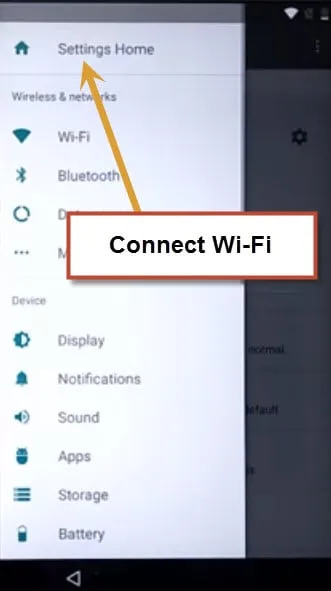
• Swipe from left corner screen to right to bring “Settings”.
• Tap on “Setting Home”.
• Now connect “Wi-Fi” to successfully Bypass FRP Huawei Nexus 6P .
Enable Unknown Sources:
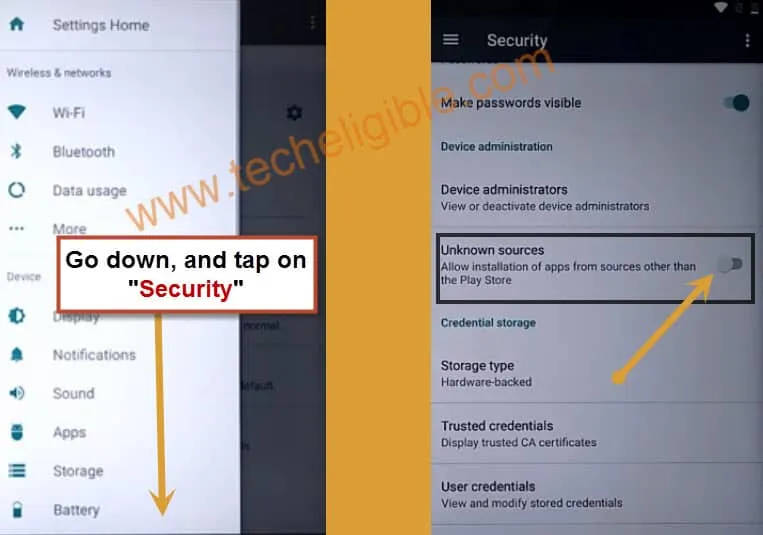
• Once Wi-Fi connected successfully, tap on “Back Key” to go back to “Settings”.
• Go down from there, and tap on”Security”, and then enable “Unknown Sources” from there.
Disable Drive from Apps:
• Again tap on “Back key” to go to “Settings”.
• Tap on “Apps”, and then “Drive”, after that tap on “Disable”.

• Tap on “Back Key” to go back to “Apps”.
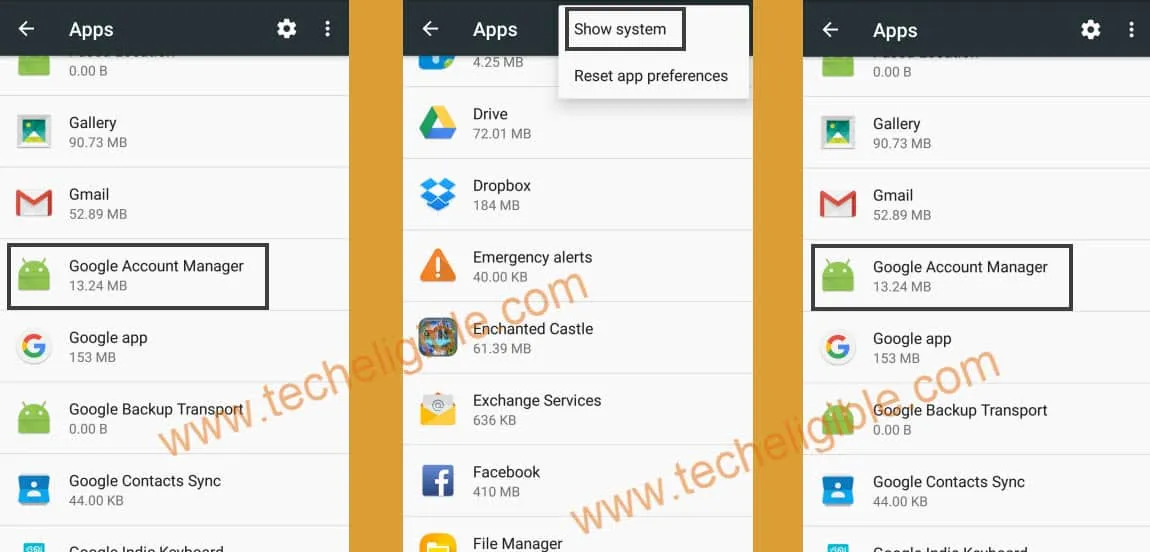
• Tap on “3 dots” from top right corner, and then tap on “Show Systems”.
• Now tap on “Google Account Manager”, and then tap on “Modify System Settings”.
• Disable “Allow modify system settings”.
Open Google Chrome to Download FRP Tools:
• Keep tapping back key until you reach to “Settings” screen.
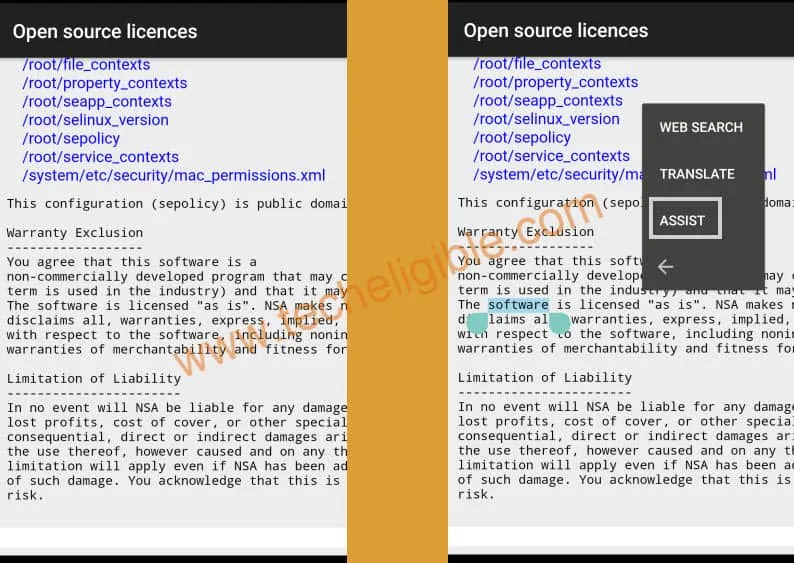
• Tap on “About Phone”, then tap on “Legal Information”, after that “Open Source Licences”.
• Tap on any link from “Open Source Licences” screen.

• “Long Press” on any text, so that (Copy, Share, Select all) options appear.
• Tap on “3 dots”, and then tap on “Assist”.
Download FRP Tools to Bypass FRP Huawei Nexus 6P:
• Tap on “No Thanks” from google.
• Type there “Chrome”, and then tap on “Chrome icon” to open it.
• Now tap on “Accept & Continue”, then “No Thanks”.
No you have successfully accessed to google chrome, now we have to download frp tools to Bypass FRP Huawei Nexus 6P device, also we will use commands to remove frp lock.
Download & Install Apex Launcher:
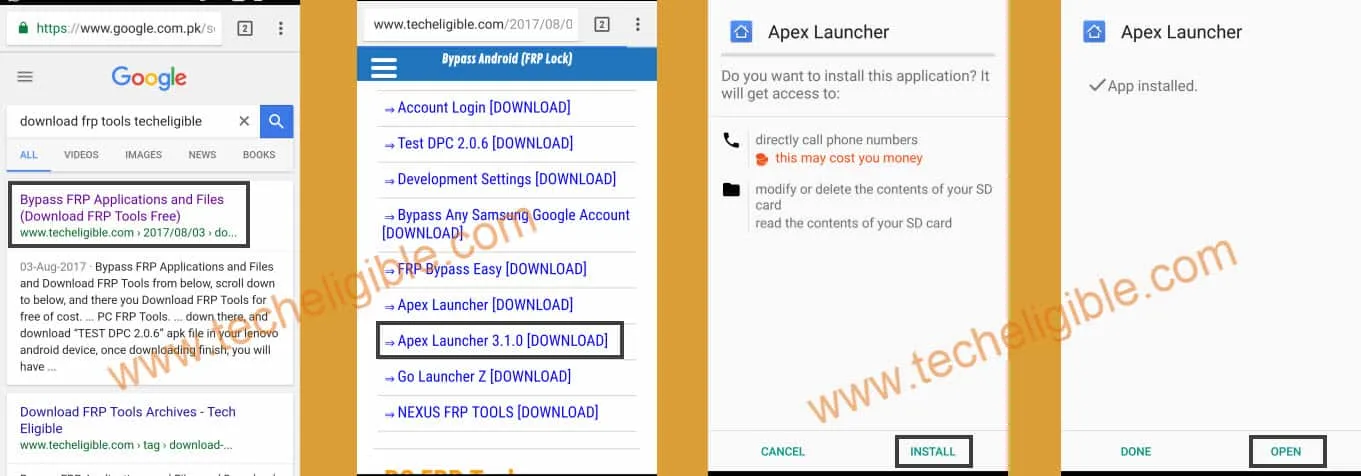
• Type in google search bar “Download FRP Tools Techeligible“.
• Open most relevant search result from there.
• Now download from there “APEX LAUNCHER 3.1.0“.
• Once downloading finish, you will get a popup bottom of your screen, tap on “OPEN”.
• Install Apex Launcher and then tap on “OPEN” on installation finished.
Download Nexus FRP Tools:
• Tap on “Chrome” browser, then you will be taken to “Download page” where from you downloaded “Apex Launcher”.
• From same download page, tap on “NEXUS FRP TOOLS“.
• Now Download All Nexus frp files from there. (there are around 8-9 files) you have to download.

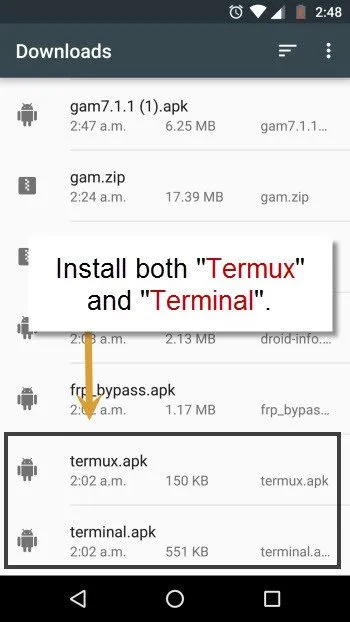
Go to Download Folder & Install “Termux and Terminal”:
• Once downloading finish of all files, go back to your Nexus 6P home screen.
• Tap on “Menu” to and then open “DOWNLOAD” folder.
• From there, Install “termux” & “terminal” both applications, at installation finished, tap on “DONE”.
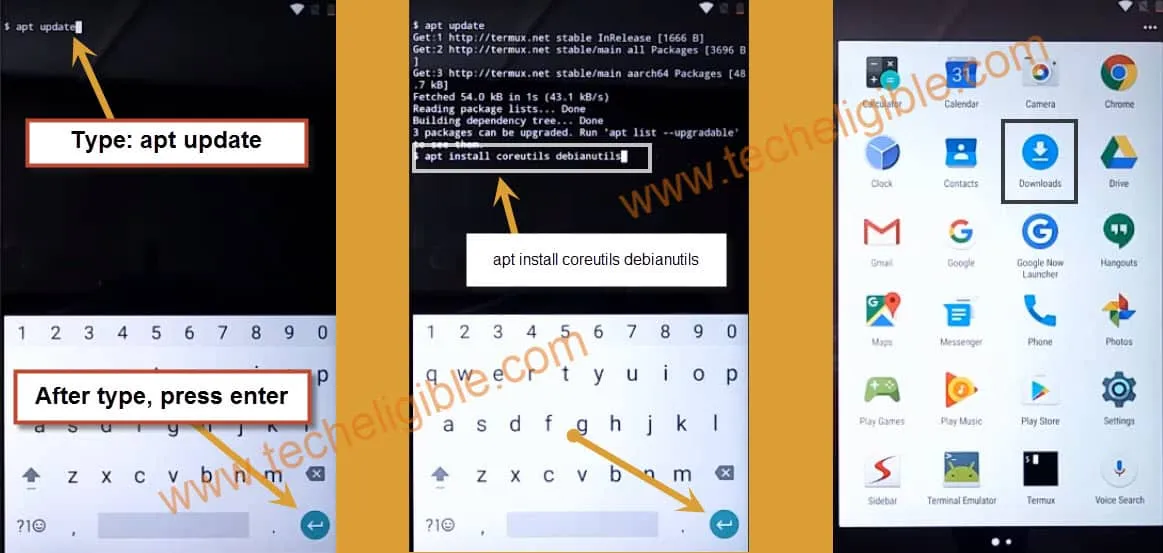
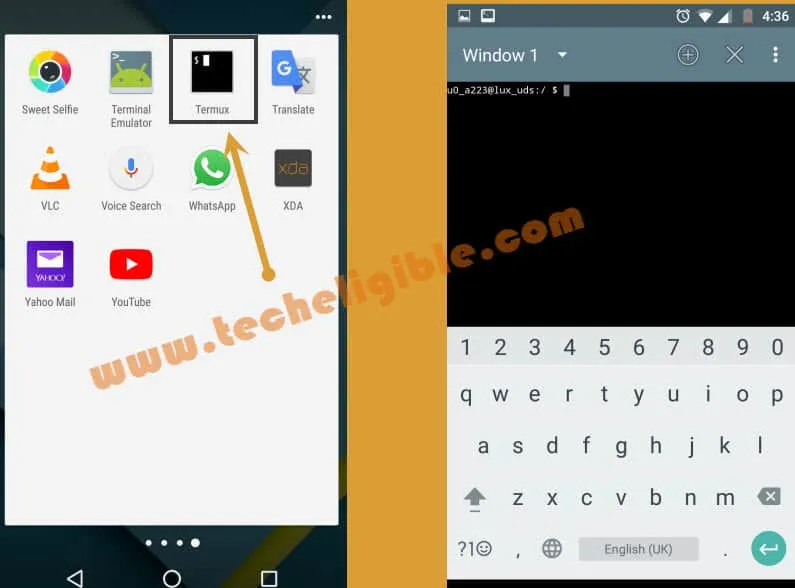
• Now tap on “Back Key” to go back to “MENU” options, and from there tap on “Termux” to open it.
Type there below commands:
apt update
(tap on “enter”)
apt install coreutils debianutils
(tap on “enter”)
• Now tap on back key to go back to “Download” folder.
• From download folder, select both file “gam6.apk & dirtycow” by long press on both, and then tap on “top right corner 3 dots”, then tap on “Copy to..”.
• Now from left side screen menu, tap on “Termux“, and tap on “Copy” from down right corner.
So now we have successfully copied both “gam6.apk” file, and “dirtcow.zip” file to the termux.
Let’s Open Termux & Add Commands There:
• Tap on back key to go back to your Nexus 6P Menu.
• From there tap on “Termux” to open it.
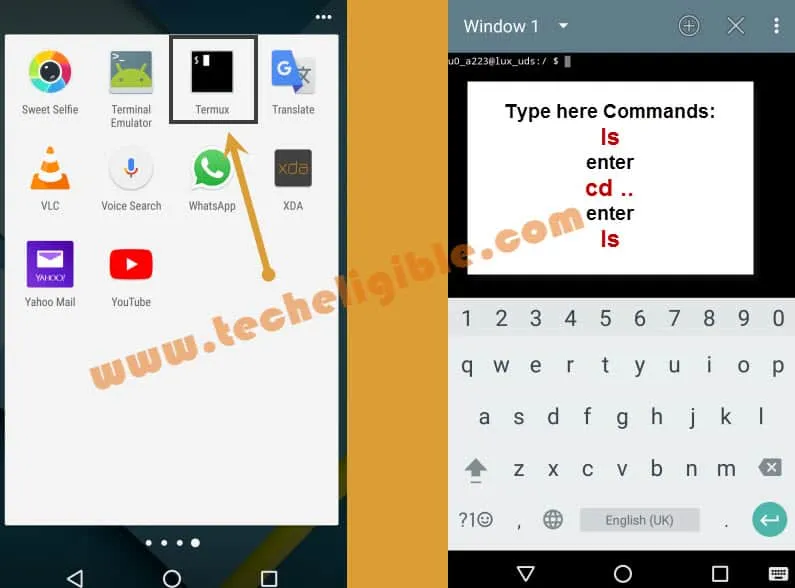
Type Below Commands in Termux:
ls
(tap on ENTER)
cd ..
(tap on ENTER)
ls
Note: ls = LS, so don’t confuse with 1 or I or something, it is L, we will type in small alphabates.
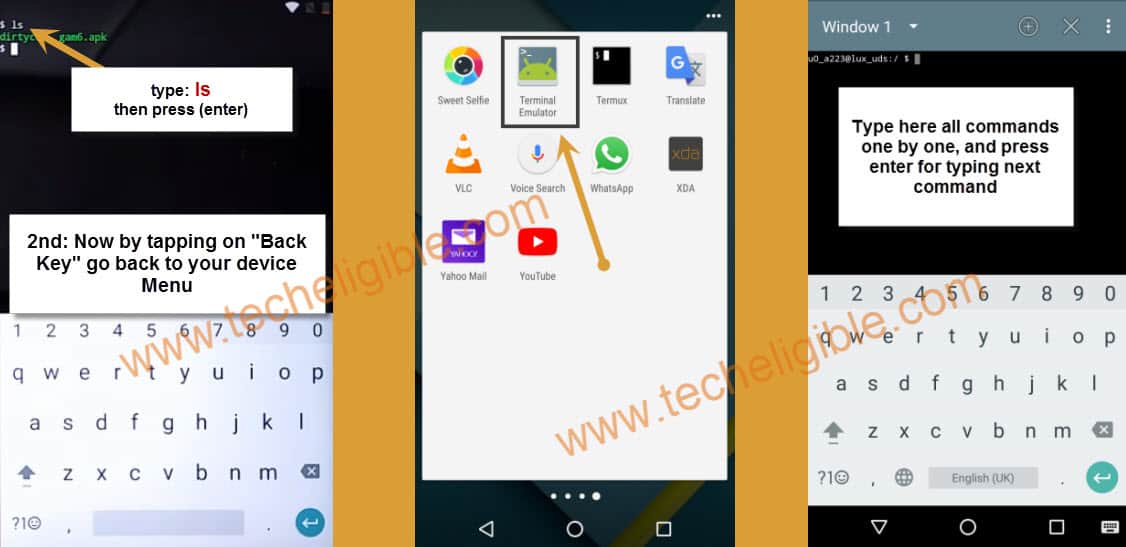
• Now tap on “Back Key” and go to “Download” folder.
• Now “Long tap” on “gam6.apk“, and then tap on “Share icon”, after that select “termux” from share options.
• Tap on “OPEN FOLDER” from popup window.

• Again go back to “Download” folder by tapping on back key.
• Long tap on “Dirtycow“, then tap on “Share icon” from top corner, and share with “termux”.
• If you get popup, tap on “OPEN FOLDER”.
• Type command ls in terminal window, and then tap on “enter” key.
• Tap on back key to go back to menu, and then tap on “TERMINAL EMULATOR” to Bypass FRP Huawei Nexus 6P.
Type Below Commands in Terminal Emulator:
cd –
(Tap on “Enter” from your keyboard)
dirtycow
(Tap on “Enter” from your keyboard)
touch file
(Tap on “Enter” from your keyboard)
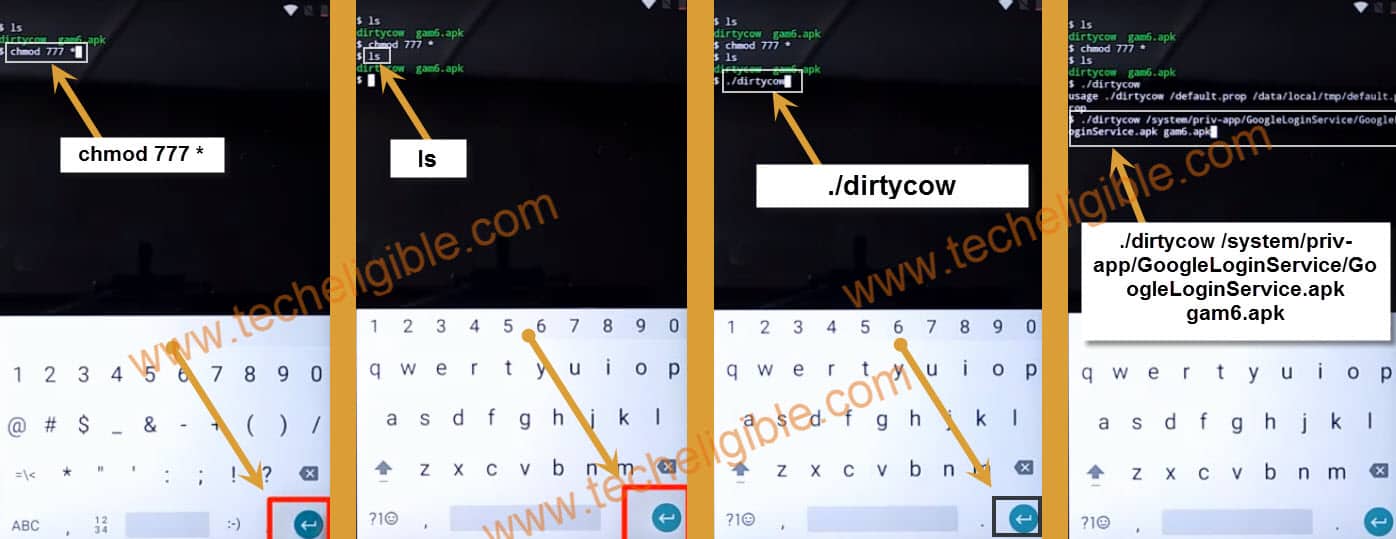
chmod 777 *
(Tap on “Enter” from your keyboard)
./dirtycow
(Tap on “Enter” from your keyboard)
./dirtycow /system/priv-app/GoogleLoginService/oat/arm64/GoogleLoginService.odex file
(tap on “Enter” from your keyboard)
Let’s Open Termux to Type Commands:
• Go back to “MENU” by tapping back key, open “Termux”.
Type below commands in “TermuX”:
chmod 777 *
(Tap on “Enter” from your keyboard)
ls
(Tap on “Enter” from your keyboard)
./dirtycow
(Tap on “Enter” from your keyboard)
./dirtycow /system/priv-app/GoogleLoginService/GoogleLoginService.apk gam6.apk
(Tap on “Enter” from your keyboard)
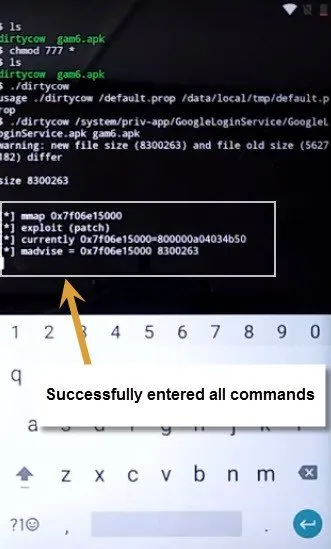
• After putting successfully commands, you will have window in TERMUX same as below.
Install Google Account Manager 7.0:
• Go back to “MENU”, and then tap on “Download”.
• Tap on “gam7.apk“, then tap on “Install”, and then tap on “Done”.
Let’s Go to Settings:
• Now tap on “Back Key” from your Nexus 6P device, go back to “MENU”.
• Tap on “Settings”, then “Apps”, and then tap on top right corner “3 Dots”, and then select “Show System”.
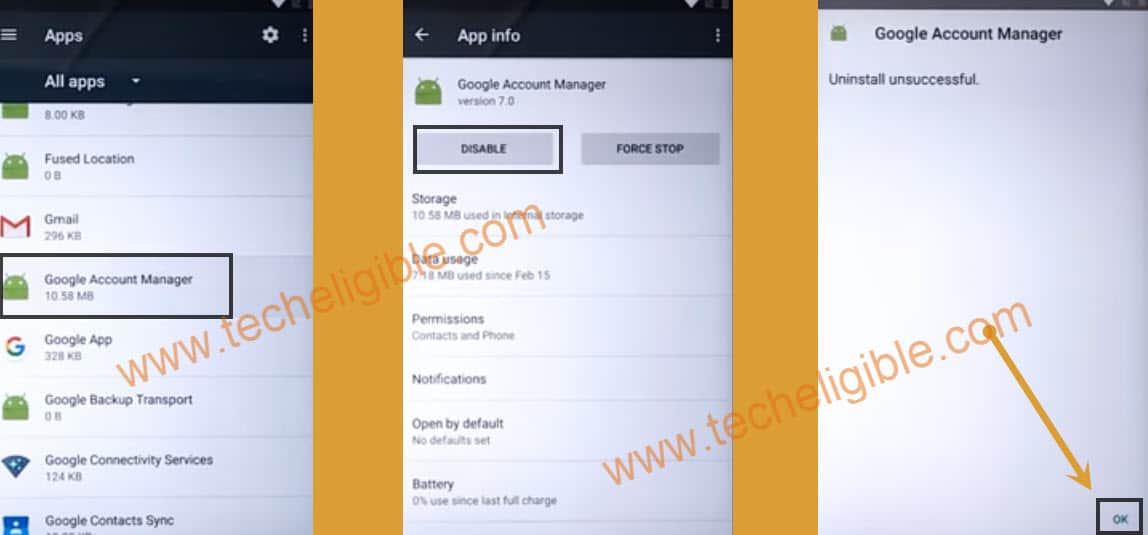
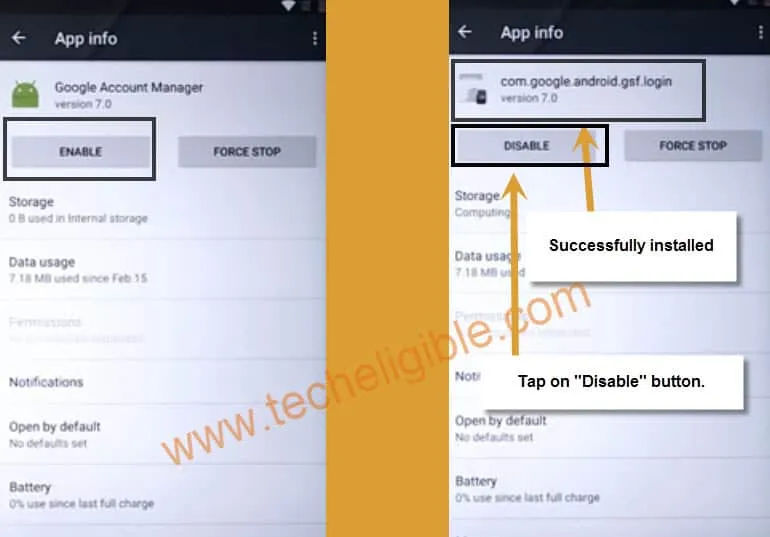
• Now tap on “Google Account Manager”.

• Tap on “Disable”, then tap on “OK”.
• Now you will see a screen of “Uninstall Unsuccessful“. just tap “OK”.
• Again tap on “Enable”.
• Now you will see there “com.google.android.gsf.login“, means everything is going well.
• Tap on “Disable” button again, to disable “com.google.android.gsf.login“.
• Now you will see a screen of “Uninstall Unsuccessful”. just tap “OK”.
Reinstall Google Account Manager 7.0:
• Go back to “Download” folder.
• Tap on “gam7.apk“, install it, then done.
• Now again go to “Settings”, then “Apps”.
• Tap on “com.google.android.gsf.login“.
• Now tap on “Uninstall” button from there, then tap on “OK”.
Install Google Account Manager 6:
• Go back to “Download” folder.
• Tap on “gam6.apk“, and install it, then done.
• Now we have successfully bypassed Android version 7.0 to Android 6.0.
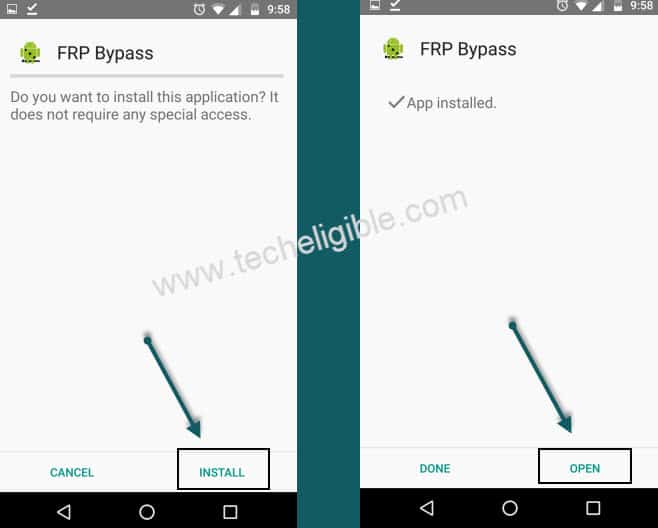
Let’s install FRP Bypass to Bypass FRP Huawei Nexus 6P:
• Tap on “frp-bypass.apk” from download folder.
• Then tap on “Install”, and then tap on “OPEN”.
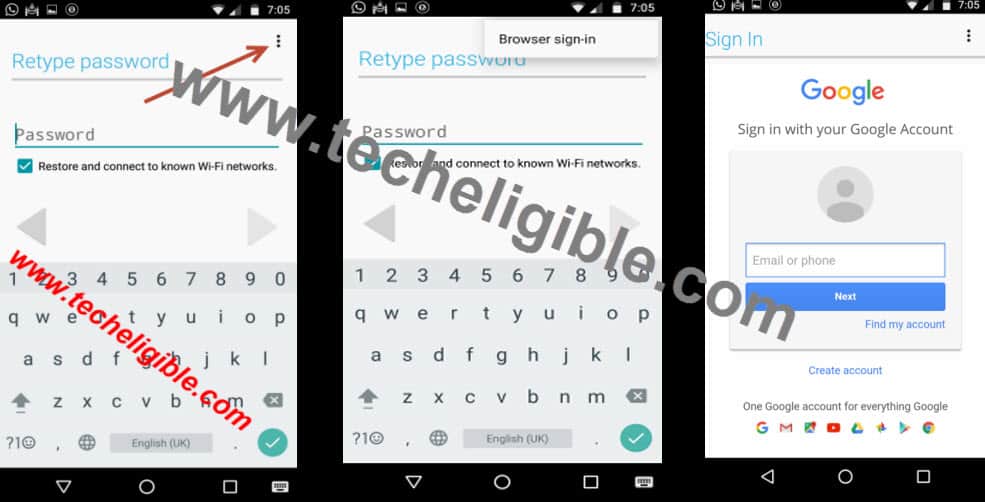
Add New Gmail Account:
• Tap on “3 Dots” from top right corner.
• After that tap on “Browser Sign-in”.
• Now type your “Valid Gmail” id there with password and then tap on “Sign in”.
Close Termux & Terminal Emulator:
• Go back to “MENU”, Tap on “Termux”, and long press on termux window, then tap on “More”, then “HANGUP”.
• Now go back to menu, then tap on “Terminal Emulator”, and tap on “X” cross sign from top right corner.
Install Google Account Manager 7.0:
• Once again go to “Download” folder.
• Tap on “gam7.apk” and install it once again.
Verify Your Google Acc Manager 7.0:
• Go back to “Settings”, then “Apps”.
• Tap on “Google Account Manager”, and there you will see “Google Account Manager 7.0“.
• Now tap on “Back Key” to back to “Apps”, then tap on “3 dots” from top right corner.
• After that select “Reset app preferences” from there, then tap on “Reset App“.
• Now go back to menu, and Switch off your Nexus 6P by pressing “Power Key”.
Enable OEM Unlock:
• Complete initial setup.
• Go to “Settings”, then “About Phone”, and tap 5-6 times rapidly on “Build Number” until see you a popup of “You are now a developer!”.
• Tap on back key, to back to settings, then tap on “Developer Options”.
• Now tap on “OEM Unlock” to enable it.
Congrats you’ve successfully accomplished the method to Bypass FRP Huawei Nexus 6P Android 7.0 device.
Thanks for visiting us, if you have any question feel free to ask in comment box.