
How to Bypass FRP BQ Aquaris X Android 8.0 (New Method 2018)
Are you facing factory reset protection on your device?, and you are unable to bypass it, so you came at right website, you can easily Bypass FRP BQ Aquaris X device just by following some simple steps from below of this post, we will download and install some frp bypass applications, and will disable some applications from BQ Aquaris X device to add new gmail account.
Warning: This method is only for DEVICE OWNER.
Note: This method has successfully been tested with BQ AQUARIS X Android 8.0.
Let’s Start to Bypass FRP BQ Aquaris X:
-Switch on device & Connect Wi-Fi to your device first (Your Device do have Internet Connection).
-Go back to very first “Welcome Screen”.
-Go to “Vision Settings”, and then tap on “Talkback”, and enable “Talkback” feature from there.
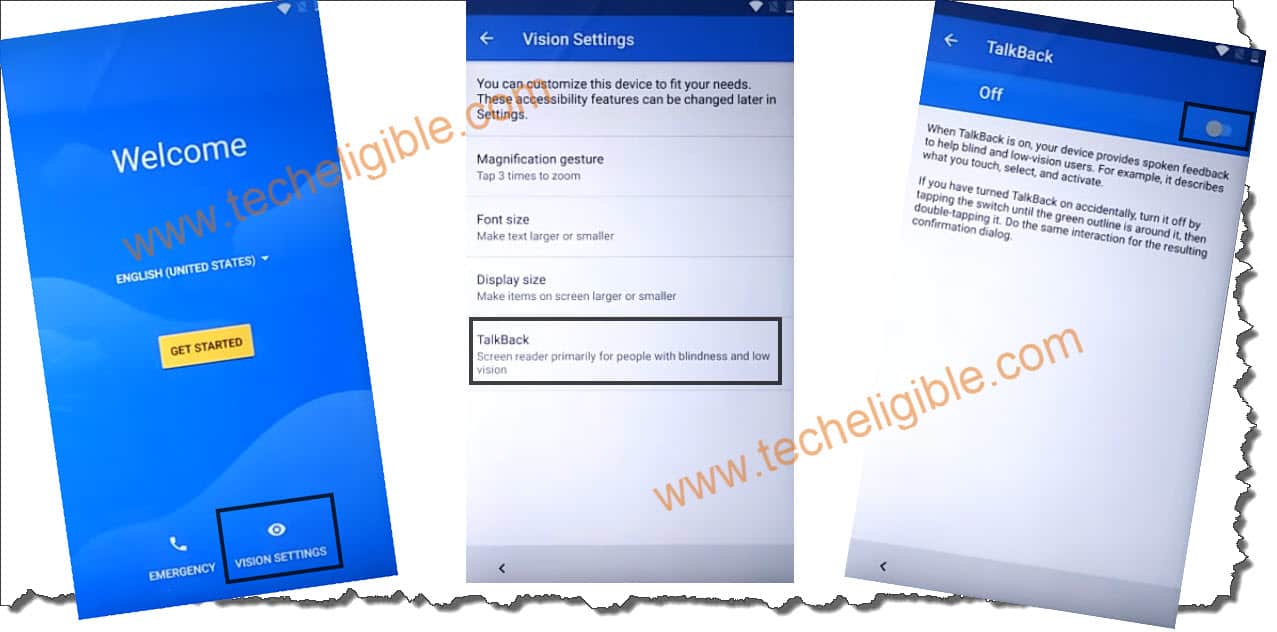
-Once the “Talkback” feature enabled, you will have “Talkback Tutorial” popup screen.
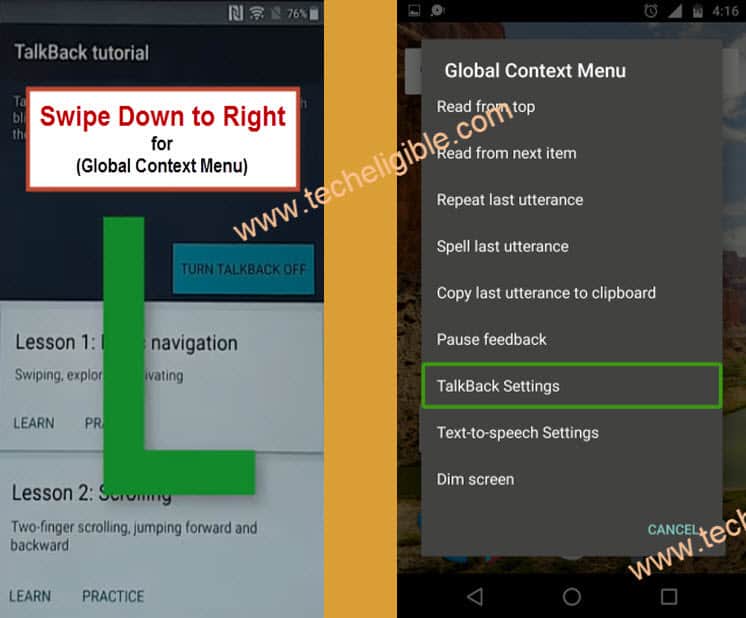
-Draw “L” on your screen by swiping down to right with your finger, after that you will have “Global Context Menu” screen.
-Double tap on “Talkback Settings” from there, and then tap on “OK”.
-Now using your two fingers, go down and disable “Explore By Touch” option.
-Perfect, now go to “Help & Feedback”.
-Tap on “Get Started with voice access”.
-Afterwards, tap on “Youtube Video Play icon”, and wait few sec, you will have some more youtube video options there.
-From those options, there will be one “Clock icon”, just tap on that to access youtube.com website.
![]()
-Drag down youtube down, and then tap on “3 Dots” or “Human icon” from top right corner.
-From there, tap on > Settings > About > Google Privacy Policy.
-Congrats, now you’ve accessed to “Google Chrome Browser”, from here we can easily download & install applications to Bypass FRP BQ Aquaris X.
-Tap on > Accept & Continue > Next > No Thanks.
Download Tools to Bypass FRP BQ Aquaris X:
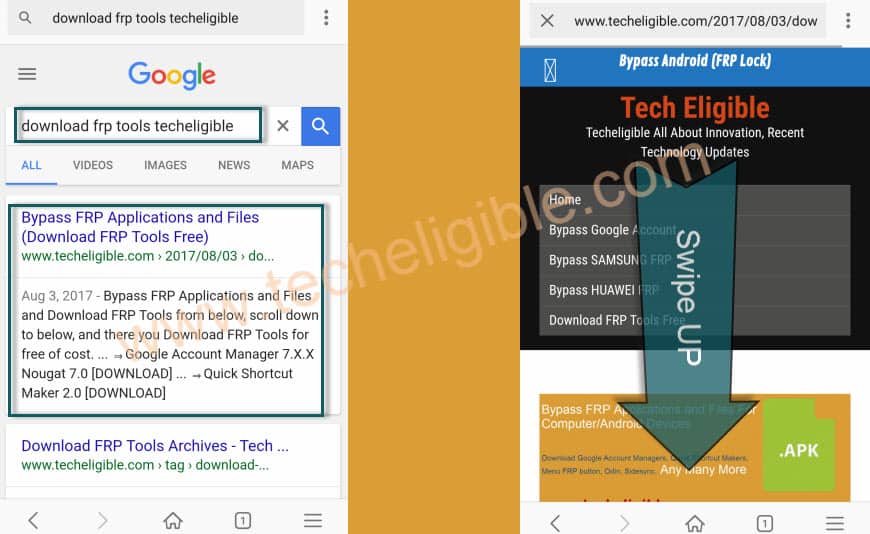
-Type in google search bar “Download FRP Tools Techeligible“.
-Go to first search result.
-Download from there “Apex Launcher 3.3.3” & “Google Play Services“.
-Now wait 2-3 minutes until downloading finish.
-Tap on “3 Dots” from top right corner, and then go to “DOWNLOAD”.
-There you will be able to see your both downloaded applications (See Below Image).

Install Apex Launcher 3.3.3:
-Tap on “Apex Launcher” to install it.
-You will get a chrome “Security Popup” message, just tap on “Settings”.
-After that tap on “Allow From This Source” to enable it.
-Now tap on “Back Key”, after that tap on “Install” to install apex launcher, once installation finish, tap on “Open” to launch this launcher and access to your BQ AQUARIS device.
-Now we need to disable some applications.
Disable BQ Aquaris X Applications:
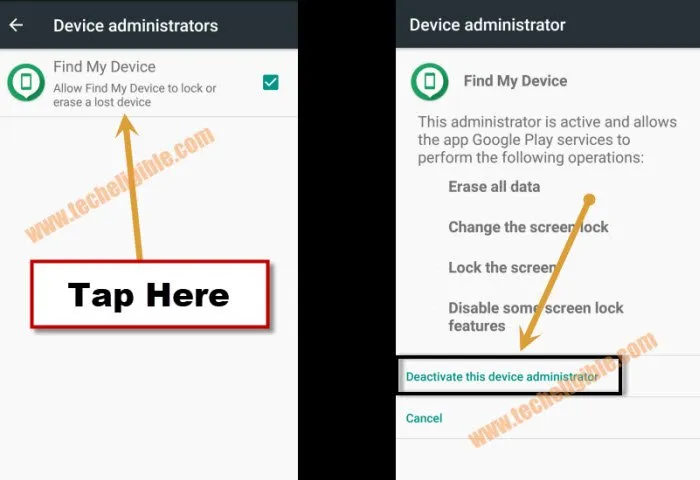
-Go to your device “Settings > Security & Location > Device Admin Apps.
-Tap on “Find My Device”, after that, tap on “Deactivate this device admin apps”.
-Perfect, now you have disabled “Find My Device” successfully (See Below Image).
-Go back to “Settings”.
-Afterwards, tap on “Apps & Notification”.
-Now tap on “See all” to see all listed applications.
-Go to “Google Play Services” app, and then tap on “Disable” to disable this app.
-After that, tap on back key to go back to app list, and then tap on “3 dots” from top right corner, and select “Show System Apps”.
-Now find “Google Services Framework” from app list, and disable that.
-Disable also “Google Backup Transport” app from app list.
-Perfect, now we have successfully disabled 3 applications from app list.
1- Google Play Services, 2- Google Services Framework, 3- Google Backup Transport”.
Let’s Install “Google Play Service” application:
-Open “Chrome Browser” app from your device menu.
-Tap on “3 dots” from top right corner, and then go to “DOWNLOADS”.
-Now you can see your all downloaded applications there.
-Tap on “Google Play Services” app, and then tap on “Install”, after that, tap on “OPEN”.
-Now go to your device “Settings”.
-After that tap on “Users & Accounts”, and then tap on “Add Account’, now login there with your any valid gmail ID to Bypass FRP BQ Aquaris X.
-Congrats, now you have successfully add new gmail account, now only you need to enable all applications.
Let’s Enable the Disabled Apps:
-Go to “Settings > Security & Location > Device Admin Apps”.
-Tap on “Activate this device admin app”.
-Now go back to “Settings”, after that tap on “Apps & Notifications”.
-after that, tap on “SEE ALL APPS”.
-Now tap on “3 dots” from top right corner, and select “Show Systems”.
-There will be symbol like down arrow “∨”, just tap on that, after that select “Disabled Apps”.
-Now you will be able to see all your disabled apps there easily.
-Just enable all the disabled applications from there.
-Once you enable all apps, now just restart your device, and congrats you have are succeeded to Bypass FRP BQ Aquaris X.