
3 Methods to Bypass FRP Galaxy A8, A8 Plus Android 9, Android 7
Top 3 methods have been described below on how to bypass frp Samsung A8 and Samsung A8 Plus (Android 9,7), so you can try any one of them, we hope one of them will work for you perfectly, if your Samsung device has a android version 9, so you should go to 1st method, which is latest one.
Warning: Do not try this frp method on a stolen phone, this is a serious crime, if you are trying to bypass frp on a stolen phone, you may also be jailed, this process is for device owner and for educational purpose only.
1st Method: Remove frp Samsung A8/A8 Plus (Android 9) New
2nd Method: Remove frp Samsung A8/A8 Plus (Android 9)
3rd Method: Remove frp Samsung A8/A8 Plus (Android 7)
Method 1: Bypass FRP Galaxy A8, A8 Plus Android 9
Latest 2021 method to bypass frp Samsung A8/A8 Plus (Android 9) without any PC, just hard reset phone, dial emergency number, and then through a call history, you will be able to access chrome browser, and install frp removal apps to bypass frp easily without any tension and expertise.
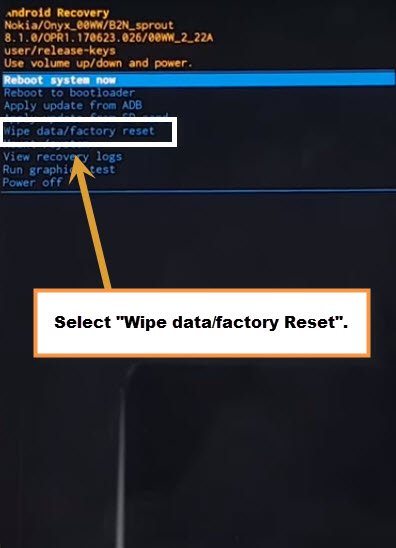
-Restart Phone & immediately hold (Power + Volume UP) button, release keys when you see (Installing system updates) screen, wait on “No Command” screen.

-Select option “Wipe Data/Factory Reset” using power and volume up/down keys, and then select “Yes” to hard reset your device Samsung A8/A8 Plus, once its done, just select “Reset System Now” option.
-Connect Samsung A8 with WiFi network & go back to “Let’s Go” screen, which very first screen that appears at the beginning.
-Hit on > Emergency Call > Dial 112 > Disconnect Call.
-Tap on > Next Arrow > Check mark (i have read and agree….), and tap to > Next > Skip This for NOW > Next > Add Network.
–Settings Gear icon > Keyboard layout and feedback > key-tap feedback.
![]()
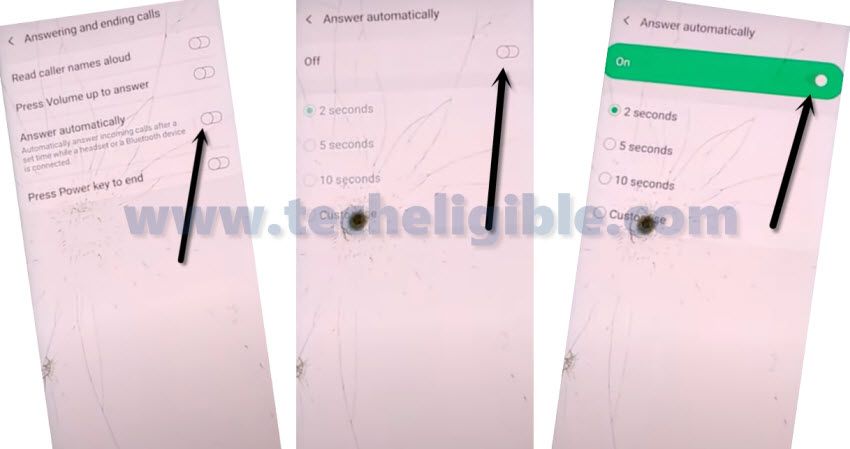
–Sounds and vibration > Answering and ending calls > enable “Answer Automatically, Afterwards, tap on top right corner button to “Turn on”.
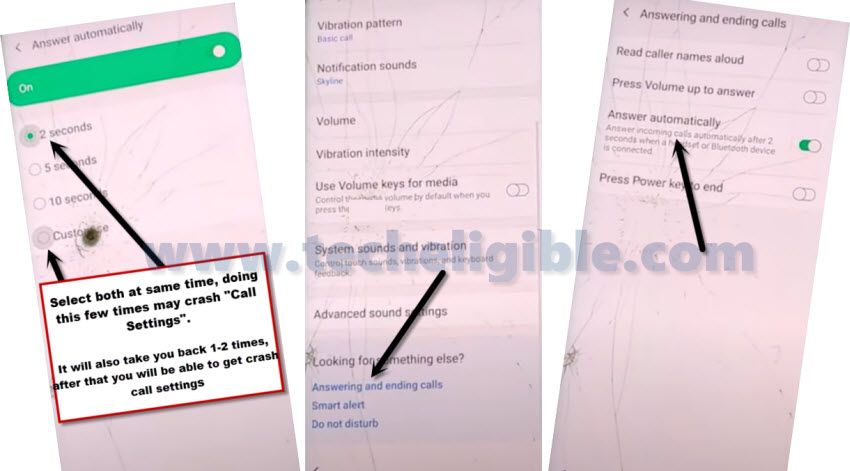
–Hit on both “2 seconds & Customize” options at the same time with your 2 fingers, by doing this few times will crash “Call Settings”.
Note: You could be failed at first attempt, so don’t worry just try 2-3 times, if you have been redirected back to previous screen, so go back by hitting on > Answering and ending calls > answer automatically.
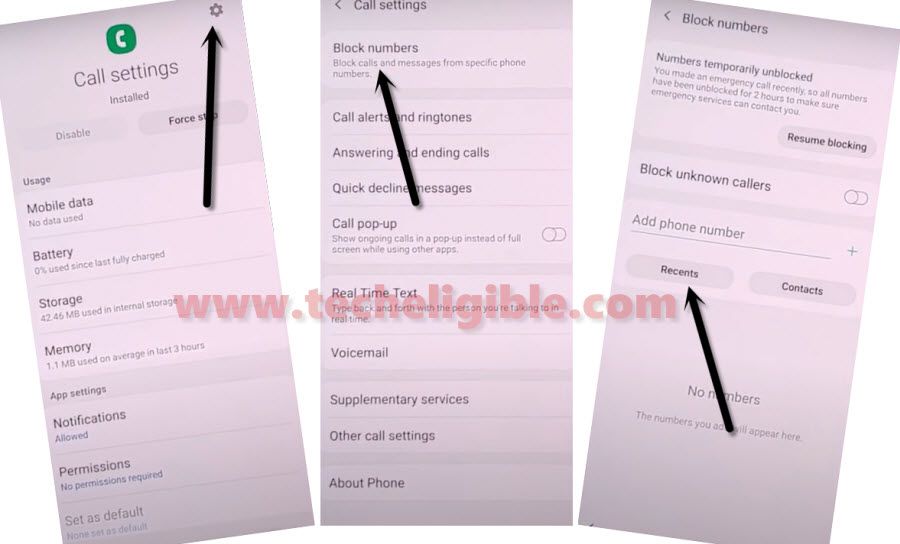
-You have to try again by hitting both options (2 seconds + Customize) at same time, from popup window, tap to “App info”, and then tap to “Settings gear icon” from top right corner of your device screen.

–Tap on > Block Number > Recent.
–After selecting the (Emergency Number), you will be shown (Emergency Number) at the top, just tap on that, and tap to “Message icon”.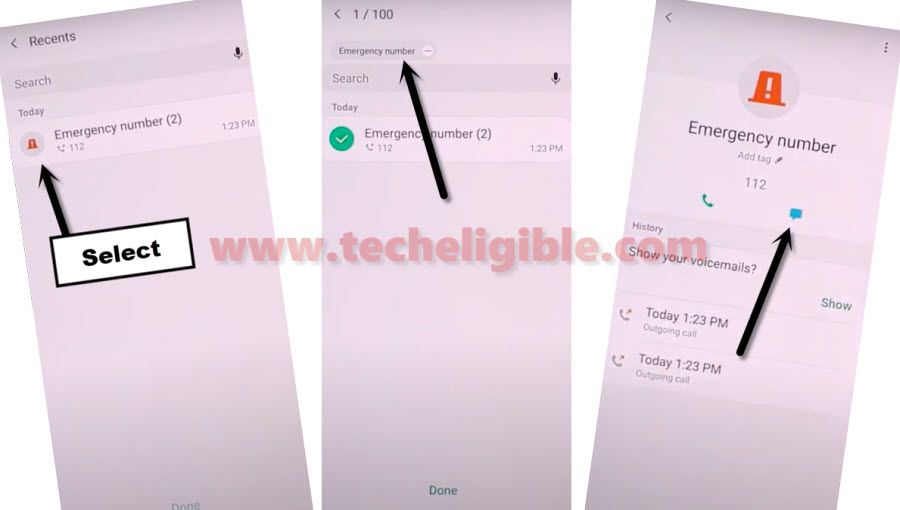
-Type “www.youtube.com“, and then send this message to 112.
-Your typed url will become a hyperlink, just tap on that to access Youtube website.
-Hit on “Profile icon” from top right corner, and then tap to > Settings > About > Youtube Terms of services.
Download & Install Apex Launcher:
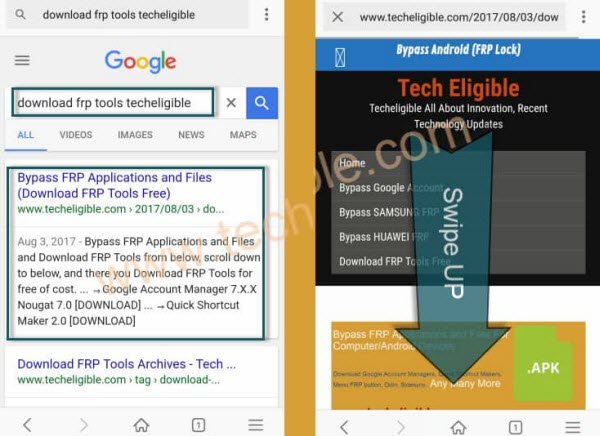
-Type in top search area “Download frp tools“.
-Visit our website searched result, and download from there (Apex Launcher 4.0.1), wait this download process finish.
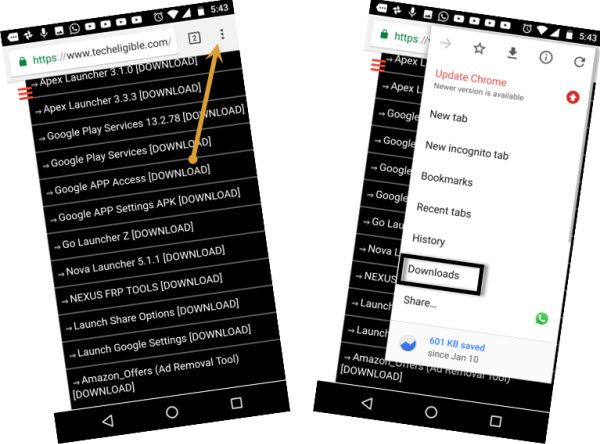
-Go top of the page, and tap on “3 dots” from top right corner of the browser, and then tap to “Downloads” to access inside download folder, where we will be able to see our downloaded app.
-So now tap on > Apex Launcher > Settings > Enable (Allow from this source).
-Tap to (Back Arrow), and then tap on > Install > Open.
-Congrats, we have got accessed into our device, but still we have some steps ahead to bypass frp Samsung A8/A8 Plus.
-Go to > Settings > Biometrics and security > Other Security Settings > Device admin apps.

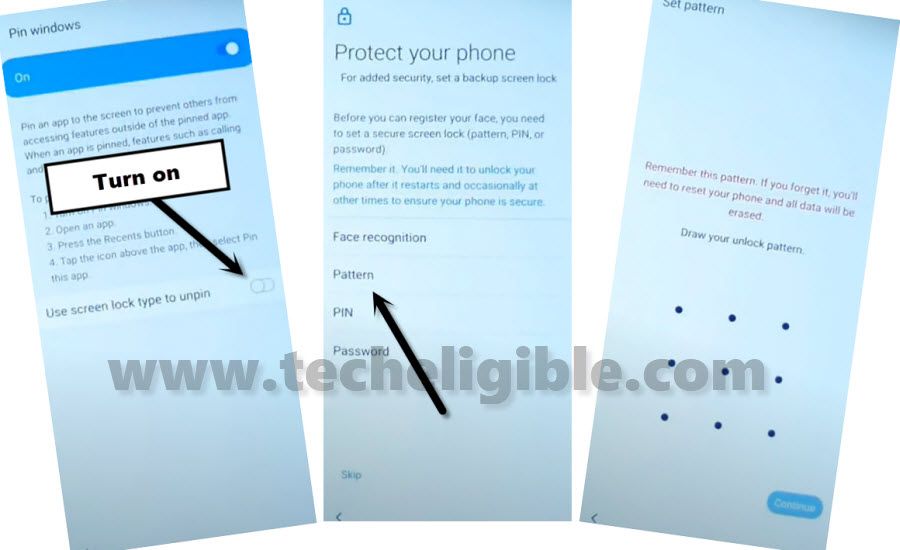
-Tap on “PIN Windows“, and then turn on “Pin Windows“, after that hit on “use screen lock type to unpin“.
-Now create any new PIN or Pattern.
-After setting up new PIN or Pattern lock, we just have verify that, have we successfully created new PIN or Pattern or not, for that, press (Power Button) once to turn off the screen only, and then press (Power Button) again to wake up the screen, swipe up, and you will be asked for the Pattern or PIN, just give your already setup Pattern/PIN there, if it worked, that means we have successfully setup new PIN, and this will allow us to bypass frp while completing setup wizard.
-Restart Phone, and complete setup wizard, and you will be asked to draw Pattern or PIN, just give there already setup code, and then hit on > SKIP > SKIP from the verify your account screen.
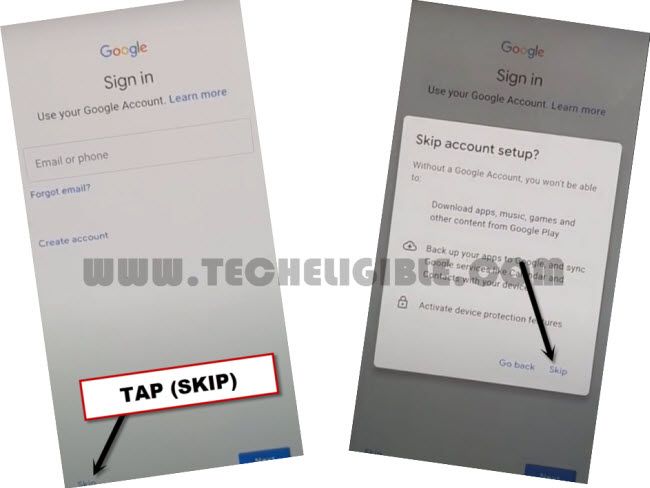
2nd Method: Bypass Google Account on Samsung A8, A8 Plus (Android 9)
-Connect a WiFi to your Phone first.
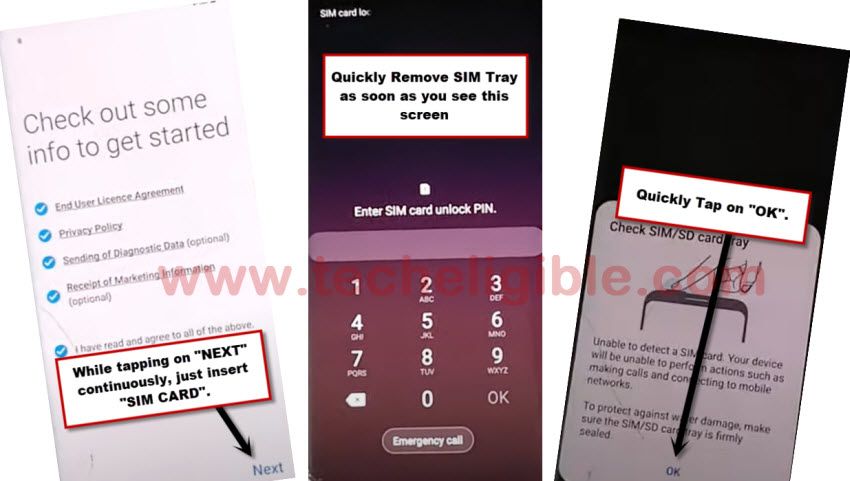
-Put your phone on the screen of “Check out some info to get started”.
-Insert Pin locked SIM Card.
Note: You can setup pin lock code on the SIM card by using any other smartphone.
-Using any sim removal pin, just insert the pin in the whole of sim tray and press that pin to only popup up sim tray, do not remove sim tray completely, otherwise you wont be able to insert sim card back very quickly, i hope you got my point, because in next steps we have to insert sim tray very quickly and after that we need to press “NEXT” option, that is why, keep your sim tray little bit popup, and also keep your sim removal pin in the whole on standby position, because later on we have to remove sim tray also very quickly.
-Insert SIM Tray, and quickly start tapping on “Next” option from (Check out some info to get started) screen.
-As soon as you see “Enter SIM Card Unlock PIN”, Quickly Remove SIM Tray, and then quickly tap on “OK” from popup window.
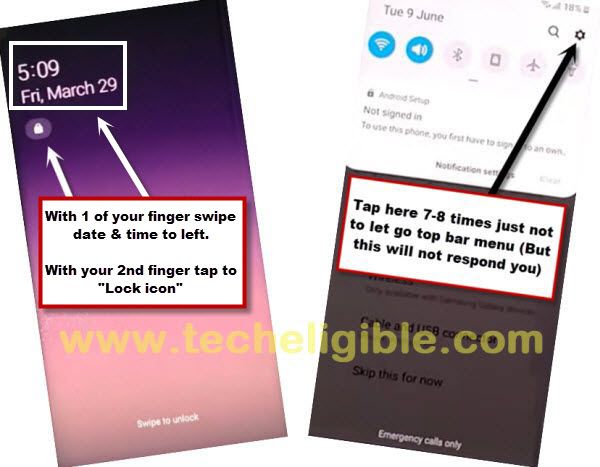
-Without wasting even a second, just swipe (Date & Time) to the right side, and then quickly tap on “Lock icon”.
-After doing that all successfully, you will be able to get Top Notification Bar, just start tapping on “Setting gear icon” from top right corner, but this will not respond you, we are doing that only to stick top notification bar on the screen.
Remember: You may could fail at 1st attempt, so don’t worry about that, that is normal, after 2-3 attempts you will be able to follow above steps very quickly, just use your mind to get top bar menu options to Bypass frp Samsung A8, A8 Plus.
Make Pair with Bluetooth Pods/Headphone:
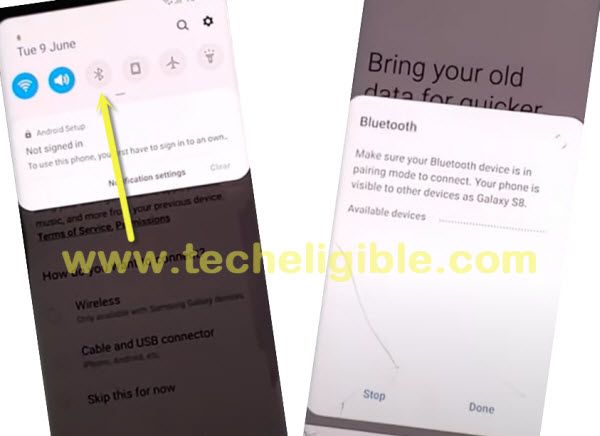
-Tap on “Bluetooth icon” from the top notification bar.
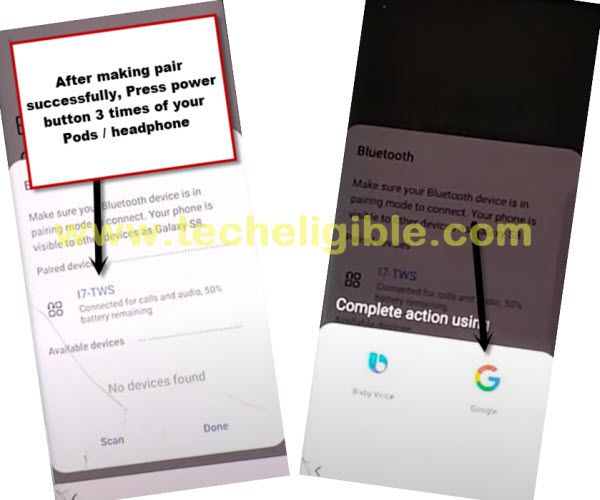
-Make pair with your any Bluetooth Pods/Headphones.
-After pairing process done, just press the power button 3 times from your Pods/headphones, after that you will receive a popup window, from there, tap on “Google app icon”.
-Now we have entered successfully in google app settings.
-Go to > Notification > In-App-Notification Settings.
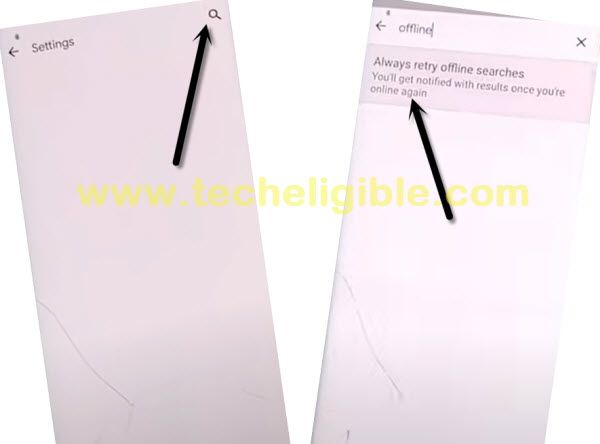
-Tap “Search” icon and type there “Offline”.
-Go to the searched result “Always Retry offline searches”.
-Now go down and then tap on “Manage Pending Searches”.
-From the bottom popup window, just hit on “No Thanks”, and then tap on “Search” from the middle of the bottom bar option.
-Type “Settings” in search box, and then tap on “Setting gear icon” from the searched result to get into Samsung Galaxy A8 settings.
-Now go down and then tap on > Biometrics and Security > Other Security Settings.
-Turn on “Pin Windows”.
-After turning it on, now tap on “Pin Windows”.
-For Bypass frp Samsung A8 Android 9, we have to setup 4 digits Pin Lock code in our phone.
-Tap on “Use screen lock type to unpin”. and then tap on “PIN”.
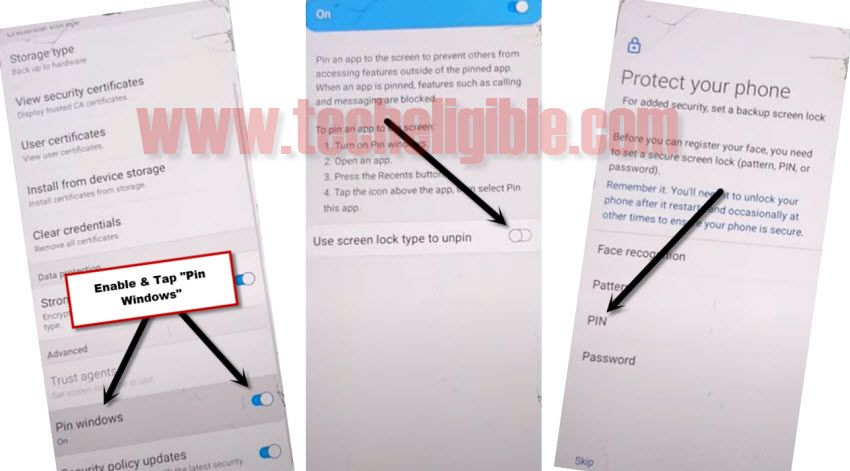
-Select option “Require pin when device power on”, and then select “Continue”.
-Afterwards, just setup your 4 digits pin code “1234”, and tap on “OK”.
-After that restart your Galaxy A8 phone.
Complete your Setup Wizard, you will be asked to enter your setup pin lock code, just give there “1234”, and you will also have the screen of “Could not Sign in”, just tap on “Back Arrow”, and then again tap on “Next”, and the screen will bypass successfully, one more thing to remind you is, just tap on “SKIP” option if you see “Verify Your Account” screen.
3rd: Bypass FRP Galaxy A8 Plus & Galaxy A8 (Android 7):
You can easily Bypass FRP on Samsung Galaxy A8 device android 7.1.1, only you have to download correct “Combination ROM + Stock ROM”, these files you can download from below, after that open “Odin” software and then flash with firmware, each and every step has been described below, just follow all steps carefully to successfully Bypass FRP Galaxy A8 Plus / A8. This method is only for “DEVICE OWNER”.
Note: This method has successfully been applied on Galaxy A8+ (SM-A730F), Android 7.1.1.
Download Firmware Galaxy A8+ / A8 in your Computer:
You have to download only your device relevant file from below, if you have galaxy A8+, then download “STOCK ROM + COMBINATION ROM” of A8+ in your computer.
⇒ (STOCK ROM A8+) SM-A730F_A730FXXU2ARD3 [DOWNLOAD]
⇒ (Combination ROM A8+) FA71_A730FXXU1ARA1_ [DOWNLOAD]
⇒ (STOCK ROM A8) SM-A530F_A530FXXU2ARD3[DOWNLOAD]
⇒ (Combination ROM A8) FA71_A530FXXU2ARC4_[DOWNLOAD]
Download FRP Bypass Tool in your Computer:
You need to download below frp tools in your computer.
Let’s Start to Bypass FRP:
-Install “Samsung USB Driver” in your computer.
-Turn off “Antivirus Software” otherwise you wont be able to use “ADB FRP BYPASS” app.
-Extract downloaded firmware both “Stock ROM + Combination ROM”.
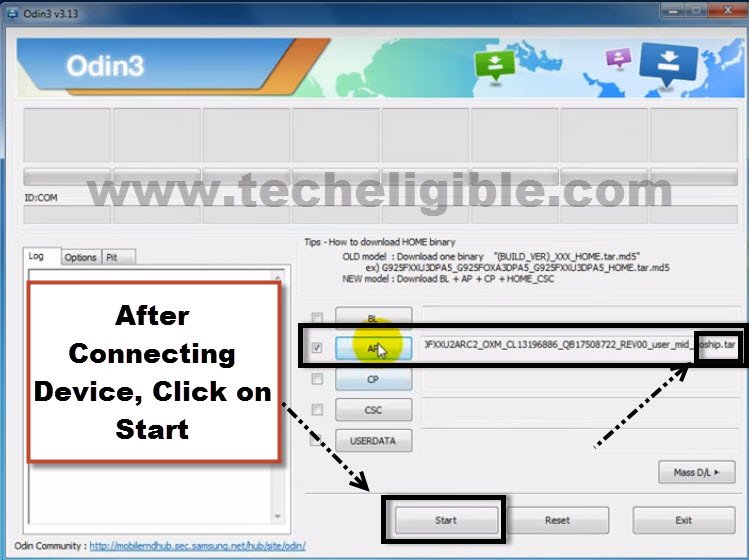
-Open “Odin Software”.
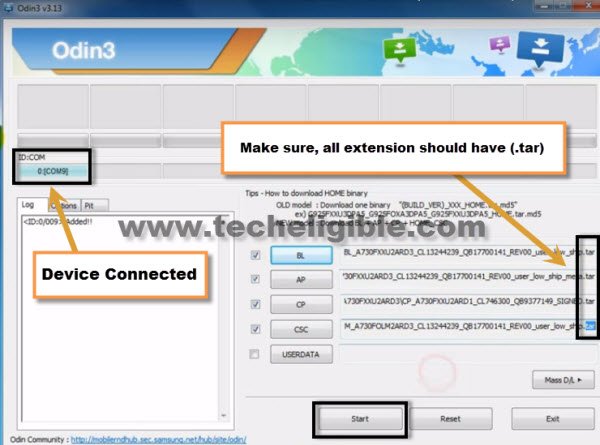
-Click on “AP” and then give there file path of “Combination ROM”.
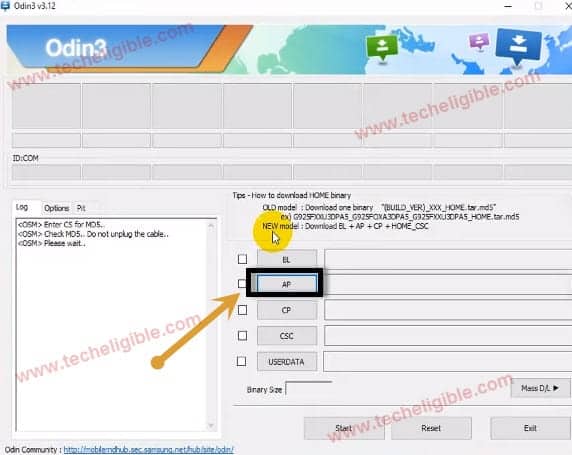
Note: Make sure, you are having .tar extension in your file path. (See Below Image)
Connect Samsung Galaxy A8+ / A8 to Computer:
-Switch off Galaxy A8+ device.
-Press and hold (Volume UP + Voume Down + Power) keys together until you see “Warning!” screen on your device.
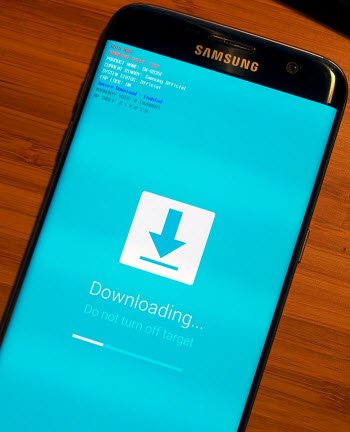
-After that, press (Volume Down) Keys to continue.
-Now you have successfully entered into “DOWNLOAD MODE”.
-Take micro USB cable, and then connect your device to computer.
Flash Galaxy A8+ / A8 By Combination ROM:
-Go to “Odin Software”.
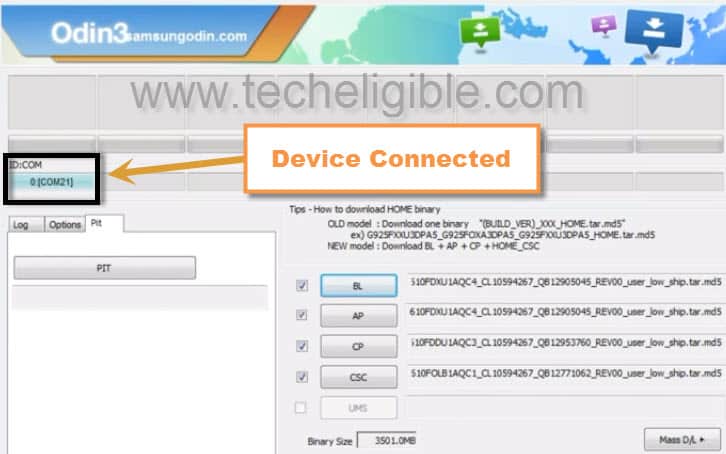
-You will see there “ID COM” has turned to “Blue color” because your device has successfully been detected by odin.
Note: If your device is not being detected by computer, reinstall “Samsung USB Driver” and reconnect your device to computer to make sure your device is being detected by computer, you can also check your device in “Device Manager” of computer.
-Click on “Start Button” to flash with combination ROM.
-Once you see a sign of “PASS!“, disconnect your device.
-Let device to be entered automatically into “Factory Binary”.
-Tap on “Menu” icon from top left corner.
-Go to “Settings”.
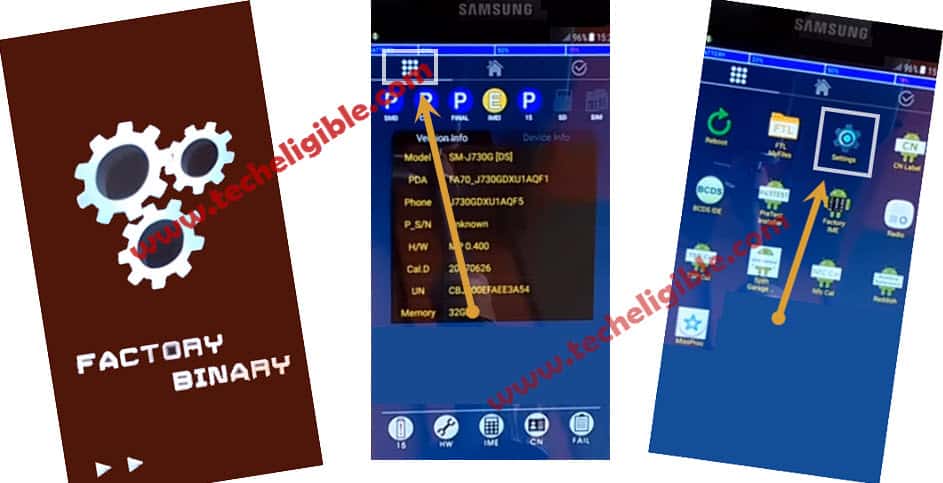
-Go to “Developer Option”.
-Enable “USB Debugging” option from there.
Enable ADB Mode By Code:
-Go back to home screen.
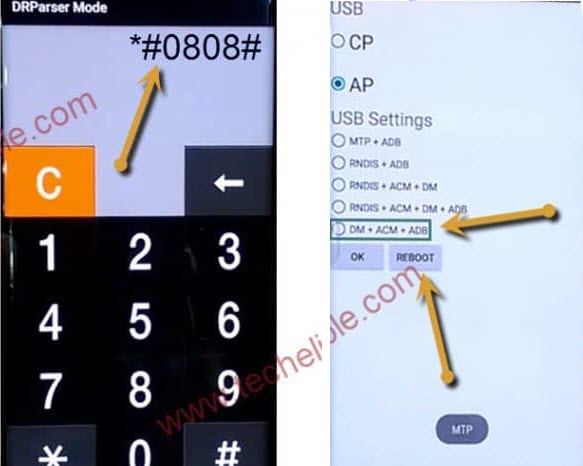
-Bottom of the screen, there is option “IME”, just click on that to open “Calculator”.

-Type code there “*#*#0808#*#*”
-From USB Settings, select “AP”, after that, select also “DM+ACM+ADB”.
-Tap on “Reboot”. (See Below Image)
We need to use “ADB FRP BYPASS” tool.
Lets Bypass FRP Samsung A8, A8 Plus by ADB tool:
-Turn off Antivirus Software.
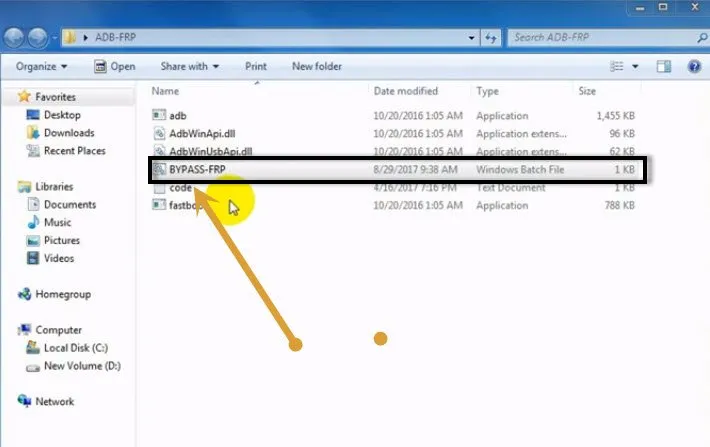
-Extract “ADB FRP” tool from winrar archive.
-Go to extracted folder, and then double click on “ADB-FRP”.
-Connect your Galaxy A8+ device to computer.
Note: Make sure your device is on, and its in normal mode, and if you get any “USB Debugging” popup window on your galaxy A8 screen, just tap on “OK” to allow USB Debugging.
-Now close “ADB-FRP” cmd window.
-Again launch “Bypass-FRP” tool by double click on it.
-Now this time you will notice that, your device successfully been detected, and you will have same window as shown below.

-Press any key to continue…
-After that wait 2-3 minutes, until it finish, and window will auto close.
-Congrats, now you have successfully bypass google account on Samsung A8, A8 Plus.
-To use Galaxy device normally, we need to flash with official STOCK ROM.
Flash Galaxy A8+/A8 By Stock ROM:
-Switch off device.
-Put your device into “Download Mode” by pressing (Volume UP + Volume Down + Power Keys) together until you see “Warning!” screen.
-Press (Volume Down) key to continue.
-Once you entered into “Download Mode” now you can easily flash galaxy device with official STOCK ROM.
-Open “Odin Software”.
-Extract the downloaded (Stock ROM Winrar File).
-Go to extracted folder, and there you will see “4 file” with the name of (AP, CL, CP, CSC).
-We have to give all these 4 files in Odin software by matching its first alpha-bates.
Warning: Give the file path of “HOM CSC File” in Odin software “CSC”, and also make sure, the file extension is (.tar)
-Connect device to computer.
-Once device connected to compute successfully, you will see “ID:COM” will turned to follow, and will start showing you “COM PORT” same as shown in below image.
-Now click on “START” button to start flashing with stock ROM.
-Wait until it finish, and you get “PASS!” sign in Odin tool.
-After that disconnect device from computer.
-Your device will take several minute to be started normally.
-Now you have successfully completed this method to Bypass FRP Galaxy A8 Plus / A8.
-Complete initial setup, and use your device normally.
-You can add new Gmail account as well by going to “Settings”.
Related Methods: