
2 Methods to Bypass FRP Galaxy A3 2017 [Updated]
Applying below 2 best methods, you can bypass frp Galaxy A3 (2017) and Android 8 version devices with using free software, we have described all steps briefly here along with screen shots, so you are not required extra effort here, just follow up steps carefully.
Disclaimer: This method is for educational purpose only, try this method only on your own phone, do not try this method only stolen phone, this is a serious crime, if you are trying to unlock stolen phone, you may also be jailed.
| Method 1: Remove Google FRP Galaxy A3 2017 (New) |
| Method 2: Remove Google FRP Galaxy A3 (Android 8) |
Method 1: Bypass FRP Galaxy A3 2017
-Lets begin this process by turning on device and connect WiFi.

-You are required below tools to achieve this process.
⇒ Amazing FRP Tools 2022 [DOWNLOAD]
⇒ All in One USB Driver Installer [DOWNLOAD]
Pass: techeligible.com
-Before extracting tools from winrar, you are required to turn off (Antivirus) software first, otherwise the tool will be removed because of Antivirus.
-First of all, install “All in one USB Driver”, all essential drivers are packed in this one software, this will fix up your device detection issue.
-Lets just go to “Amazing FRP Tool” folder, and from there right click on “Samsung FRP Tool“, and run as administrator to install this tool in your PC.
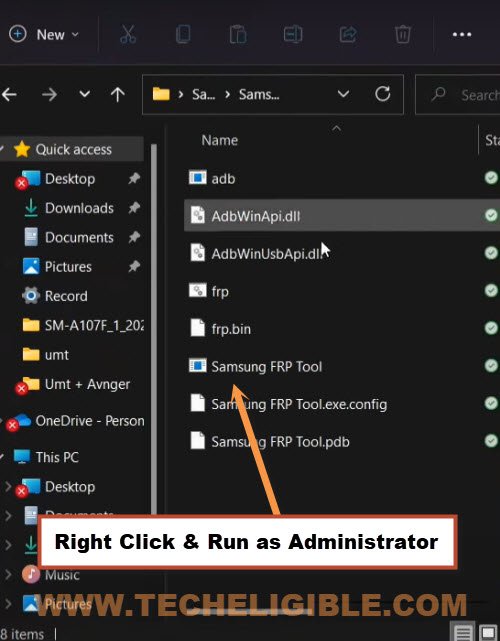
Note: Proper installing of all USB drivers, your device will not have any connectivity issue.
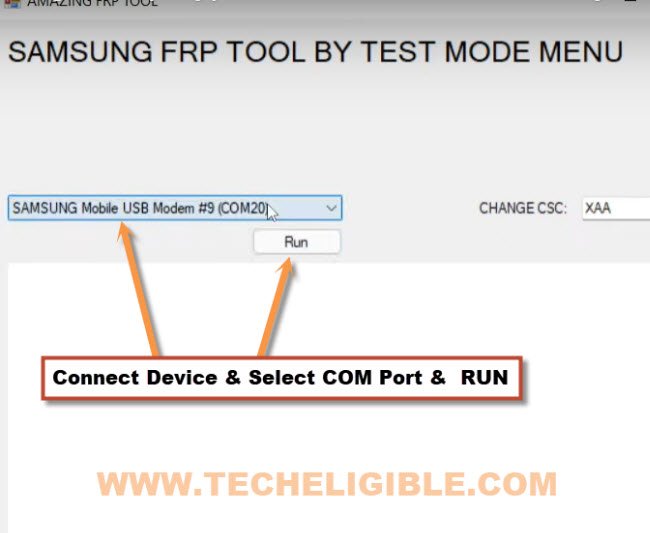
-Connect Phone with PC, and go to “Amazing FRP Tool” software screen.
-Once you get your device (Com Port) there, just click to “RUN” button.
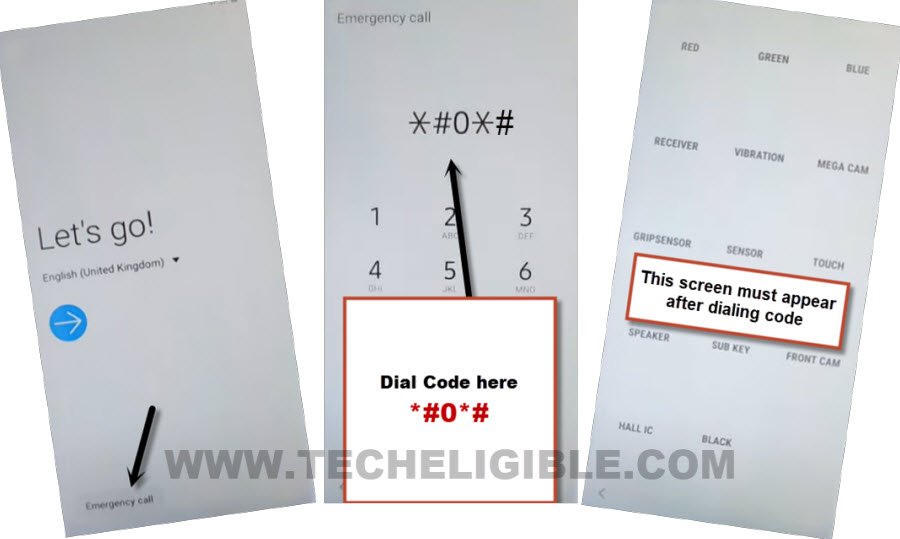
-Just do not click over “Ok” right now, we have to first dial a code as emergency from our Galaxy A3 device, after that we will hit over “OK” button.

-Lets dial this code from Galaxy A3 *#0*#.
-You will see same “Blank Boxes” screen right after dialing given code same as shown in below image.
-Now we have to click over “OK” button from our PC popup message, in which we were told to dial code.
-Now the “Allow USB” popup message will be sent to your device, just select option “Always Allow from this computer”, and then tap to “Allow” option from the device.

-The ADB mode has successfully been enabled in our Galaxy A3 device through previous PC software, lets get back to another PC tool.
-Download below (Samfirm) tool in your PC.
⇒ Samfim A.I.O V3.1 Tool [DOWNLOAD]
Password: 12345678
-Extract tool and run tool in your PC by clicking over “SamFirm.exe” file to run.
-From the popup window of (Could not find path…), just hit on “OK”.
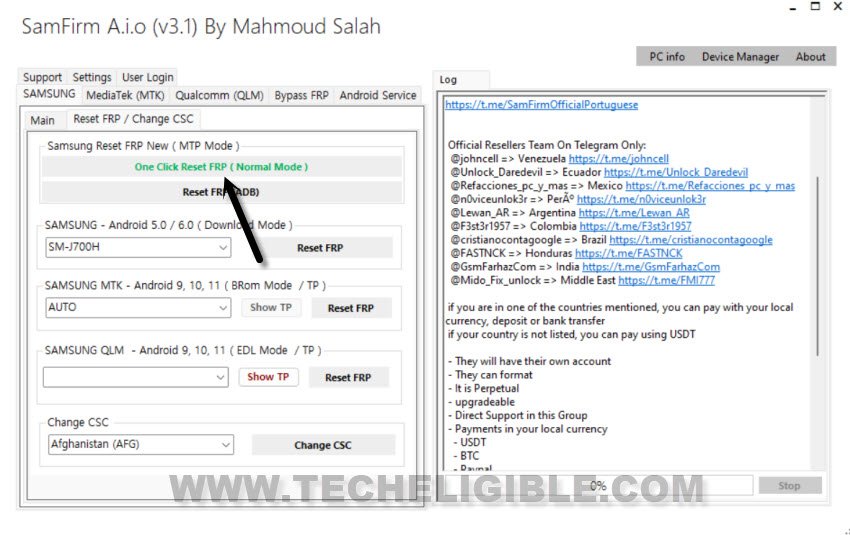
-Now go to the tab > Samsung > Reset FRP / Change CSC.
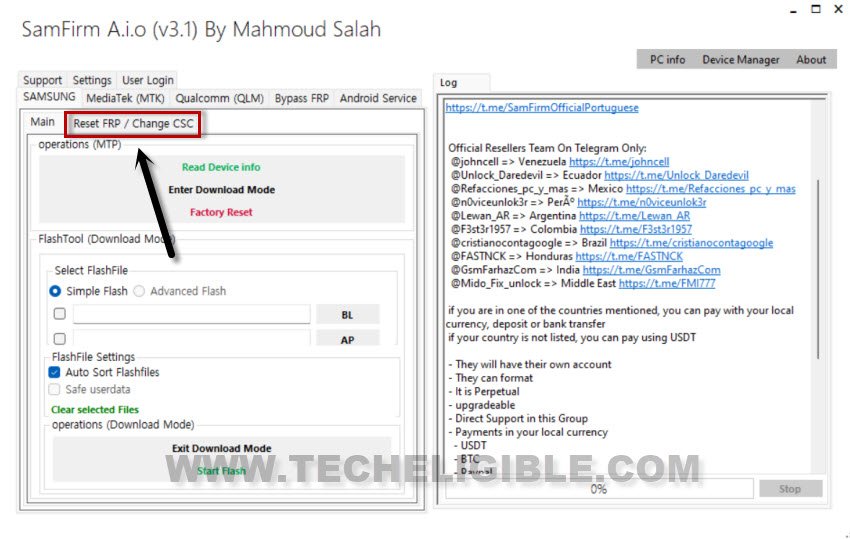
-Click on a button “Once Click Reset FRP (Normal Mode)”.
-If this option do not work, you can click also on “Reset FRP (ADB)” button.
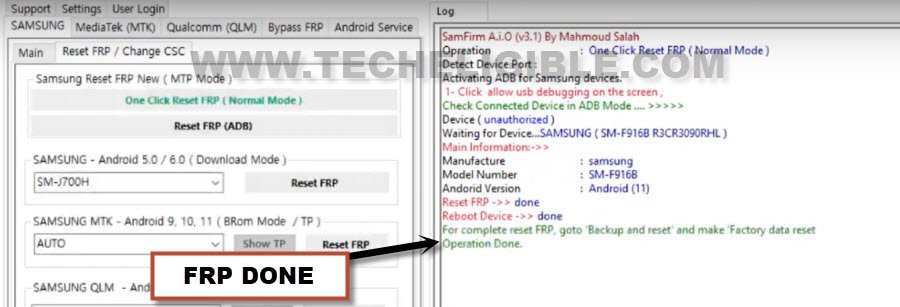
-The frp removal process will be started shortly, and in few seconds, you will receive message in software window, that the “Factory Data Reset Operation done“, congrats, you are all done, now you can disconnect and restart your Samsung Galaxy A3 and finish setup wizard easily.
Method 2: How to Remove FRP Galaxy A3 2017 Android 8 ?
You are only required to have 1 SIM card with you, and 1 sim ejector tool, that’s all, and this tools has every one who has android phone, so with this way we can get access into google chrome browser to download frp removal tools.
No doubt, this factory reset protection (FRP) is for our Samsung Galaxy A3 2017 device security, and this feature prevent our device Samsung Galaxy A3 2017 from data leaking and from accessing to personal data to our device, but in some cases we forget our own Gmail account, so in this case we go for Bypass Frp Samsung Samsung Galaxy A3 2017.
-First of all, we need to prepare a PIN locked SIM, if you can add PIN in your SIM with other phone.
-Now connect WiFi to your device, otherwise you won’ be able to follow this method.
-Afterwards, get back to first “Welcome Screen”.
-Insert SIM Card (PIN Locked)
-You will be shown a “Enter SIM card Unlock Pin” screen.
-Keep “SIM Removal PIN” in Sim tray hole on Standby Position, means do not remove sim tray now.
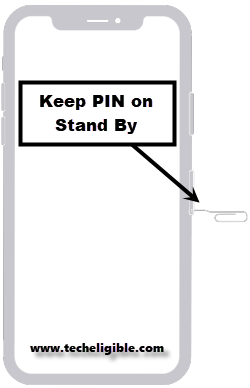
-Keep your other finger in standby position on “Power button”, but do not press button now.
-Now we have to follow below step very quickly as much as possible, because right after popping up sim tray, we have to press power button very quickly.
–Quickly push “SIM Removal PIN” to popup the sim tray, and after that, quickly press “Power Button“.
-You device screen will turn off, just press power button again to wakeup the screen.
-On your screen, you will have “Not Signed in” popup window. (That means you followed above step correctly).
Note: If you do not see that “Not Signed in” popup screen, that means you failed in your attempt, try again, this may take 2-3 attempts in getting “Not Signed in” popup window. (So Do not worry about that!).
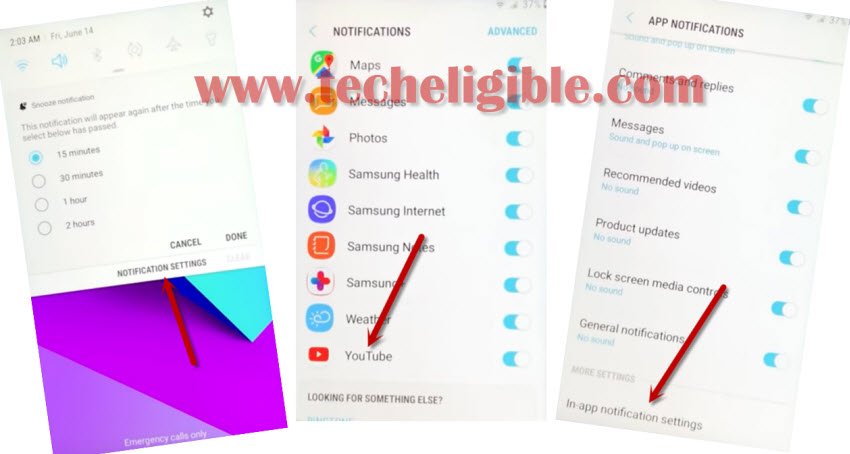
-Swipe to left the “Not Signed in”, and hit on “Bell icon”.
-By doing this, you will be shown a Top Notification MENU.

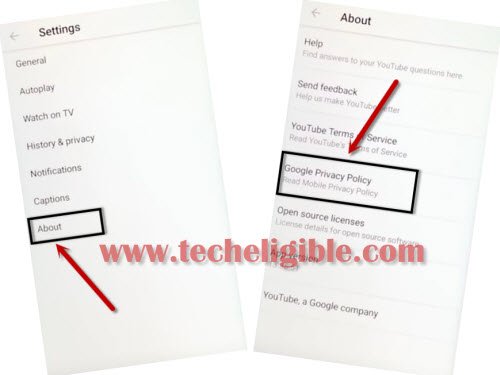
-From there, hit on > Notification Settings > Youtube > More Settings in App.
-Go to > About > Google Privacy Policy.
-Hit on “Cancel” from update Samsung internet popup window.
-Lets download & install frp apps to Bypass frp Galaxy A3 2017 Android 8.
Download FRP Apps:
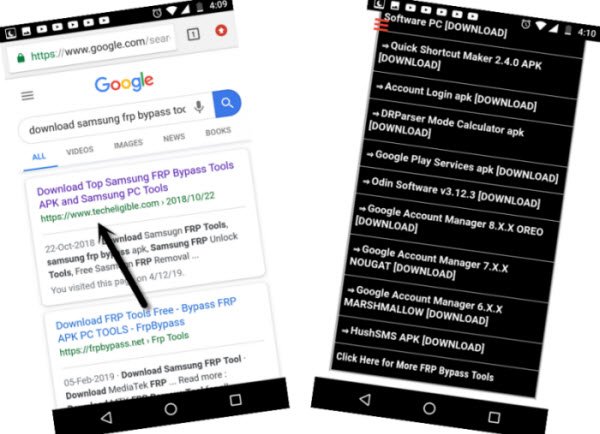
-Search “Download top samsung frp tools“.
-From searched result, Tap on “Download Top Samsung frp bypass tools….” same as shown in below image
-Download from there below 2 applications.
1-Google Account Manger 8.
2-Account Login.
-Wait few minutes until downloading process finish.
-To see your downloaded apps, just tap on “Bookmark” from the bottom of your browser.
-Go to > History > Download History.
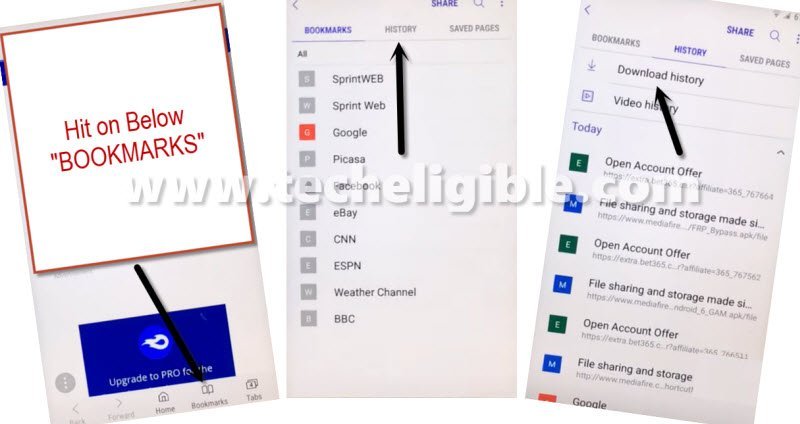
-Tap on “Google Account Manger 8”.
-This will popup new window of Samsung internet, from that window, tap on “Settings”, and then enable option “Allow from this source”.
-Go back, and tap to > Next > Next > Install > Done.
-Install final app by tapping on > Account Login > install > open.
-Tap “3 dots” from top right corner & hit on “Browser Sign in”.
-Sign in with new Gmail Account, now you have done this process, restart your Galaxy A3 2017, and complete setup wizard.
More FRP Ways on Relevant Android Devices: