Remove FRP Account Galaxy M32 On Latest Security Patch
Remove FRP Account Galaxy M32 with this new way, and this method will work also on a latest security patch level Samsung device, we will use one free PC software (SameFirm tool) latest version, and through this tool, we will open youtube and also will bypass frp lock right after enabling the (MTP + ADB) mode in Galaxy M32.
Warning: This method is only for device owner and for educational purpose only.
Tools We Need:
⇒ SamFirm Tool.
⇒ Samsung UBS Drivers.
⇒ Any other android device.
Let’s Start to Remove FRP Account Galaxy M32:
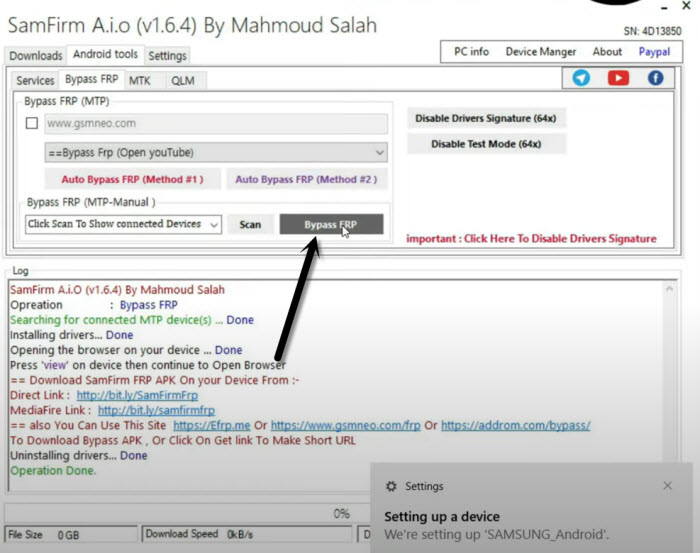
-Install & Open “SamFirm Tool 1.6.4” in your PC [DOWNLOAD HERE]
-Connect “WiFi” to Galaxy M32.
-Connect Galaxy M32 with PC.
-Install also “Samsung USB Drive” in PC [DOWNLOAD]
-Once the device is connected successfully to your PC, just open (Samfirm tool), and go to > Android Tool > Bypass FRP.
-Click to “Scan”, once the device port is detected successfully, after that hit on “Bypass FRP” button.
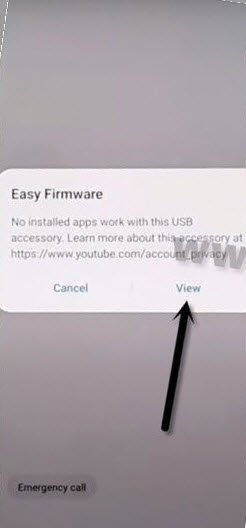
-You will receive a popup window in Galaxy M32, just hit on “View”.
-Tap to > Accept & Continue > Next > No Thanks.
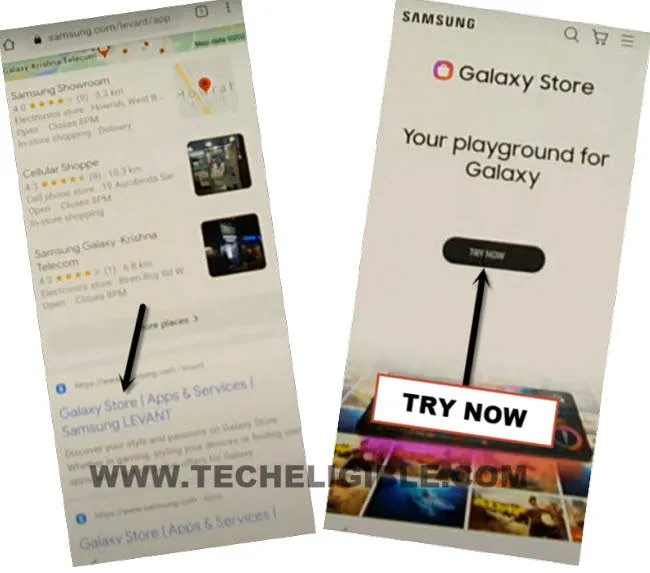
-You will see “Google Sign in” screen, but there will be a search area at the top bar, just search there “Samsung Galaxy Store”.
-From searched result, tap on “Galaxy Store | Apps & Services | Samsung LEVANT“.
-Hit on “TRY” no button from the galaxy store website.
-Tap to “Update” button, and wait until this process completes.
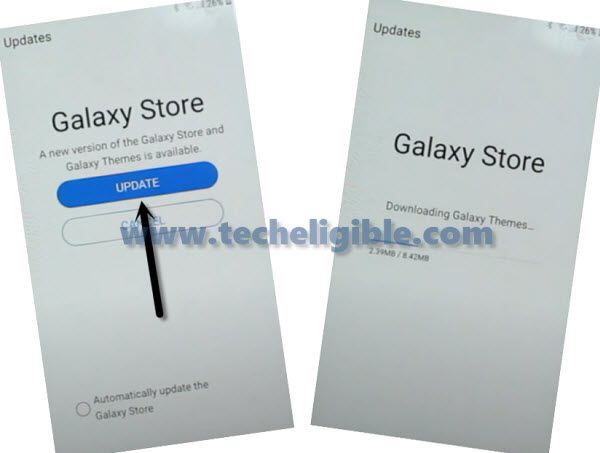
-Tap again on “TRY” now from the galaxy store site, and after that you will be redirected into galaxy store app.
-Tap to “Search icon” from top corner, and search there “S9 Launcher”.
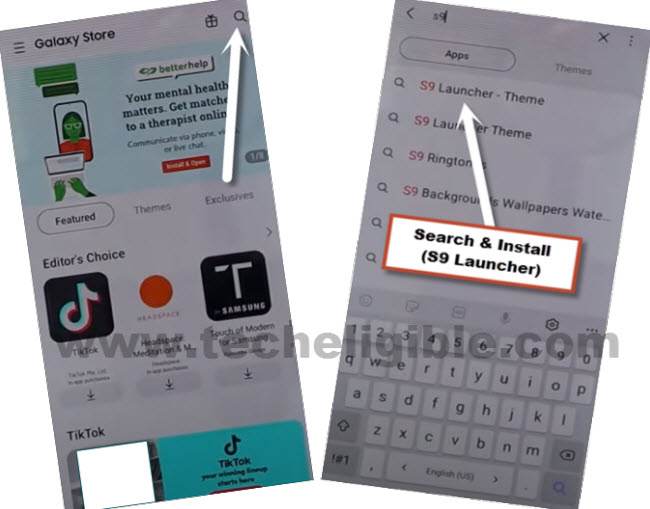
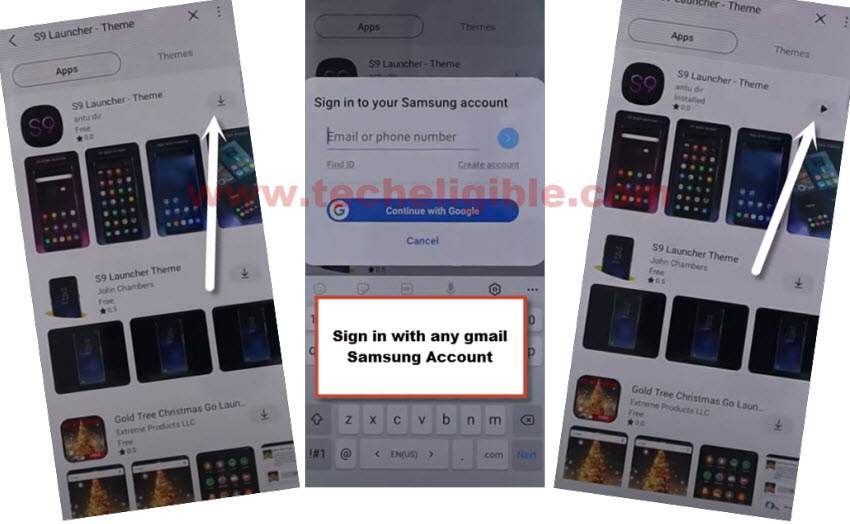
-Install & Open “S9 Launcher – Theme” app.
Note: Before the installation starts, you will have to sign in with your Gmail Account, you can use your any active and remembered Gmail account, this Gmail account will also be added in your other android device too.
-Congrats, you have reached to your device home screen, but still plenty of steps remaining to bypass frp completely.
-Bring your any other android device, because below steps we need to follow in other android device.
Follow Steps in Other Android Device:
We will add same Gmail account in other android device, and also will install a (Alliance Shield X), for doing all these, follow steps below.
-Go to > Settings > Accounts & Backup > Accounts.
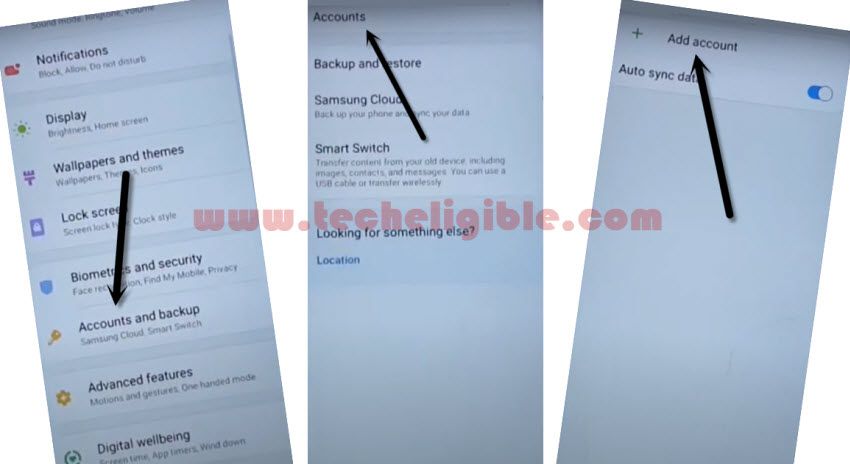
-Add your Same (Gmail Account) which you have already added in your Galaxy M32 device.
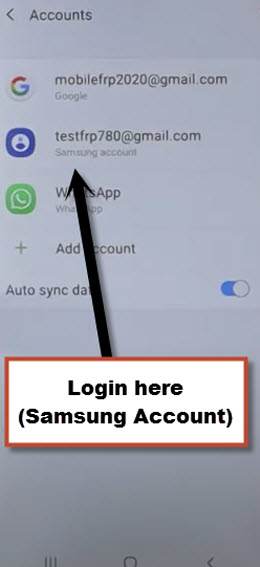
Note: Make sure, your both android devices are on same WiFi network and on Same Samsung Account.
-Open “Play Store” in other android device, and install “Alliance Shield X” app.

-Go to > Settings > Accounts and Backup > Backup And Restore > Back up data.
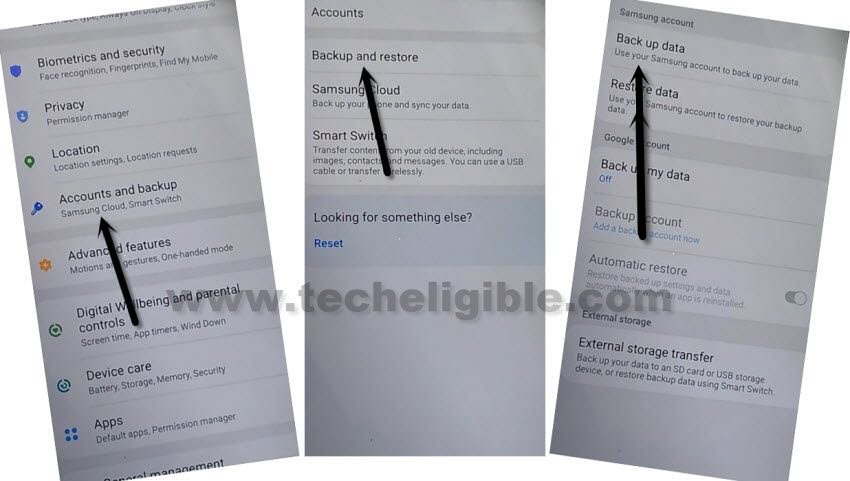
-Tap to “BACKUP UP” button from below to backup all your apps in Samsung Account, which is already signed-in in your (Galaxy A22) phone.
Follow Steps in Galaxy M32 Device:
-We are going to remind you again, do make sure your both devices are signed in same Gmail Account.
-Go to > Accounts & Backup > Backup and Restore > Restore Data.
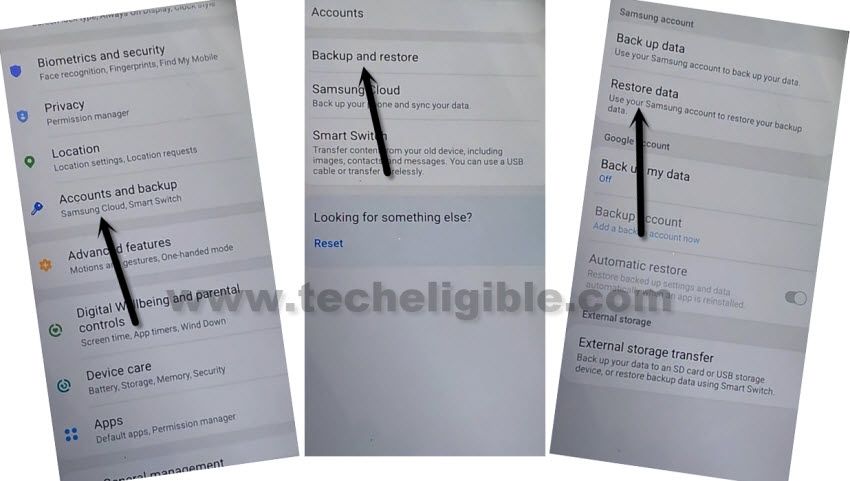
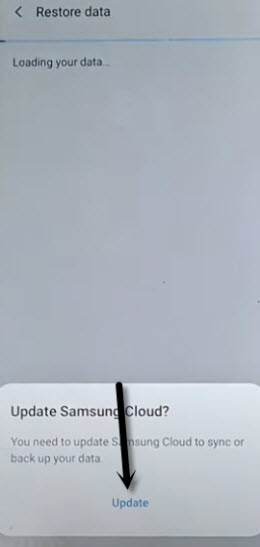
Note: You may have a (Update Samsung Cloud) popup window, just hit on “Update” button, after that tap to “Restore” and wait until this updating process done.
-After few minutes waiting, tap again on “Restore Data” option.
-Now you will see (Choose a verification Method) screen, just select “Email” and this email you a verification code to your Gmail account.
-Click to “Verification” button from the Gmail account to verify that it is you.
-Now tap to “Get Started” button and this will start restoring data.
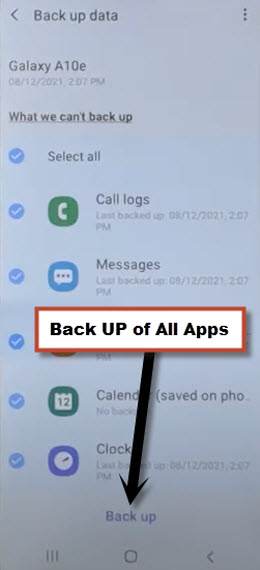
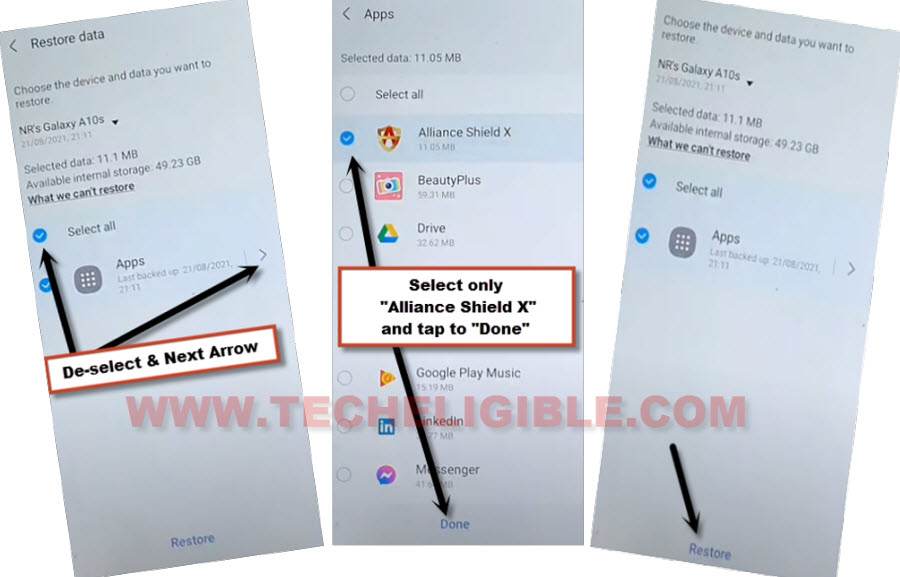
-De-select the “Select All” option, and the tap to “Next Arrow” which is right next to the (Apps).
-Select only “Alliance Shield X” app, and tap to “Done.
-Tap to > Restore > Install.
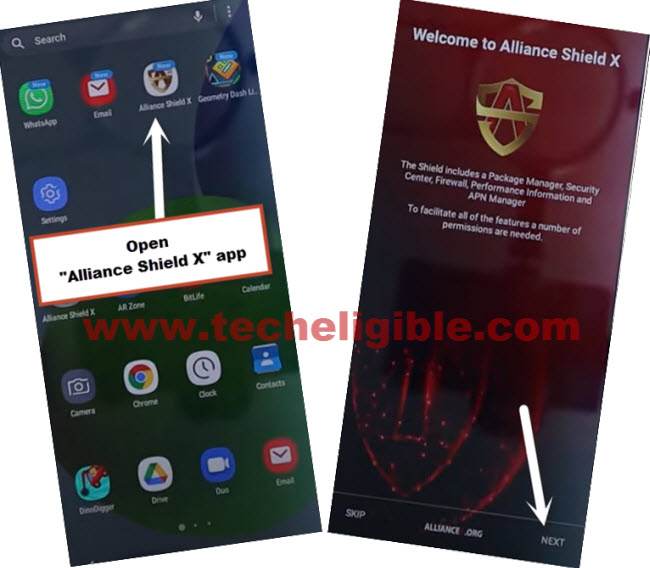
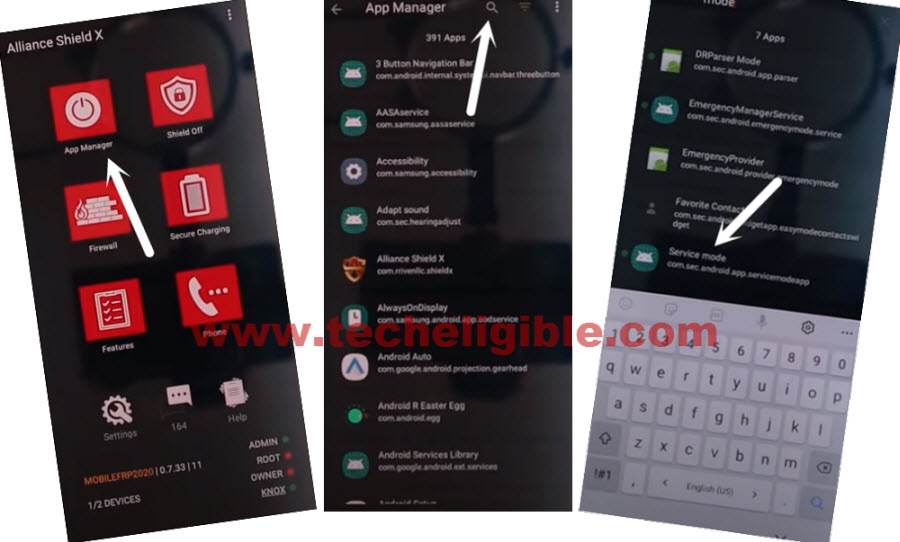
-Go to > MENU > Alliance Shield X.
-From the (Alliance Shield X) app, tap to > Next > Next > Next > Got it.
-Register your new account in (Alliance Shield X) .
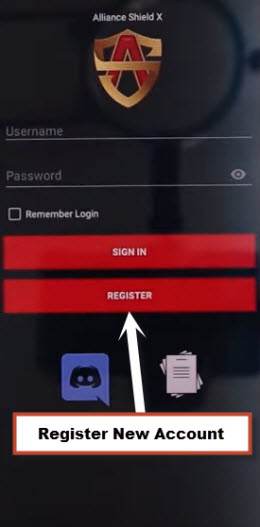
-Sign-in with your registered account in (Alliance Shield X) app to Remove FRP Account Galaxy M32.
-Type any “Device Name”, and then tap to “Next”.
-Turn on “Device Admin”, and hit on > Activate > Next.
-Turn on “Knox”, and select option (i have read and agree…), and tap to > Confirm > Next > Finish.
-Tap on “App Manager”, and tap to “Close” from popup box.
-Hit on “Search icon” from top corner, and search there “Mode”, and tap to “Service Mode”.
-Tap to “Activities”
-Go all the way down, and tap on option (com.sec.android.app.modemui.activities.usb.settings).
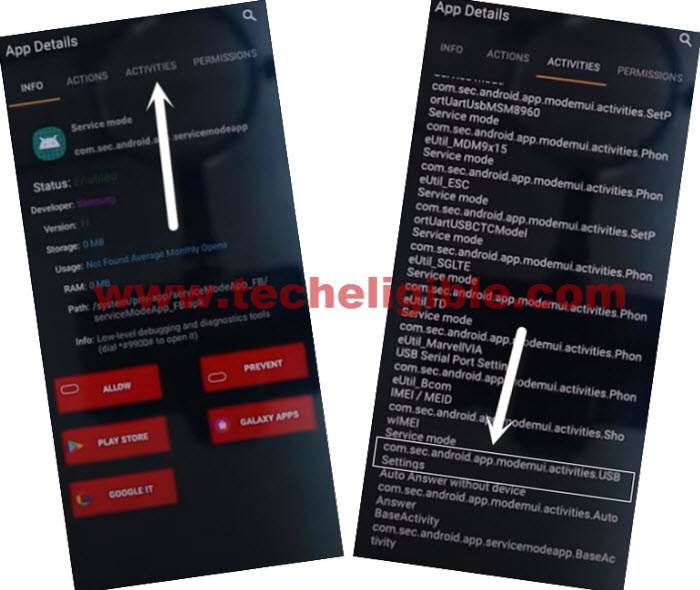
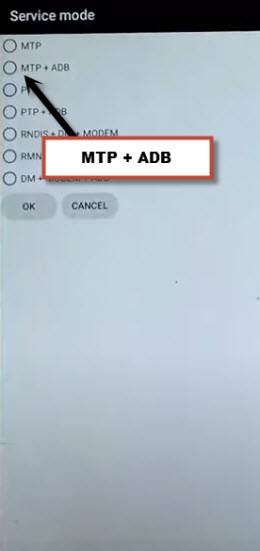
-Tap again on (com.sec.android.app.modemui.activities.usb.settings), and again hit on “OPEN”, and then select (MTP+ADB).
Final Step to Remove FRP Account Galaxy M32:
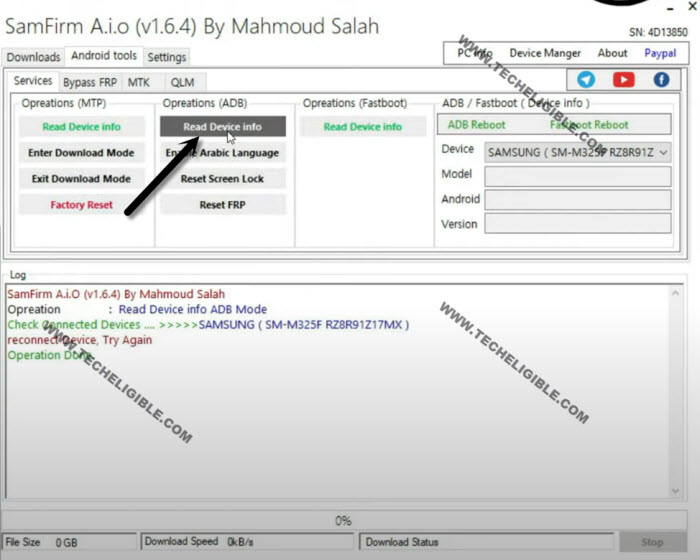
-Open “SamFirm tool” again in your PC.
-Connect Galaxy M32 again to your PC.
-From (Samfirm tool), tap to > Android Tool > Bypass FRP > Scan.
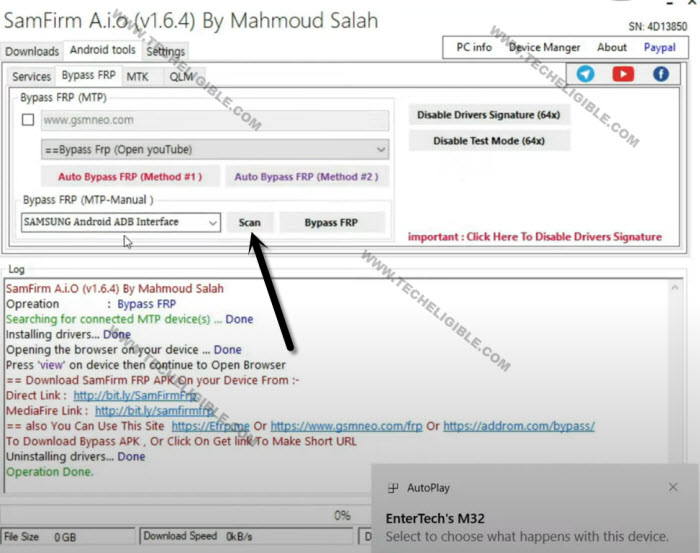
-Go to > Services > Read Device info.
-Once the info reading process completes, just hit on “Reset FRP” button from there to Remove FRP Account Galaxy M32.
Note: You will also receive a popup window (Allow USB Debugging) in your Galaxy M32, just tap to “Allow”.
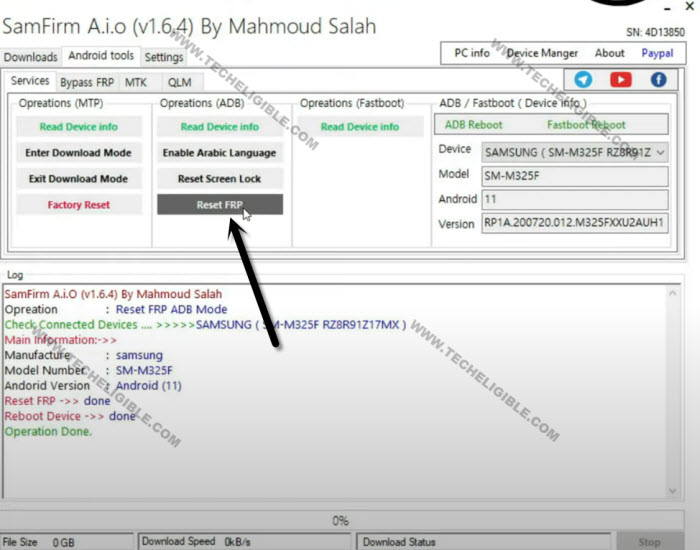
-After that, the device will be reboot, now the frp lock has been removed successfully.
Read More: