
Bypass FRP Galaxy A03s – Reset Google Account Android 11
You’ve got a FRP lock on your personal device, don’t worry, this issue can be resolved easily, and you can Bypass FRP Galaxy A03s Android 11 with the help of below 2 methods, we have included both methods in same post, so if you fail with 1 method, you still have a chance to go with 2nd method, and we want you to get back your device with latest google account.
Disclaimer: This method is for educational purpose only, try this method only on your own phone, do not try this method on stolen phone, this is a serious crime, if you are trying to unlock stolen phone, you may also be jailed.
All Available Methods:
| Method 1: Remove FRP Galaxy A03s [New] |
| Method 2: Remove FRP Galaxy A03s [OLD] |
Method 1: Bypass FRP Galaxy A03s:
Requirement before Start:
⇒ Create Samsung Account [Click Here]
⇒ Create Alliance Shield X Account. [Click Here]
⇒ WiFi Connection.
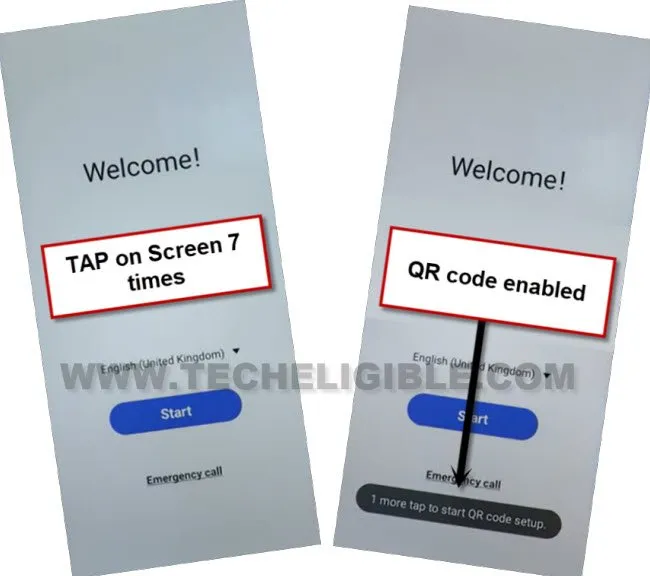
Step 1: Connect WiFi, and go back t first (Welcome!) homepage.
Step 2: Tap 7 times rapidly on a screen to enable (QR Code) option, you will be redirected to the (Checking for update..) screen, just go back.
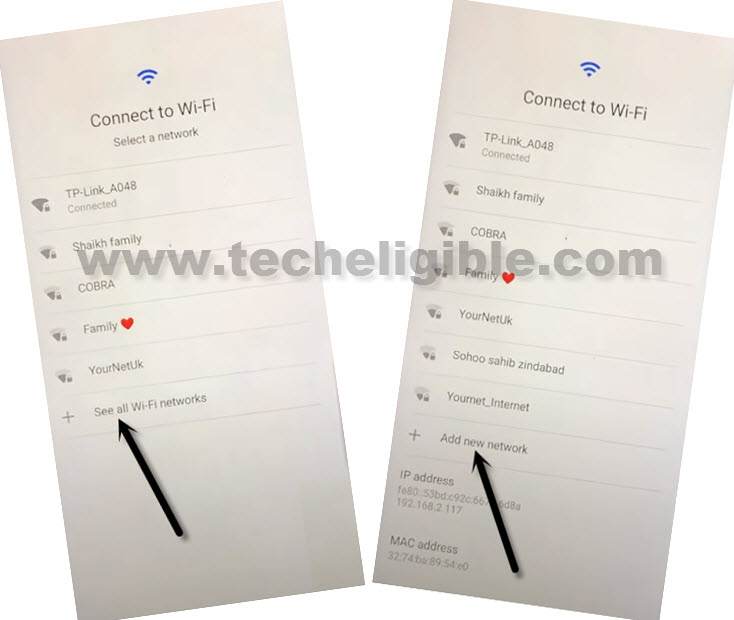
Step 3: Tap on > See All WiFi Network > Add New Network.
Step 4: Hit on “QR Code” logo, which is right after (Enter Network Name), and then tap on “image” icon.
![]()
Step 5: Tap to “MENU” icon from up-left corner, and go to “Drive”.
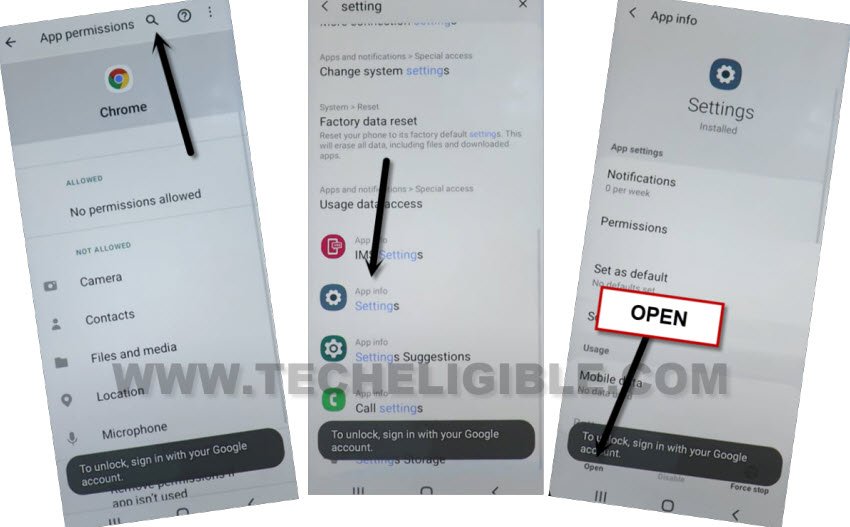
Step 6: Tap to “Permission”, and then hit on “Search icon” from top corner.
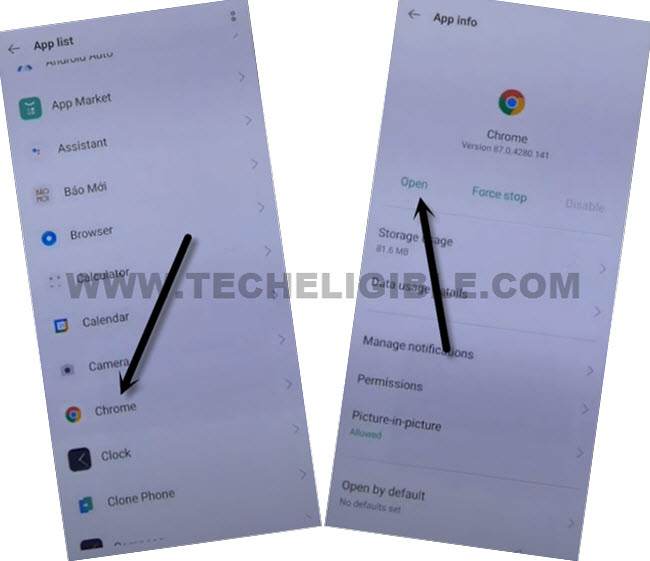
Step 7: Search and access to > Chrome > Open.
Step 8: Go to > Accept & Continue > No Thanks.
Download & Install Alliance Shield App:
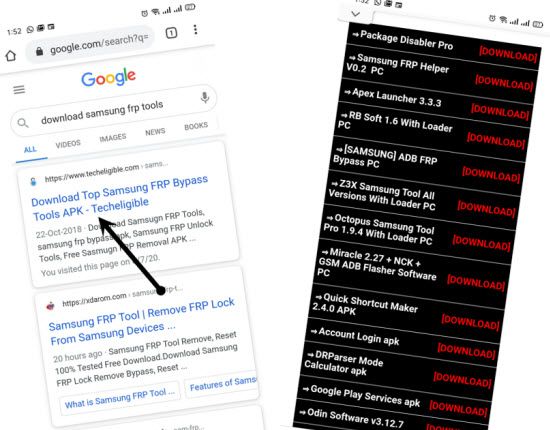
Step 9: Search in browser “Download Samsung FRP Tools“, and visit our website searched result.
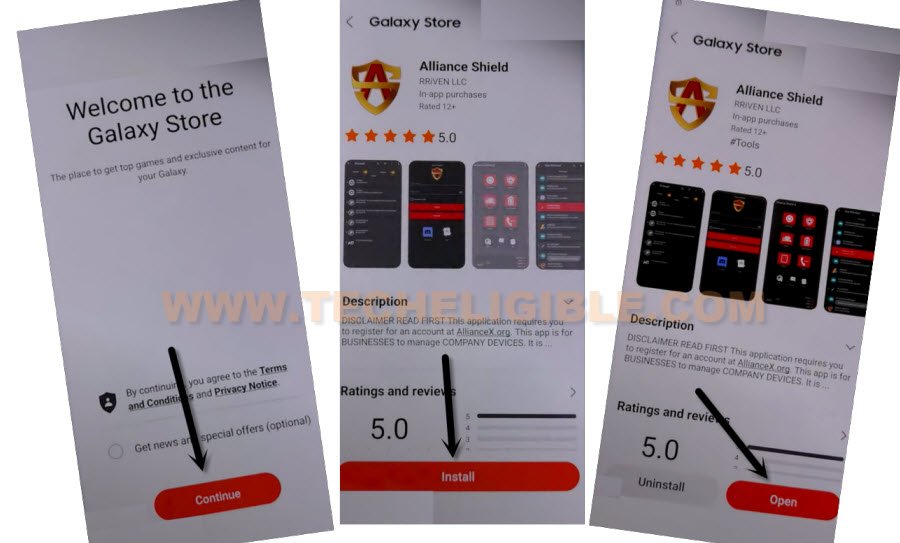
Step 10: Scroll down, and tap on “Install Alliance Shield X from Galaxy Store” to Bypass FRP Galaxy A03s.
-You will be redirected inside Galaxy Store, from there hit on > Continue > Install > Open.
Note: You may be asked to sign in first, so you have to sign in with your Samsung Account, if you don’t have any account, you create that account in free from Samsung website.
Step 11: Tap to “Skip” from app, and then you will have (Sign in) screen, just sign in with your registered account, if don’t own any account, so create that one in free.
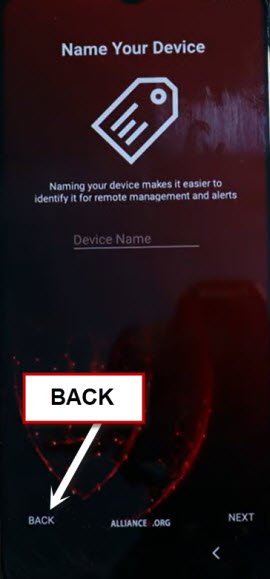
Step 12: Tap on “Back Arrow” Name Your Device screen.
Force Stop & Clear Cache Some Apps:
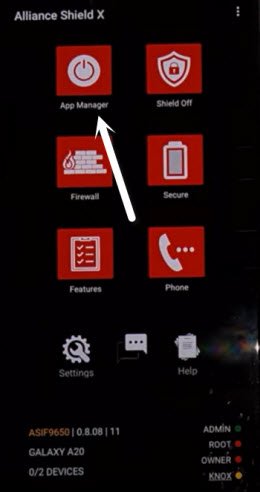
Step 13: Go to “App Manager”, and tap on “Search icon” from top corner.
Step 14: Tap to “Search icon” from top right corner, search & Tap on “Android Setup”, go to > Actions > App Settings.
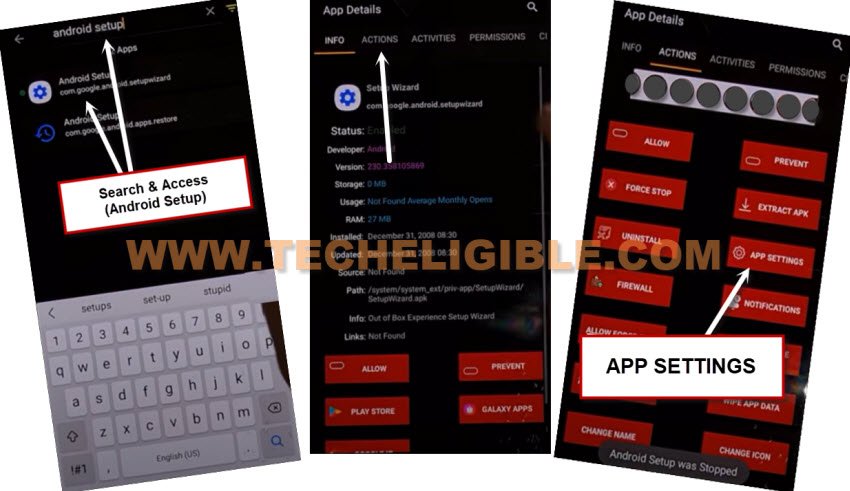
Step 15: We need to clear cache and force stop the (Android Setup) app, so tap to “Force Stop”, and hit on “OK” from popup window.
Step 16: Go to > Storage > Clear Cache.
![]()
Step 17: Go back to (Searching Area) again, now search and go to > Samsung Setup Wizard > Actions > App Settings.
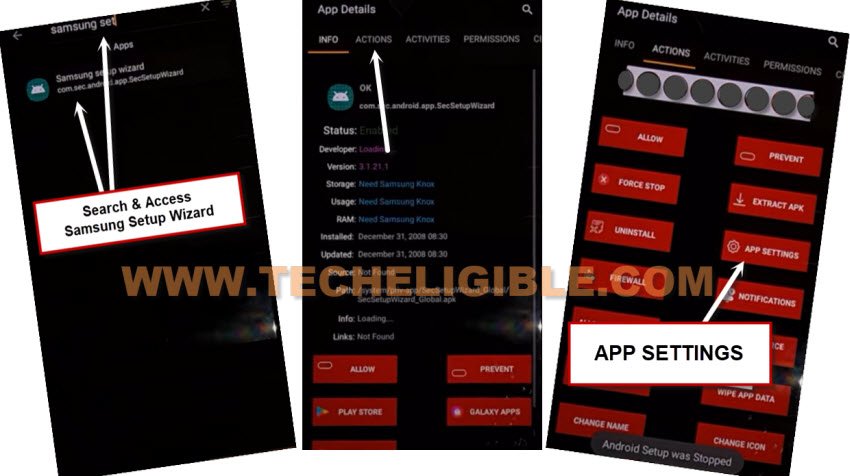
Step 18: Tap to “Force Stop”, and hit on “OK” from popup window.
Step 19: Go to > Storage > Clear Cache.
![]()
Step 20: Go back to (Searching Area) again, now search and go to > Google Play Services > Actions > App Settings.
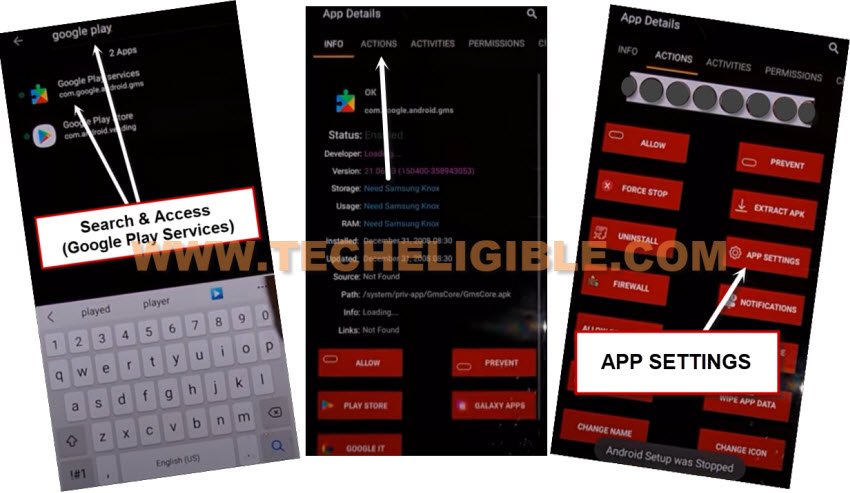
Step 21: Tap to “Force Stop”, and then hit on “Disable”.
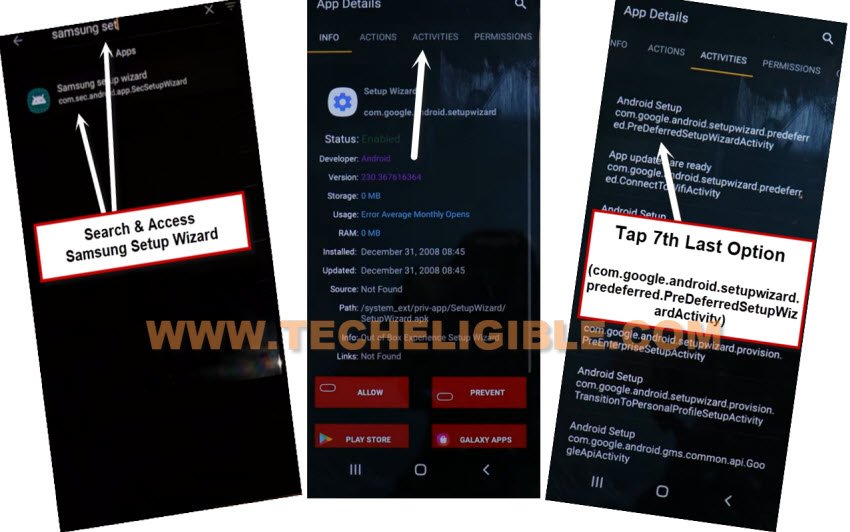
Step 22: Get back to search page, search and access again to “Samsung Setup Wizard”, and then tap to “Activities”.
Step 23: Tap on 7th last option (come.google.android.setupwizard.predeferred.PredefferedSetupWizardActivity).
Step 24: Tap on “Open” from pop window.
Step 25: Now you will be redirecting inside your device homescreen, but the homescreen may start flashing up, this can be fixed easily just by enabling (Google Play Services).
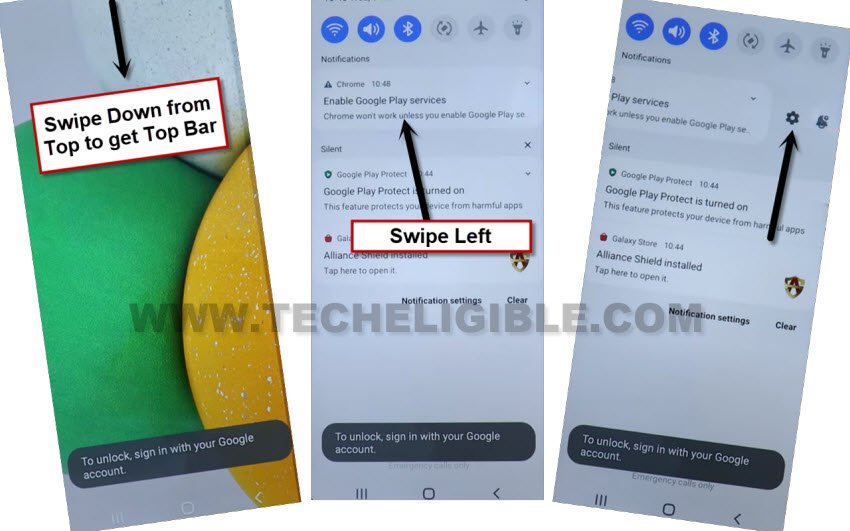
Step 26: Bring top bar menu by swiping down, and tap “Settings”
Note: You may have to put some effort to get top bar menu, because the screen will keep flashing, after multiple tries, you will be able to bring top bar menu.
Step 27: Swipe to right the (Enable Google Play Services) message, and tap to “Settings”.
Step 28: Go to > Chrome icon > Permissions.
![]()
Step 29: Search “Settings”, and go all the way down, from there tap on “Settings app info“.
Step 30: Tap to “Open” from bottom left corner.
Enable Google Play Services:
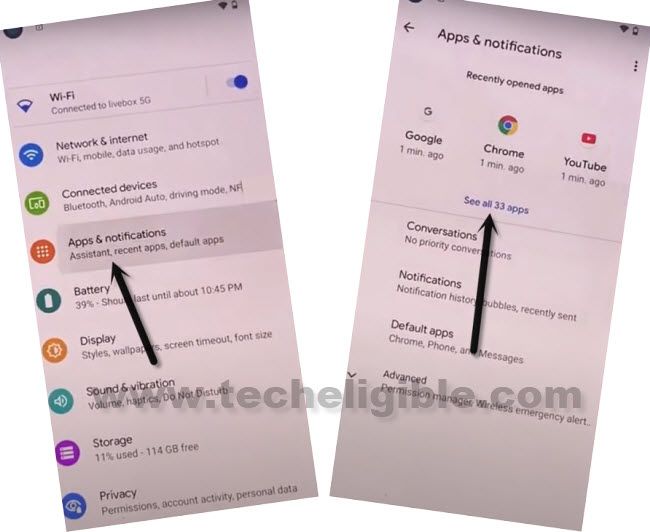
Step 31: Go to “Apps & Notification > All Apps.
Step 32: Tap to “Down arrow” from top left corner of (All), and select “Disabled”.
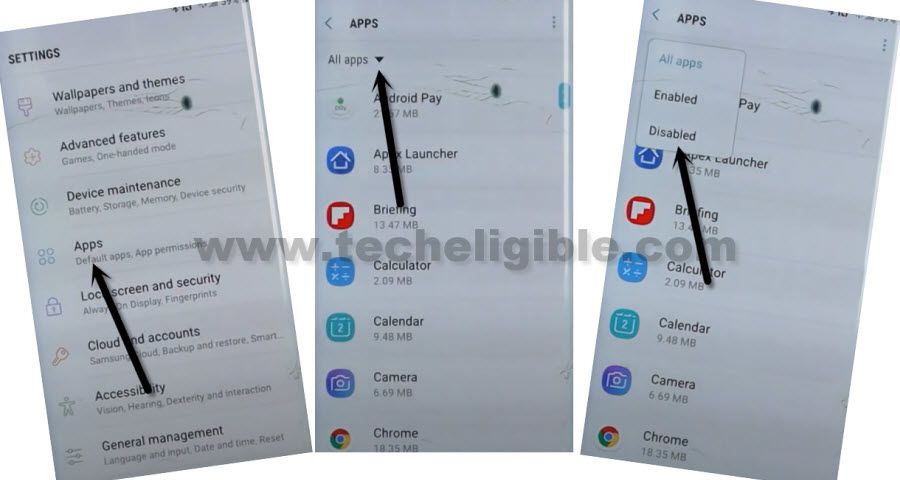
Step 33: Go to “Google Play Services”, and hit on “Enable” button.
Step 34: Now Go back to (Settings), and hit on > Account > Account > Add Account > Google, after that you can easily login with your new google account, Thanks for visiting us.
Method 2: Bypass FRP Galaxy A03s [OLD]
Bypass FRP Galaxy A03s Android 11, you don’t need any alliance shield x method, this has been old, now apply this latest one to easily bypass frp from your device without using any paid or credit tool, but you must need a computer for completing this process, afterwards, you will be able to access the device menu and all functions without any restrictions.
Note: This method is only for device owner and for educational purpose only.
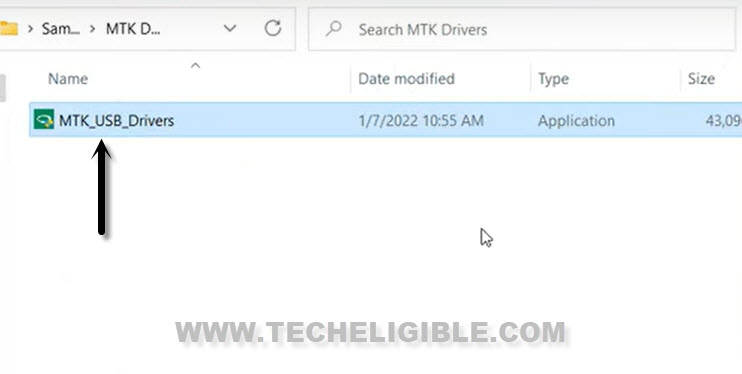
-Firstly, you have to download and install Samfirm tool and some USB and MTK Driver.
⇒ Samfirm Tools + Drivers [DOWNLOAD]
-Extract and open downloaded main folder.
-Open “MTK USB Driver” folder.
-Click to > MTK_USB_Drivers > Yes > Left Option.
-Go back to “Sam Aio 1.4.3….” folder, extract the “Sam Aio 1.4.3” from winrar, now install & open this tool in your PC to bypass frp.
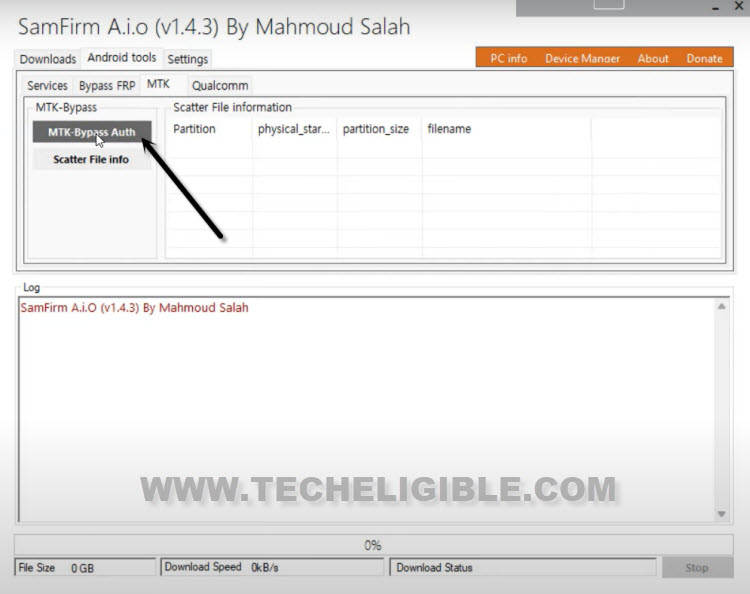
-From the tool, go to > Android_Tools > >MTK > MTK-Bypass Auth.
-Turn off Galaxy A03s device.
-While Pressing Both (Volume UP/DOWN) keys, insert USB Cable to connect with PC.
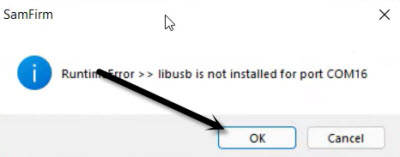
-You may have an error “Libusb is not installed”.
-You will also have a popup window of (Samfirm), just tap to “OK”.
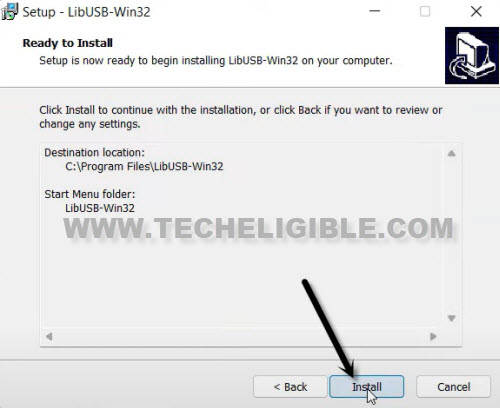
-Install (Lib USB) driver in your PC by clicking on (Next & Install) option.
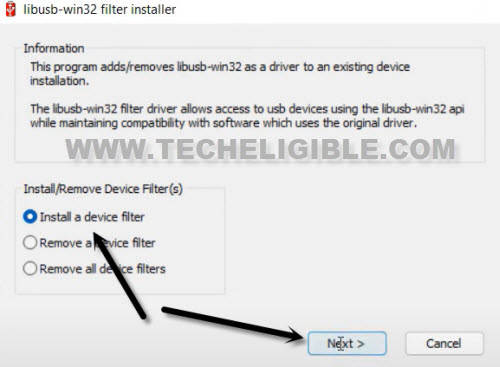
-Select option “Install a device Filter”, and go to “Next”.
-Open “Device Manager” in your PC, to open this device manager, just right click on “My Computer”, and go to “Device Manager”.
-Go down, and click on “Ports (COM & LPT) to expand it, and there you will be able to see your device port name.
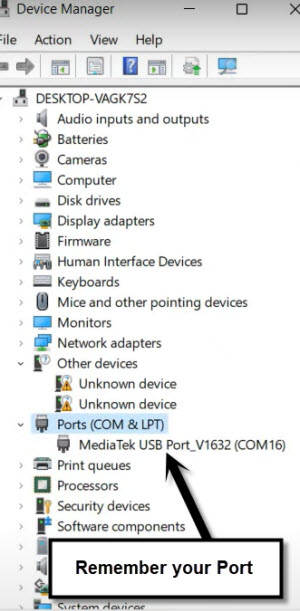
-Select same port, which is appearing up in “Device Manager”, now tap to > Install > Ok.
-We can easily bypass frp Galaxy A03s, because the LibUSB has been installed successfully, and Samfirm can easily detect the device to finish its (AUTH-BYPASS) operation.
-Go back to “Sam Firm” tool software, from there hit on > Android Tools > MTK > MTK_BYPASS_AUTH.
-Keep holding both (Volume UP/DOWN + Power) keys together.
-Do not release keys until you see a (Operation done) in Samfirm tool.
-Congrats, we have successfully Auth Bypass on Samsung A03s device.
Flash Galaxy A03s with SP Flash Tool:
-Go back to downloaded folder, from there go to “SP Flash Tool” folder.
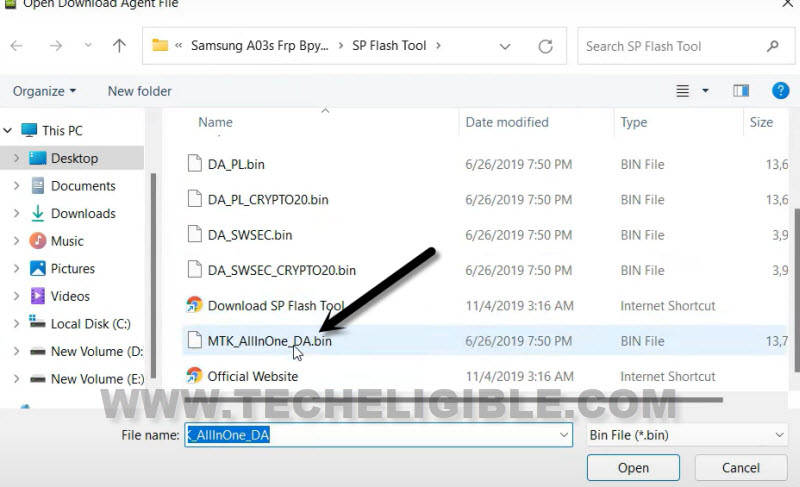
-Run “Flash_Tool”, click on first “Choose”.
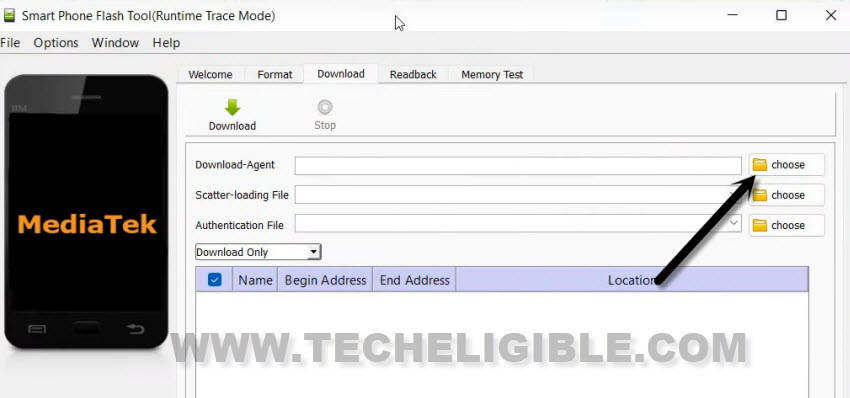
-Select “MTK_Allinone_BA.BIN” file.
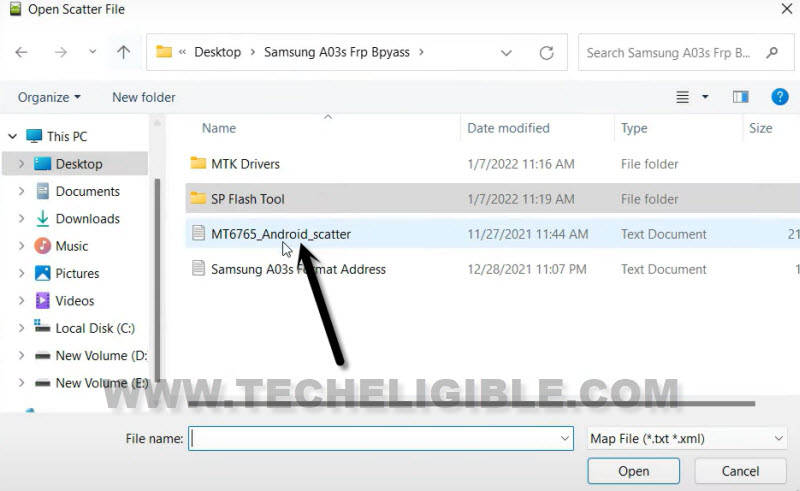
-Select 2nd “Choose”, and go back to main “Downloaded” folder.

-From there select “MT6765_Android_Scatter” file.
Note: Main folder means, the folder which you downloaded above.
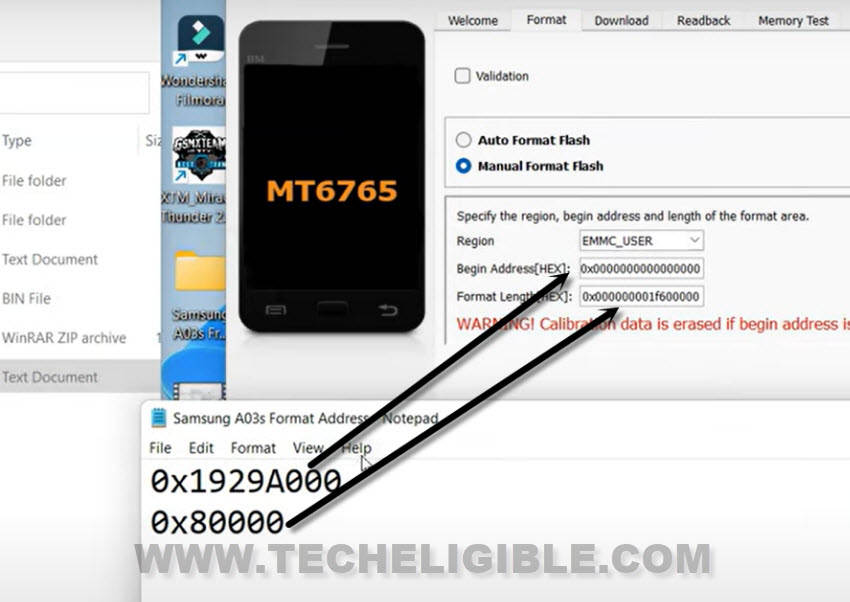
-Click to > Format > Manual Format Flash.
-Open “Main Folder” again, from there go to “Samsung A03s Format Address”.
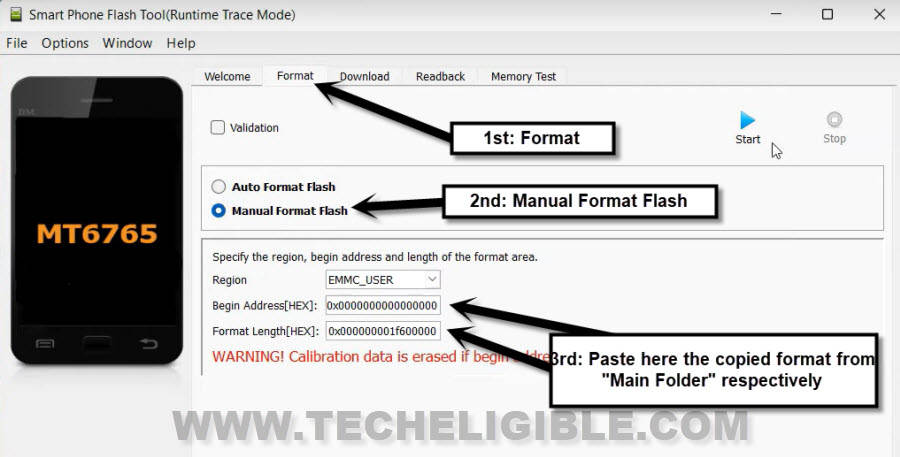
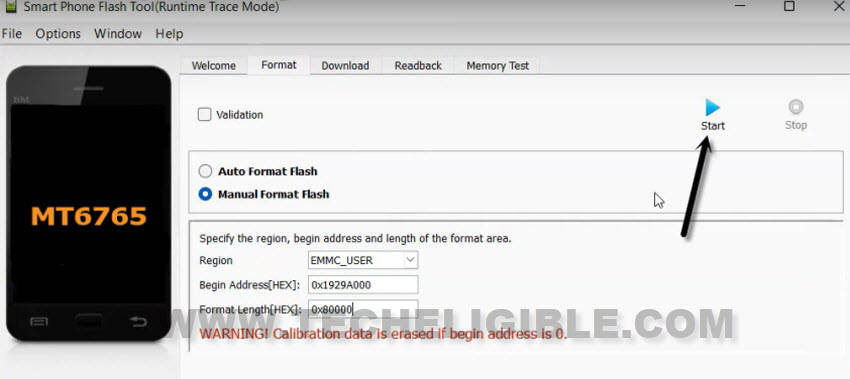
-Copy and Past both format respectively in SP Flash tool.
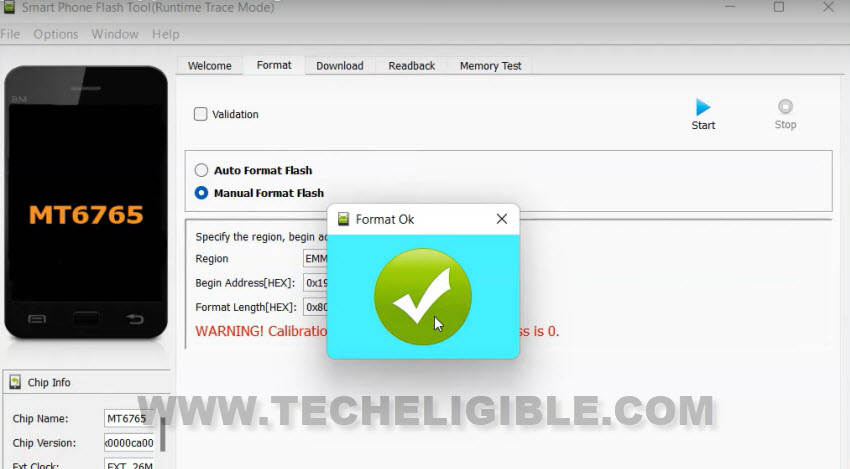
-After pasting both format correctly, click to “START” button.
-In few seconds, the format process will complete, and you are all done from Bypass FRP Galaxy A03s.
-Again hold all keys for 8-10 sec (Volume UP + DOWN + Power) keys to forcefully exit into normal mode.
-Disconnect device from PC, and turn on Galaxy A03s.
-Complete setup wizard accordingly to reach device home-screen without having any old Gmail Account.
Read More: