
If there is google FRP protection on your device and you have mistakenly or deliberately hard reset your device due to delete your device data or bugs etc. Then, you need your previously signed in google account to use this device again. Otherwise, you will stuck on a google Samsung J7 verification screen. To remove this obstacle, you need to follow up this way for the Bypass FRP Samsung Galaxy J7/J7 Plus. Luckily, we have 5 FRP Bypass methods here on Android 9/8/7/6/5.
Note: We highly recommend you to apply this method only on your own device, if you are not owner of this device, or you found this from some where, you must return this device to its real owner.
Method 1: Bypass FRP Samsung Galaxy J7/J7 Plus Without PC
Follow below easy steps to Bypass FRP. We will download (Quick Shortcut Maker & Google Account Manager) application from frp tools screen. After that, install both apps one by one and setup new google account to bypass frp easily without using any PC. Checkout steps from below.
-Turn on phone & connect Wifi.
-Go to the screen of “Verify your account”.
-Type on type and email field to bring keyboard, and from the keyboard, just tap on “Setting gear icon”.
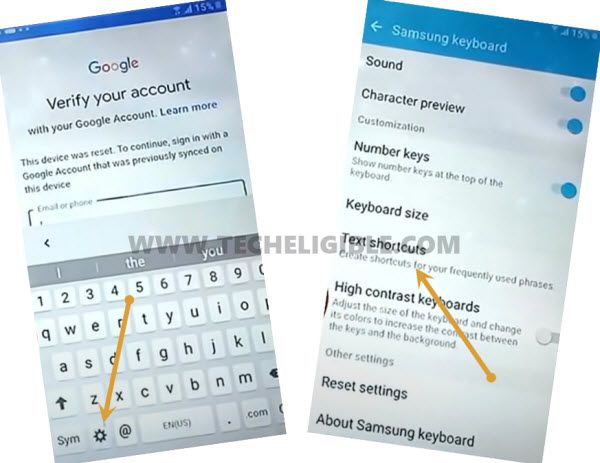
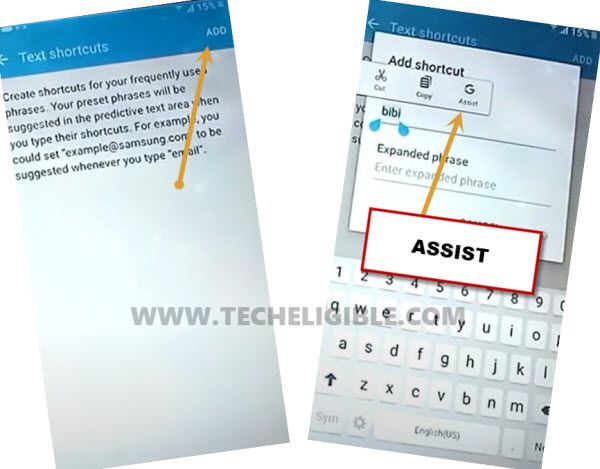
-Tap on “Text Shortcut”, and then tap “Add” from top right corner.
-Type there any random text, and then long tap on your typed text.
-It will show “ASSIST” option, just tap on that, you will be redirected to google app.
-From the google screen, tap on “NO THANKS”.
-Type in search box “Chrome”, and tap on “Chrome icon” from searched result to access chrome browser for downloading frp tools.
Download Galaxy FRP Apps:
-Now we will download 2 frp bypass apps.
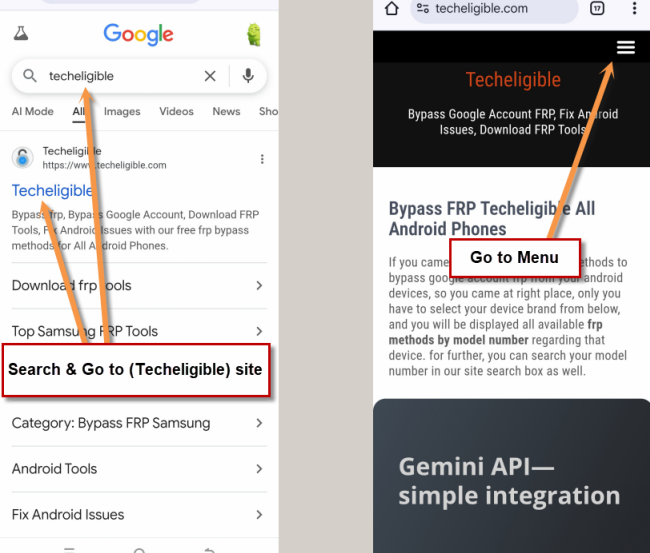
-Access to Samsung frp downloading page by searching in browser with “Techeligible“. After that, visit 1st searched result from there same as instructed in below image.
-Hit on “Menu” option from top corner of the site.
-You have to hit on > Other Free Tools > Samsung FRP Tools.
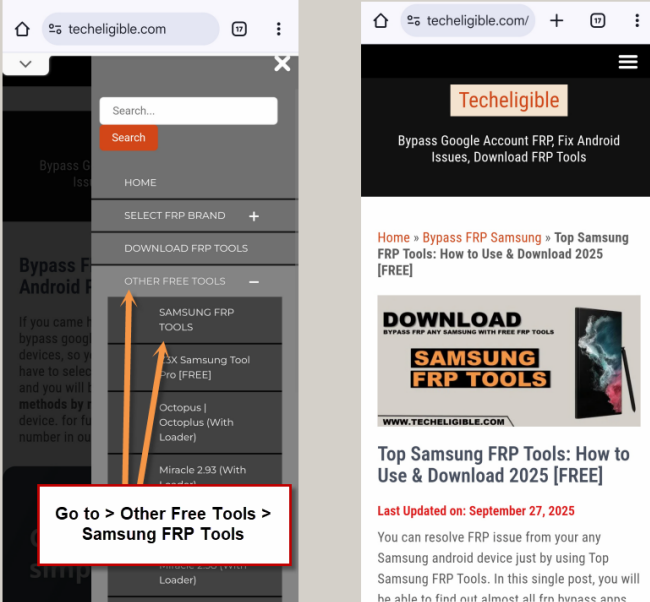
-Download from there “Google Account Manager” according to your Android Version.
Note: If you don’t know what is your device exact android version, then you can download all Android 6, 8, 9 versions of google account manager, and try installing all one by one.
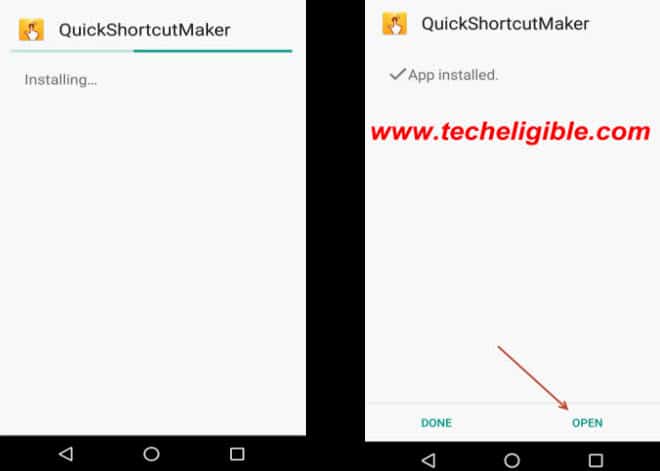
-Download also “Quick Shortcut Maker“, once downloading finish, you will have “OPEN” option bottom of your screen.
-Tap on “OPEN” to open download folder.
-Install “Google Account Manager”, then tap on “Done”.
-Install “Quick Shortcut Maker”, after installation finish, tap on “OPEN”.
Note: If you are getting “INSTALLATION Block” popup, tap on “Settings from popup”, and enable “UNKNOWN SOURCES”
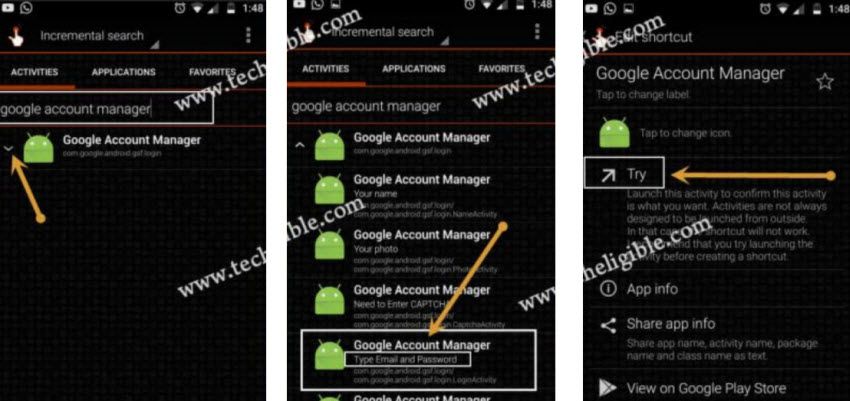
-Type in search bar “Google Account Manager”, tap on google account manager to expand it.
-Select one google account manager that appears with “Type Email and Password”, then tap on “Try”.
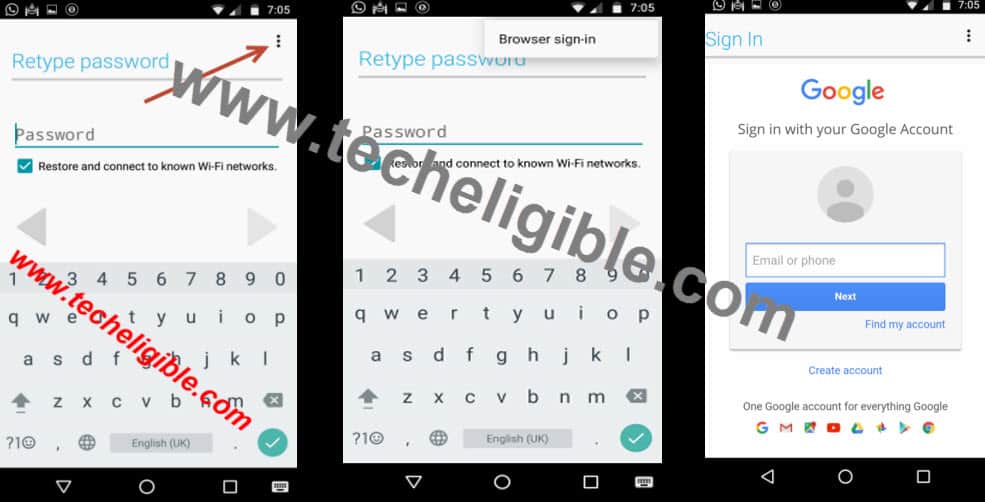
-Now from top right corner, tap on “3 dots”, then tap on “Browser Sign-in.
-Add your valid “Gmail Account”.
Note: If you are unable to see “3 dots” click here how to get 3 dots.
-Restart your device by pressing “Power button”, then tap on “Restart”.
-Finish up your device setup wizard on your own to reach device homescreen easily.
Method 2: Bypass FRP Samsung Galaxy J7/J7 Plus Android 8/9 By Enabling Talkback Option
You can also give a try to this method, if you are still failed in performing bypass frp method successfully on your Galaxy J7 model, may be you have latest android version, you are following old android version frp bypass guides, we hope this will solve your issue. We will use (Talkback function) here to access to frp tools screen and use FRP removal applications from there.
-Connect Wifi & Put your screen on first “Welcome!” screen.
-Long tap with your 2 fingers for 10-15 seconds until you have “Talkback Tutorial” screen.
-Draw “L” by swiping down to right, and then double tap on “Talkback Settings”.
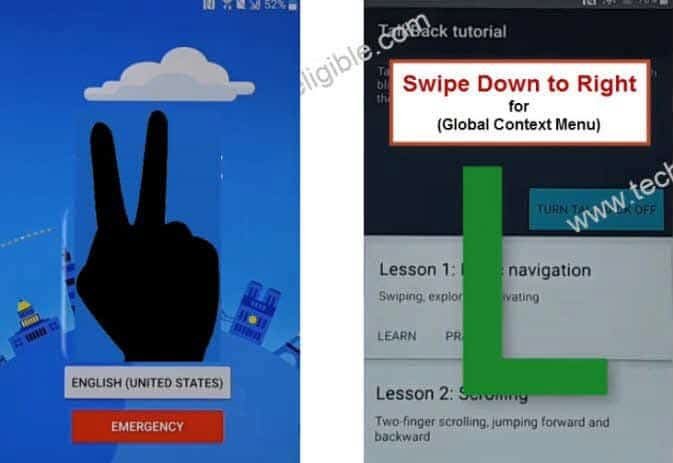
-Using your 2 fingers, just go down and turn off “Explore by touch” by double tap on that, and then double tap on “OK” from dialog box.
-Tap on “Help & Feedback” option.
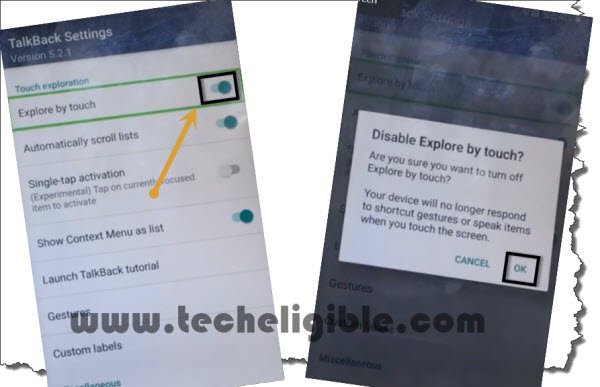
Note: in some most updated version, you will not have (Help & Feedback) option, for that we would recommend you to try this new method that has successfully been applied on J7 Prime without help & feedback Method, we hope this will work on your device as well.
-Tap on “Search icon”, and type there any random text, such as type “Techeligible”.
-Long tap on your typed text “Techeligible”, and then tap on “ASSIST“.
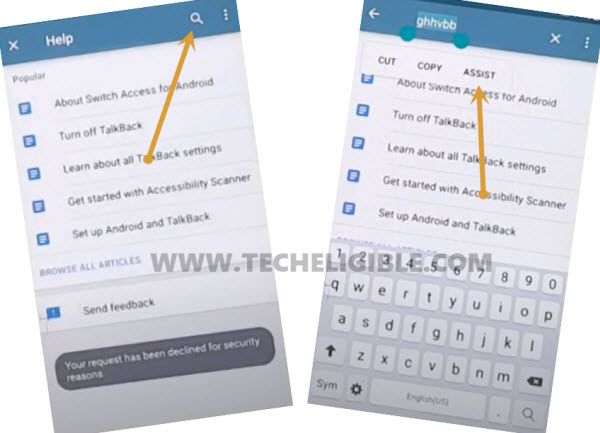
-Tap “No Thanks” from bottom left corner of google screen to bypass frp on Samsung J7.
Open Google Chrome Browser:
-Type in search box “Chrome”, and tap “Chrome icon”.
-Access to Samsung frp downloading page by searching in browser with “Techeligible“. After that, visit 1st searched result from there same as instructed in below image.
-Hit on “Menu” option from top corner of the site.
-You have to hit on > Other Free Tools > Samsung FRP Tools.
-Visit 1st searched of our website, and download from there below 2 apps.
1/ Google Account Manager 8.
2/ Account Login.
-Wait until downloading process finish, after that go top of the page, and tap on “3 dots” from top right corner, and tap “Downloads” to access download folder, there you will be able to see your both downloaded applications, so lets go for installing these 2 frp bypass app for the bypass google account galaxy J7.
-Tap on “Google Account Manager 8”, and then tap on “Settings” from the installation blocked popup window, after that enable “Unknown Sources”.
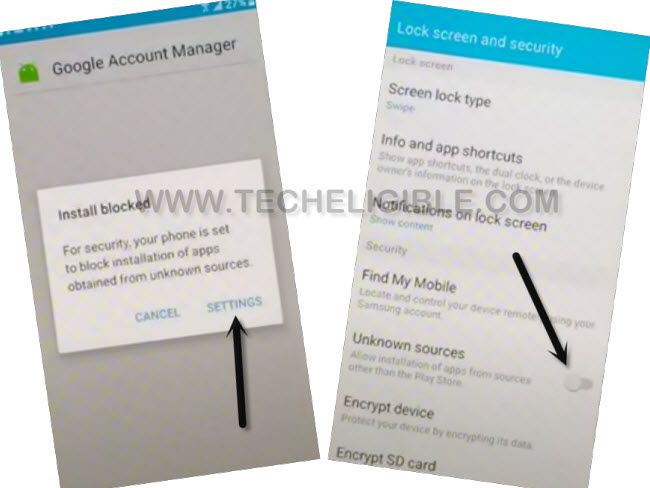
-Tap > install > done.
-Tap > Account Login > Install > Open.
-Now you have to enter your new Gmail account, for that, just tap on “3 dots” from top right corner of the screen, and then tap “Browser Sign-in” option, now there you will see browser sign in screen, just enter there your valid Gmail account id to sign in.
-Once you signed in, that means you are all done to from FRP bypass process.
Method 3: Samsung J7/J7 Plus FRP Bypass [Android 7] By PC
Access back to your Samsung Galaxy J7 Plus device using flashing method. We will download and (Odin Software) and some flashing files in the PC. After that, put your device into the download mode and flash the with your downloaded flashing tool to complete remove frp account on your Samsung Galaxy J7 Plus (Android 7).
-Firstly, you have to download below tools in your PC.
Download Tools in PC:
| – Odin v3.12.3 [DOWNLOAD] – SAMSUNG USB Driver [DOWNLOAD] – Combination File (558 MB) [DOWNLOAD] – Official Firmware (1.9 GB) full stock [DOWNLOAD] |
Reboot the Phone into Download Mode:
-Extract All “4 Downloaded FRP Tools” from Winrar Archive.
-Install “Samsung USB Driver” in your Computer.
– Power Off your device by pressing “Power Key”.
– Press “Volume Down + Power + Home” keys together for a while to go to “DOWNLOAD MODE“.
– Now Press “Volume UP” key to continue.

Connect J7+ to Computer & FLASH Via Odin:
– Connect your Galaxy J7+ Device to your Computer/Laptop to start the process Bypass FRP Samsung Galaxy J7/J7 plus.

– Now Open “Odin Software”.
– Make sure, your getting “0:[COM6]” in your Odin software (This is for sure that your j7+ has successfully been detected in Odin).
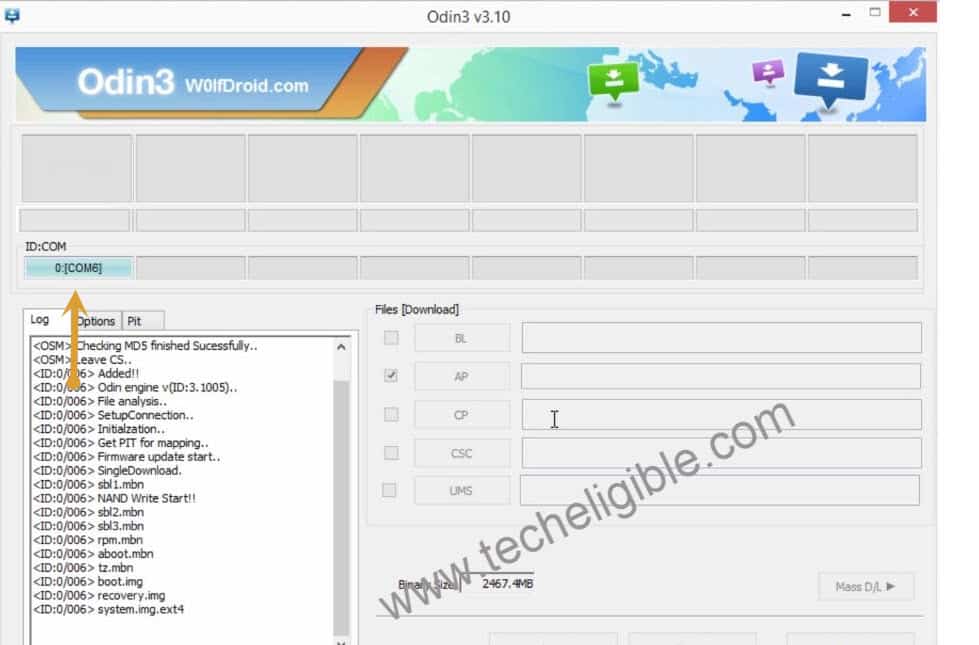
– Click on “AP” from “ODIN Software” and Give path of “Combination File” (this file you’ve downloaded already from above).
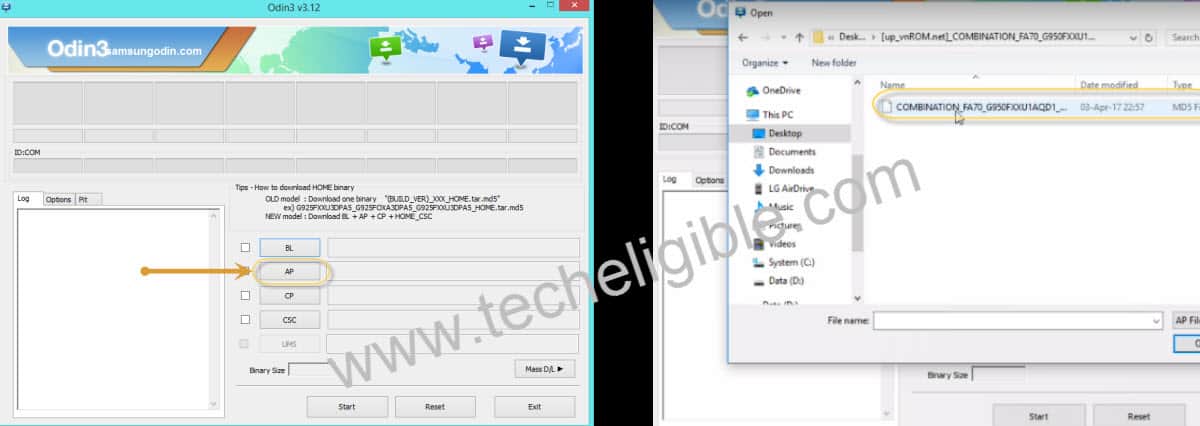
– Now click on “START” button from Odin software.
– Wait until you get “PASS!“, and your device auto restart.
Note: If you get an error in your Galaxy J7+ device after flash, don’t worry, repeat this process again to flash via odin. Remove USB Cable, then put your j7+ to download mode, and open odin software, then give combination file as path and then click on start to flash j7+ again.
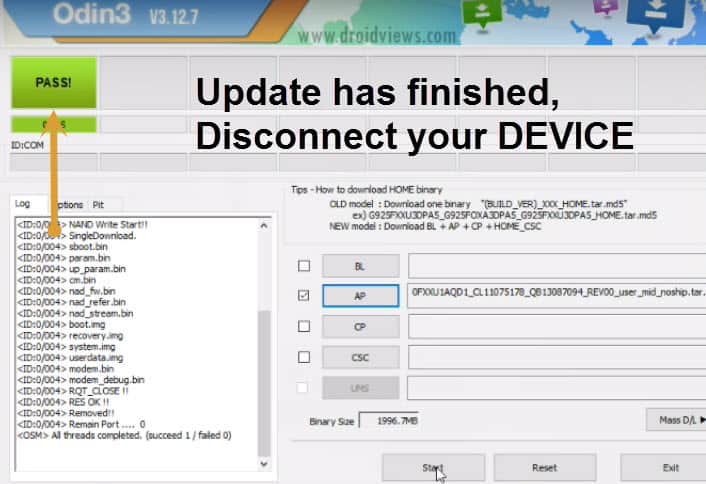
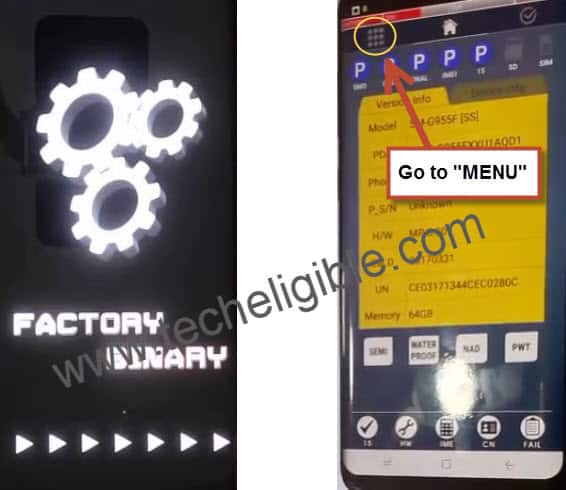
– After successfully flashing done, Galaxy j7+ will restart to “Factory Binary”. and now remove “USB Cable” as well.
Enable USB Debugging Option via Factory Binary:
– Tap on “MENU” from left top corner.
– After that, tap on “Settings”.
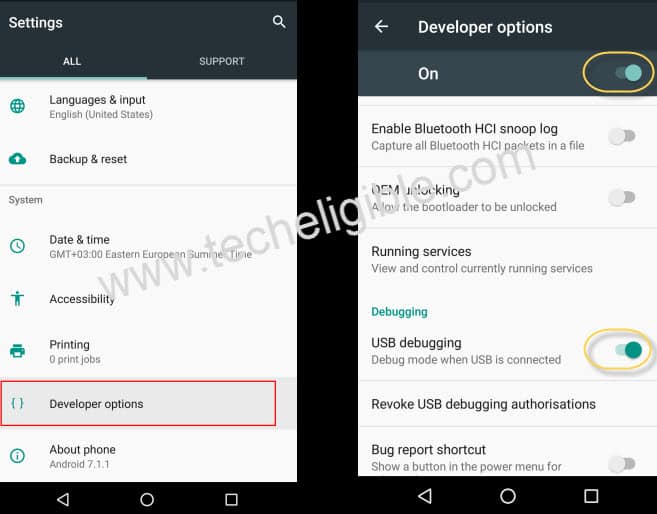
– Go to “Developer Options”.
– Turn on “USB Debugging” from there.
Switch Off and Reboot J7 Plus to Download Mode for Final Flash:
– Power Off your device by pressing “Power Key”.
– Press “Volume Down + Power + Home” keys together for a while to go to “DOWNLOAD MODE”.
– Now Press “Volume UP” key to continue.
– Now again connect your device to computer.
Flash the Device via FULL STOCK ROM Files:
– Open “Odin Software”, and click “RESET” button to remove any file from “AP”, if it’s there.
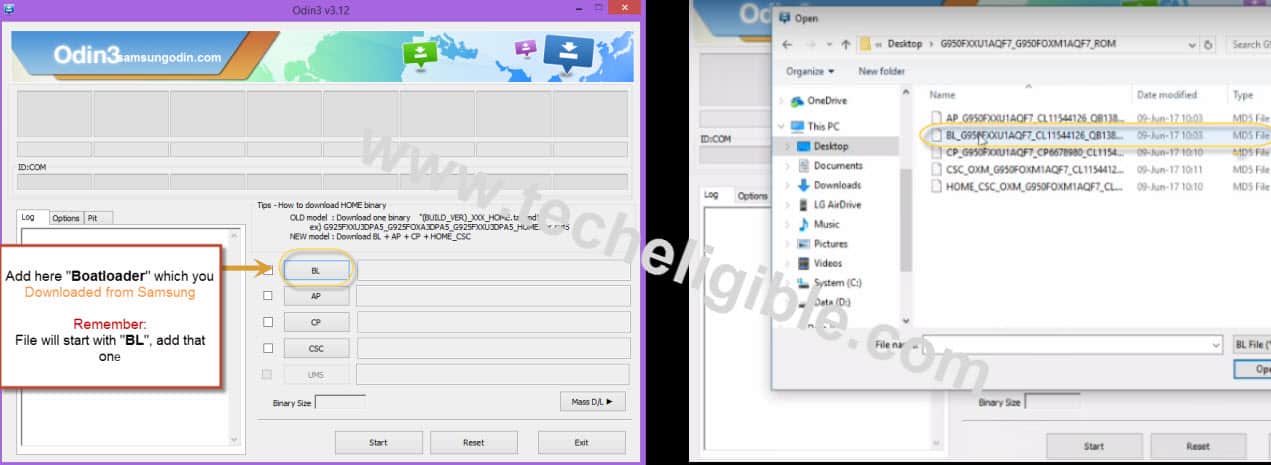
– Click on “BL” and then give file path of “BL File“, that will be in “FULL STOCK” folder (which you have downloaded already from above).
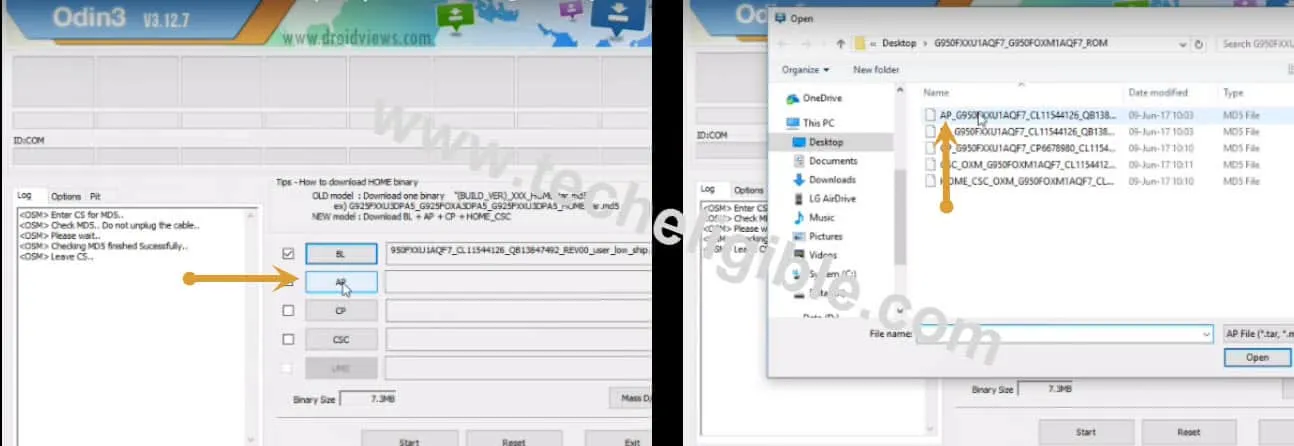
– Click on “AP” and then give file path of “AP File“, that will be in “FULL STOCK” folder.
Note: Do not Select “CP”
– Click on “CSC” from Odin Software, and here you will give path of “HOME CSC“. Do not give path of “CSC”, (NOTE THIS)

– Now Click on “Start” button to finish frp removal process.

– Now wait until you get “PASS!” in Odin software, after flashing process finish, J7+ will restart, and then it will take several minutes to finish it’s process. You can finish all remaining initial steps on your own.
Method 4: Use SD Card to Remove FRP Samsung J7/J7+ Android 6
-Download Apk File in your SD Card First
Note: This method is successfully tested on Galaxy J7 (2016), SM-J710F, Android Version 6.0.1
-Use your any android device, and search on google “Download FRP Tools Techeligible“, and visit our website searched result.
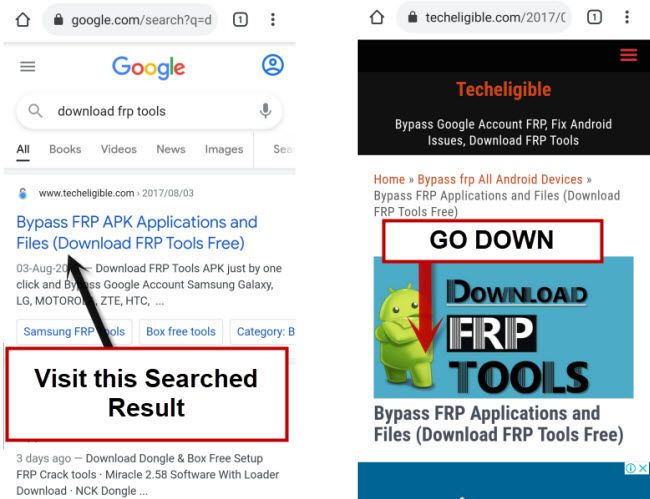
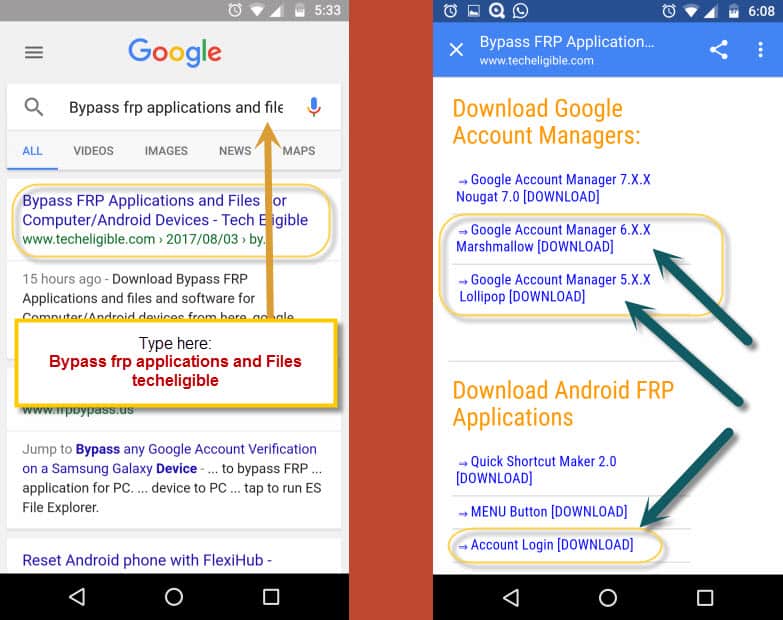
-Download “Account Login“, and “Google Account Manager 6.x.x or 5.x.x” application in your phone according to your device android version.
-Now remove your SD Card, and keep it nearby.
Let’s Start Steps:
-Select your “Language”, tap on “Yellow icon” to go for next, then connect your device to “WIFI Connection”.
-Once “Wifi” connected, tap on > NEXT > NEXT > AGREE.
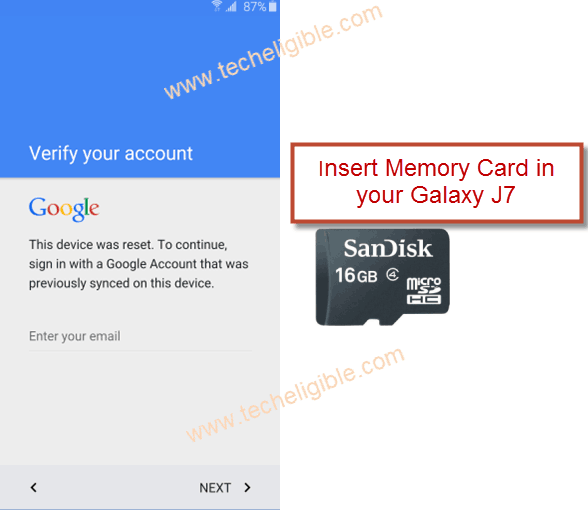
-Now from “Verify Your Account” screen, insert “SD Card” in your Galaxy J7.
Enable “Talkback” to Open File Manager:
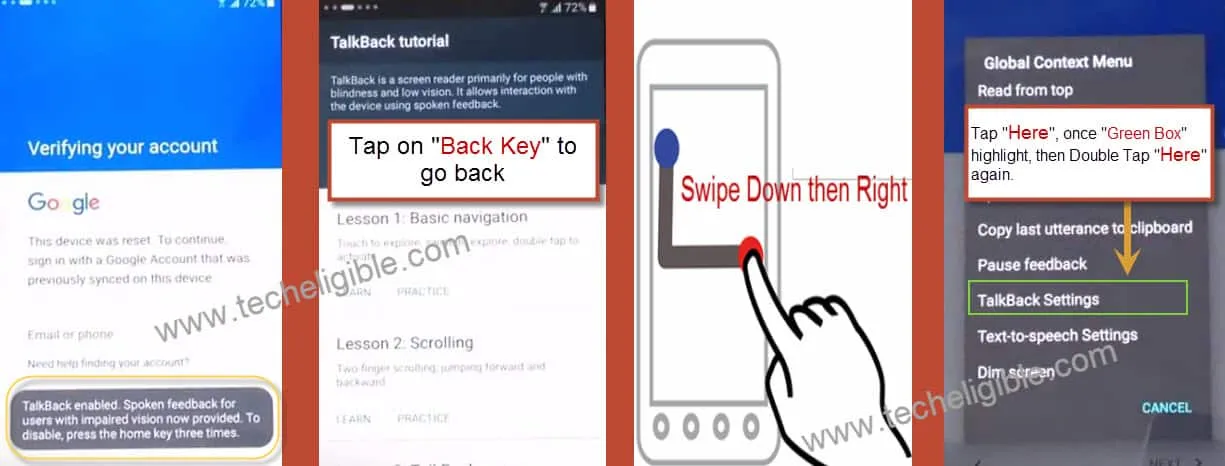
-Tap on “Home Key” 3 times to enable “Talkback” option. (You will see a popup of successfully enabled talkback).
-Wait few second, you will be redirected to “Talkback Tutorial”, from there tap on “Back key” to go back to “VERIFY YOUR ACCOUNT” screen.
-From “Verify Your Account” screen, “SWIPE DOWN then RIGHT” to go to “Global Context Menu”.
-Tap on “Talkback Settings”, once “Green Box appear there”, Double tap again on “Talkback Settings”.
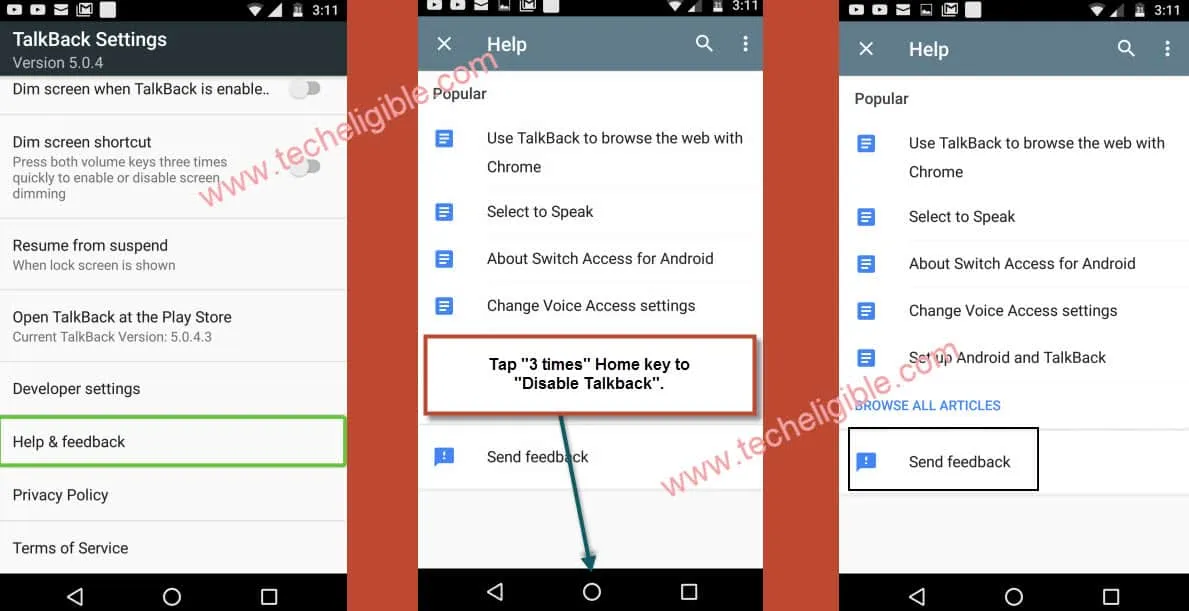
-From “Talkback Settings”, swipe up using your “2 fingers”, and tap on “Help and Feedback”, once green box appear there, then “Double Tap” on same help and feedback option.
Note: If you see “Youtube Update” screen, and you are unable to bypass this screen, for that you should follow this method to bypass youtube update screen.
-Now from “Help” screen, tap on “Home Key” 3 times to disable talkback.
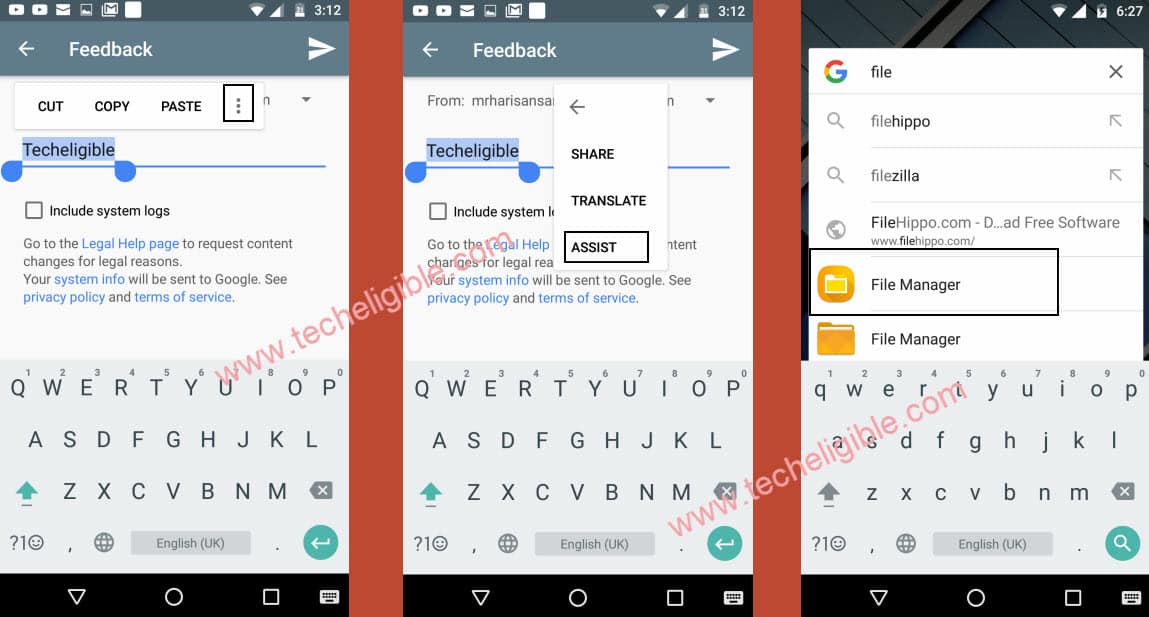
-Tap on “Send Feedback”, then type in search box “Techeligible“.
-Long press on your typed text, and (CUT, COPY, SHARE), tap on “3 dots” and select “ASSIST”.
-Tap on “No thanks” from google, then search there “File Manager“, and tap on “File Manager” to open it.
Install APK Files from SD Card:
We have already downloaded all apk files in SD Card from above 1st step, now we will install these apps for FRP Unlock on Samsung J7 and J7 Plus.
-Tap on “SD Card”, then install “Google Account Manager”, according to your android version.
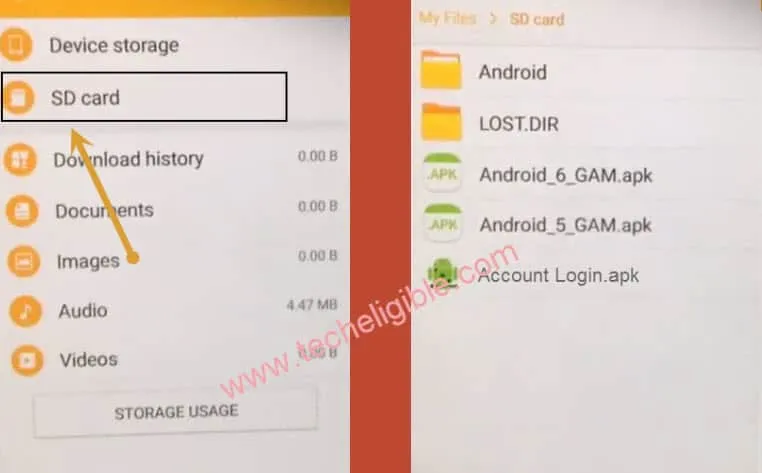
Remember: If you see “Installation blocked” error, then tap on “Settings” from popup, and then enable “Unknown Sources“.
-Go back to “SD CARD”, and install “Google Account Manager” according to your android version.
-Install “Account Login” and tap on “OPEN”, on installation done.
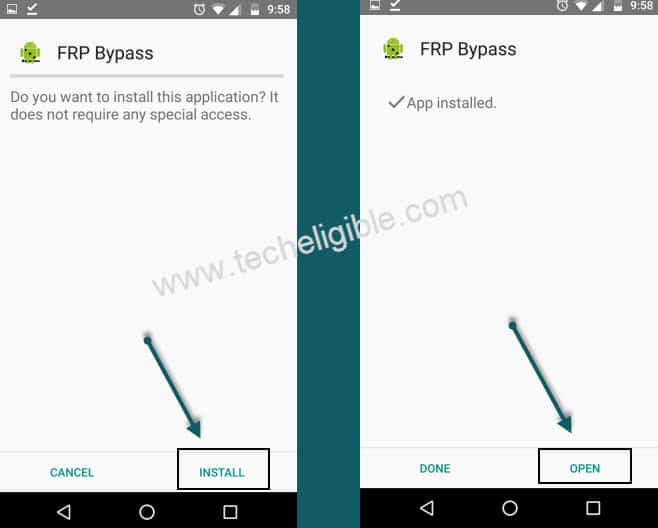
-Tap on “3 dots” from top right corner.
-Select “Browser Sing-in”
-Add your new “Gmail Account” there.
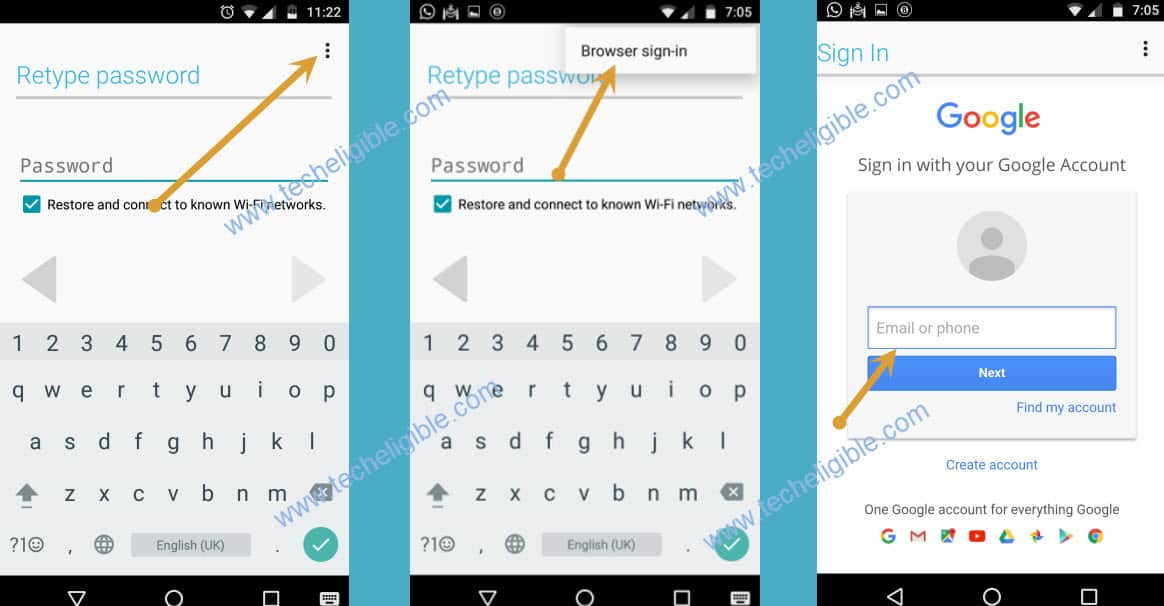
-Keep tapping on “Back key” till you reach “Verify Your Account” screen.
-Tap on “<” this symbol to back, then tap on “NEXT” and then “AGREE”.
-After that you will see “Account Added” on verify your account screen.
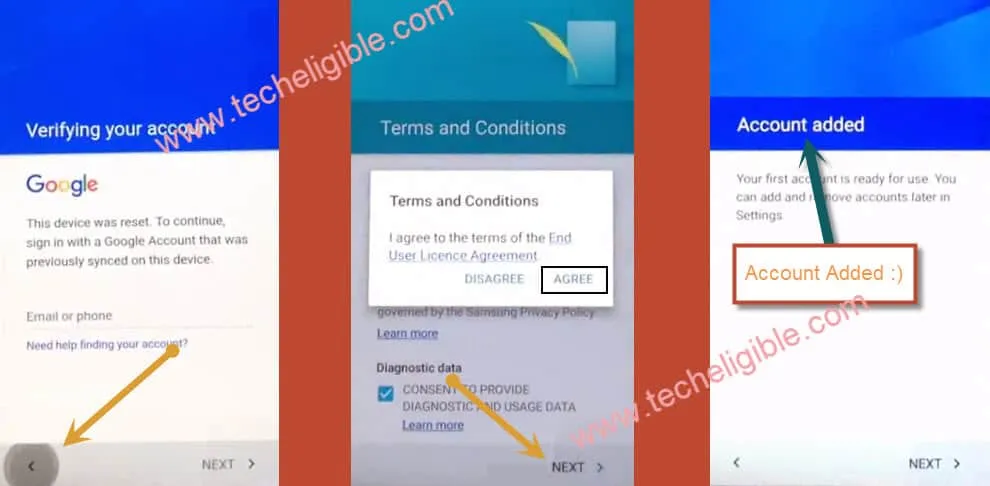
-Tap on “NEXT” from account added screen, and wait few minutes till “Date & Time” screen display.
-From Date & Time screen, tap on > Next > Not Now > un-check “Protect this device” > Skip > Skip Anyway > “∨” > Skip > “∨” > Next > Agree > Not Now > Next > Finish.
Method 5: Let Use Bluetooth Headset for Bypassing J7, J7 Plus FRP [Android 6]
You just have to make call via Bypass FRP Calling Software, and then tap on “Bluetooth” icon and connect your “Bluetooth Headset”, then you can easily open google chrome, and also download some applications in your Galaxy J7.
Note: This method is tested on Galaxy J7 (SM-J700F), Android version 6.0.1.
-Download Below Tools in PC
♦ Bypass FRP Calling Software [DOWNLOAD]
♦ Samsung USB Driver [DOWNLOAD]
Continue Procedure:
-Insert valid SIM card in your device.
-Install “Samsung USB Drive”, and “Bypass FRP Calling Software”.
-Make Galaxy j7 device is on “Verify your account” screen.
-Open “Bypass FRP Calling Software”.
-Now check what “COM” ports you are getting in your FRP Calling Software.

-Now Connect your Galaxy j7 device to PC/Laptop via Micro USB Cable.
-Click on “R” button from FRP Calling Software to refresh it, and select your “Galaxy j7 COM Port” number there.
Verify Your Galaxy J7 COM PORT:
-Right click on “My Computer” icon, Click on “Manage”, Click on “Device Manager”.
-Click on “Modems”, then click on “Samsung Mobile USB Modems”, then “Properties”.
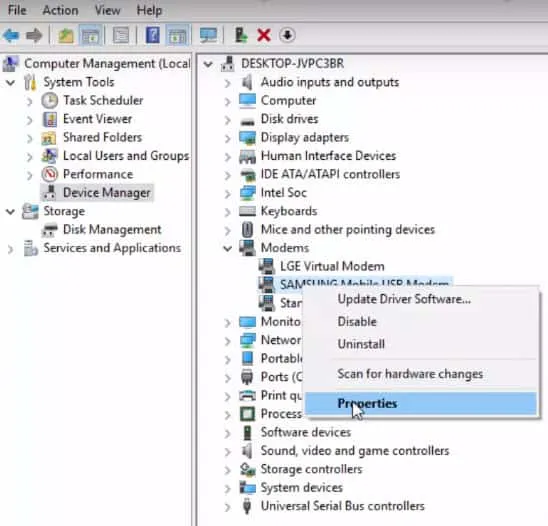
-Click on “MODEM” tab, now see what “COM Port” is appearing there, select same COM PORT in Bypass Frp Calling Software.

Make a Call to Customer Care Number from Galaxy J7:
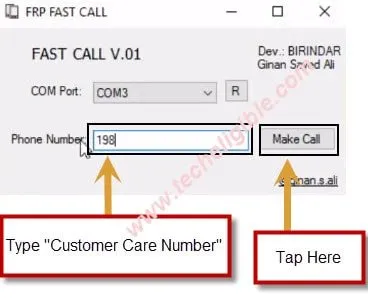
-Type “Customer Care Number” in your “Phone Number BOX”, and then click on “MAKE CALL” button.
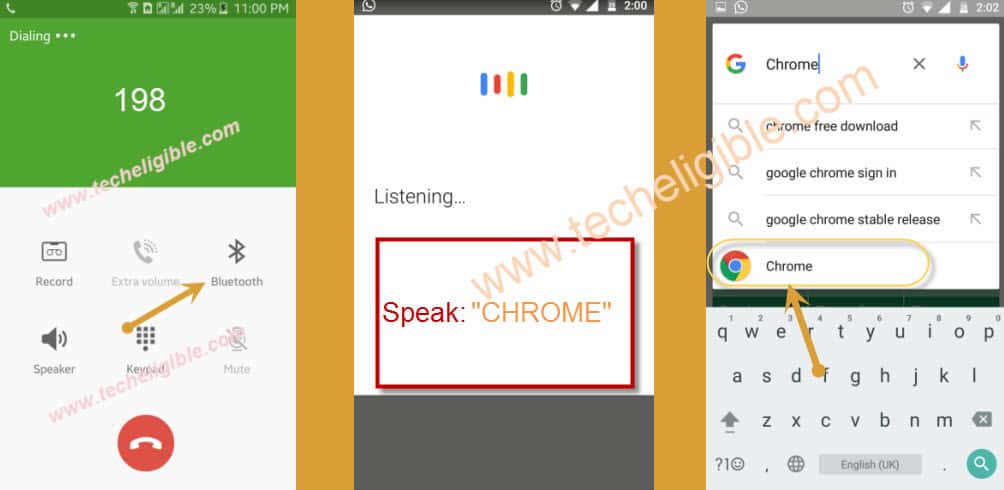
-Tap on “Bluetooth” icon, and connect your “Bluetooth Headset” with Samsung J7/J7 Plus.
-Once Bluetooth Headset connected, Long Press “Call Key” button from “Bluetooth HEADSET” to open “Google Search”.
-Speak there “Chrome”, then tap on “Search Bar”, then type there “Chrome” and tap on “Chrome” icon.
-From Welcome to Chrome, tap “Accept & Continue” and then “No Thanks”. Now you have opened Chrome Browser.
-Type in chrome search bar “Bypass FRP Application Files Techeligible“, open 1st search result.
-Download from there “Google Account Manager 6.x.x” according to your Android Version.
-Download also “Quick Shortcut Maker“, once downloading finish, you will have “OPEN” option bottom of your screen.
-Tap on “OPEN” to open download folder.
-Install “Google Account Manager”, then tap on “Done”.
-Install “Quick Shortcut Maker”, after installation finish, tap on “OPEN”.
Note: If you are getting “INSTALLATION Block” popup, tap on “Settings from popup“, and enable “UNKNOWN SOURCES“
-Type in search bar “Google Account Manager”, tap on google account manager to expand it.
-Select one google account manager that appears with “Type Email and Password”, then tap on “Try”.
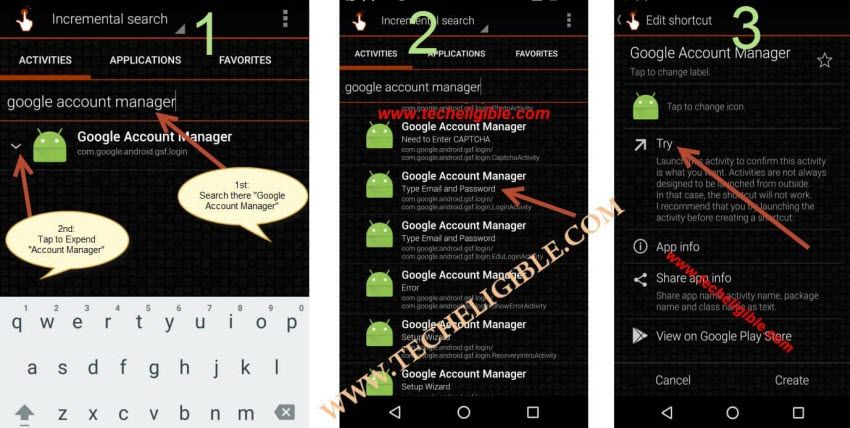
-Now from top right corner, tap on “3 dots”, then tap on “Browser Sign-in.
-Add your valid “Gmail Account” and setup fresh FRP with updated account.
Note: If you are unable to see “3 dots” Click here how to get 3 dots.
-Restart your device by pressing “Power button”, then tap on “Restart”.
-Follow below steps to easily bypass “Initial Setup”.
Tap on > Start > Next > Next > Agree > Next > Not Now > Uncheck “Protect this device” > Skip > Skip Anyway > Don’t Restore > ∨ > ∨ > Skip > Skip > Next > Agree > Yes > Next > Finish.
Read Also: