
The device owner can also face google verification screen while completing the setup wizard steps after factory reset the Samsung A52. You can go through this verification screen only by signing in back with your already synced Gmail account credential. If your google account is not being accepted there, that means, you are trying with the google account, that is not already synced. In this situation, you will have to look for a FRP Bypass method on your Samsung Phone A52/A52s Android 12/11/10.
Read Also: Samsung Galaxy A52 FRP Bypass [Android 10]
Why i am Stuck on Google Verification Screen?
The reason, you are unable to go through or bypass the google verification just because of, you are unable login back with the same google account, that was previously setup on this phone. Your device is on FRP lock protection with that Gmail account.
To fix up your device accessing issue, you can follow up 2 frp bypass guides from here on your Samsung Galaxy A52 device without any paid tool. In 1st frp bypass method, we will enable talkback function and open galaxy store app. From there, we will download and install (Alliance Shield x app for bypassing google frp. In the 2nd frp guide, we will use PC tool to launch chrome browser directly, after that, with the help of (Smart Switch) feature, we will copy Gmail account from other android phone ot our Samsung A52.
Disclaimer: This method is for educational purpose only, try this method only on your own phone, do not try this method on stolen phone, this is a serious crime, if you are trying to unlock stolen Samsung A52.
Method 1: Bypass FRP Samsung Galaxy A52/A52s By Alliance Shield App (Android 12)
-Turn on device, Connect WiFi, and go back to first homepage screen.
-Enable talkback by long press both buttons (Volume UP + Power) at very same time, and tap to “Use” from popup window.
Note: In case, if you are unable to turn on talkback, so try with long press both (Volume UP/Down) keys, if this works, then use these keys to turn on or turn off talkback instead of (Volume UP + Power), even then, if you are failed to turn on talkback, then you will have to use your PC to launch browser directly, for that click here to launch browser via PC.
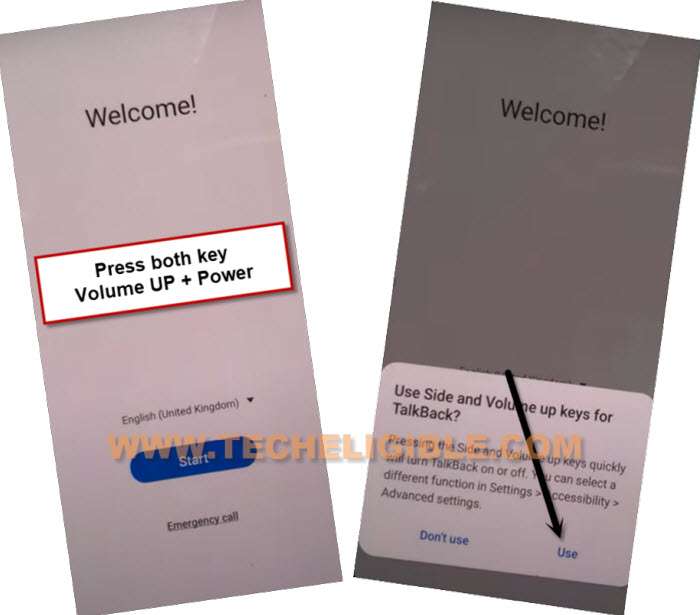
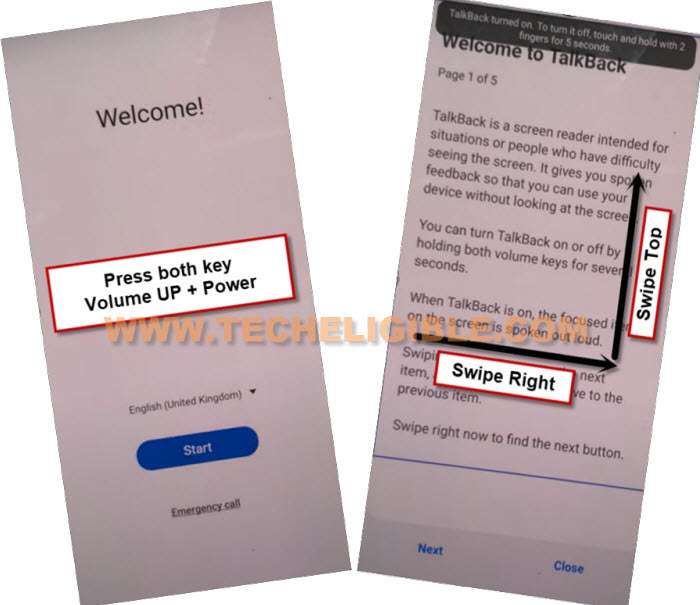
-Once again Long press both buttons (Volume UP + Power), this time the talkback feature will be enabled.
–Make “L” shape on screen by swiping from right to left, and then swipe top. (See below image).
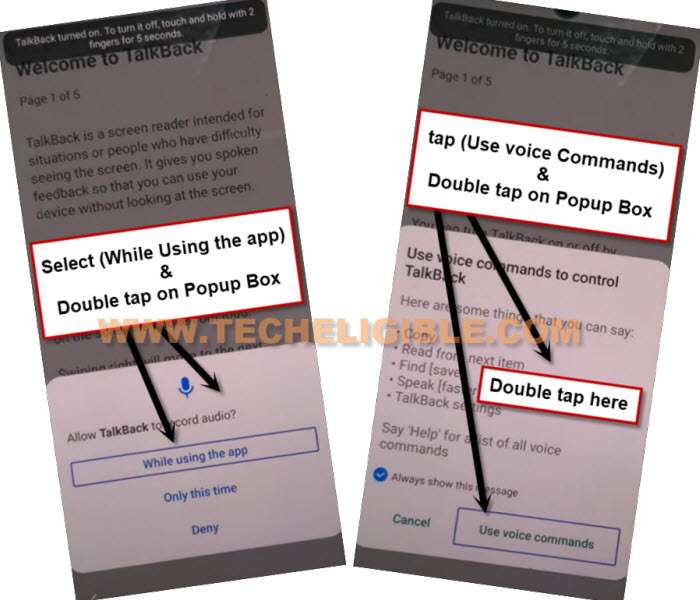
–From the popup window, select only “while using the app”, now double tap on anywhere on screen.
–Tap once and twice in a row on “Use Command Voice” option.
Go to Bixby App & Login with Samsung Account:
–Let’s speak very loudly (Open Google Assistant).
-You will be shown a (Welcome to Bixby) screen, just Press both (Volume UP + Power) keys at same to turn off talkback option.
-Sign with your already created Samsung account.
Note: If you do not have any Samsung Account, click here to create new acc.
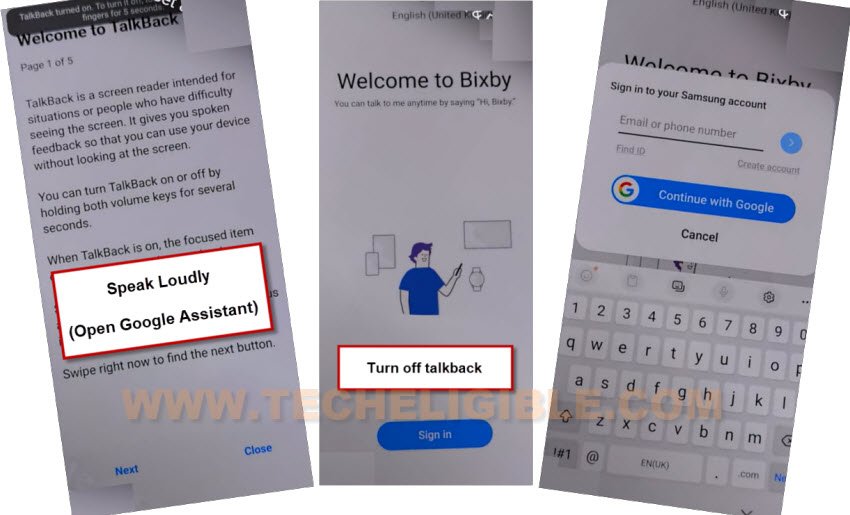
-Once the signing with Samsung account is done. You may face a popup screen of (Want a faster way to sign in). You just have to tap on “Cancel” option from there.
-After that, tap on > Start > Continue.
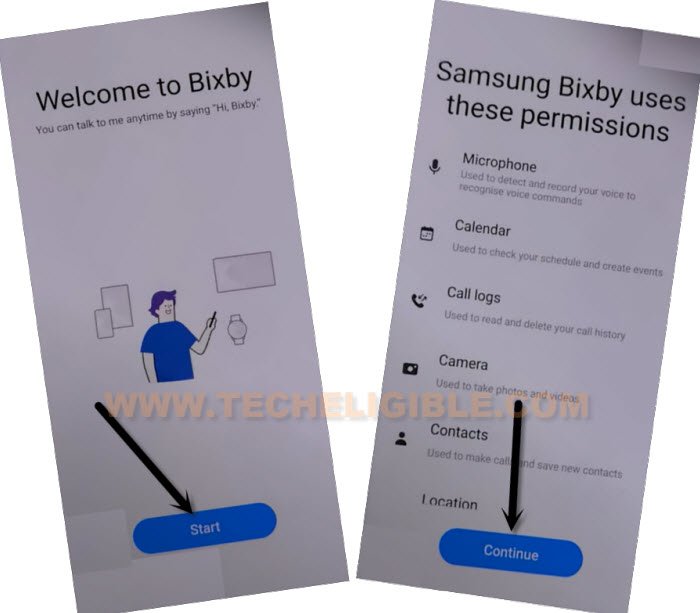
Go back to Welcome! Screen:
-Keep tapping on back arrow icon until you reach back to (Welcome) screen. From there, press and hold (Volume UP + Power) keys at the same time for 3 seconds to enable talkback function again.
-You will displayed (Welcome to talkback) screen. From there, double tap on “while using the app” option. After that, double tap at “Use Voice Commands”.
-Try to speak loudly “Open Galaxy Store“. If the galax store has opened successfully. Don’t follow below (Bixby) opening steps.
–(If the galaxy store did not open), then, speak loudly “Open Bixby assistant“. From bixby screen, go to > Continue > Continue. After that, you will have a popup window of Bixby assistant. Just speak loudly “Open Galaxy Store” from there.
-After you reach to galaxy store, let’s turn off talkback by pressing once the (Power button + Volume Up) buttons simultaneously.
-Once the talkback is turned off successfully, let’s tap to “Continue” option from galaxy store screen.
Install Alliance Shield App on Samsung A52/A52s:
-Search there “Alliance Shield X” application from galaxy store.
-Download & Install this app.
-Once installing process is done, just go to “Open” option. (See below image),
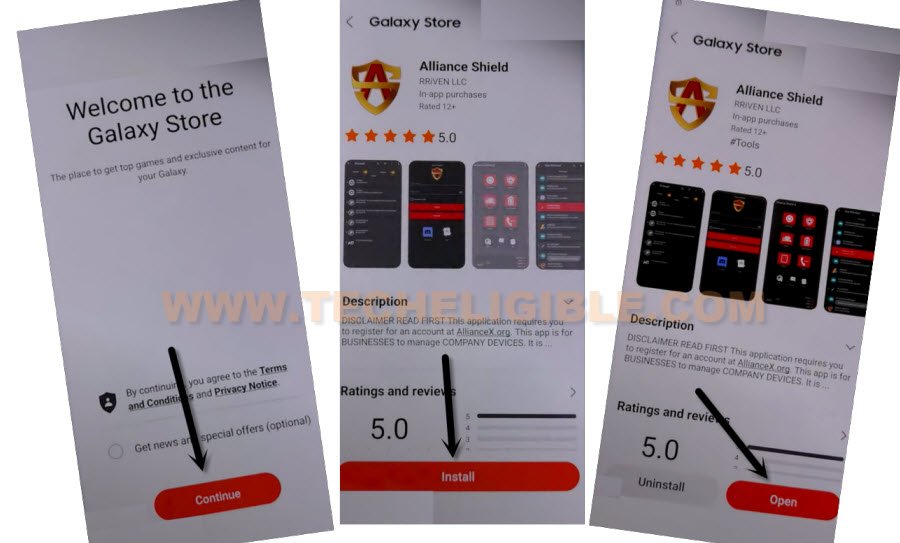
-Hit over the “Skip” option from alliance shield app page. After that, sign-in with your already registered alliance shield x app account.
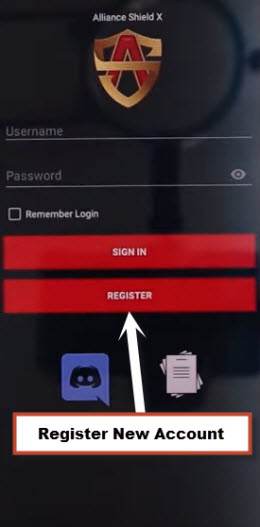
Note: If the alliance shield x account is not registered yet, you can register the account by tapping at “Register” option. After that login with registered account.
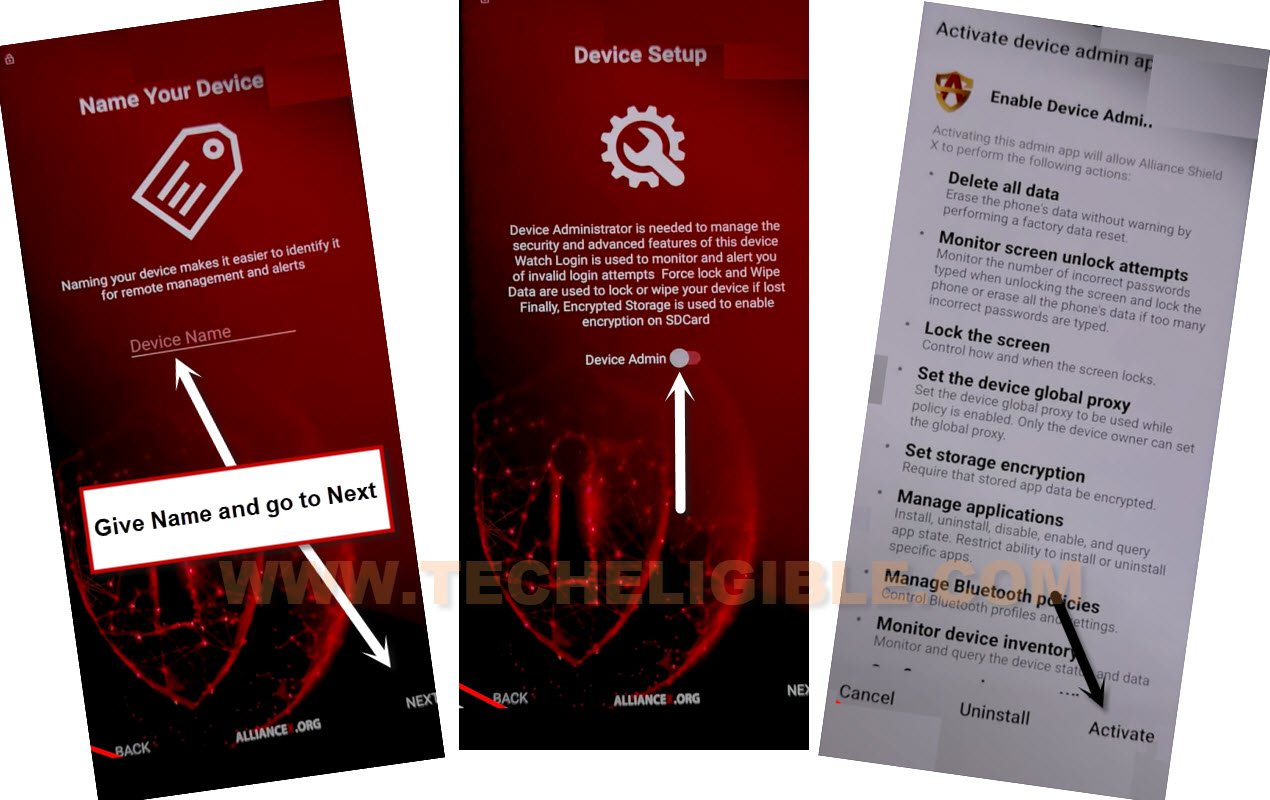
–Tap to > Next > Turn on (Device Admin) > Activate.
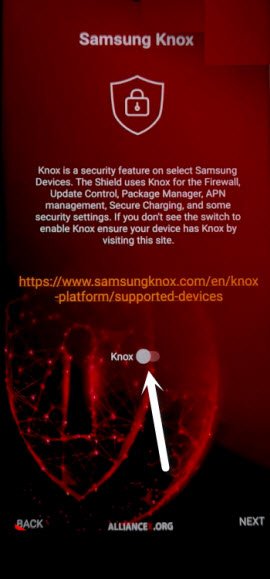
–Turn on (Knox) > Agree > Next > Finish.
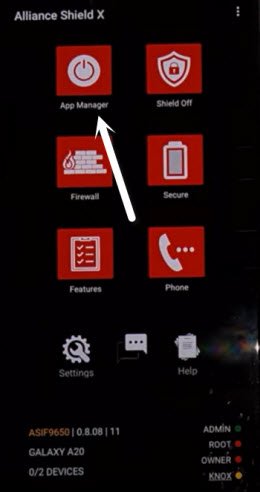
Go to App Manager from the App:
–From your alliance shield x app, just hit over the “App Manager” option.
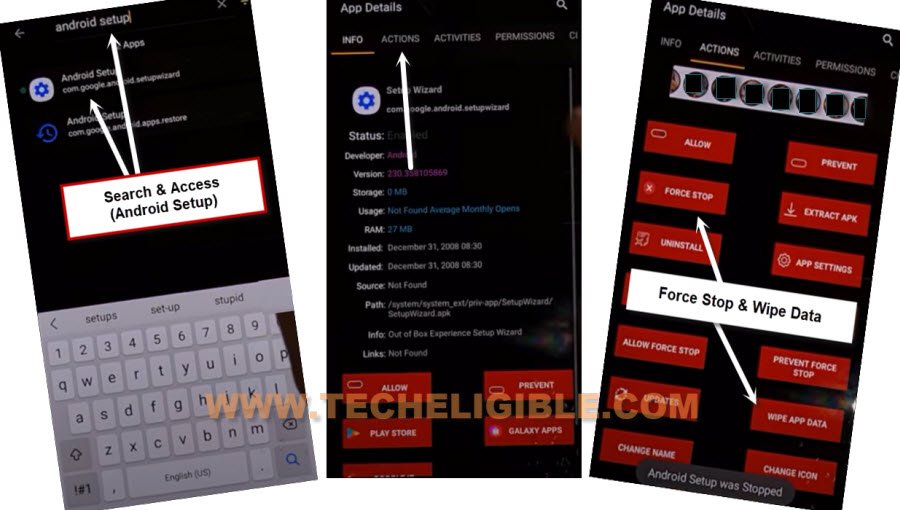
-Tap on “Search” icon from top corner, after that, search there “Android Setup”. Go to “Actions” from top bar.
-Hit on “Force Stop” option. After that, hit on “Wipe App Data”.
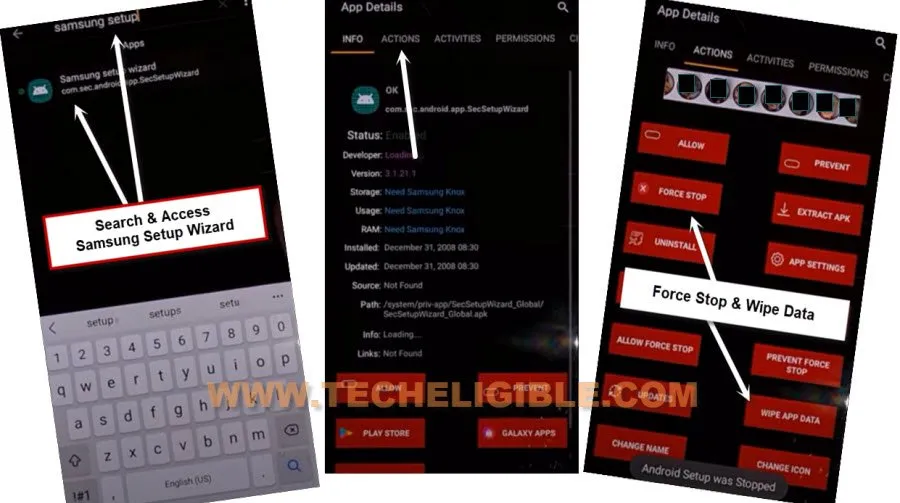
-Let’s get back searching page again, from top bar, search with “Samsung Setup Wizard”.
-Tap to “Actions” option again.
-Hit on a “Force Stop” option. After that, tap on “Wipe Data”.
–Go back by tapping on back arrow.
-We are going to disable google play services application. This is very important app in bypassing frp account form Samsung A52 phone.
-Let’s search and go to “Google Play Services” from the alliance shield app screen.
-Go to “Actions” option.
–After that, you have to hit on “Force Stop” option. Once the app is stopped successfully, just tap also on “Wipe Data”. This will wipe out forgotten google account as well.
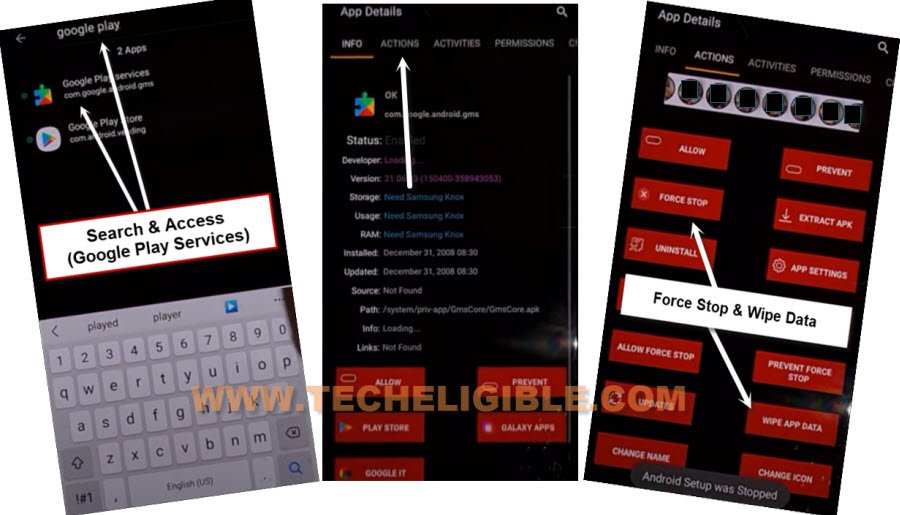
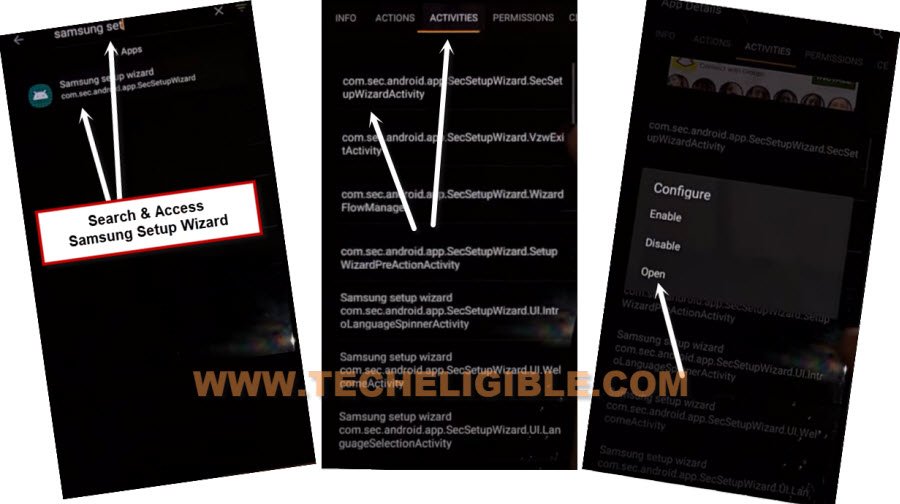
–Tap on the back arrow icon to go to back. From there, search and go to “Samsung Setup Wizard”.
–Tap on “Activities”, and then tap on 1st (com.sec.android.app….) same as shown in below image.
-A popup window will be displayed to you same as shown in below image, from there, go to “Open”.
-You have to wait for a while on a please wait…. page. Once its done, just go to > Skip > Finish. You will be redirected to your device main home-screen successfully.
-Your Samsung A52 phone is now logged with your already setup Samsung account. We have to factory reset our phone now from settings.
Factory Reset the Samsung A52/A52s After Bypass FRP:
-The device may respond you slowly, but, don’t feel hassle. Just, open up your Samsung A52 device menu. From there, go to “Settings”.
-After that, go to > General management > Reset > select Factory data reset.
-You will be asked to enter password of your logged in Samsung account. Enter your already logged account password there to continue factory reset process on the phone.
Method 2: Bypass FRP Samsung Galaxy A52/A52s (Android 11)
-Turn on device, Connect WiFi, and go back to first homepage screen.
-Enable talkback by long press both buttons (Volume UP + Power) at very same time, and tap to “Use” from popup window.
Note: In case, if you are unable to turn on talkback, so try with long press both (Volume UP/Down) keys, if this works, then use these keys to turn on or turn off talkback instead of (Volume UP + Power), even then, if you are failed to turn on talkback, then you will have to use your PC to launch browser directly, for that click here to launch browser via PC.
-Once again Long press both buttons (Volume UP + Power), this time the talkback feature will be enabled.
–Make “L” shape on screen by swiping from right to left, and then swipe top. (See below image).
–From the popup window, select only “while using the app”, now double tap on anywhere on screen.
–Tap once on “Use Command Voice” option, and again double tap on popup box.
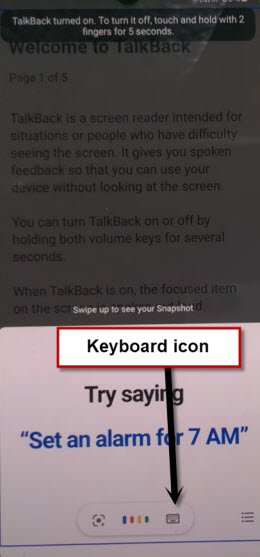
–You need to Speaking loudly (Google Assistant), and this will launch a google listening window for you.
-Turn off talkback by Long press both buttons (Volume UP + Power).
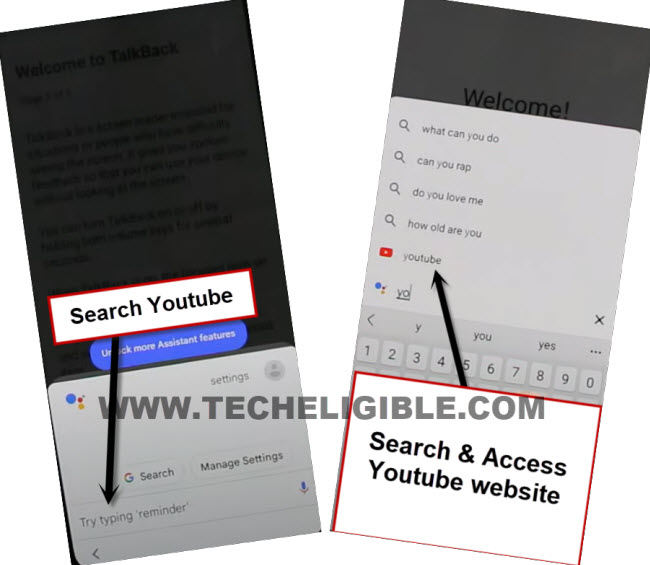
-Hit on “Keyboard icon”.
–Reach to Youtube official website just by typing “You”, and hit on “Youtube” icon.
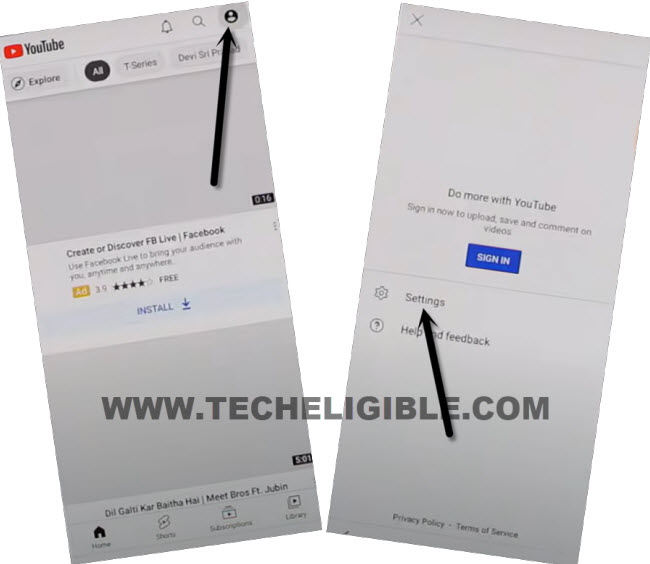
–Go to > Profile icon > Settings.
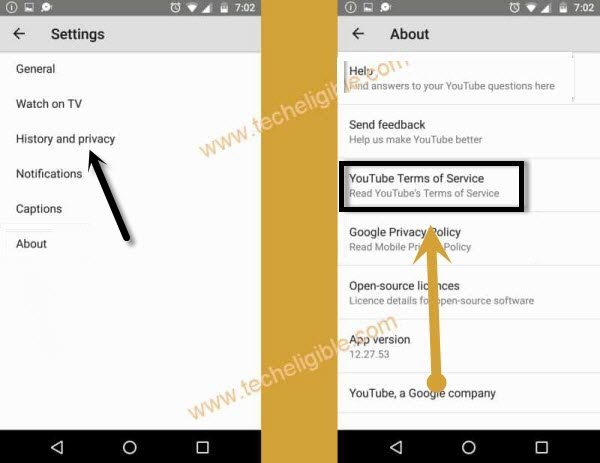
–Tap to > History and Privacy > Youtube terms of service.
–Go to > Accept & Continue > No Thanks.
Open Galaxy Store in Samsung A52:
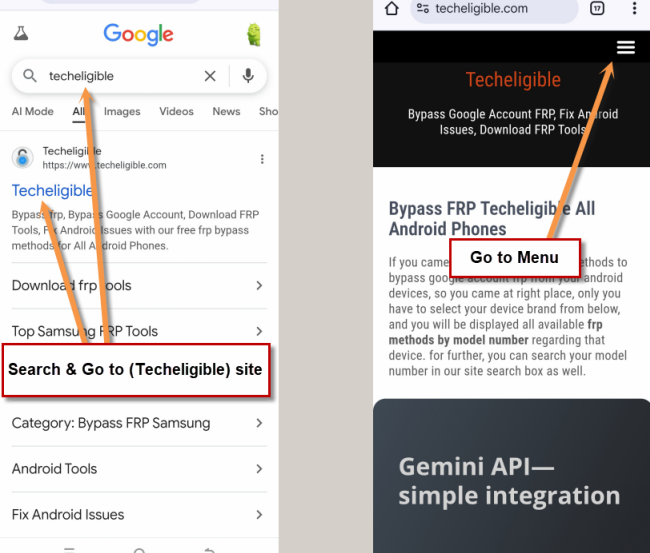
-Access to Samsung frp downloading page by searching in browser with “Techeligible“. After that, visit 1st searched result from there same as instructed in below image.
-Hit on “Menu” option from top corner of the site.
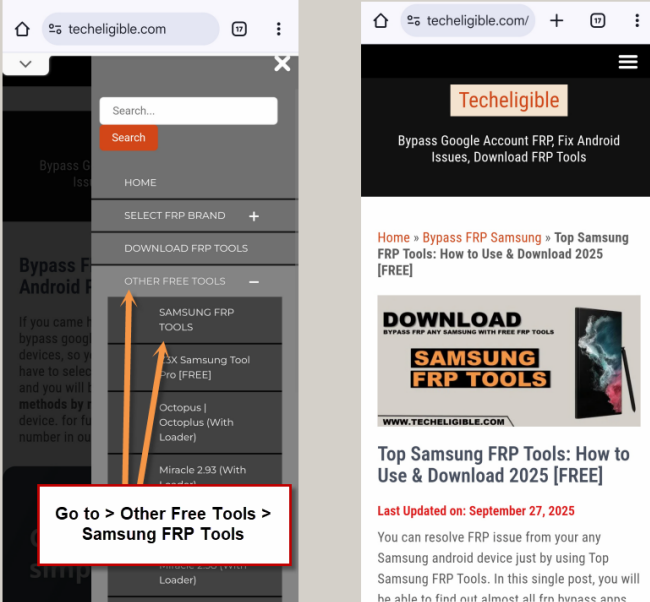
-You have to hit on > Other Free Tools > Samsung FRP Tools.
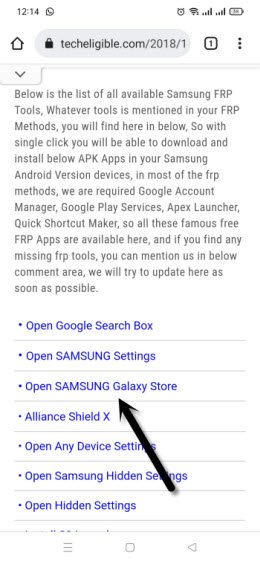
-Go down and tap on “Open Samsung Galaxy Store“.
–Check mark option “Get news and Special Offer”, and then tap to “Agree” button.
–Tap on “Update”, just wait, as soon as you see “Installing…” screen, just tap on “Back Arrow” from bottom left corner before the installing finish.
Note: Do not let installing.. process complete, just tap on “Back Arrow” as soon as you see “Installing..”.
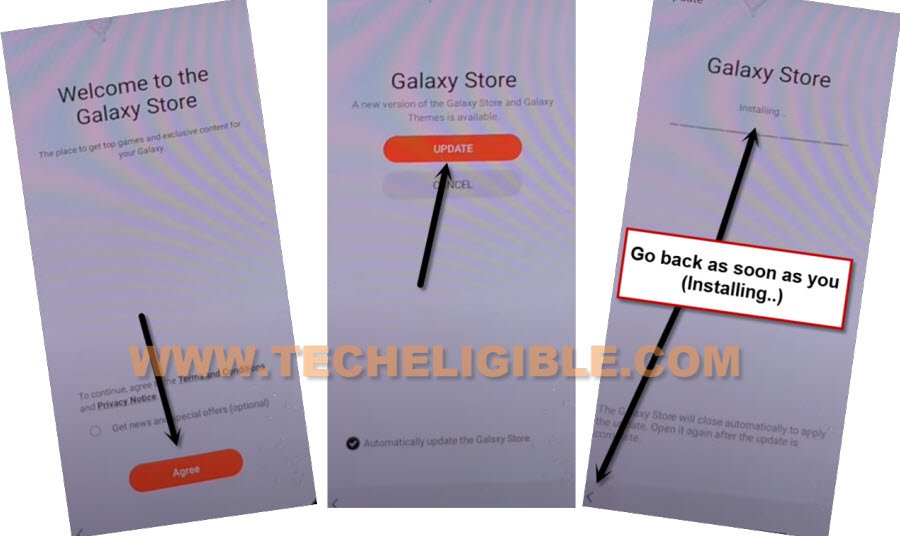
–You will see there galaxy store has opened, but wait for 1 minutes, you may could see again (downloading…) screen, if you see again, just wait there, hit again on back arrow as soon as you see “Installing….”, and you will get back to “frp tools” page.
–Tap again on “Open Samsung Galaxy Store” again, and this time without updating, you will reach inside Galaxy Store.
–Tap to > Continue > Skip.
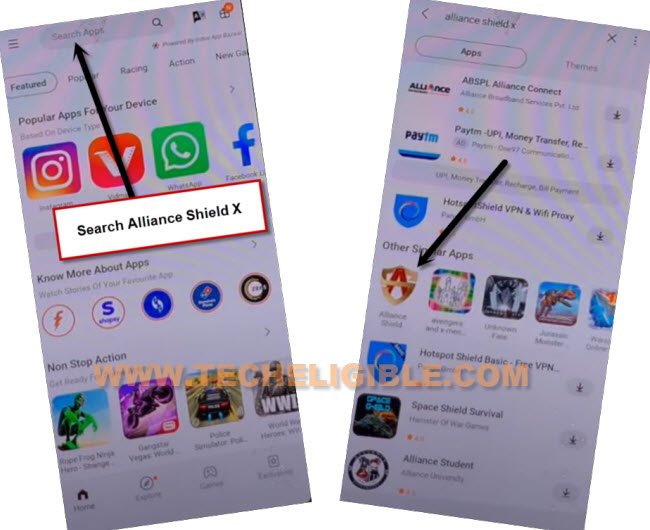
–Give some app permissions by tapping on > While Using the app > English.
–Type in search box “Alliance Shield X”, and then tap to “Alliance Shield X” app icon.
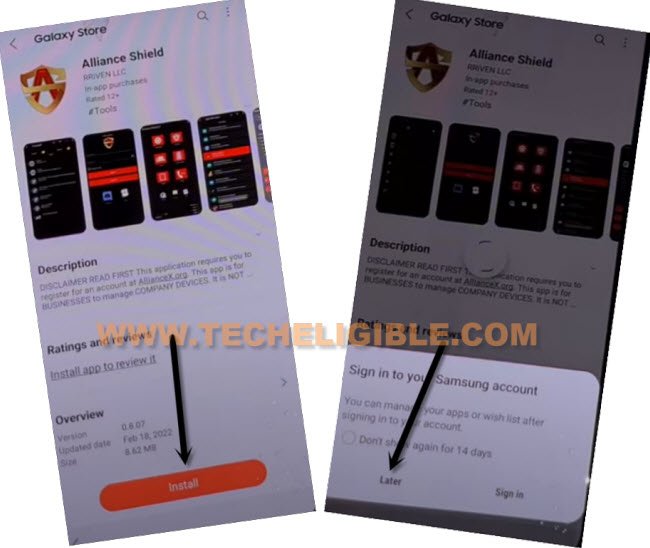
–Tap on “Install”, and hit on “Later” from sign in window to Bypass FRP Samsung Galaxy A52 without restore and Samsung Account.
–Tap to “OPEN” button to reach Alliance Shield X app, if you don’t have an account, so you can register new account by tapping on “Resister” option, otherwise just sign in.
Sign in into Alliance Shield X App:
-If you don’t have account, you can Register your new account in (Alliance Shield X) .
–Sign-in with your registered account in (Alliance Shield X) app, after that, give any device name, and tap “Next”.
–Turn on “Device Admin”, and hit on > Activate > Next.
–Turn on “Knox”, and select option (i have read and agree…), and tap to > Confirm > Next > Finish, now hit on “App Manager”, and then tap “Close”.
–Tap to “Search icon” from top corner, and search there “Mode”, and tap to “Service Mode” from list.
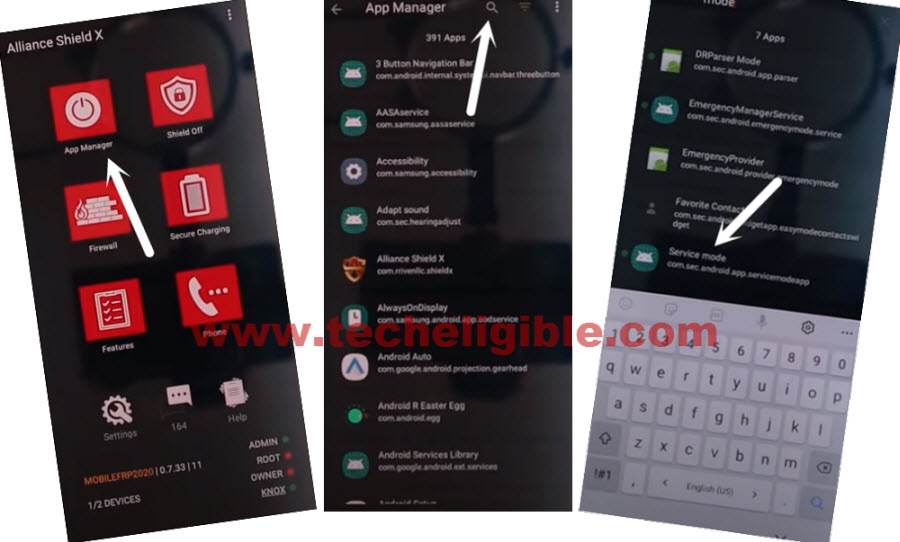
–From top tab, hit on “Activities”, go down and tap 3rd last option (com.sec.android.app.modemui.activities.usb.settings).
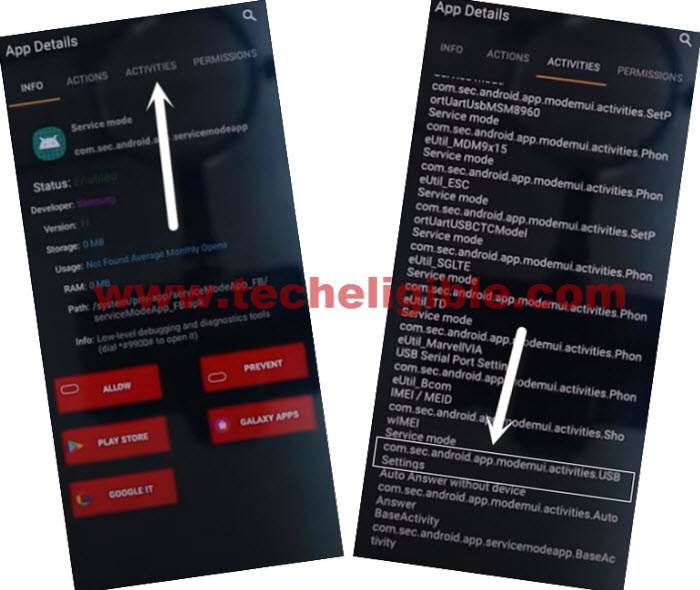
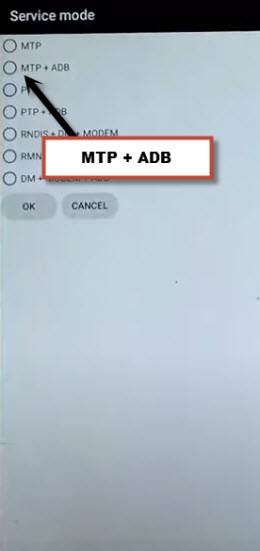
–Tap again on (com.sec.android.app.modemui.activities.usb.settings), and again hit on “OPEN”, and then select (MTP+ADB).
Note: If you cant enable “MTP+ADB”, you can easily enable that from outside, as soon as you hit on 3rd option from the last, you will see popup window, just tap on “Enable” option from there instead of “Open”.
Lets Bypass FRP Samsung A52:
-Download below Samfirm tool in your PC.
⇒ Samfirm Tool. V3.0 [DOWNLOAD]
–Open Samfirm tool in your PC.
–Connect Samsung device with PC using USB Cable, do make sure, your device is also connected with WiFi.
–Go to “Android Service” tab, and click on “Reset FRP” button.
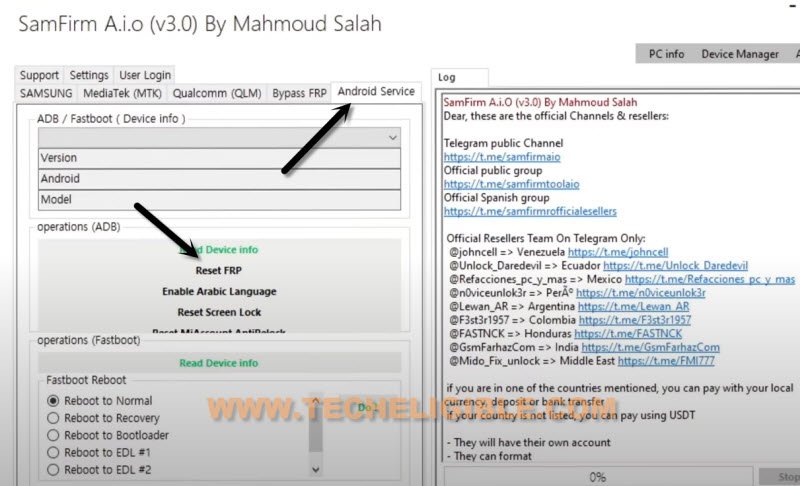
Note: You will have (Allow USB Debugging) popup window, just tap to “Allow” button from Samsung A52.
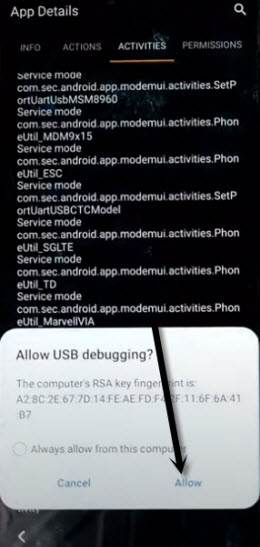
This is how you can easily bypass frp using this free method.
Method 3: Bypass Google Account Samsung A52 using Smart Switch App (Android 11)
Connect WiFi in your device, and then through a software, we will open chrome browser, through this way we can easily Bypass FRP Samsung Galaxy A52 Android 11, follow complete method, and we hope you will get your device back with new frp protection.
In some cases, people just add any random Gmail account, and after that, they just forget their adding Gmail account, they regret after they hard reset their device, because the device will get frp lock, and you can get through the google sign in screen until you enter previously added Google Account in Samsung Galaxy A52.
Note: This Method is only for Device Owner, and for educational purpose only, if you don’t own of this phone, you don’t need to apply to method to access this phone, otherwise we are not responsible for this act.
Tools Requirement:
Note: Download and Install below 1st and 2nd no tools in your PC.
1st: Latest Samsung USB Driver [DOWNLOAD]
2nd: Easy Samsung FRP Tools [DOWNLOAD]
3rd: PC or Laptop
4th: Any other Android Samsung Phone.
5th: OTG.
Let’s Begin to Bypass FRP:
-Start the process by connecting WiFi in your phone first.
-You need to Get back to first “Welcome”.
-Connect your Phone with PC using USB Cable.
-Install & Launch “Easy Samsung FRP Tool” in PC, and click on > Bypass FRP > OK.
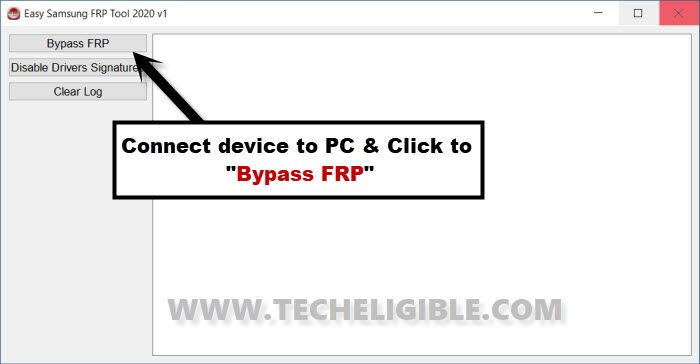
Note: if you find trouble in connecting the device with PC, first try few times on your own by connecting and disconnecting device, or also by restart the PC or Laptop, and do make sure you have latest Samsung drivers installed, even then if are unsuccessful in all your tries, you can use this alternate tool (Samfirm a.i.o v1.4.3) Just install and open this software, and click on (MTP Bypass FRP New) button.
-You will see easy firmware popup box on Galaxy Phone screen, just Tap on “View” for frp bypass from Samsung A52, Samsung A52s.
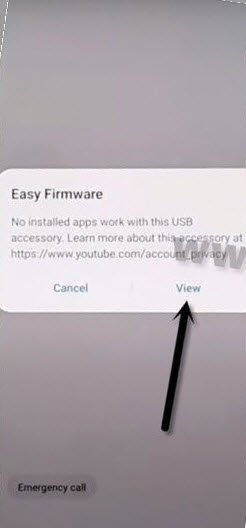
-From chrome window, just hit on > Accept & Continue > Next > No Thanks.
Go to Settings in Galaxy A52:
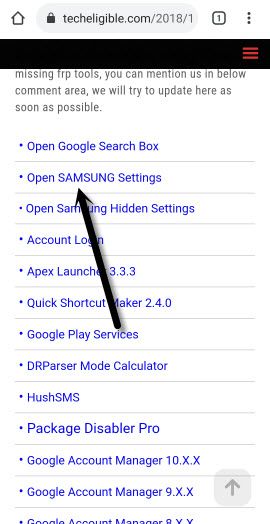
-You have to Search in chrome browser “Download Samsung FRP Tools“, go to same searched result as shown in below image to access Samsung frp tools page.
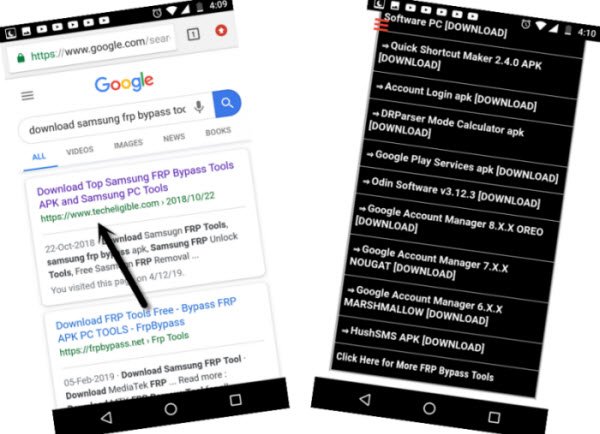
-Hit on “Open Samsung Settings“, this will get you in your device Settings.
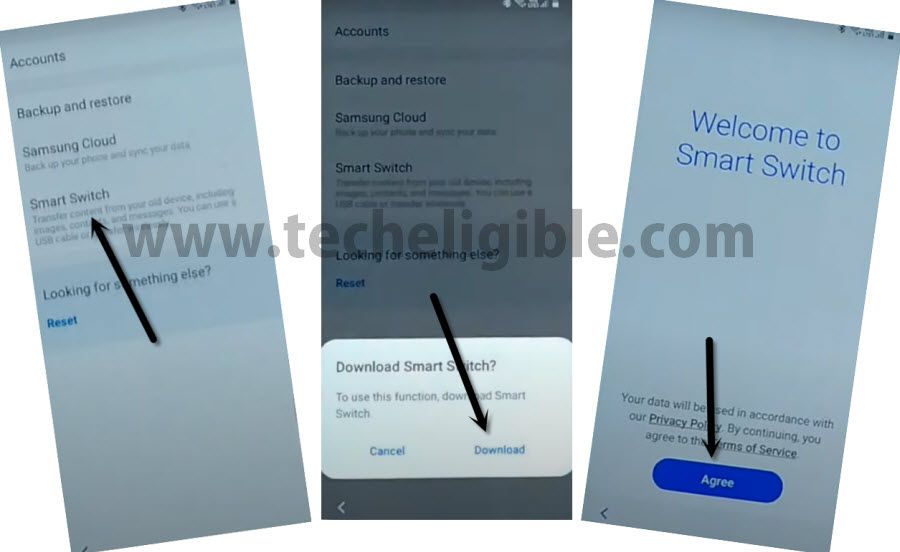
-From there, you need to tap on > Accounts & Backup > Bring Data from old device > Download.
-You should wait there until this downloading process completes, this will show you (Welcome to Smart Switch) screen, hit on > AGREE.
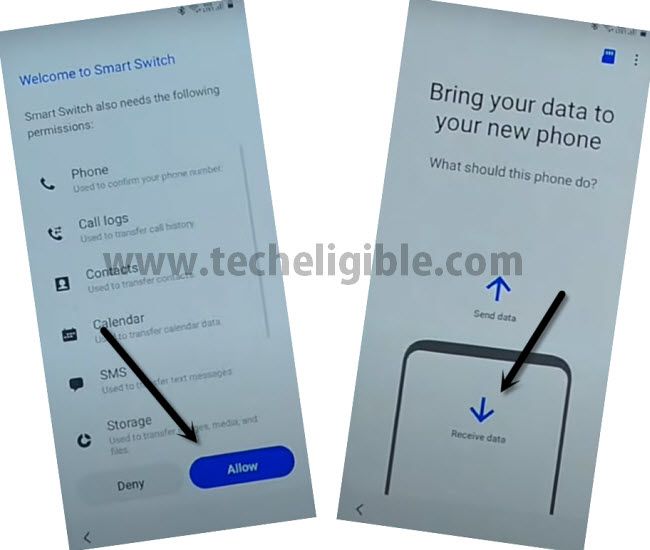
-Now go further by tapping at > Allow > Receive Data > Cable.
Open Smart Switch in Other Samsung Device:
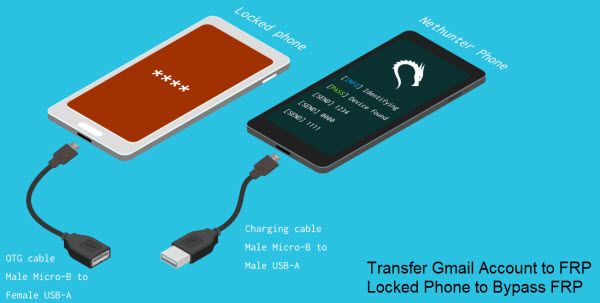
-What is Smart switch app?, this is the only app of Samsung Galaxy phone, which will allow you to share and transfer data between two Samsung Android Devices, so for connecting 2 android galaxy phones together, we use OTG and USB Cable, through this way, we can easily transfer already signed in Gmail Account from other Galaxy phone to our frp locked Galaxy A52.
-In other Android device, just Open “Galaxy Store”, download & open “Smart Switch” app from there, and tap on > Send Data > Cable.
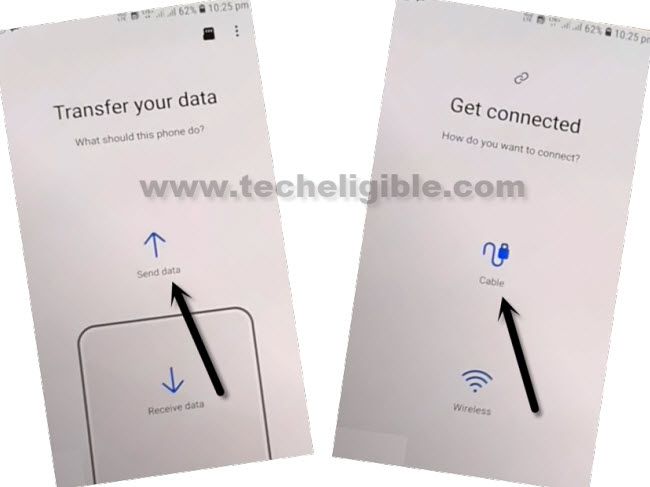
-We are going to Use OTG to transfer and receiving data, OTG should be connect to your “FRP Locked Samusng Android 11” device, and normal USB end will be inserted to other Samsung Phone to bypass frp account.
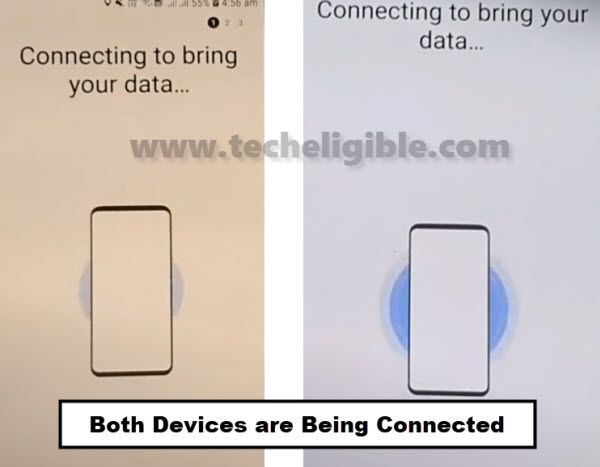
-On both of your device screen, you have to tap on “Allow”, both phone will start connecting each other, so wait for that process to be done.
Final Step to Bypass FRP:
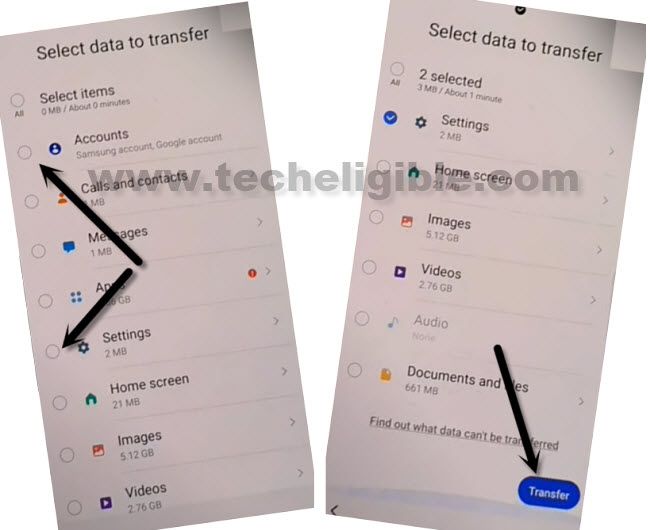
-De-select all, and select only (Accounts & Settings), after that tap on “Transfer” option.
-Now you need to tap on “COPY” from other Samsung Android Device.
-Select also in both device (Keep Screen on) option.
-Once the transferring data process done, that means you have successfully transferred Old Phone Gmail account to your Frp locked Galaxy A52.
-Tap on “Go to the HOME Screen” from frp locked device.
-Now, disconnect both phone and go for completing initial setup wizard in Galaxy A52.
FAQs About Samsung A52 FRP
Will i face again FRP lock on my Samsung A52 after factory reset?
No, you will not be locked out this time, because, your device has been signed-in with Samsung account.
Creating Samsung & Alliance Shield is free?
Yeah, you can create for both accounts in free with few steps. Just visit both sites official site and setup your new account just as you do with your fb account.
Are these legit frp bypass methods for Samsung A52 Phone?
Yeah, you can try on your own FRP locked Samsung A52 Android 11 device to remove frp account.
What is use of Smart Switch Application on Samsung Phone & How to bypass frp with this app?
The smart switch application is actually pre-installed app, that come in almost all Samsung galaxy phones. The uses of this app is to connect two Samsung phone together to transfer and receiving data easily. That is why, we can use this app in frp bypass steps to receive Gmail account and settings from other Samsung phone on our Samsung A52 frp locked phone.
Conclusion
We applied 3 frp bypass methods to remove frp from Samsung Galaxy A52 and Galaxy A52S 5G. In two frp bypass methods, we used galaxy store application to download and install (Alliance Shield x) application. With the assist of this app, we disabled google play services app and forced stopped some apps. After that, reached to Samsung Setup Wizard steps directly to complete start up steps easily.
After that, we simply factory reset from the settings of Samsung A52 phone using our logged Samsung account. There are total 3 methods available on Android 10/11/12. Choose any one by matching with the android version of your Samsung FRP locked phone.