
2 Ways to Remove FRP Samsung Galaxy A13 Android 12, 11
If you wanna remove frp from your device, so you can follow this method to Remove FRP Samsung Galaxy A13 Android 12, 11 Without PC with updated steps, you don’t required other Samsung device, or any other paid service, just use your any Samsung Account and access the device home-screen directly to setup new Gmail Account, follow steps below.
Warning: This method is only for device owner and for educational purpose only to bypass google account 2023.
| Method 1: Bypass Google FRP Samsung A13 [ANDROID 12] New |
| Method 2: Bypass Google FRP Samsung A13 [ANDROID 11, 12] |
Method 1: Bypass FRP Samsung Galaxy Android 12 (New)
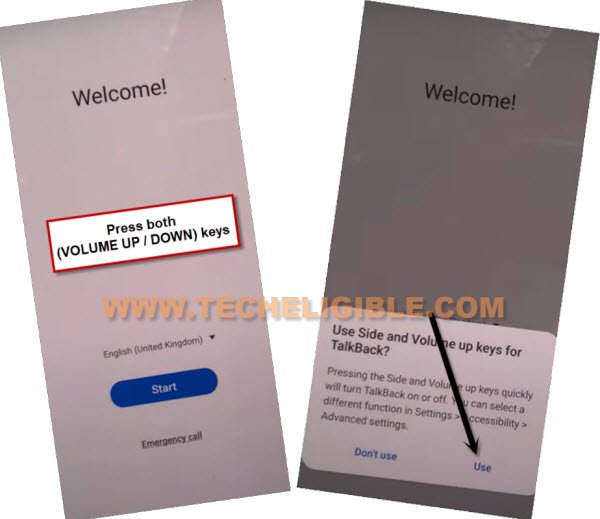
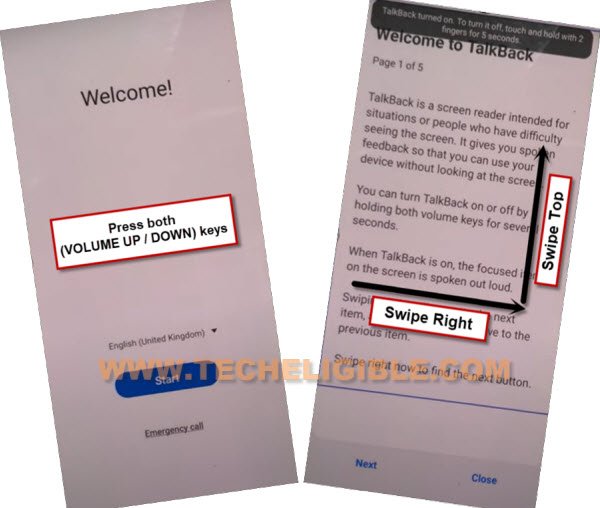
-Start this method by connecting WiFi, afterwards long hit on both (Volume UP + Down), and then double hit on “Use” to enable talkback.
Note: If you are unable to turn on talkback using (Volume UP + Down), then press (Volume UP + Power) keys.
-Let’s hold again both (Volume UP + Down) or (Volume UP + Power) keys, and then draw a reverse “L” same as shown in below screen shot.
-After that, from popup box, just double tap to “while using the app”, and then double tap on “Use voice Command”.
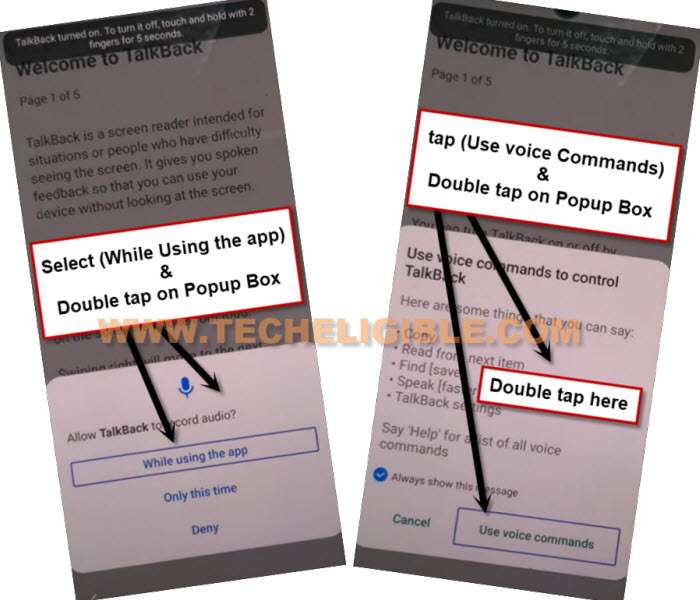
-As soon you see green border, so speak there loudly “Open Google Assistant”, and then double tap to “Keyboard icon”.
![]()
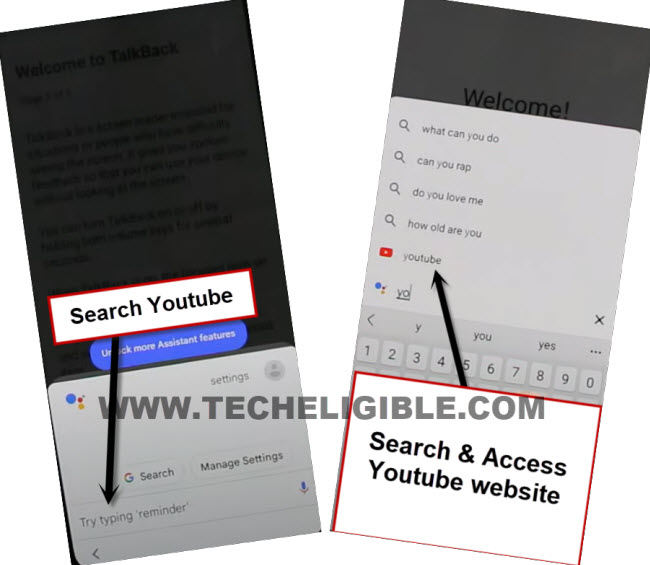
-Lets just turn off talkback by long press (Volume UP/DOWN) or (Volume UP + Power) keys, after that search there “Youtube”, and tap on “Youtube” from searched result.
Note: If you don’t see (Youtube) icon, just type “Youtube”, and tap to “Send” button from bottom right corner, you may see google search window again, repeat same process, tyupe “Youtbe”, and tap to “Send” button again.
-Afterwards, you will be redirected inside youtube official website.
-Tap “Profile icon” from top corner, and go to “Settings”.
![]()
-Go to > About > Google Privacy Policy.
-After reaching chrome browser, tap to > Accept & Continue > Next > No Thanks.
Lets Start to Download FRP Apps:
-Search in chrome browser “Download Samsung frp tools“, and visit our website searched result.
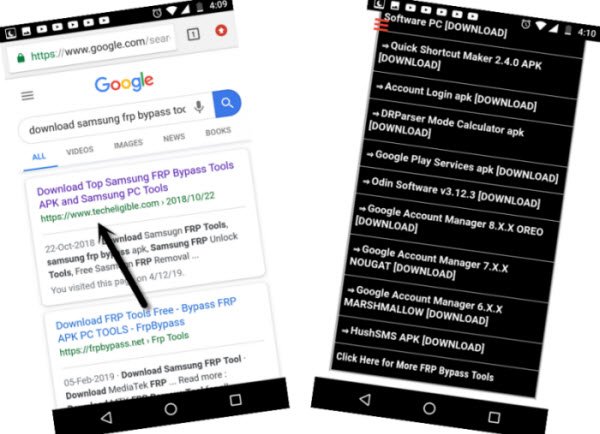
-Download from there below applications.
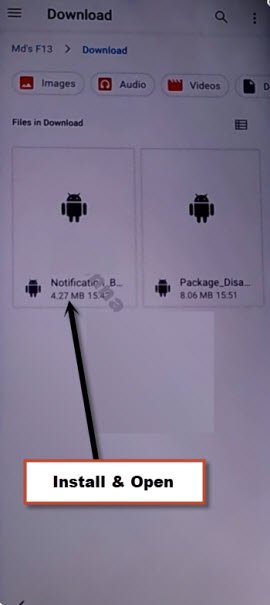
1/ Package Disabler Pro.
2/ Notification Bar.
-Now, we have download & install another app directly from galaxy store, this is very essential app to remove frp Samsung Galaxy A13.
-Tap to “Open File Shortcut App” from same frp tools page, and you will be redirected inside galaxy store.
-From there tap to “Install” button.
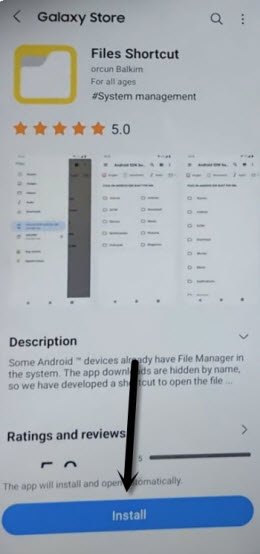
-But you are supposed to sign in with Samsung Account. (You can create your free Samsung Acc directly from Samsung website).
-Sign in with your Samsung account while installing an app.

-After installing successfully “Files Shortcut” app from galaxy store, just tap to “Back Arrow” from bottom left corner to get back to Samsung frp tools page.
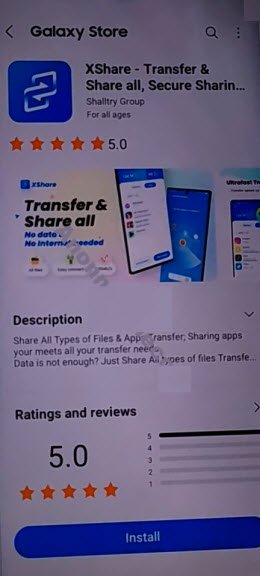
-Now tap on “Open XShare App“, and this is also required to be installed from Galaxy store.
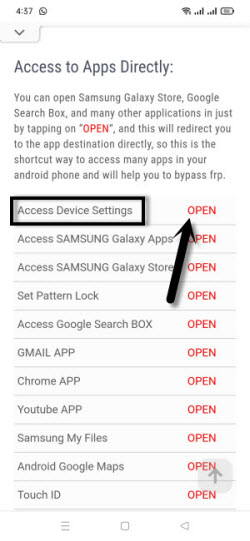
-After that, go back to “Download FRP Tools” page, from there tap to “Access Device Settings” link to reach directly inside your Samsung Galaxy settings.
-Scroll down, and go to > Privacy > Permission Manager > Files and Media.
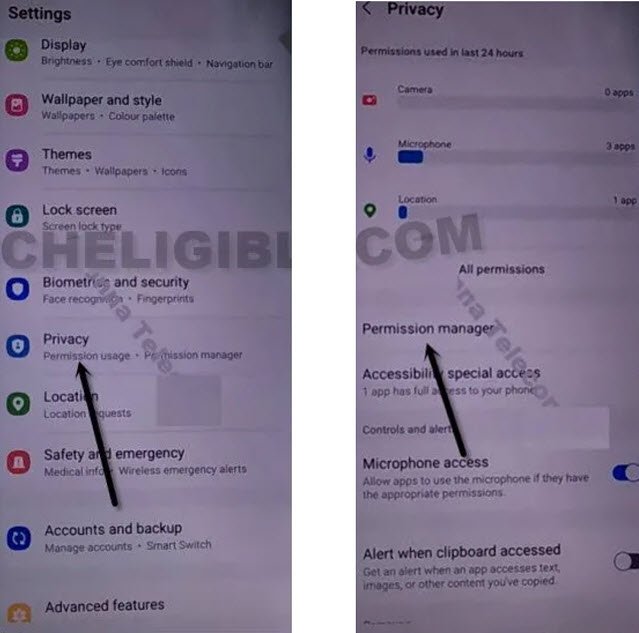
-Hit on “3 dots” from top right corner, and tap to “Show System”.
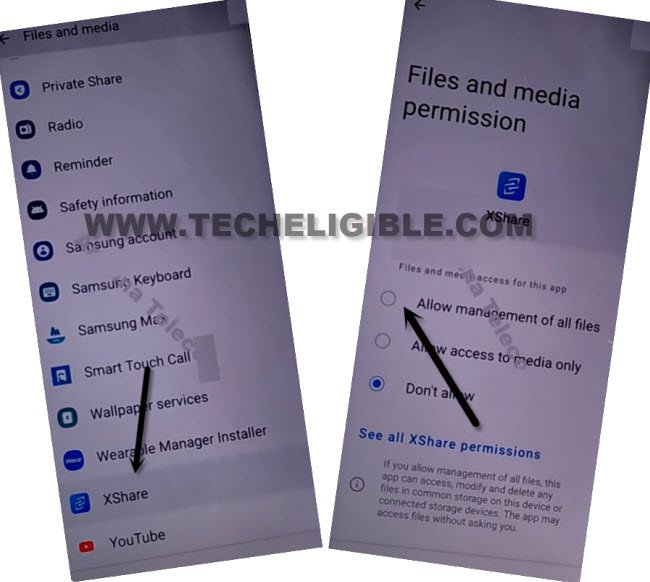
-After that, just go down, and hit on “Xshare” app from app list.
-Select “Allow management of all files”, and then hit on “Allow” from popup.
-By tapping on back arrow carefully, just get back to again “Download frp tools” page.
-From there, hit again on “Open Xshare App“, and hit on “Open” button from galaxy store to reach inside this app.
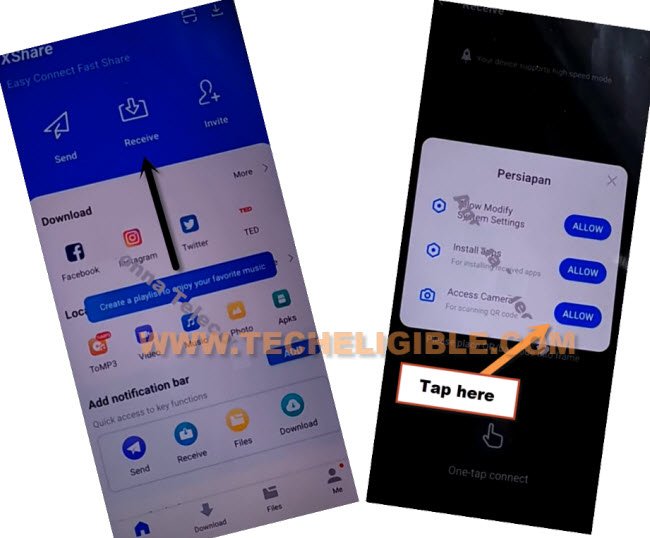
-Hit on > Agree and Continue > While using the app > Enter > Receive.
-From popup window, tap to 3rd option “Allow” from Access Camera, and then hit on “While using the app”.
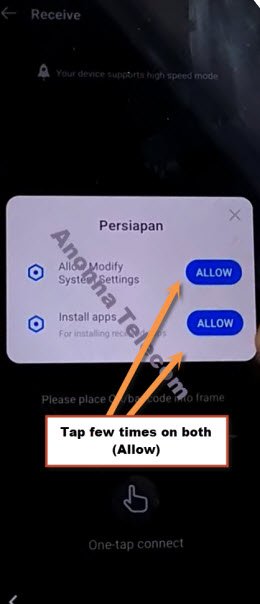
-Now, you will see there 2 option of “Allow”, so now hit 3 times on each (Allow) option.
-Go back by tapping (Back Arrow) from bottom left corner 2 times to reach back to (Xshare Galaxy Store) same as shown in below image.
-Search in galaxy store “File Shortcut”, and the tap to “Open” icon to launch this app.
-Hit on “Menu” icon from top left corner, and select your “Mobile Model” as storage.
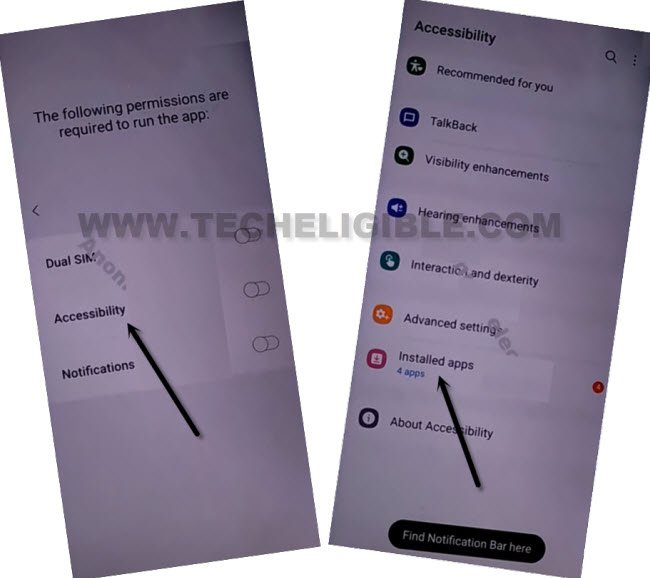
-Tap to “Downloads” option to reach inside the downloaded app folder, from there tap to > Notification Bar > Continue > Install > Open.
-Hit on > Accessibility > Installed apps.
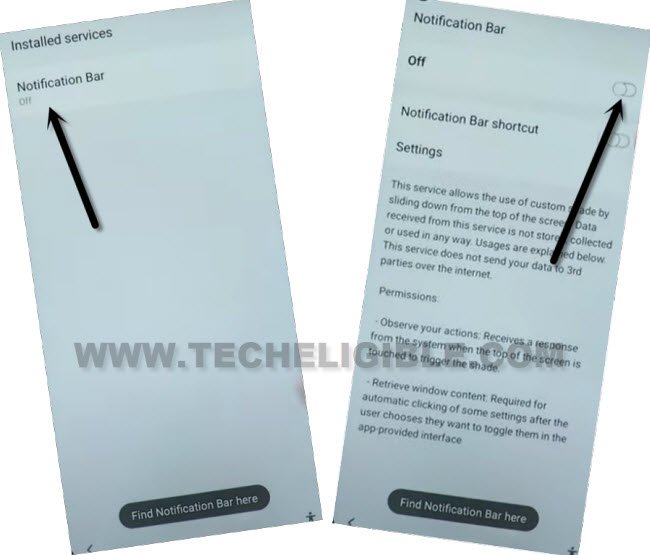
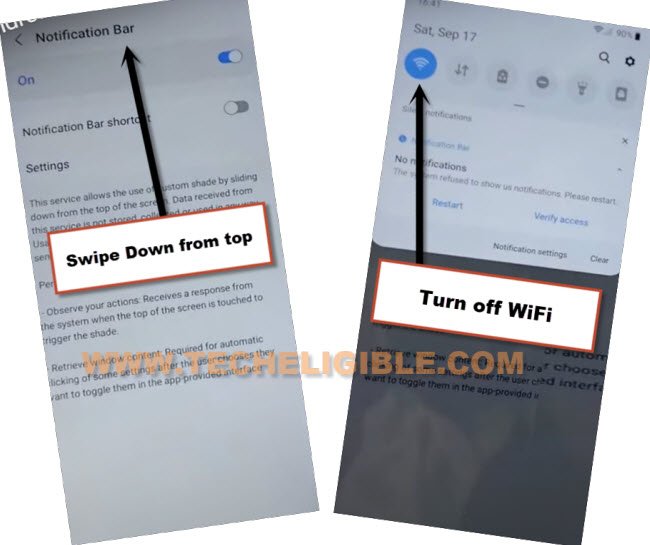
-Now hit on > Notification bar> Turn on > Allow.
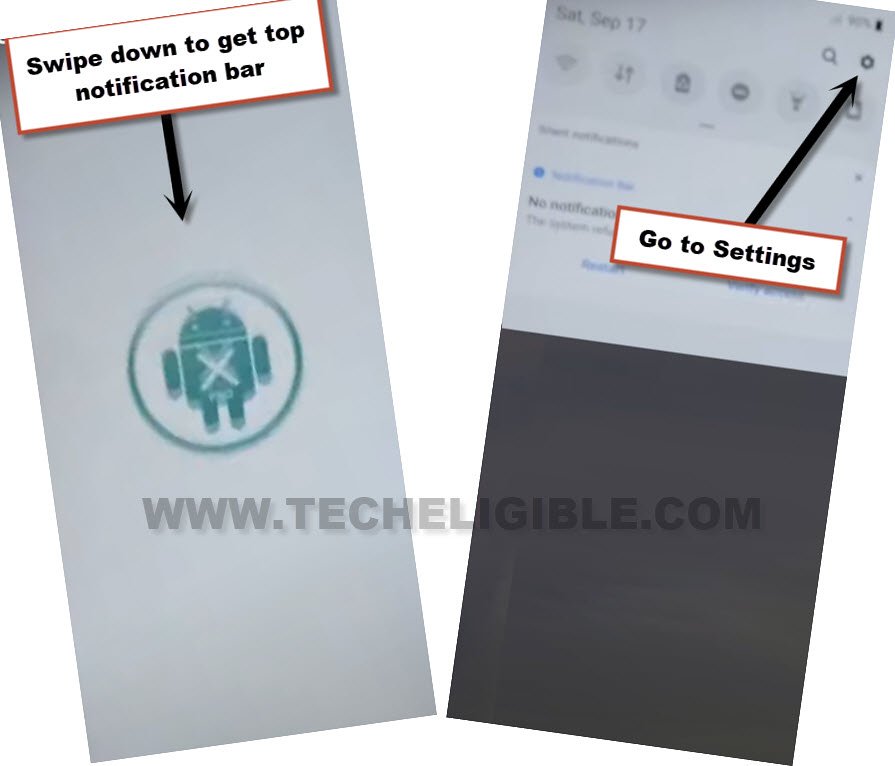
-Swipe down from top to get notification bar, and this will come out, now turn off “WiFi”.
-Tap 4-5 times on back arrow from bottom left corner to get back to download folder, where from we are gonna installed (Notification bar) app.
-Now tap to > Package Disabler Pro > Continue > Install > Open.

-Tap to “Allow”, and hit on white screen anywhere, the screen will just start blinking.
-Now you have to bring back (Notification) bar from top, and go to “Settings”.
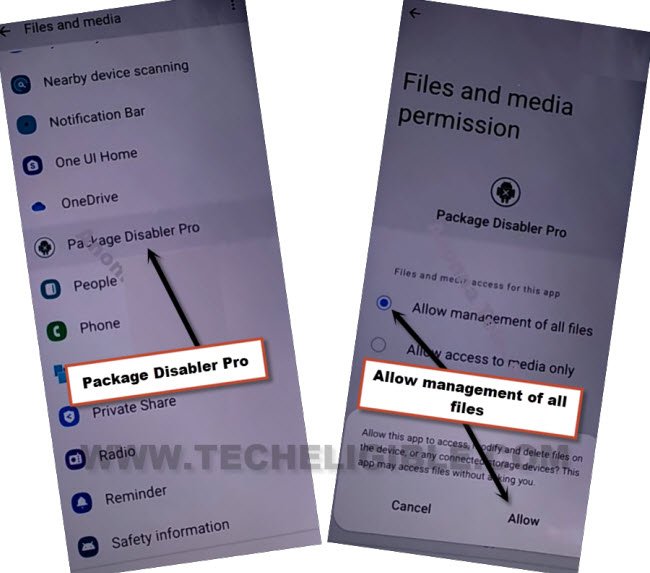
-Go to > Privacy > Permission Manager > Files and Media.
-Just go to “3 dots” from top corner, and tap to “Show system”, from the app list, just go to “Package Disabler Pro”
-Select “Allow management of all files”, and then tap to “Allow”.
-Tap to back arrow 2-3 times to reach back to “Settings” page.
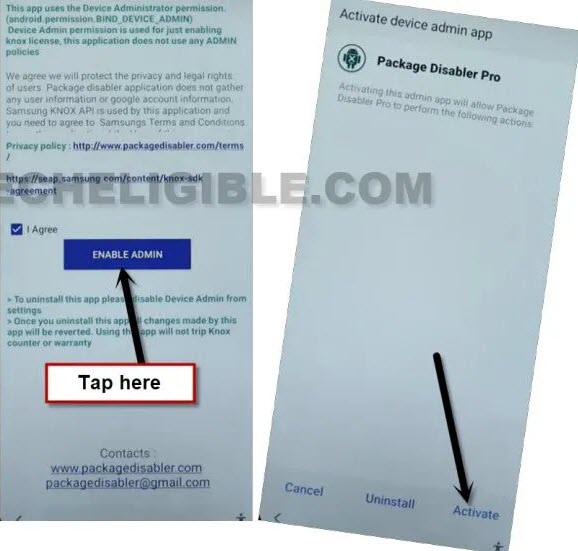
-Now tap to “Back Arrow”, and there you will have a same screen shown in below image, just hit on “i agree” option, and tap to “Enable” button.
-Tap to > Activate > Agree.
-Bring back notification bar, and turn on “WiFi” from there, and wait over there.
-Now hit on “Agree” button from package disabler pro app.
-There you will see a flash message of “Knox license validation completed successfully”, we did this all effort just to activate this somehow, once you done this, now we are only few steps behind from completely removing frp.
Final Step to Access Device HomeScreen:
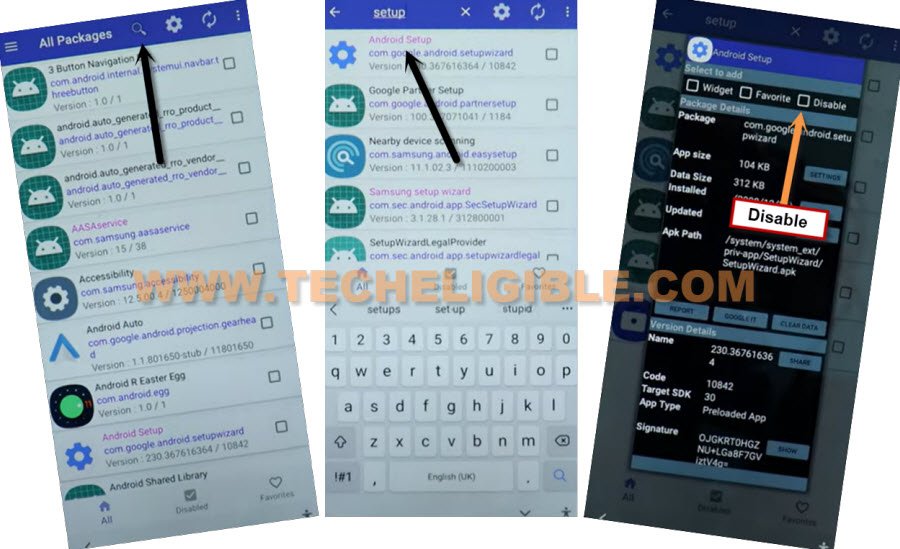
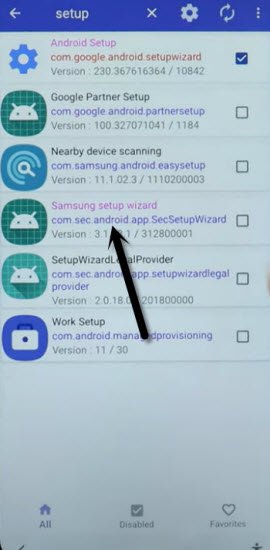
-Hit on “Search icon” from All packages screen, and Type “Setup”, and go to “Android Setup” from there, check mark top “Disable” option (Follow below image).
-type “Setup”, and go to “Samsung Setup Wizard“.
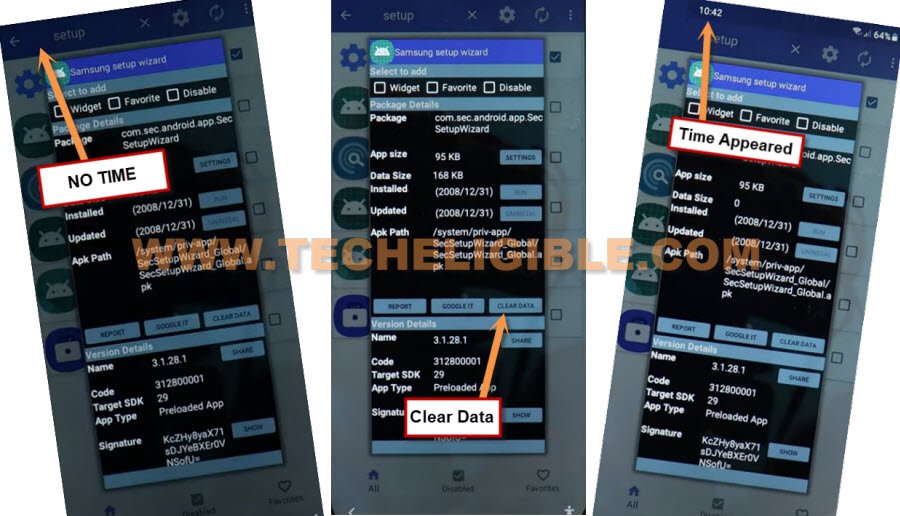
-Just tap on “Clear Data” button, and the time will start appearing up at top bar.
-Tap on back arrow 2 times, and wait, you will be redirected to Samsung Setup wizard screen, finish rest steps and access your Samsung Galaxy device homescreen, and don’t forget to setup your new google account & Security Lock.
Method 2: Remove FRP Samsung Galaxy A13 (Android 11, 12)
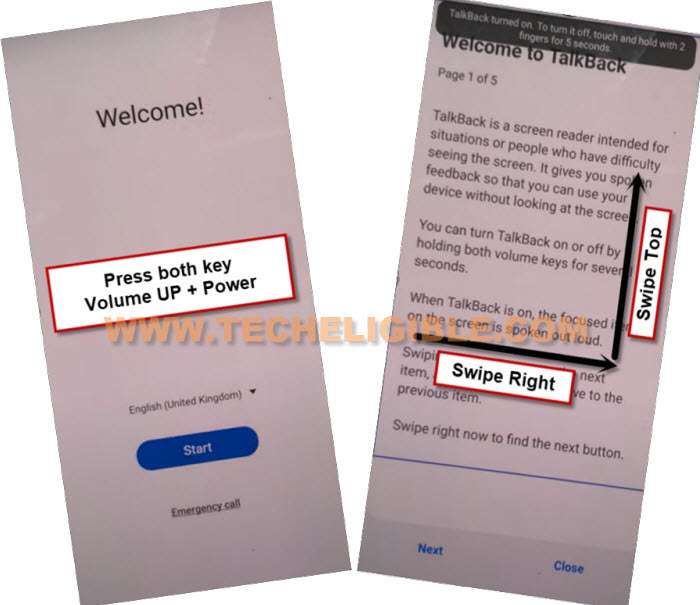
1. After connecting WiFi, go back to (Welcome) screen, and turn on talkback by long hold both (Volume UP + Power) buttons same time, and hit on “Use” option from popup box.

2. You have to long press again both (Volume UP + Power) buttons, and you will see popup flash message of (Talkback turned on….).
3. Make “L” shape by swiping on screen from right to left, and then swipe up having seen below image.
4. From the popup window, select only “while using the app”, now double tap anywhere on screen.
5. Tap once on “Use Command Voice” option, and again double tap on popup box.
6. Lets open google assistant by Speaking loudly (Google Assistant).
7. After having a popup window of google assistant, just long press both (Volume UP + Power keys) to turn off talkback.
8. Now tap to “Keyboard icon”.
![]()
9. Type “You”, and hit on “Youtube” icon to reach Youtube website.
10. From up-right, hit on “Profile icon”, and tap on “Settings”.
![]()
11. Go to > About > Youtube terms of services.
12. From chrome browser, hit on > Accept & Continue > Next > No Thanks.
Install Alliance Shield X app:
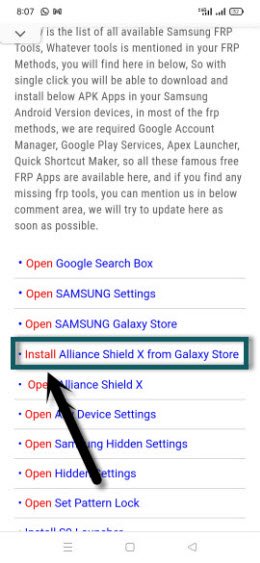
13. Search in browser “Download Top Samsung FRP Tools“, and go to our website searched result same as shown in below image.
Note: If your device is on latest security patch level, and you are unable to bypass frp with below steps, would recommend to try this new method for Bypass FRP Galaxy Android 12.
14. Scroll down, and tap on “Install Alliance Shield X from Galaxy Store”.
15. You will be redirected inside Galaxy Store, from there hit on > Continue > Install > Open.
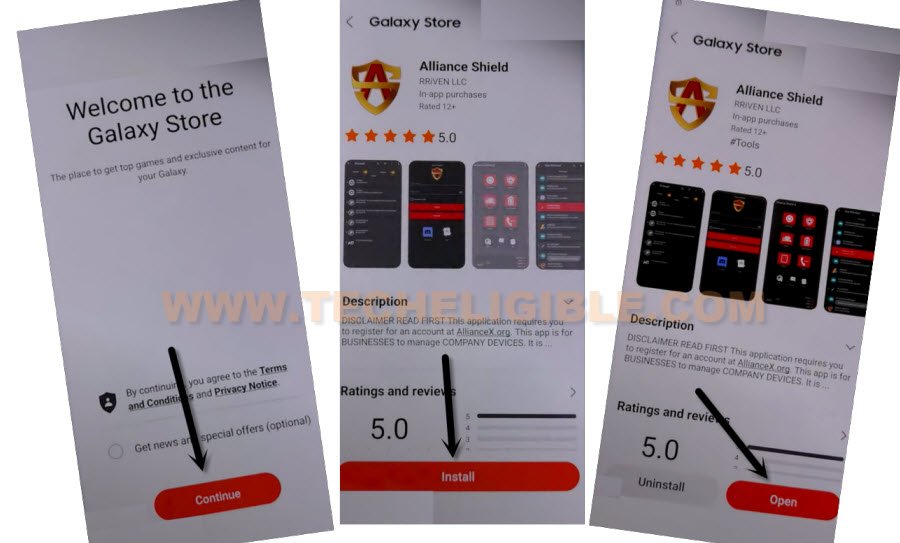
16. Once you reach to Alliance Shield X app, tap to “Skip”.
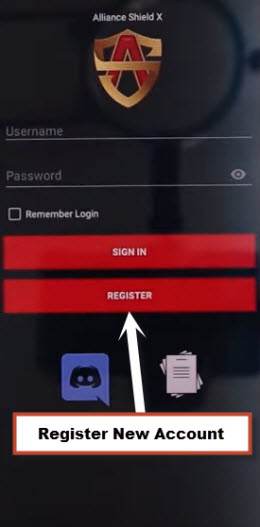
17. If you have registered your account already, so sign in there with your account, otherwise create your free account in (Alliance Shield X) app by hitting on (Register) button.
18. Tap to > Next > Turn on (Device Admin) > Activate.

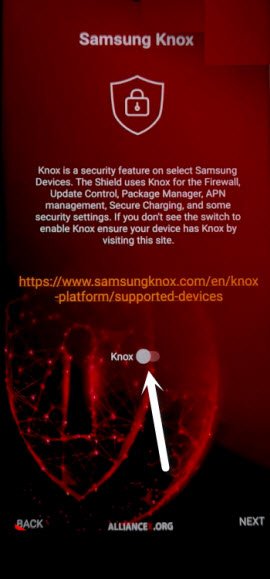
19. Turn on (Knox) > Agree > Next > Finish.
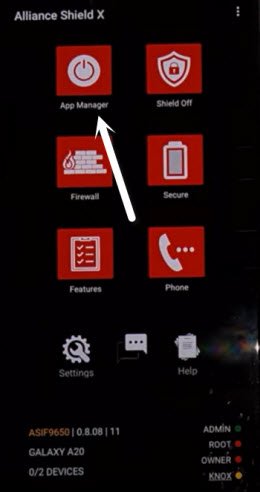
Stop Some app through Alliance Shield X:
20. Tap on “App Manager”.
21. You will have a (Search icon) at up-right corner, just tap on that.
22. Search & Tap on “Android Setup”, and tap on “Actions”.
23. Force Stop & Wipe Data from there.
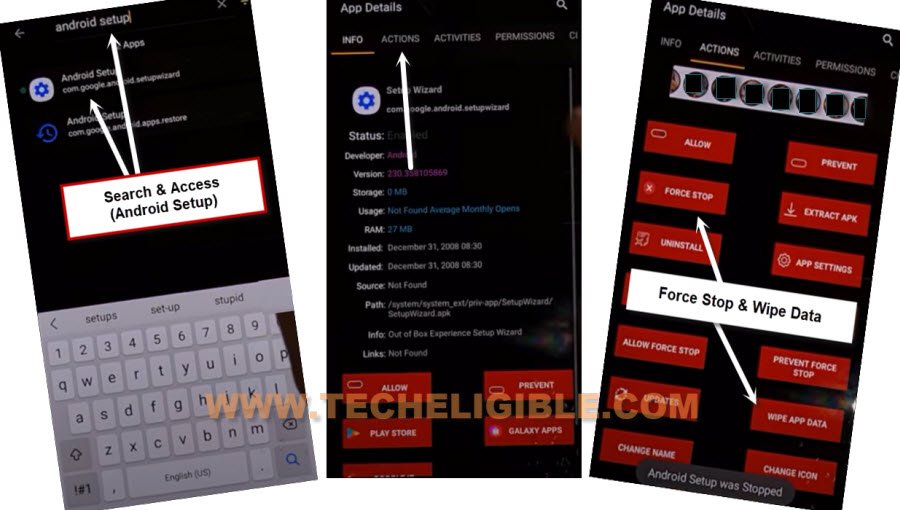
24. Go back by tapping on back arrow.
25. Type in search area “Samsung Setup Wizard”, and go to “Actions”.
26. Hit on “Force Stop”, and after that, tap on “Wipe Data”.
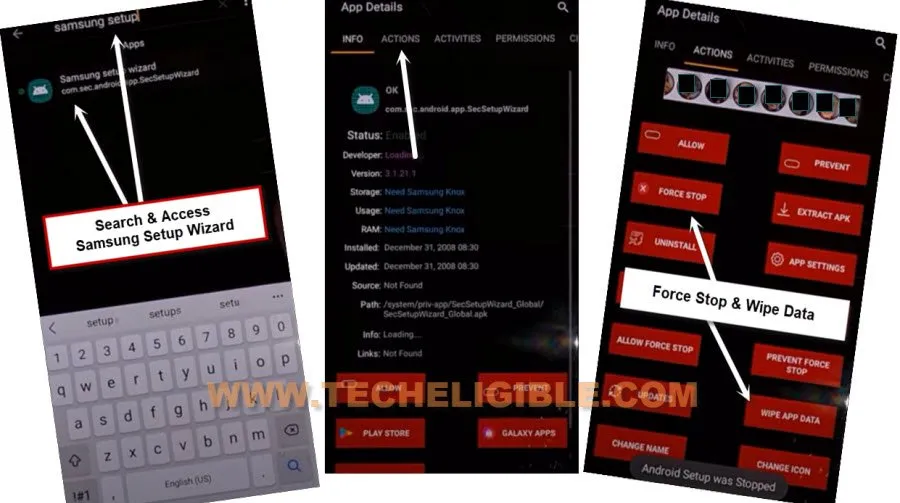
27. Go back by tapping on back arrow.
Disable Google Play Services:
28. Now Search there “Google Play Services”
29. Go to “Actions”.
30. Now tap on “Force Stop”, and after that, tap on “Wipe Data”.
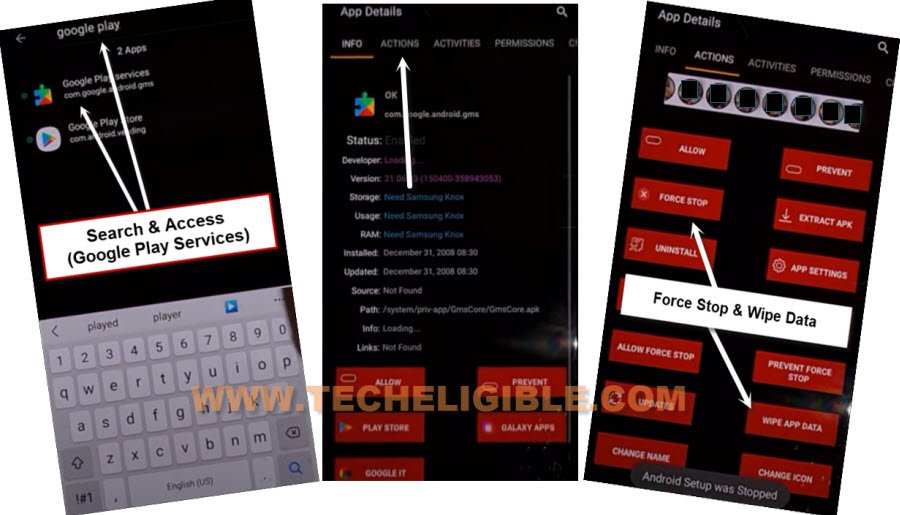
31. Go back by tapping on back arrow.
32. Search there “Samsung Setup Wizard”, now tap on “Activities”, and then tap on 1st (com.sec.android.app….) same as shown in below image.
33. Now you will see (Configure) popup window, just tap on “Open”.
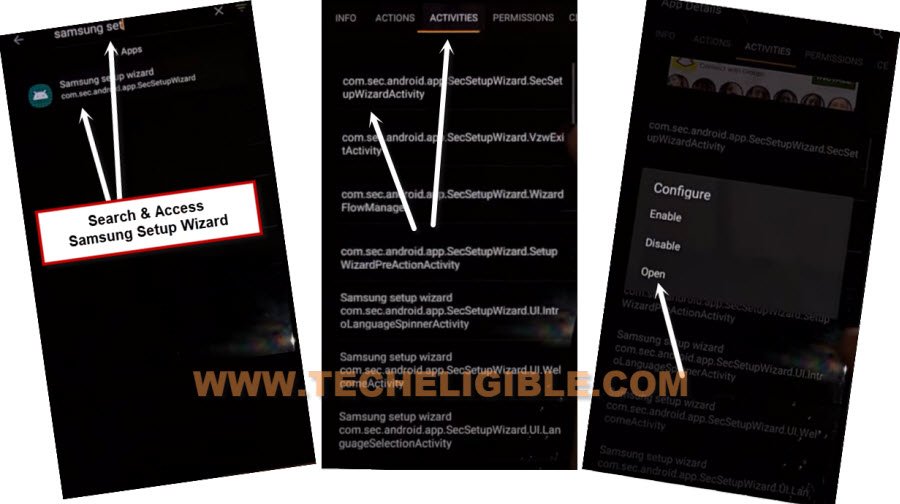
34. Just over (Please Wait…) screen, and then tap to > Skip > Finish.
35. You have successfully reached inside device screen without signing in with previously added google account, this is how, you can easily Remove FRP Samsung Galaxy A13, thanks for visiting us.
Read More: