We are going to share with you 4 Methods to Bypass FRP Samsung Galaxy J6, J6 Plus Android 9, 8, you can follow any method from below according to your device android version, because each method is different as per android version is different, so get your device back, and remove your forgotten Gmail account right now.
How FRP Protects Samsung J6/j6+ From Data Accessing?
FRP can be set up easily just by signing in with your any gmail account at the time of first time set up the device. You don’t need to follow further step to activate the FRP protection on your Samsung j6 and J6+ phone. If someone intentionally hard reset your device and try to break security lock. So, he easily delete and break (Pattern/PIN) locks just by hard reset, but he cannot break the FRP security measure.
FRP protection will not allow any unknown person to reach your device main home-scree, even, unknown person can not set up the device again after hard reset until sign in with the first time setup Gmail account.
If the device owner lost his/her own signed in google account after hard reset Samsung J6 phone. In this case, he/she needs to follow up FRP bypass method for Samsung phone to set up new google account. Follow up 4 frp bypass methods from below.
| Disclaimer: FRP Bypass methods are only for device owners to educate, how to recover back his FRP locked phone after forgetting Gmail account. |
Method 1: Bypass FRP Samsung Galaxy J6, J6 Plus By Samfw Tool Android 10/9/8 [New]
There is another best tool, that is (Samfw Tool). This tool is working tremendously well on so many Samsung devices. So, you can use this tool to bypass frp on Samsung J6 or J6 Plus android device with any android version. Connect your FRP locked phone with PC after installing proper USB drivers. After that, install and run (Samfw) pc tool. Click on a (Remove FRP) option from the tool. After that (Allow usb debugging) option and the tool will bypass frp once the devic is detected successfully.
-Turn on Samsung J6/J6 Plus, and connect WiFi, after that put your device back to first homescreen.
-Download below required (PC Tool & USB drivers) on PC Windows & Install these tools after unzipping from winrar archive.
Samfw Tool V5.4 [Link] Samsung USB Driver [Link] All in One USB Driver Installer [Link] Pass: techeligible |
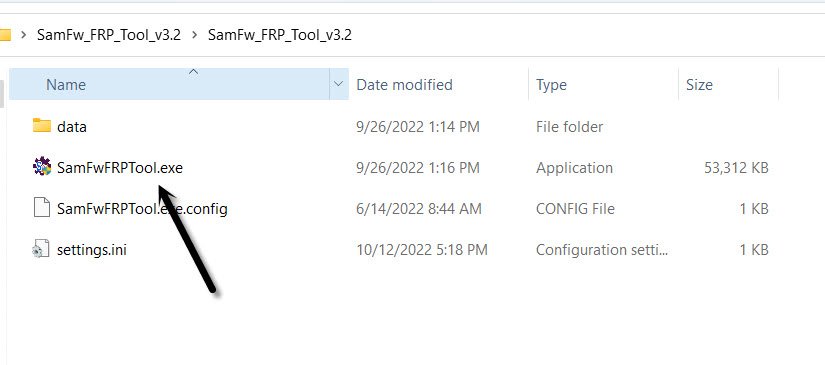
-You have to run Samfw tool on PC by double clicking on (Samfwfrptool.exe) file.
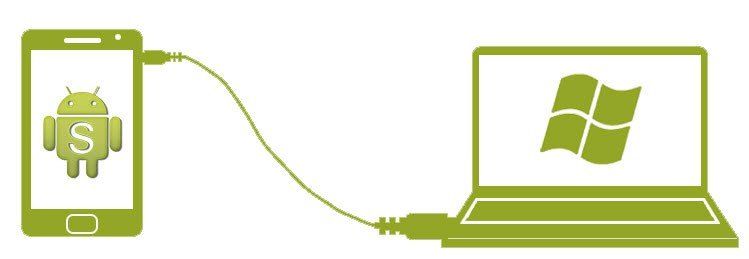
 -We have to connect Samsung Phone with PC.
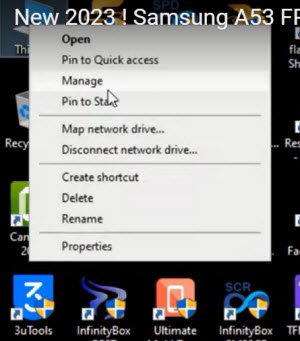
-Go to your PC Windows screen, right click on “My Computer or This PC” icon after that, tap on “Manage” option to go computer device manager.
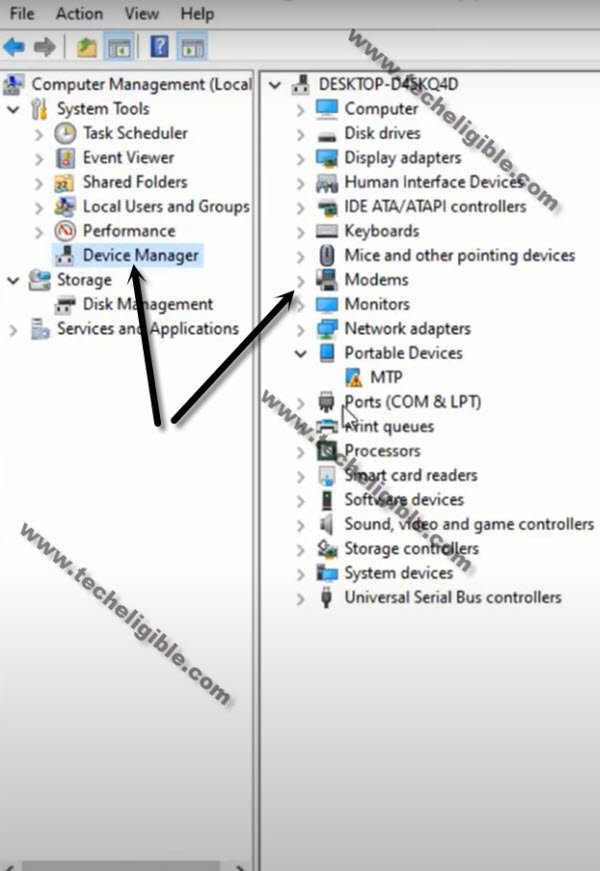
-From left panel of the screen, just tap on “Device Manager” option. This will show you driver listed and connectivity details with your PC input on a single page.
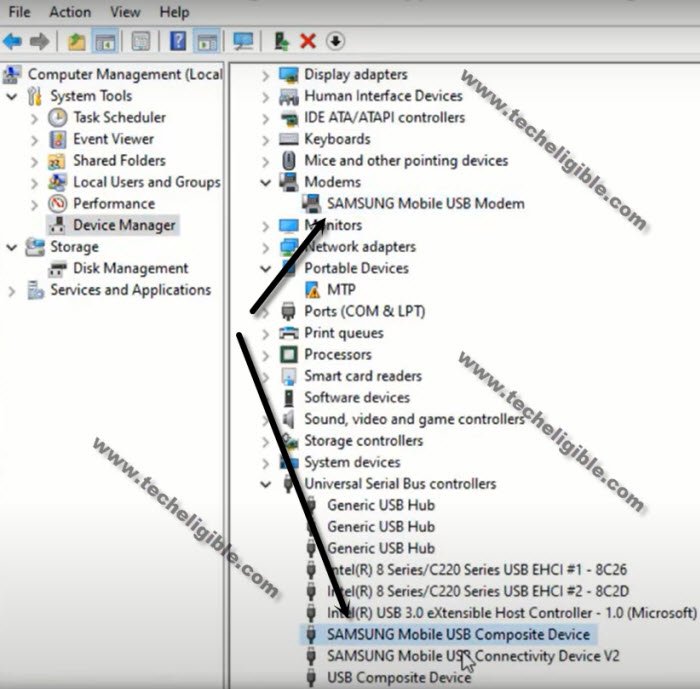
-You will be able to see your connected (Samsung Galaxy J6/J6 Plus) details there. That means, our device has been detected by the PC successfully. We use (Samfw Tool) easily for Bypass FRP Samsung Galaxy J6/J6 Plus.
Use Samfw Tool to Bypass FRP:
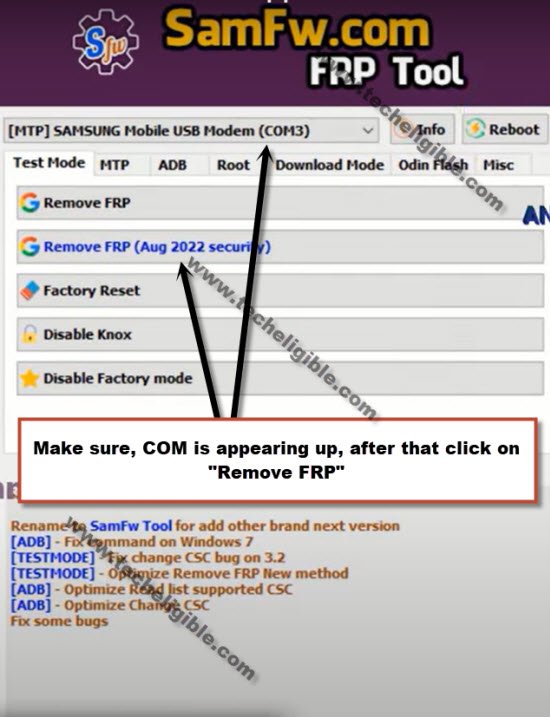
-Go to Samfw Tool screen and select your Samsung Galaxy J6 / J6 Plus device (COM) port.
-After that, click to button (Remove FRP) from the tool screen (See below image).
Note: If your Samsung USB modem hardware has an exclamation point (SamFw), it indicates that your computer needs to install the correct Samsung USB drivers. You can quickly install the Samsung USB drivers from the popup message that appears when you use the SamFw tool.
-You will be shown some instruction in popup window to dial a code from Galaxy J6/J6 Plus to enable the testing mode. You don’t need hit on “Ok” option right now. Firstly, we follow up given instruction from our FRP locked phone. After that, we will click to “Ok” option.
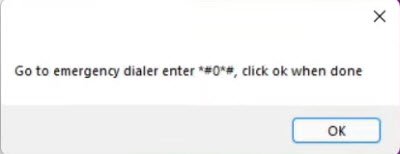
Enable Testing Mode on Samsung Galaxy J6/J6 Plus:
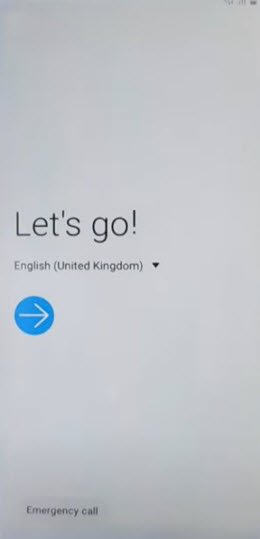
-From the first (Let’s Go) screen of the Galaxy J6/J6 Plus, just tap to “Emergency Call” from bottom left corner. This will open up dialer screen. From there, dial this code *#0*#. You will be redirected on a (Blank Box) page. That means, testing mode enabled successfully.
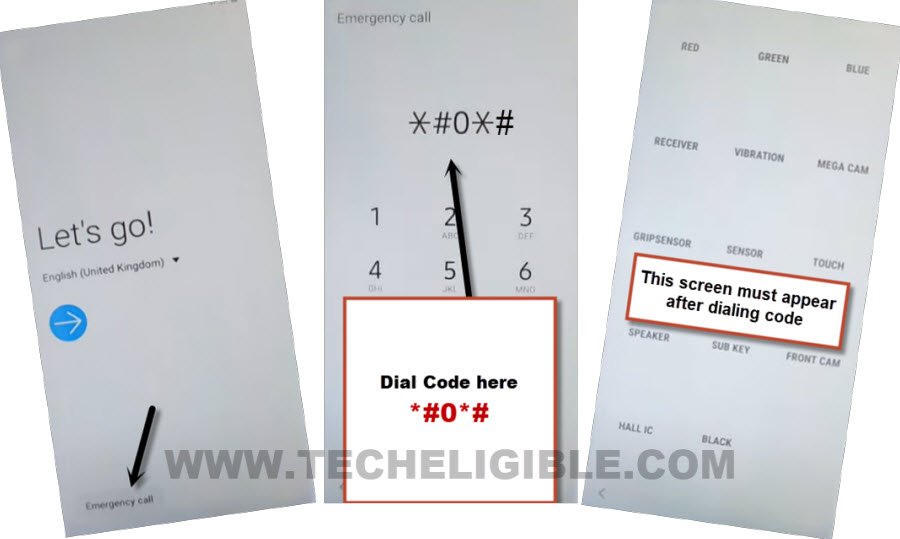
-You can click on “Ok” option from popup window.
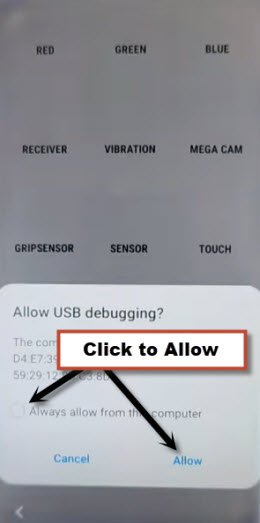
-Another popup window will popup up on Samsung Galaxy J6 / J6 Plus screen. We have to allow usb debugging option from there. Just check mark “Always allow from this computer” option and then, tap to “Allow”.
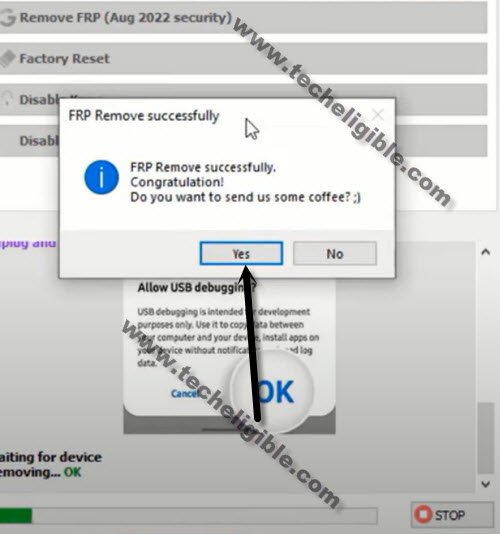
-FRP will be removed completely from Samsung Galaxy J6/J6 Plus. Once the FRP is removed successfully, you will see a popup window, just tap to “Yes” option.
Method 2: Bypass FRP Galaxy J6, J6 Plus Using Samsung Keyboard Option [Android 10]
Through new method, we can Bypass Google Account on Samsung Galaxy J6 Android 10, and Galaxy J6 Plus using our pin locked sim card, and also with secure folder option, if you do not have that option, then we will use smart switch app method, all steps has been described below, so you don’t need to be confused now. just follow steps.
-Firstly, connect Wi-Fi.
-Go to screen of “Verify your account”.
-Tap on “Email or Phone” field to bring keyboard.
-Now tap on “Settings gear icon”, and then tap on “Swipe, Touch and Feedback”.
-Select “Touch Feedback”.
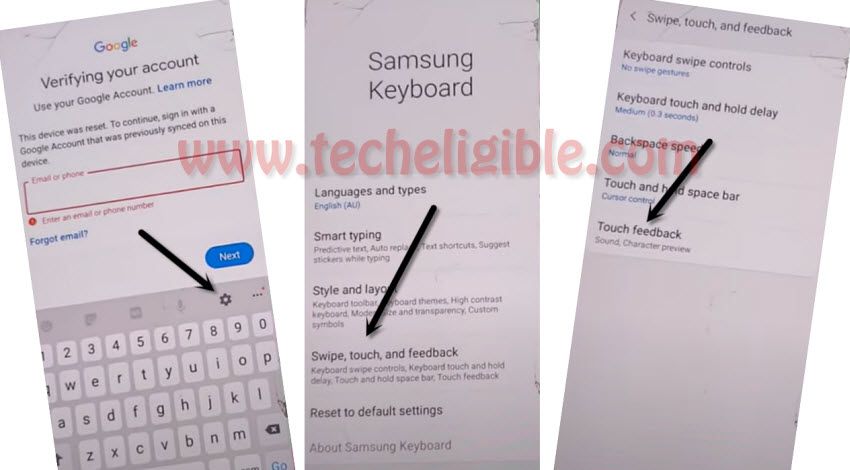
-Tap on “Sound & Vibration”.
-Tap on “Ringtone” .
-Select “SIM 1”.
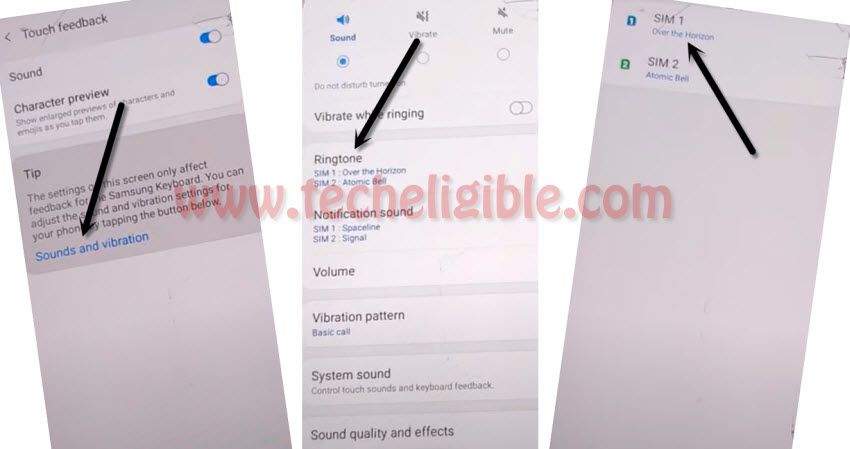
-Now tap on “+” sign from top right corner, and then tap on “Search” from there.
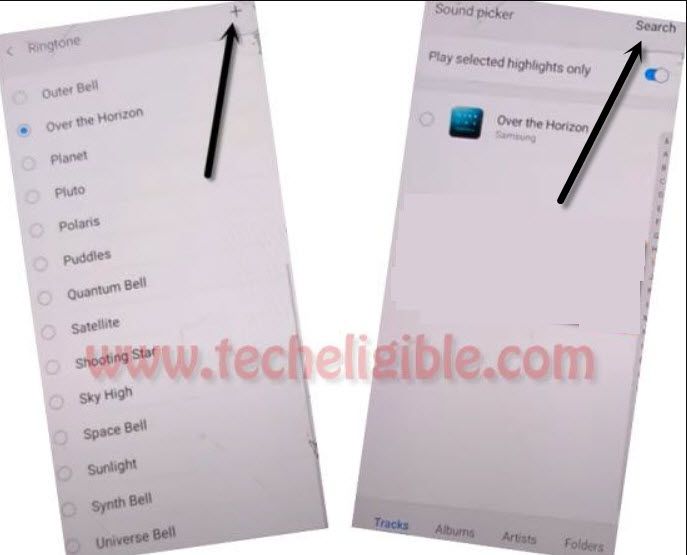
-Insert your 4 digits pin locked SIM card.
Note: if your sim card has not any PIN lock code, so you can setup PIN code using other device.
-After inserting the sim card, wait few seconds, and then start tapping on “Mic icon” from top right corner, keep tapping on mic icon until you see a window of “Enter SIM Card PIN”.
-Now enter your correct 4 digits pin code, and then tap on “OK”.
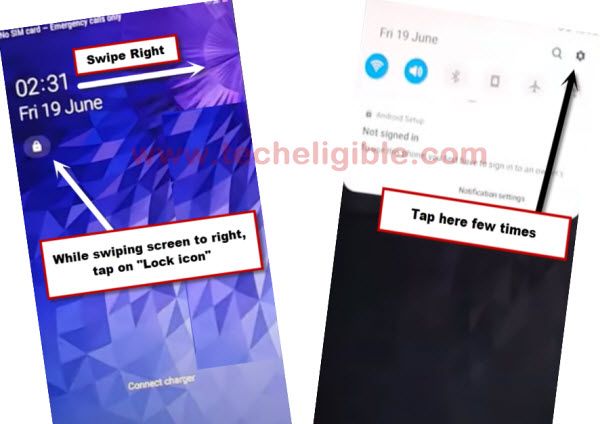
-Quickly Swipe date & time to right and do not lift up your finger keep holding date and time to right side, and with other finger quickly hit on “Lock icon”.
-Quickly drag down the “Not Signed in” popup window, and then it will bring top bar menu.
-Fastly tap 3-4 times on “Setting gear icon” from top right corner of the top bar menu.
Note: You have to do this very quickly, with one of your finger swipe date and time to right, while keeping it swiped, just tap on “Lock icon” with other of your finger, and quickly drag down (Not Signed in) screen to get top bar menu options (See Below image).
Connect Bluetooth Pods or Headphone to Galaxy J6:
-We need to make a Bluetooth pair with our any Bluetooth headphone or pods.
-Before doing this, wait until you get Samsung error screen in the background of top bar menu, same as shown in below image.
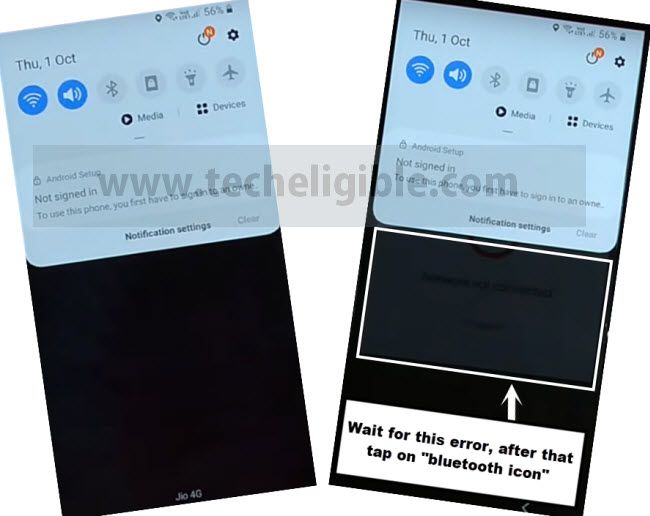
-After that, tap on “Bluetooth icon”.
-Make pair with your any new generation (Bluetooth Pods / Headphone) for Bypass frp Galaxy J6 Android 10.
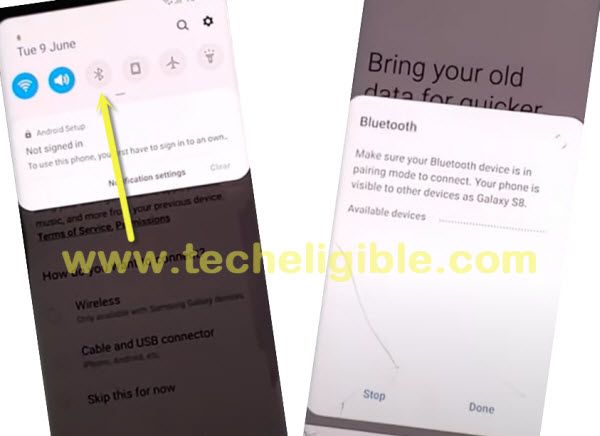
-After making pair successfully, press power button 3 times from your connected Bluetooth pods or headphone, this will open a dialog box for you, from there, tap on “Mic icon”, and then speak loudly “Open Settings”.
-This will redirect you to your Samsung Galaxy J6 settings.
Final Steps to Bypass frp:
-We are going to show you 2 methods from here, one is with (Secure Folder) option, and 2nd method is with (Smart Switch) option, because in some device, secure folder option is not available, so to bypass frp successfully, you are supposed to go to Samsung Smart Switch App method. for that.
-Let’s check, do you have (Secure Folder) option, or not, for that tap on “Biometrics & Security”.
-If you have “Secure Folder” option there, then you can easily bypass frp with Samsung account.
-Tap on “Secure Folder”, and then tap on “Agree”.
-Enter your any “Samsung Account” there to sign in with, if you do not have Samsung account, you can create that easily with any other android device or laptop etc.
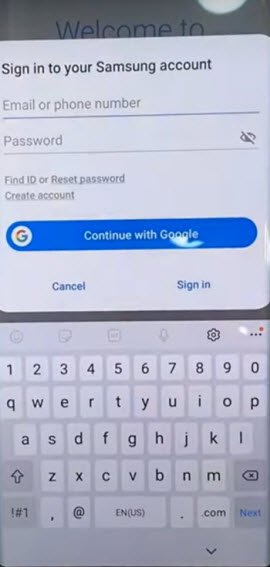
-After signing in successfully, you are all done, you don’t need follow extra steps from below.
–If you do not have “Secure Folder”, then you are required some extra tools.
1- Other Android Device.
2- OTG Connector.
-Make sure your other android device is on same Wi-Fi connection.
-In your Galaxy J6, tap on “Accounts & Backup”.
-Tap on “Smart Switch”, and then tap on “Downloads”.
-Wait few minutes until downloading finish.
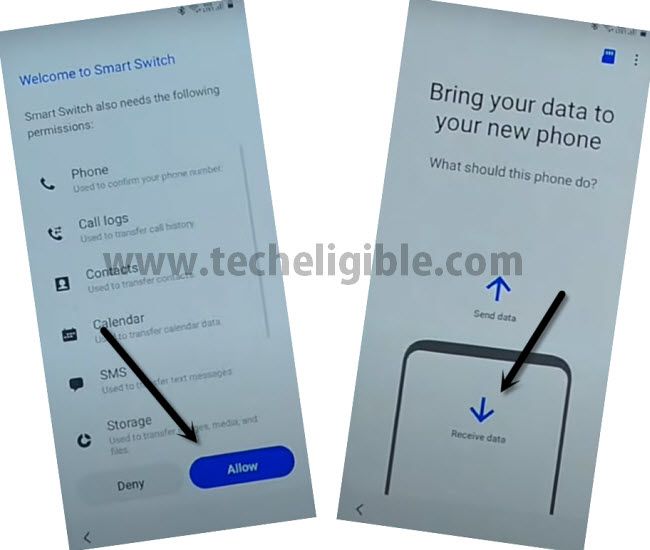
-After that, you will automatically get new screen of “Welcome Smart Switch”, and then tap on “Agree” button.
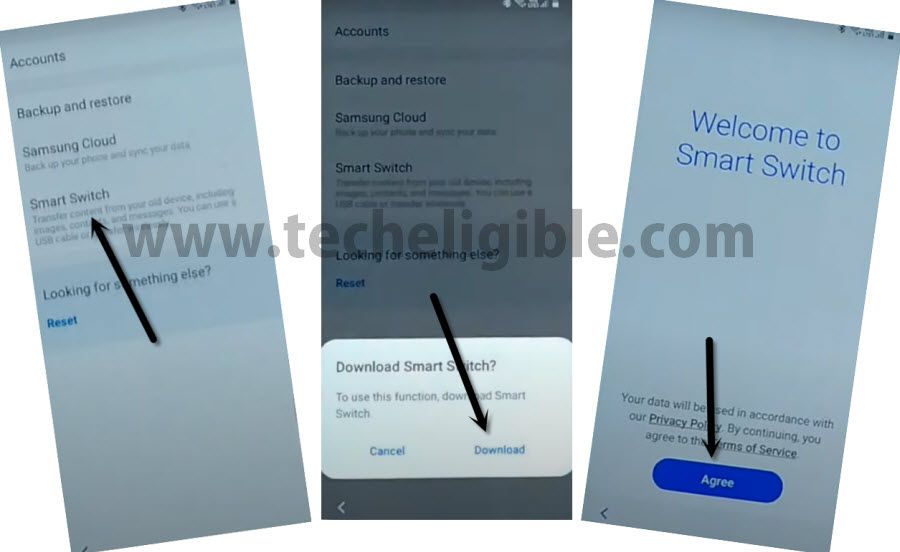
-Tap on > Allow > Receive Data > Galaxy/Android > Cable.
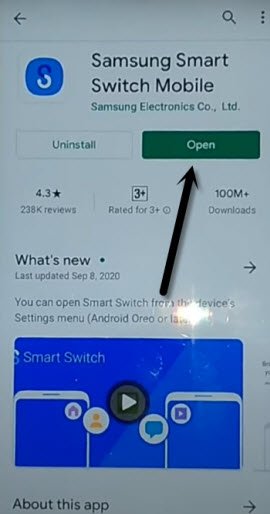
-In your Other Android Device, just open Google Play Store, and then download and install “Samsung Smart Switch Mobile” app.
-After that, tap on > OPEN > Let’s Go > Cable.
-Connect (OTG connector) in your frp locked phone Galaxy J6.
-Connect (USB Cable) in your other android device.
-Tap on “Back Arrow” in your other android device.
-After that, tap on “Allow” from your galaxy J6 phone.
-in your Galaxy J6, just tap on “Back Arrow”, and then tap on > Smart Switch > Receive Data > Galaxy/Android > Wireless.
-in other android device, tap on “Wireless” as well.
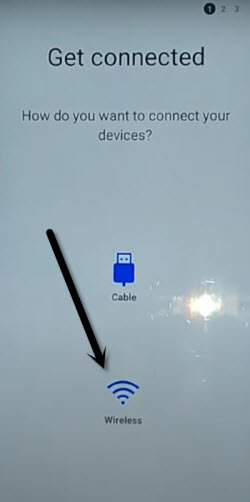
Note: if you see a popup window in your galaxy j6, just tap on “Settings”, and then tap on “Back Arrow”, after that it will show you same screen as shown in below image.
-Now your galaxy j6 will start connecting to your other android device to receive data.
-Through that, we can send Gmail account of our other android device to our Samsung Galaxy J6, this will bypass frp easily.
-In other android device, You will receive a dialog box of invitation to connect, just tap on “Accept”.
-In your Galaxy J6, you will be asked to choose data, that you want to bring from other android device.
-deselect all item from top left corner circle icon.
-Now go inside “Apps”.
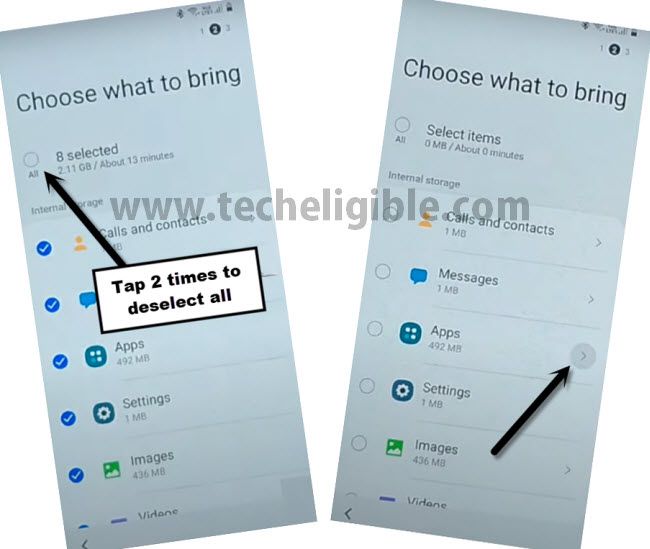
-Deselect all items by tapping on “circle icon” from top left corner.
-Select only “Drive”, and then tap on “DONE”.

-Select “Settings” as well.
-Now you have selected two options, 1st is “Apps”, and 2nd is “Settings”.
-Go down and tap on “Transfer”.
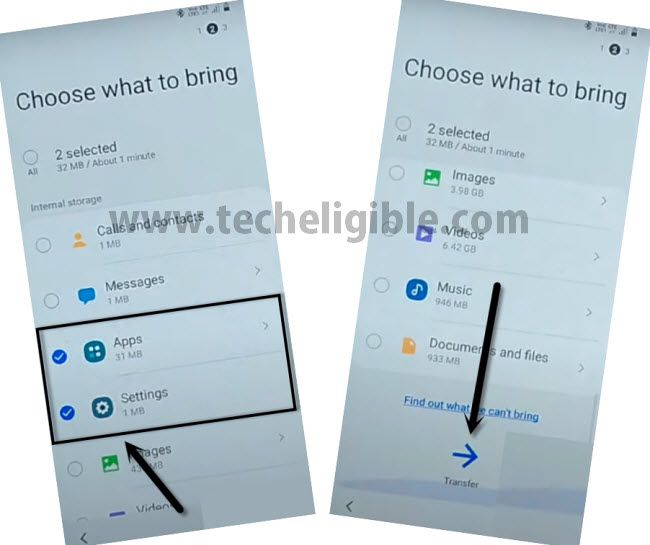
-In your other android device, just tap on “COPY” button, and then give screen lock password, the one that is already setup.
-Select option in both android device (Keep Screen on).
-This will start transferring data to your Samsung Galaxy J6 to bypass frp.
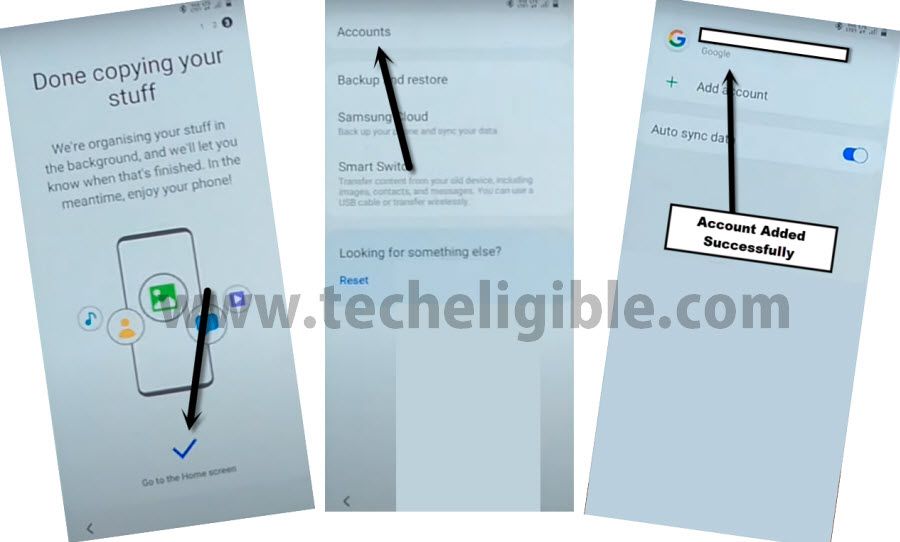
-Once it is done, just tap on “Go to the HOME SCREEN” in your Galaxy J6.
-Tap on “Accounts”, and there you will have your Gmail account, the one that you have in other android device, so you have successfully added your Gmail account and you are all done from Bypass FRP Galaxy J6, J6 Plus Android 10.
Method 3: Bypass FRP Samsung Galaxy J6, Galaxy J6 Plus [ANDROID 9]
If you are facing verify your account screen, and you have forgotten your Gmail account, in this case, you will have to bypass FRP on Samsung Galaxy J6/Galaxy J6 Plus for latest security patch level phone, otherwise you will not be able to to get access into your phone. Before starting this process, we would inform you that this process is only for device owner, and this method is only for educational purpose only.
You should also know your phone android version, because this method will work android 9 version phone, if you are not aware of the phone version, you can easily check that by putting device into android recovery mode. or you can also google it about how to find my phone android version from android recovery mode.
Factory Reset Protection is the latest security protection which will not let you use any android phone if you are not the owner of that device, but question is, what we do if being owner, i cant access to my own device because of unintentional hard reset phone without knowing my own Gmail account, in this scenario, you will go for method to Bypass Google frp Galaxy J6 Plus Android 9.
Let’s Start to FRP Bypass Steps on Samsung J6/J6+:
-Firstly, you are required to connect WiFi in Galaxy J6+ phone.
-Now go to the screen of “Verify your Account”, where you are asked to enter previously synced Gmail account.
-Tap on “Email or Phone” field to get keyboard.
-Tap “Setting gear icon” from top right of the keyboard corner.
-Now tap on “Back Arrow” from top left corner, and this will show you “Google Voice Typing”, just tap on that.

-Afterwards, Tap “Search icon” from top right corner, and type “Open“, and then select “Open web page in the app” from the searched results.
-Go to “Manage Pending Searches“, and hit on “No Thanks” from bottom right corner, after that tap on “Search” from the bottom middle option.
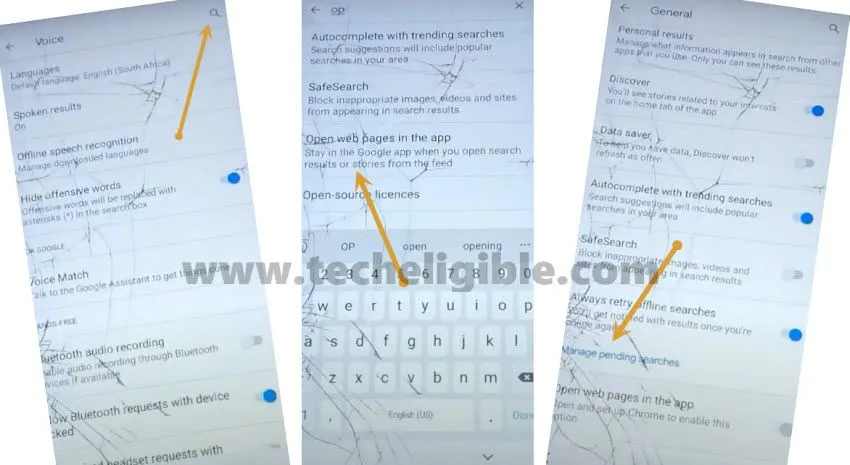
We have successfully accessed into google app, from here we will open google chrome browser to download some free frp tools, and through from frp tools we will be able to Bypass Google account.
Open Browser & Download frp Tools on Samsung J6:
-Type in search box “Chrome”, and tap on “Chrome icon” from the searched result.
-From Welcome to chrome screen, just tap on > Accept & Continue > Next > No Thanks.
-After access to chrome browser, lets download frp tools.
-Make search there with “Techeligible“. After that, go to techeligible site.
-Navigate to “Menu” option from top corner.
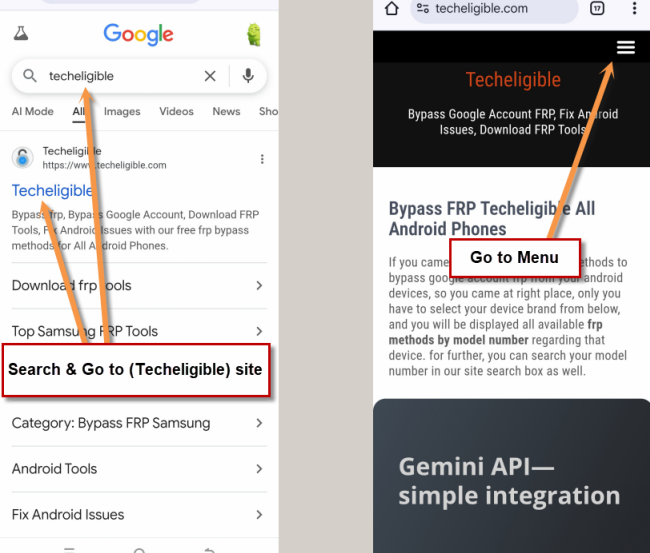
-After that, simply, hit on > Other Free Tools > Samsung FRP Tools.
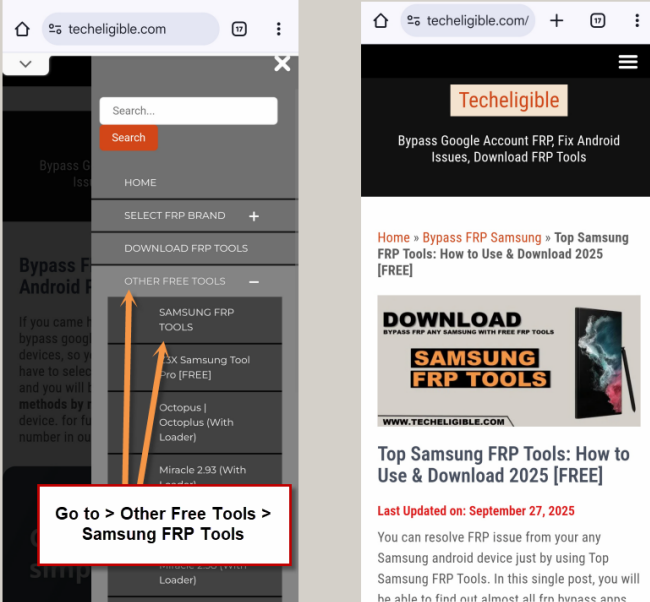
-Download from there below 2 applications.
1/ Apex Launcher 3.3.3
2/ Google Play Services
-Tap 3 dots from top right corner, and then tap “Downloads” to see both downloaded apps.
-Tap “Apex Launcher 3.3.3”, and from the popup window, tap “Settings”, and turn option “Allow from this source”.
-Go back by tapping on back arrow from bottom left corner, and tap on > Install > Open.
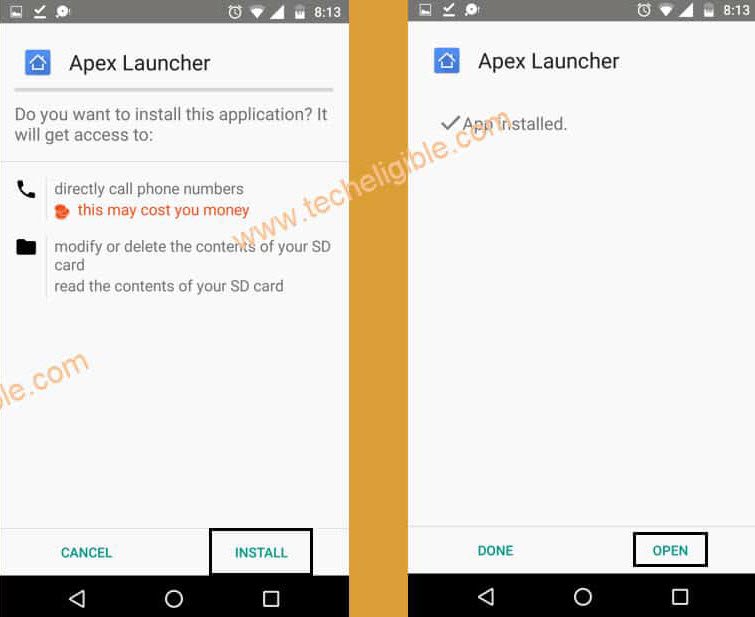
Disable Some Apps from Galaxy J6/J6+:
-Go to phone > Settings > Biometrics and Security > Other Security Settings.
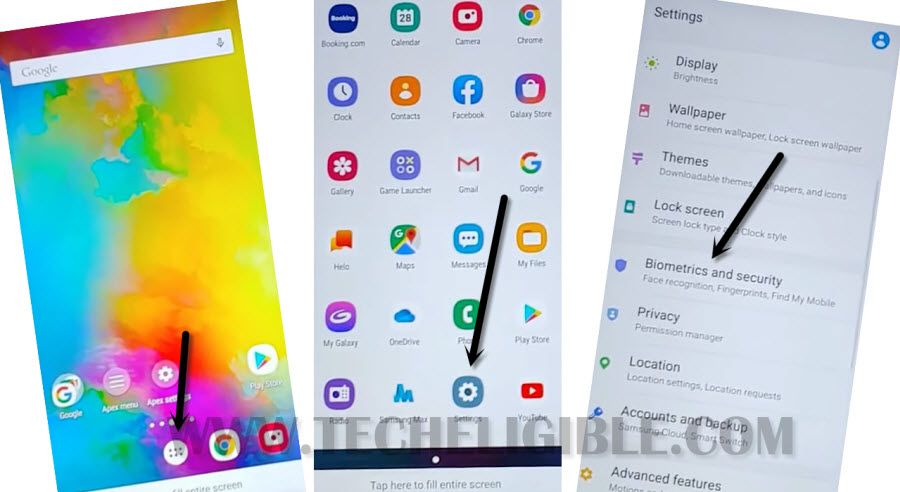
-Tap on > Device admin apps > Find My Device > Deactivate.
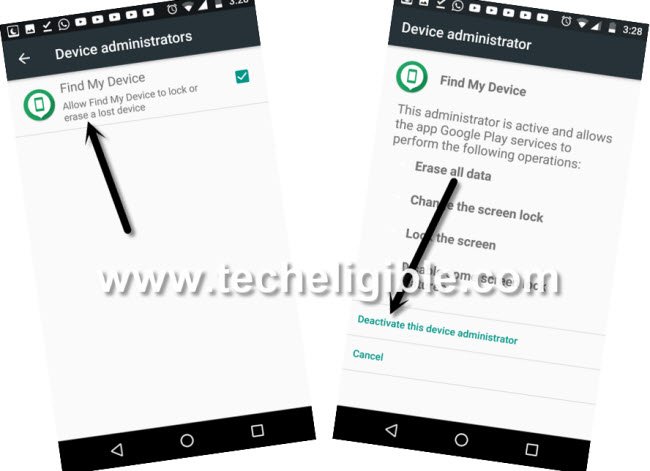
-Now we have to go back to “Settings”, and from there, just tap on “Apps”.
-There you will see huge list of apps, all phone installed apps can be seen there, find and tap on “Google Play Services” app, after that, just tap on “Disable” button.
-Find and tap on “Google Play Store” also, and then tap on “Disable” button. Now we have disabled both apps successfully to easily Bypass Google frp Galaxy J6 Plus Android 9.0.
-Go to phone menu, and then tap on “MY Files”.
-Afterwards, just open “Downloads”, there you will see your final app for the install.
-Tap on > Google Play Services > Next > Install > done.
Note: If you see popup window of my files right after hitting on app, just tap on “Settings” from the popup window and then enable “Allow from this source” option to easily install that. now go back to install Google Play Services app again.
Add New Google Account to Bypass FRP:
-Go to > Settings > Accounts & Backup > Accounts > Add Account.
-Select “Google” from the list, and it will show you “Just a sec…” screen. wait for it until finish and show you google sign in screen.
-You may receive google play services app stopping popup window, just tap on “Close app”.
-Now enter your new Gmail account.
-Activate device admin app again by going back to “Settings”.
-From there go to > Biometrics and Security > Other Security Settings > Device admin apps > Android Device Manager > Activate.
-Restart phone by long press power button and hit on “Restart” option.
Now you can easily complete your phone initial setup right after connecting WIFI, and this time your phone J6 Plus will not ask for the previously synced Gmail account, if it asks you, just enter your already new setup Gmail account to bypass the screen, we hope this method has resolved your phone issue, and you can also comment us for asking any question relevant to this method.
Method 4: Bypass FRP Samsung Galaxy J6, J6 Plus By Talkback [Android 8.1]
If you are facing factory reset protection, and you cant remember your previously synced Gmail account, so surely you do need to follow this method to Bypass FRP Samsung Galaxy J6/J6 Plus smartphones, good thing is that you don’t need to paid anyone to bypass frp lock from your device, just follow our frp bypass instructions from below and access to your device with new gmail account. This frp bypass method has successfully been applied on Samsung Galaxy J6 Plus (J610) Android 8.1 device.
Follow up Steps Wise FRP Bypass Guide:
-Connect Wi-fi to your Galaxy J6 Plus device first.
-Go back to very first “Welcome Screen” by tapping on back key.
-Long tap on screen with “Two Fingers” until you get popup window of “Talkback Tutorial”.
-Perfect, now we have enabled talkback feature.
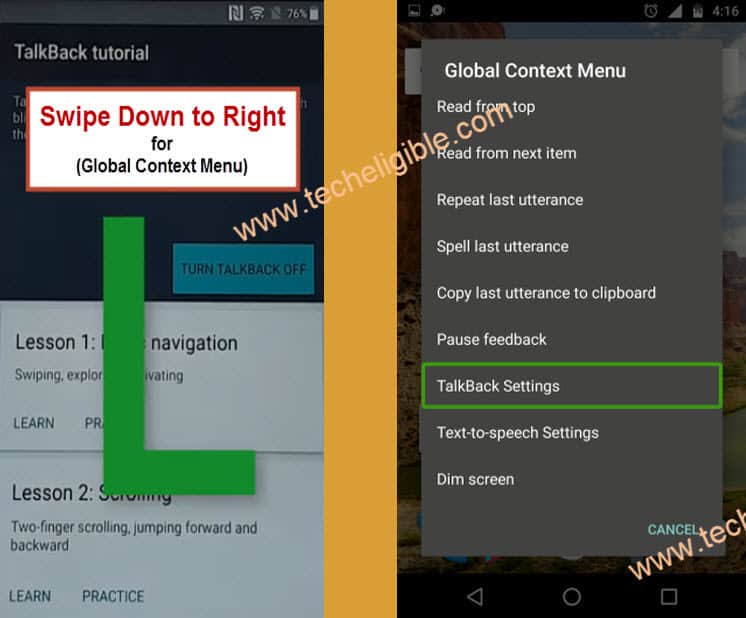
-Draw “L” on your screen to bring “Global Context Menu”.
Note: To draw “L” you need swipe from up to down, and then swipe to right, when you will draw L in this way, then you will be able to get another new popup window.
-From “Global Context Menu”, just double tap on “Talkback Settings”.
-Long press both (Volume UP + Volume Down) keys together, then you will get popup message of “Accessibility Shortcut was used to turn off talkback”.
Note: If you see popup window of “Use Accessibility Shortcut?”, simple select “Use Shortcut” option. After that, again long tap both (Volume Keys), and then you will surely get popup message of “Accessibility Shortcut was used to turn off talkback”.
-Perfect, now we have successfully disabled “Talkback Option“.
-Simple go down, and tap on “Help & Feedback”.
-Select “Get Started with voice access”.
Access to Internet Browser & Download FRP Tools:
-Tap on “Youtube Video” play icon and wait few second.
-After that, tap on “Clock icon” from youtube video.
-You will see one popup window, just tap on “Not Now”.
-Type in search box “Download FRP Tools Techeligible“.
-Visit very first search result same as shown in below image.

-Go down, and download from there “APEX LAUNCHER 3.3.3“.
-Wait until downloading finish.
-Once downloading finish, you will get bottom popup, just tap on “OPEN FILE”.
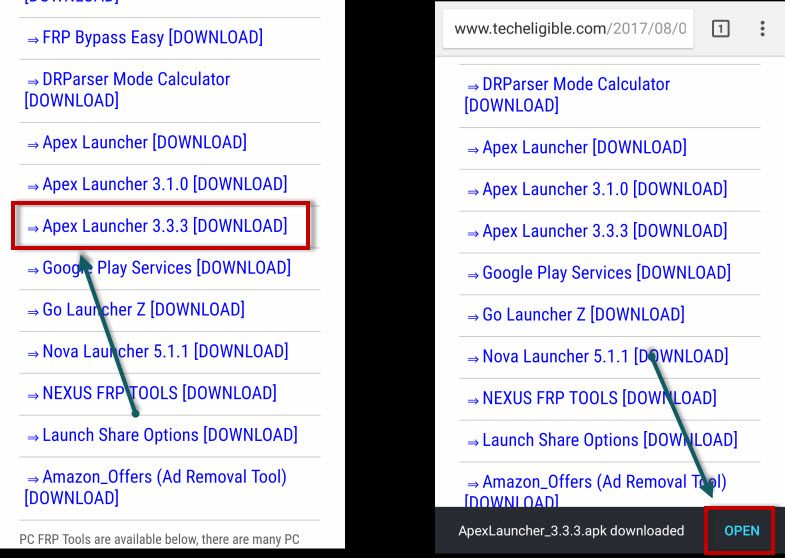
-From popup window, tap on “Settings”, and then enable the option “Allow from this source” to bypass Samsung FRP.
-Tap on “Back Key’ to go back, and then tap on “Install” to install apex launcher app.
-Once installation finish, just tap on “OPEN” to access to your J6 Plus “HOME SCREEN”.
-Now we are few steps away from Bypass FRP on Galaxy J6 Plus and Galaxy J6.
-Go to “MENU”, and then open “Internet Browser”.
-Type in search bar “download google account manager techeligible“.
-Go to first search result as shown in below image.
-Download from there “Google Account Manager 8.0“.
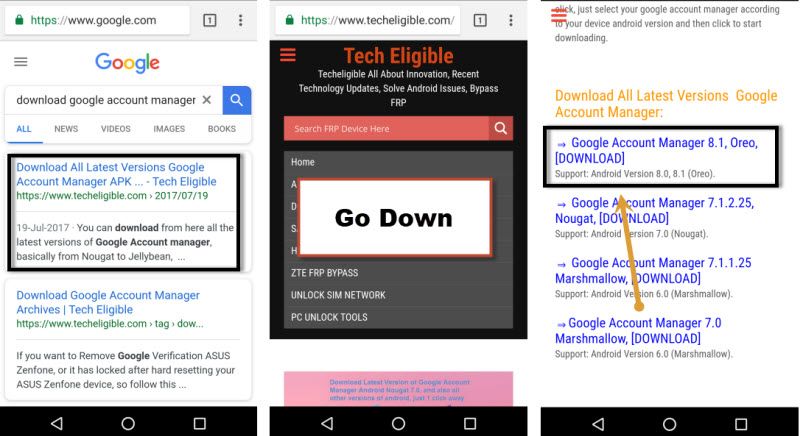
-Once downloading finish, you will have “OPEN File” option, just tap on that.
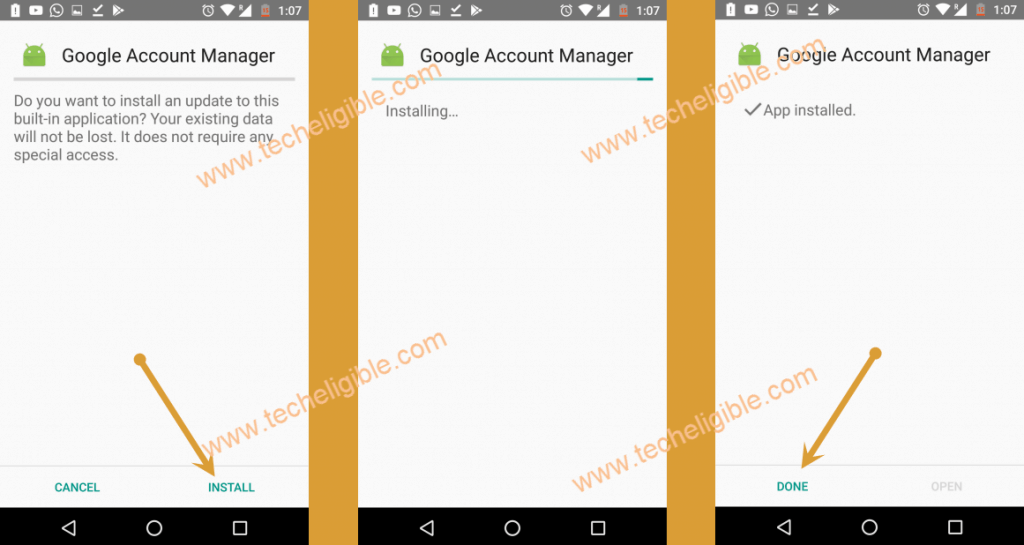
-Tap on “Install” to install google account manager, after that tap on “DONE”.
Let’s Install FRP Bypass Apps:
-Go back to internet browser.
-Type in search bar “Download FRP Tools Techeligible“.
-Go to first search result as shown below image.
-Download from there “Account Login” app.
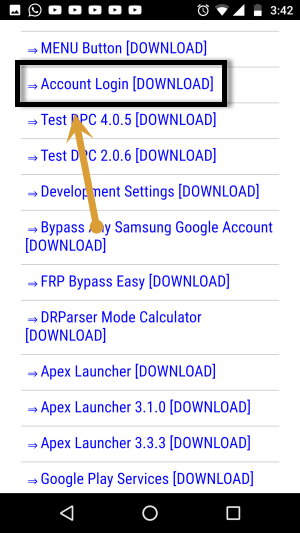
-After downloading done, tap on “OPEN File” option.
-Tap on “Install”, and after installation finish, just tap on “OPEN”.
-You will be redirected to the “RETYPE Password” screen, just tap on “3 dots” from top right corner.
-Select “Browser-Sign in” from there.
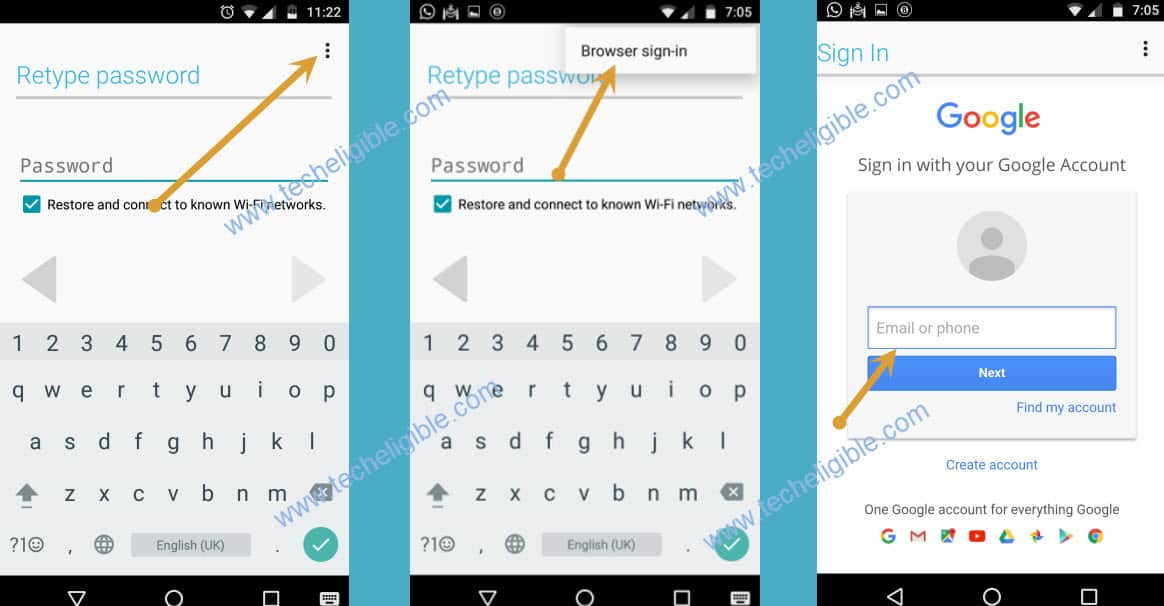
-Enter your any valid Gmail ID there.
-Once you successfully signed in there, congrats, you are all done from Bypass FRP Samsung Galaxy J6 Plus, Galaxy J6.
-Reboot J6 Plus device by long press “Power Button”, and then select “Restart”.
-After that, complete initial setup, and this time you won’t be asked to enter previously synced Gmail account.