
Villaon V40s was released in 06 Feb 2025 with updated android 14 version. As you know, each device on a latest android version is already come with FRP protection. If you are a device owner and setup Villaon V40s phone at the first time with google account signing-in. Then, the FRP will automatically been added on your device. But, what to do, when you have been locked with FRP on your own device?
That happens sometimes with owner, when he forgets his google account after factory reset the device on which Gmail account was setup. That is the reason, you might have come here to find out frp bypass solution.
What to do, if Villaon V40s owner Face FRP lock?
FRP is the locking feature to save your device from unauthorized access by strangers. This great security feature come into its action when someone find a stolen device and tries to setup everything from starting just by factory reset it.
Look, factory reset is too simple to be done by anyone easily just by holding some volume and power keys together to put device into android recovery mode. After that, with few steps, the device data could easily be erased including pattern lock and password. But, google account can’t be removed. If you are a device owner, then, you deserve your device back with the help of frp bypass process.
You will have to follow up steps from here for FRP Bypass Villaon V40s, we have mentioned all steps below to fix up this accessing issue on your device with the help using of (SamsungFRP Tools V.16) without using any paid tool.
FRP Bypass Villaon V40s Step by Step Guideline:
-Arrange any working SIM card and setup 4 Digits PIN Lock code on your SIM card.
Read Also: How to Setup 4 Digits PIN on SIM
-Let’s begin frp bypass steps by turning on Phone and connect WiFi first by going to WiFi screen.
-After that, insert PIN locked SIM on FRP locked Villaon V40s device.
-Once you see (Enter SIM PIN) page there, simply, eject SIM tray to remove inserted PIN locked SIM.

-After removing the SIM, you will be shown a locked screen with (Not signed in) popup message.
-There is (Camera) icon at bottom right corner, just open up camera by long holding on it.
-Open up (Google Lens) by tapping on “Google Lens icon” from top left corner.

-Withing a second, the google lens will be opened on your Villaon device screen.
-From the same screen, hit over the “3 dots” icon from top corner and go to “Privacy Policy” option.
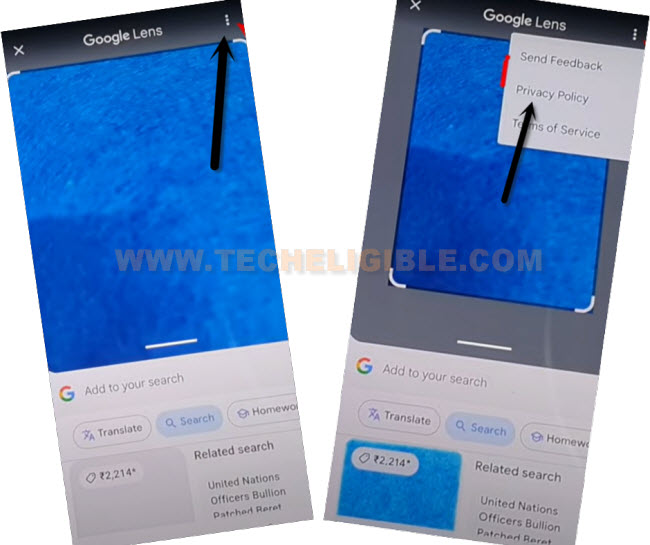
-Go to “Google Menu” from top bar and hit on “Search” icon.

Go to FRP Tools Screen & Open Dialer on Villaon V40s:
-You will reach on a google web browser. From there, we have to access to official techeligible frp tools page and open dialer screen from there with single tap. This will help you in bypassing frp on Villaon V40s.
-Search in web browser with “Techeligible” text.
-Visit 1st searched result same as mentioned in below given screen shot. After reaching on techeligible site, just go to > Menu > Download FRP Tools.

-Scrolling down little bit and open “Dialer Code” from there.

Enable ADB on Phone By Dialing Code:
-For successfully frp bypass, we need to enable ADB on this phone. So that, we may not face any unrecognized issue while connecting the Villaon V40s device with PC.
-Connect your Viallon phone with PC using USB Cable.
-Enter this ADB enabling code on screen *#*#49#*#*
-After that, you will see a flash message there saying (USB debugging is turned on).

Download & Install SamsungFRP Tool V1.6 For FRP Bypass Villaon V40s:
-Let’s go to PC screen, download & install SamsungFRP Tool V1.6 by Mohammad Ali. This is tool will be used for frp bypass Villaon V40s device.
| ⇒ SamsungFRP Tool V1.6 [Download] |
-Unzip the downloaded tool and install on your PC.
-Run this tool.

-As the device has already been connected to PC with adb enabled successfully. Simply, click on a button “REMOVE FRP (ADB)” from the tool interface.

-The SamsungFRP Tool will send you a popup window on your FRP locked device screen, which of (Allow USB Debugging). You have to check mark “Always allow from this computer” and then, tap to “Allow” option.
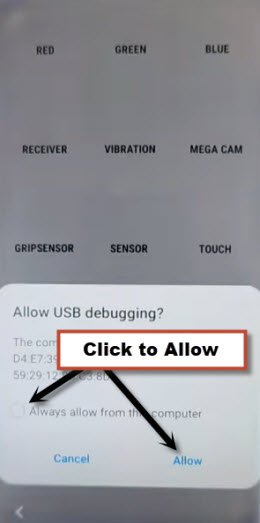
-After that, FRP will be bypassed from Villaon V40s within a minute, as you can see in below screen shot.

-Villaon phone will auto restart. Its all done, just disconnect your phone from PC.

Enable Developer Option & Erase All Data on Villaone V40s Phone:
-After frp is bypassed successfully, we need to erase all data from our device to make sure that, old signed in google account is deleted completely and may not face FRP lock after restart the device again.
-Go to > Settings > About Phone.
-Tap 7 times quickly on “Build Number”. This will enable developer option on your phone.

-Tap once on the back arrow icon to get out of the (About Phone) Screen.
-From (Settings) screen, just go to > System > Developer Options > Turn on (OEM Unlocking) option.
-Go back to (System) screen. Hit on > Reset Phone > Erase all data (Factory Reset)
-Tap 2-3 times on “Erase All Data” button. Your device will auto restart and may take a minute in completing factory reset process. After that, the device can be setup again with another google account to setup fresh FRP lock protection on Villaon V40s device.
Conclusion:
We just download & installed (SamsungFRP Tools V1.6 by Mohammad Ali) software on PC. After that, enabled ADB mode on Viallaon V40s device using a code (*#*#49#*#*). After that, connect Villaondevice with PC using USB Cable. After that click to (REMOVE FRP ADB) option from the software interface screen for FRP Bypass process to be completed. After FRP has been removed successfully, we just go to main settings screen of the device and enabled developer options. Finally, erased all data from Villaon V40s device.