
Dealing with the FRP lock security on your smartphone? It’s possible that you performed a hard reset on your phone and can’t recall the details of your Google account needed for verification. If your Google account information is forgotten, you can follow this procedure to Bypass FRP All ZTE Android 14. In this tutorial, we will demonstrate how to bypass the security lock easily.
Disclaimer: We strongly advise using this technique solely on your personal device. If you are not the legitimate owner of the device or if you have obtained it from another source, you should return it to its rightful owner. This method is intended for educational purposes exclusively.
Method 1: Bypass FRP All ZTE Android 14 (By BFT Tool)
-Firstly, download and install below (BFT Tool) on PC.
| ⇒ BFT Tool V1.7 [DOWNLOAD]. |
-Before running the (BFT Tool), don’t forge to deactivate (@ntivirus software) from PC. otherwise, you won’t be able to run this tool properly.
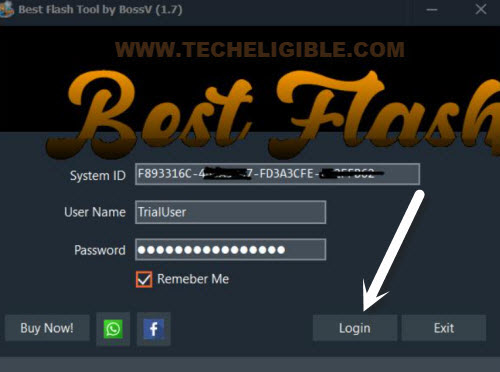
-From the popup screen of BFT User login id, just hit on “Login” option.
-Let’s select your device processor “0-UNISOC”.
-Then, check mark the “Manual” option and, choose “[AUTH] SC9863A (64)”.

Install SPD + LibUSB Filter Drivers on PC
-Go to “Drivers” tab from top corner.
-From there, install “SPD drivers” and “LibUSB Filter Driver“.

Install LibUSB Driver Filter
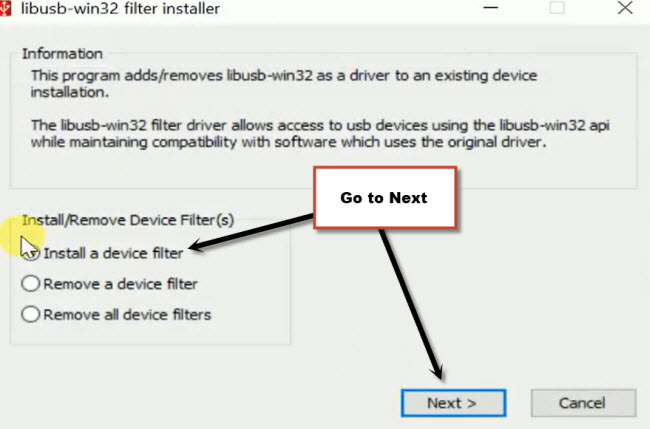
-From the popup window of (LibUSB filter driver), just select “Install a device filter” and go to “Next”.
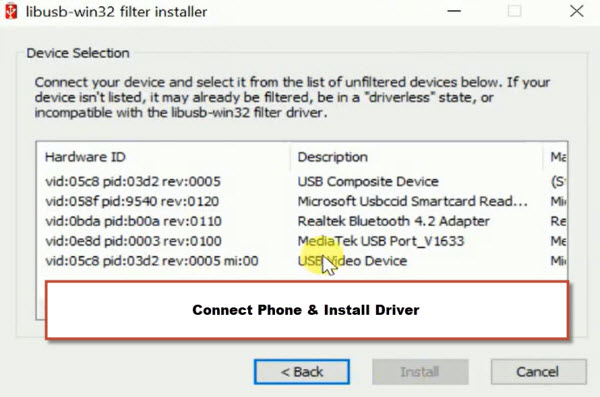
-Turn off ZTE phone and wait for 10 sec. After that, connect the USB cable to your device while long holding the (Volume Down) key. After that, your device driver will appear up on (LibUSB filter) popup screen same as shown in below image. Simply, select that driver and click to install it on PC.
-Once the drivers are fully installed, disconnect the phone from PC.
-We have successfully installed required drivers on PC, so that, we may not face any difficulty at the time of bypass frp all ZTE Android 14.
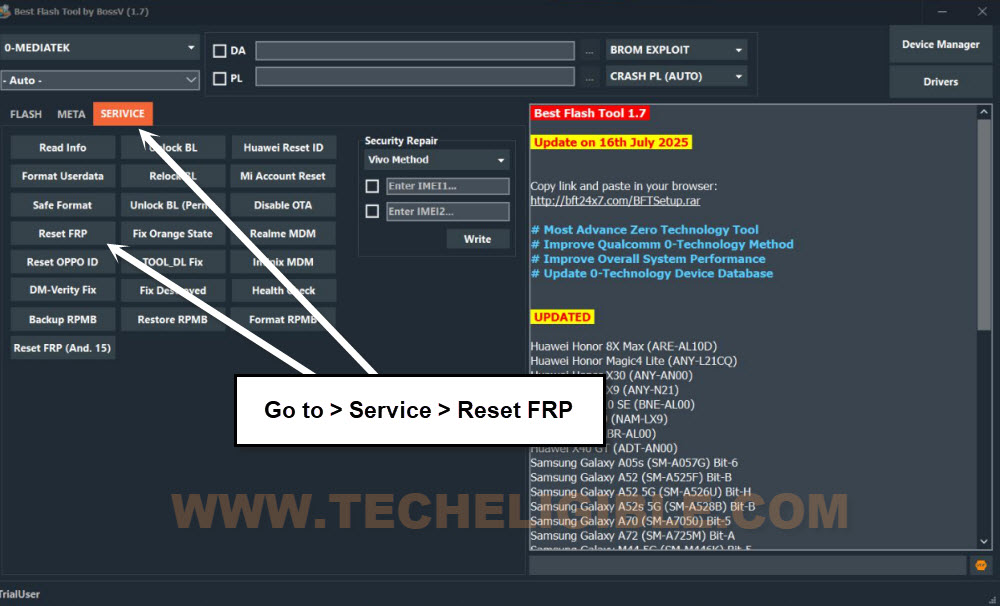
-From the BFT Tool interface, tap on “Services” tab.
Reset FRP By BFT Tool
-Click at “Reset FRP” option.
-Connect ZTE Android 14 phone with PC again while long pressing (Volume Down) button.
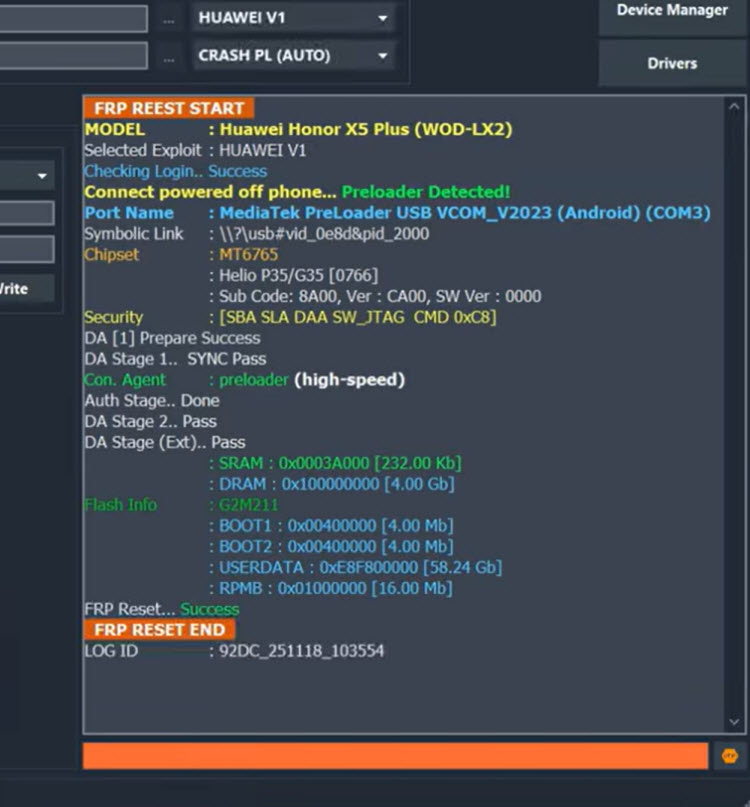
-Your device will be detected by the tool and it will Bypass FRP All Android 14 within few seconds.
| Note: If you are getting error and frp is not being bypassed. In this case, close and reopen (BFT Tool) program. After that, try again by selecting the [Tiger T610 (64)] or [Tiger T606 (64) V2]. |

-Afterwards, within few seconds, the device frp lock will bypassed.
| Note: If you are still facing the connectivity issue, then, try to install SPD drivers manually and try again. Facing trouble in downloading and installing the drivers directly through (BFT TOOL). You can download it manually on PC and install it.
|
-Disconnect the phone from PC and complete startup steps on your own.
| Note: If your device stuck on loading screen and its not completing, you just hard reset your phone by going into the (Recovery Mode). After that, try to finish up setup wizard steps after connecting to WiFi network. |
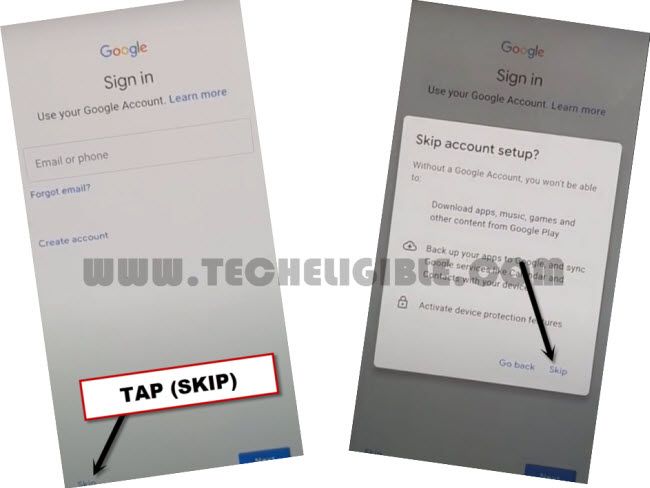
-While completing the setup wizard steps, you may face again the (Google sing in) screen, just hit on > Skip > Skip.
Method 2: Bypass FRP All ZTE Android 14 (Without PC)
-Get any SIM card ready and establish a 4-digit PIN lock code.
Note: Unsure how to create a 4-digit code? Check here.
-Begin the process by linking the phone to WiFi initially.
-Navigate back to the initial setup screen. Insert the SIM card that has the PIN lock.
-Get back over the (Hello) page. After that, insert the SIM card for which you have already configured the 4-digit PIN code.

Use PIN Locked SIM to Get (Not Signed in Message):
-When you insert the SIM card, a locked screen will appear.
-Now, let’s take out the SIM card and without wasting any time, immediately press the “Power” button. To execute this action quickly and at the same time, utilize both fingers together. The moment you remove the SIM card, swiftly press the “Power” button.
-If done correctly, just tap the “Power” button once. This will turn on the device screen and present a (Not signed in) notification.
Note: If you do not see a (Not Signed in) message like the one shown below, it indicates that you did not perform the (eject SIM card & pressing power button) procedure correctly. Restart your device and attempt it again. After several attempts, you will achieve success.

Drag & Drop (Screen Record) icon on 3rd Position:
-After you receive the (Not signed in) message, click on the “Down Arrow” icon and select the “Edit” option from upright corner.
-Drag and drop the (Screen Record) option in the third position.

Enable the Screen Recording Function:
-Go back to (Not Signed-in) screen by tapping on the “Back Arrow” icon located at the top left.
Note: This is the most challenging step and requires precision. This may take several attempts, and is crucial to activate the (Screen Recording) feature. Let us proceed with that now.
-Tap both options simultaneously (Down Arrow) + (Record Screen) Area.
| Tip: We have to bring up the top menu options, because, after hitting on (Down Arrow) from not signed-in message, the top menu bar will come up and disappear very quickly. To get this, you just have to start tapping at the point, where the (Screen Record) icon is displayed, this area might be on the left side. To get this done easily, keep both fingers standby, as soon as, you hit on “Down Arrow”, just quickly start tapping on “left side screen record” area. By doing this, the top menu bar will appear up and stir. |

-We’ve go the top menu bar on screen. We have to turn on the screen recording, for this, select both options simultaneously again (Record Screen) + (Top Corner Area illustrated in the image below).
-Once the screen recording options appeared up on top right corner, that means, everything is going perfectly.
| Note: If you are failed, then screen record will not come up. You have to restart your device and repeat all step from the beginning. |

-Return to the (Hello) startup page. Tap the “Red” option to initiate the screen recording process.
-Wait around 4-5 seconds for the recording to start, and then stop the recording by selecting the “Pause” option.

-Let’s hit over the “Share” option located at the bottom. After that, choose > Message > New Message.

Capture the Screen Shot:
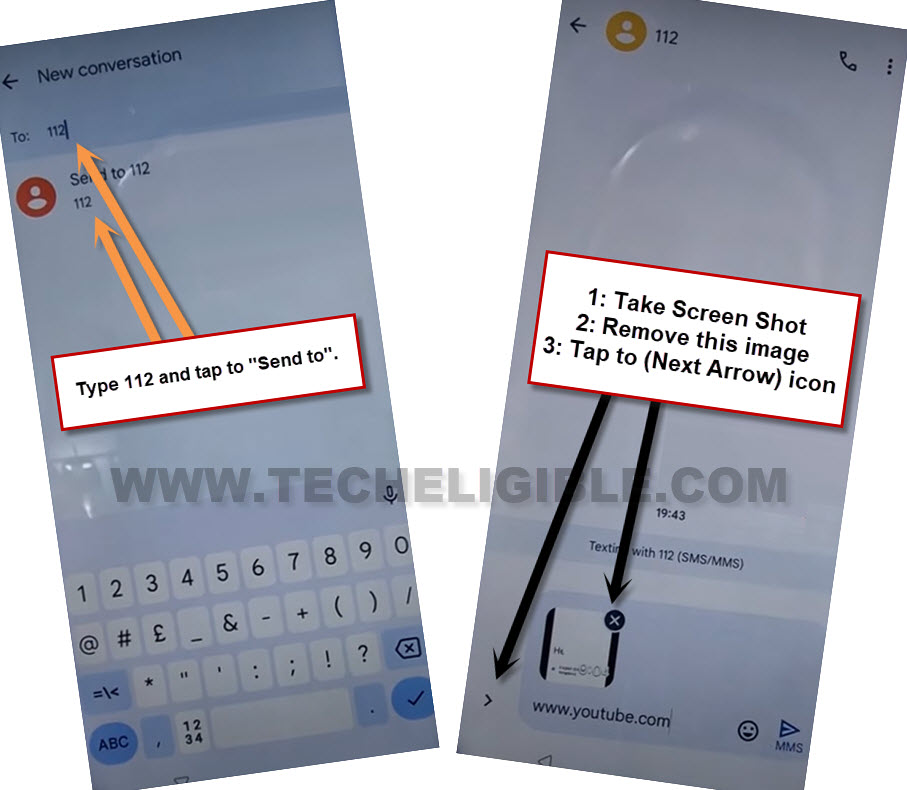
-Input any number in the (To) field and proceed to “Send to”.
-Take a screenshot by pressing and holding (Volume down + power) simultaneously. The captured screenshot will be shown at the bottom; just dismiss it by clicking the “Cross” icon.
-Select the “Next” icon.
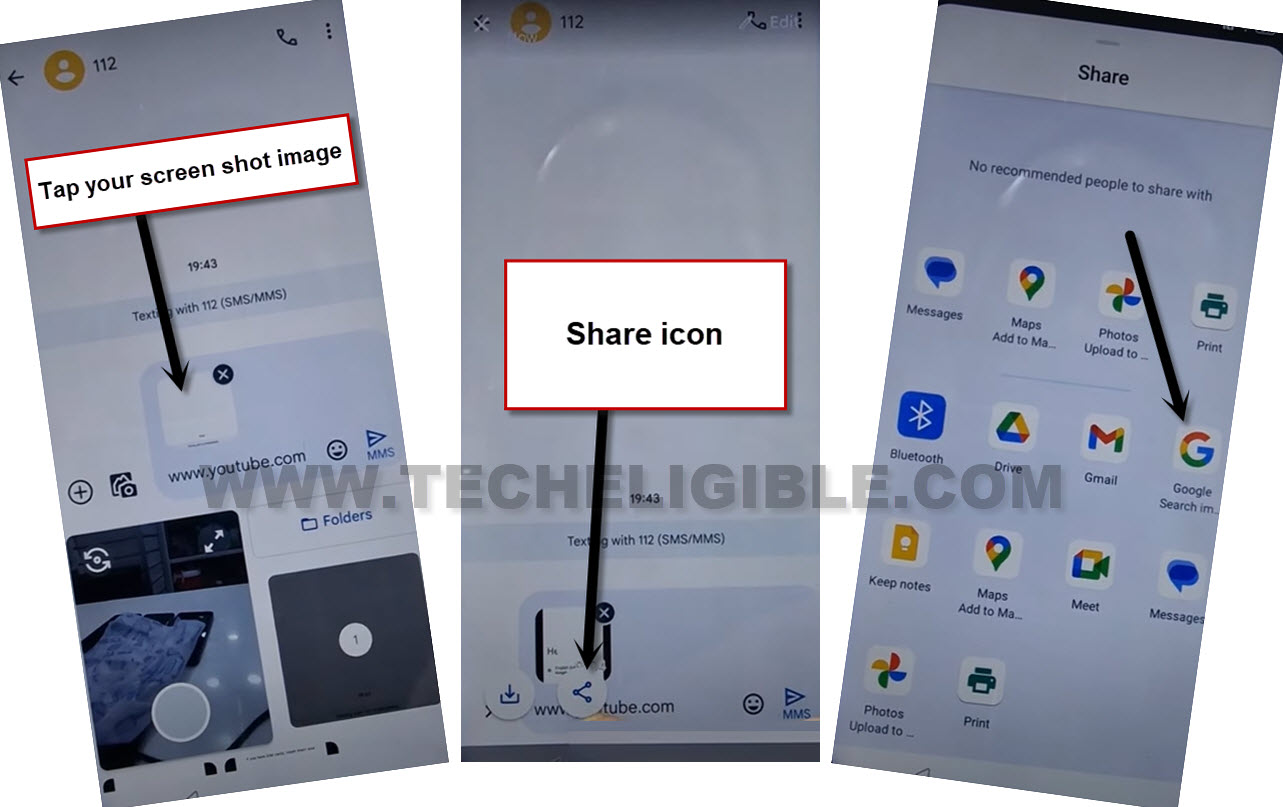
-Open up the phone gallery from there and you will be shown your recently taken screen shot image there.
-Tap on that screen shot image for attaching it as text message..
-Let’s share this image with google search image, for this, tap on the “Image” and hit on “Share” option. After that, select “Google Search image”. (See below image).
-Access the phone gallery from that location, where you will see your recently captured screenshot image.
-Tap on the screenshot image to attach it as a text message.
-Click on the “Image” and choose the “Share” option. Next, select “Google Search image”.
-Once you reach the (Google Lens) page, find the “3 dots” icon. Click on “Privacy Policy”.
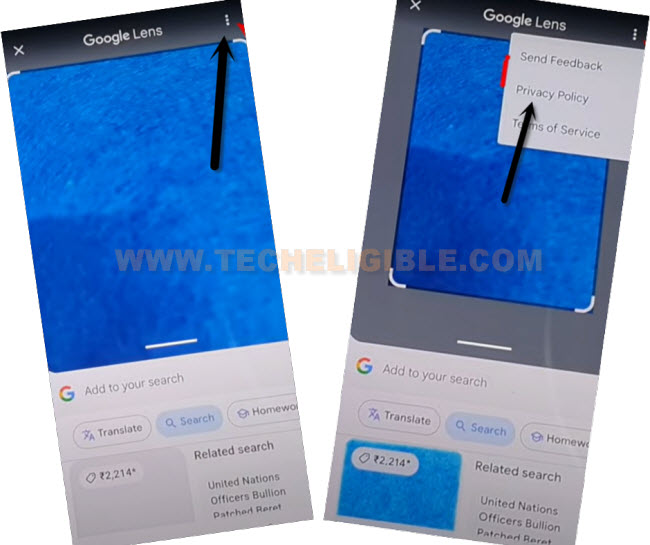
-A welcome screen will appear; simply select “Use without an account”.
-After reaching on the (Privacy Policy) page, select the “Menu” option and then tap the “Google Search” icon.

Go to Settings Page:
-Type “Techeligible” into the search box.
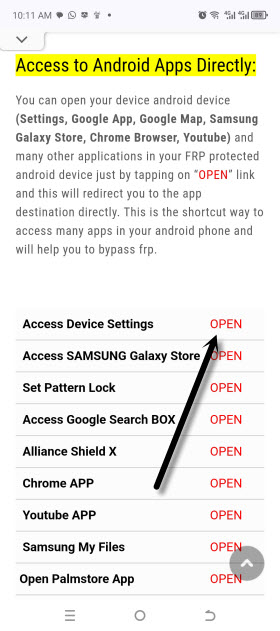
-Click on the first search result to access our official site. From that page, open the site’s “Menu” and navigate to the “Download FRP Tools” section.

-From the frp tools page, tap on “Access device settings” This will direct you to the main settings page of the phone.
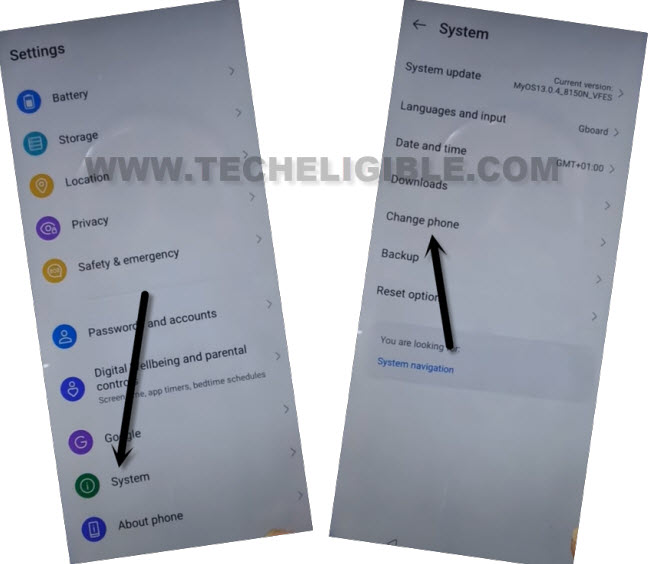
-On the main settings page, select “System.”
-Then tap > Change Phone > Accept.
-Tap the “Allow” several times from the pop-up window.
Share (Clone Phone) App with Other Phone:
-Now let’s share the (ZTE Clone Phone) app with another Android device. For this, click on the “Share Phone Switch” blue link. Afterwards, tap > Share > Turn on (Bluetooth).
-Position another Android phone close to your ZTE phone and switch on the “Bluetooth” option.
-Within a few moments, the name of the other Android device will appear on your ZTE’s display. Simply choose that device, and the (Clone Phone) application will be sent to the other Android phone.

-Now, let us install the received (ZTE Clone Phone) app on the other Android device.
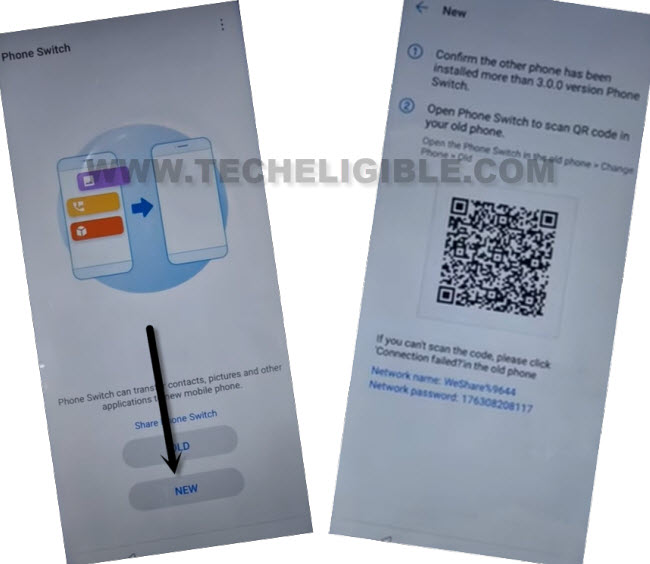
-From the ZTE phone’s screen, return to the main (Phone Switch) page. There, select the “New” option.
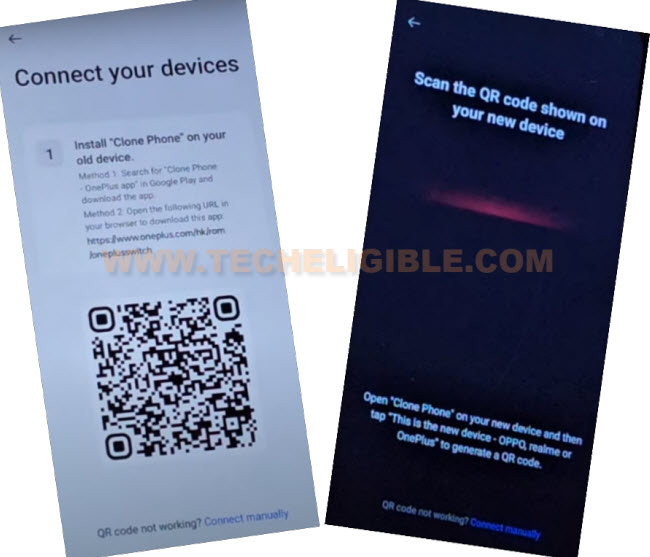
-On the popup screen, repeatedly tap on “While using the app & Allow.” Eventually, a (QR Code) will show on your other android phone screen. (Refer to the image below).
Follow Steps on Other Android Phone:
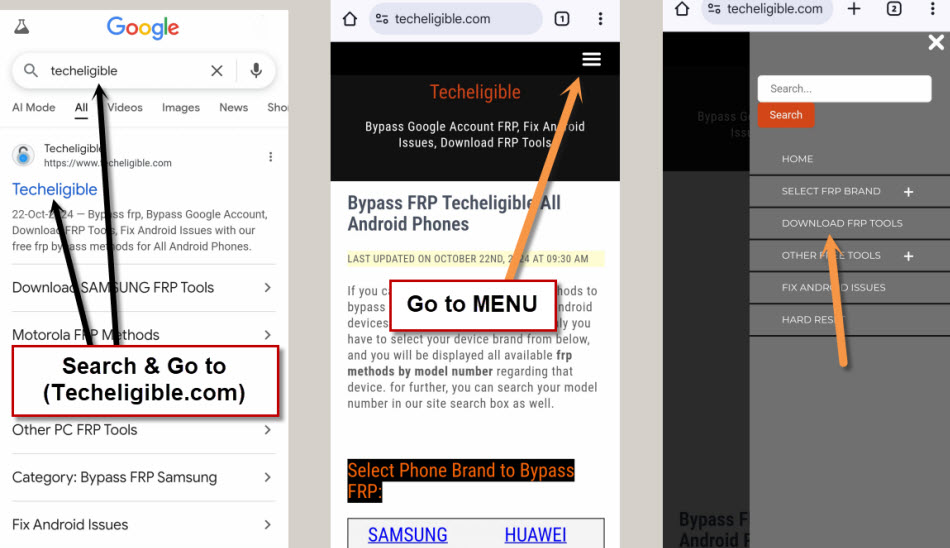
-Open the Chrome browser and search for “Techeligible”
-Access our website and navigate to > Menu > Download FRP Tools.
-On that page, locate and download the application “Activity Launcher” on other android phone.
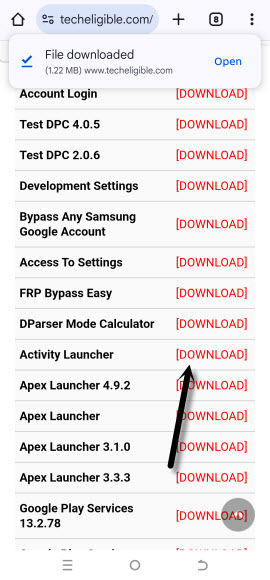
-Once the download finishes, install this app on your other Android device.
-Let’s open the (ZTE Clone Phone) application on the other Android phone, which was transferred via Bluetooth from the ZTE device.
-Select this phone as “Old Phone.” After granting some permissions, you will view a screen for scanning a (QR Code).
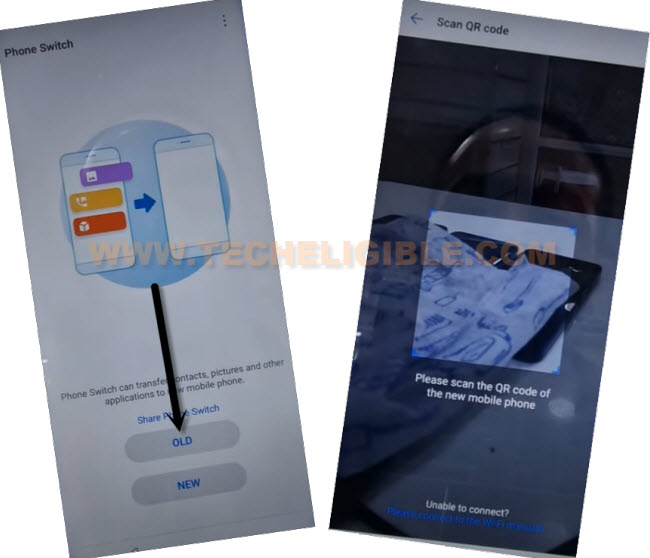
-Let’s scan the QR Code displayed on the ZTE phone using the other phone qr code scanner to link both devices together.
-Once both phones are connected through the Clone Phone app, navigate to “App” on the other phone’s screen and choose the recently downloaded “Activity Launcher” application. Then, send this app to the ZTE phone by selecting the “Start Cloning/Changing” button.
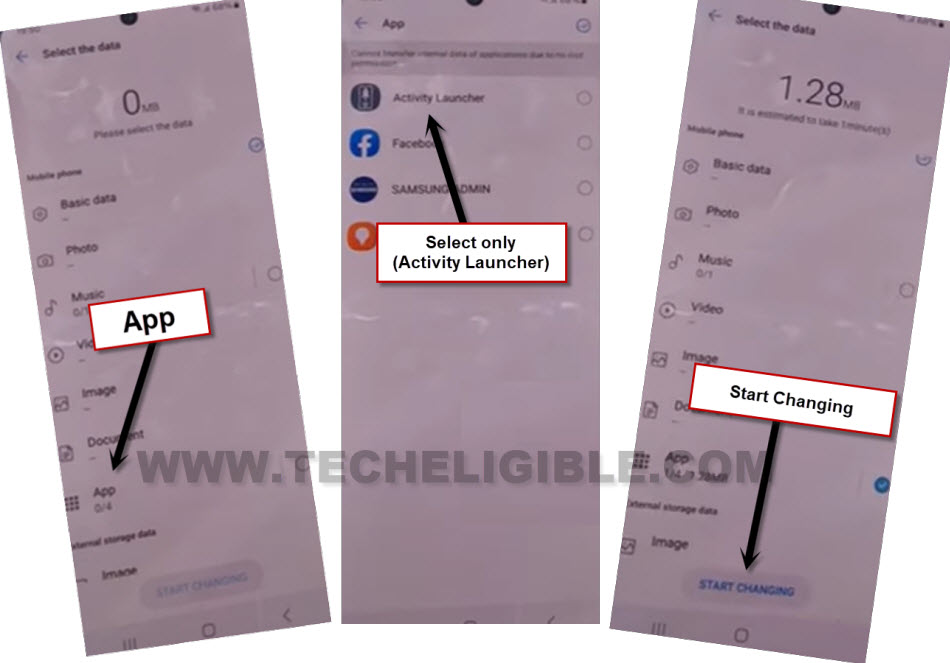
-Wait until the application is successfully received on the ZTE device that is FRP locked.
Get back on FRP Tools Page from ZTE Phone:
-To install the (Activity Launcher) app, we have to return to the FRP tools page. Tap the back arrow several times until you arrive back at the (FRP tools) page.
-Now, let’s hit on “Open Activity Launcher” option. This will initiate the application.
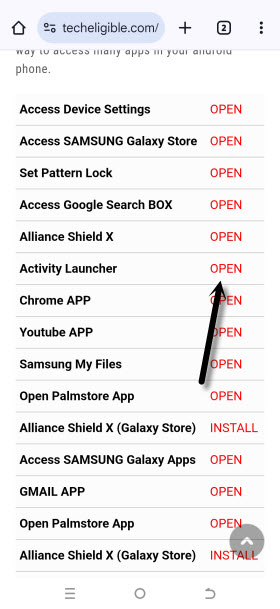
-Stay on the (Loading….) screen, then select “Ok.”
-Within the app, locate and navigate to “Android Setup.”
-This will display a list (com.google.android…). From it, choose the entry labeled (com.google.android.setupwizard.deferred.DeferredTrampolineActivity).
-Ultimately, you will arrive at the finish setup wizard page; just press “Start.”
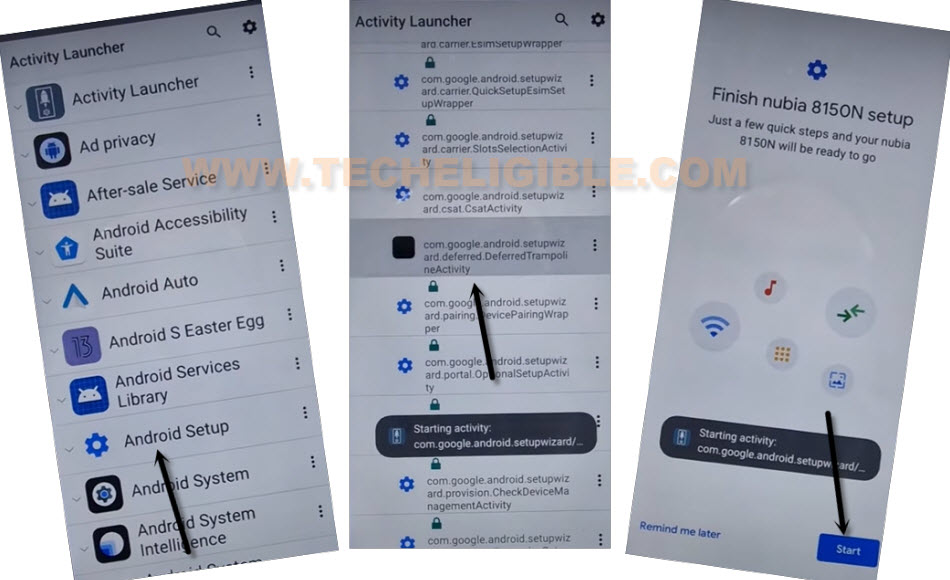
-Subsequently, from the (Use another device) screen, select these options > Next > No Cable > Copy without cable.
-On the pattern lock page, click on the link labeled “Use my google account instead.”
-Then, go to > Next > Next. After that, there will be a (Verify your device) screen.
Follow Steps in other android device:
Note: Ensure both Android devices are connected to the same WiFi network.
-Open the “Google App.” Afterwards, access the “Mic” option from the search box.
-Clearly say “Setup my device.”
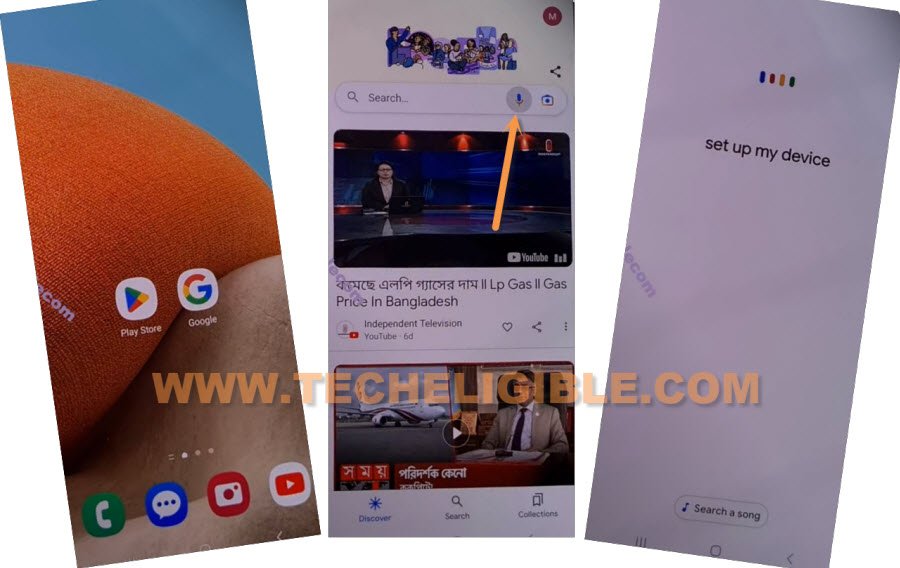
-On the (Getting Started) page, tap the “Next” option.
-In a few seconds, both device screens will display (Shape Verification) icons.
-On the (Other Android device), tap > Next > Copy.
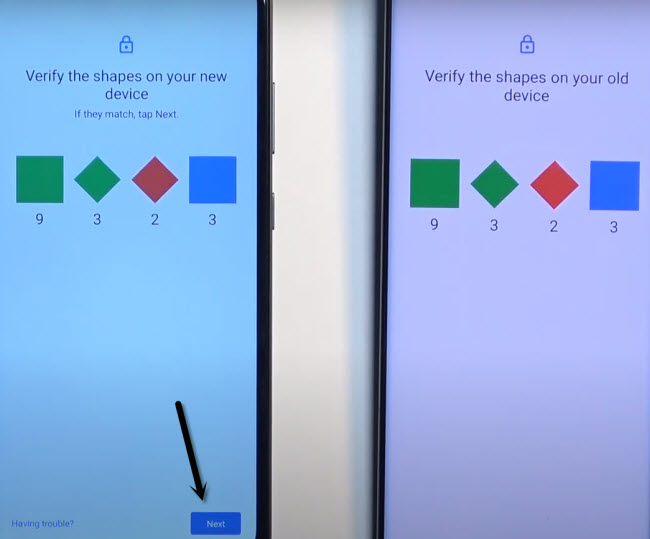
-Wait for the copying process to complete on your (ZTE Android 14) device.
-Ultimately, you might encounter a (Confirm it’s you) page. Access this page using the identical Gmail account that is already signed in on another Android device.
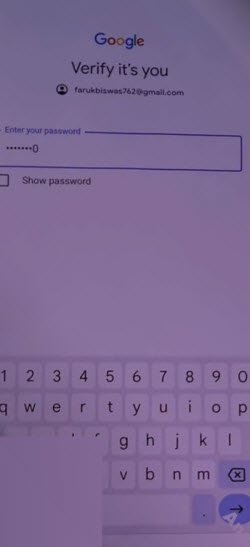
-You are almost done now from frp bypass on ZTE Android 14, just tap to > Don’t Copy > Don’t Copy > Next.
The Bottom Line
In this method, we applied 2 different frp bypass methods on a (ZTE Android 14) phones. In the (Method 1), we simply downloaded the (BFT Tool) on PC. After that, installed the proper USB drivers, then, connected phone to PC. With one click on (Reset FRP) option, we successfully bypassed frp on ZTE Android 14.
In 2nd method, we simply used pin locked SIM card. Through inserting and removing the sim card, we go the (Not Signed in) message on screen. After that, with few tricks, we turned on the screen recording option and accessed to chrome browser. From there, accessed to main settings page and used the (ZTE Clone Phone) application for frp reset.
Frequently Asked Question
I am unable to turn on (Screen Recording) option, getting back to WiFi page again and again from (2nd Method)?
In this case, try to apply (1st FRP Method). There, you just need a free tool (BFT Tool) and Computer.
My device is not being detected by the BFT Tool?
Try installing proper (Unisoc) drivers on computer. Or, switch your device input and use another USB Cable.
Is BFT Tool free to use?
Yeah, this tool is free and can be used on multiple android devices.
My ZTE Android 14 is detected by the tool and FRP is not being bypassed
Re-open the BFT program, try selecting different (Auth) options, such as Tiger T610 (64) & Tiger T606 (64) V2.