
Bypass FRP Account VIVO Y03T Android 14 By Activity Launcher
If you have lost your device google account and unable to get yourself verified being device owner. Then, you will have to setup new FRP protection by signing in with updated google account without any paid services. We will use free (Activity Launcher) application to access the device Android Setup page. After that, you will be able to Bypass FRP Account VIVO Y03T (Android 14). Follow up steps by steps guideline from below.
Note: This method is just for device owner & for educational purpose only.
Lets Begin to Bypass FRP Account VIVO Y03T:
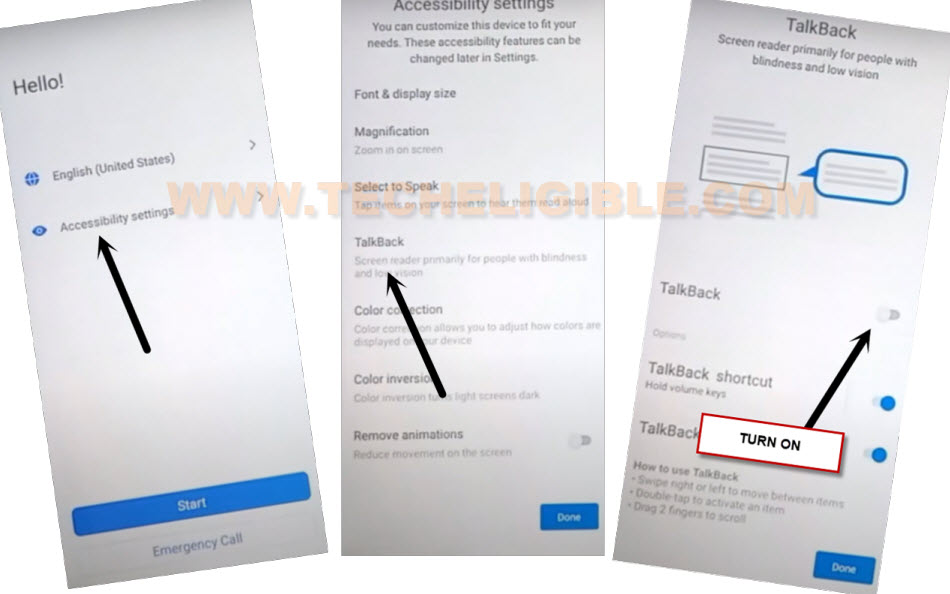
-Turn on device & Connect WIFI first. Go back to on first (Hello!) startup screen.
-Let’s turn on talkback feature by going to > Accessibility Settings > Talkback.
-Turn on “Talkback” from talkback page.
-After that, you will access to (welcome to talkback) page. Just swipe down and swipe right on screen to get (Talkback Menu) popup window.
-Double tap on “Screen Search” option.
-You will access to (Black Screen). Just get back to (Talkback) page again by hitting on back arrow icon two times.

-If you get popup window asking you to allow, just double tap to “Allow” option from there.
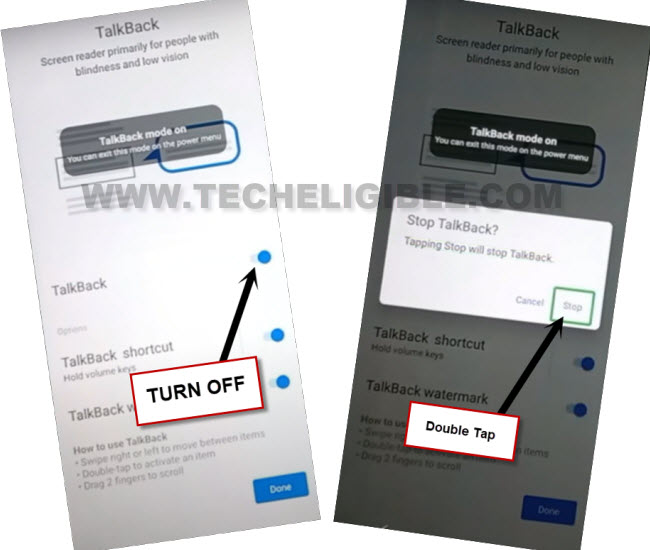
-Turn off talkback option from there by double tap on (Talkback turn off) button. After that, from popup window, double tap to “Stop”.
-Go back to (Hello!) startup page again.
-Tap to > Start > Next > Next.
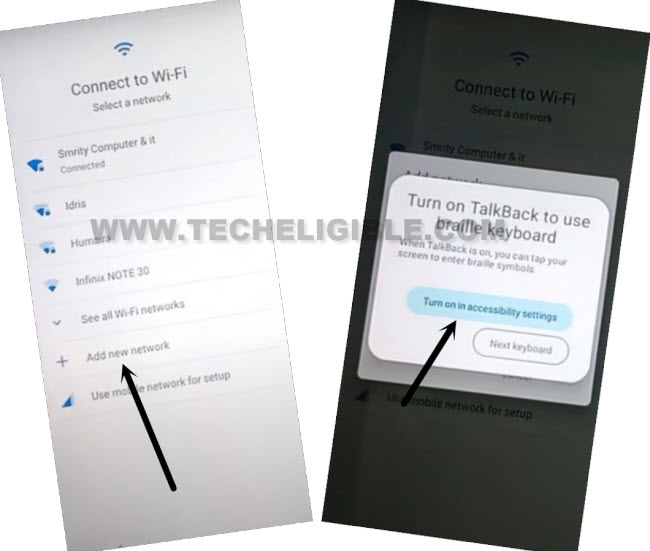
-You will stuck on (Getting your phone ready..) page. Just tap to “back arrow” from bottom to go on (Connect to WiFi) page.
-Let’s tap on “Add new network” option.
-After that, you will have a popup window of (Turn on Talkback to use braille keyboard). Simply, hit on an option of “Turn on in accessibility Settings”.
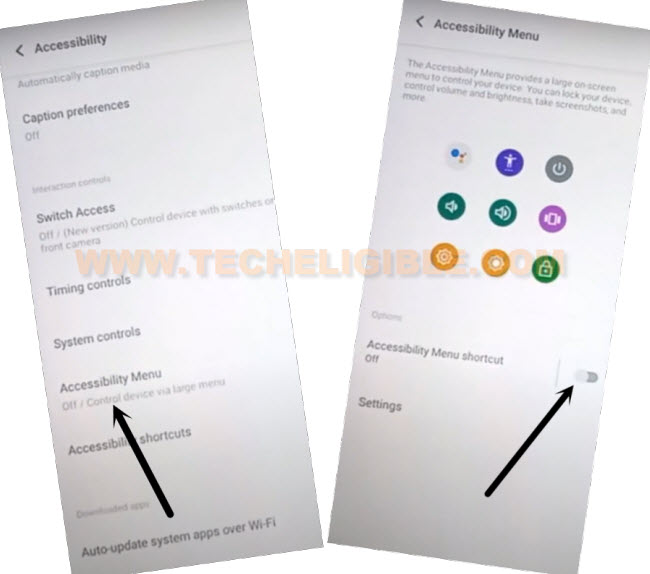
-Go to > Accessibility Menu > turn on (Accessibility menu shortcut).
-Hit on > Allow > Got it. After that, you will start having a (3 dots) icon on right edge of the device screen.
-Go back again to (Hello!) startup page. From there, tap to > 3 dots > Assistant. After that, say loudly “Open Settings” to Bypass FRP Account VIVO Y03T.
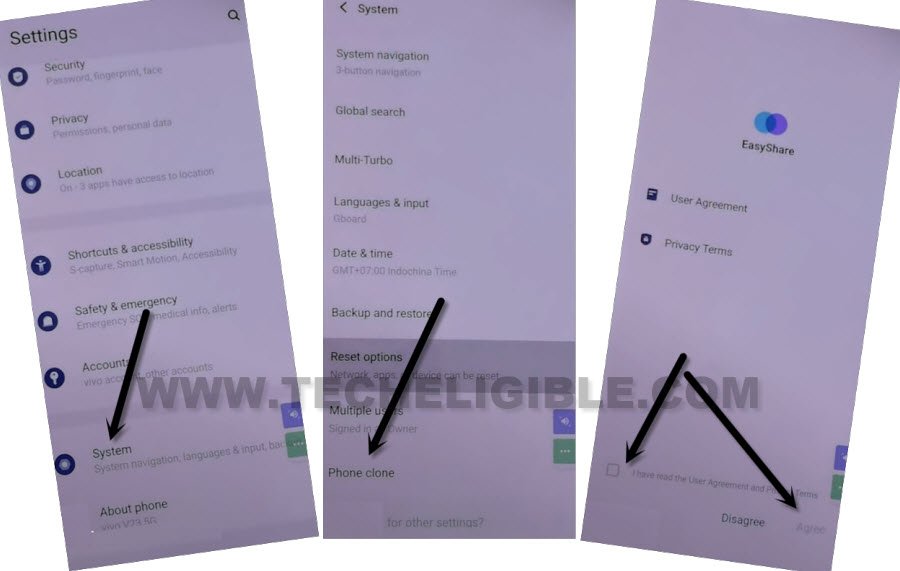
-Congrats, you are now inside your VIVO device main settings page.

Go to Phone Clone Option:
-Go to > System > Phone Clone.
-Check mark option from (Easy Share) popup window, and tap to “Agree”.
-Tap to > This is a new device > Android > Got it.
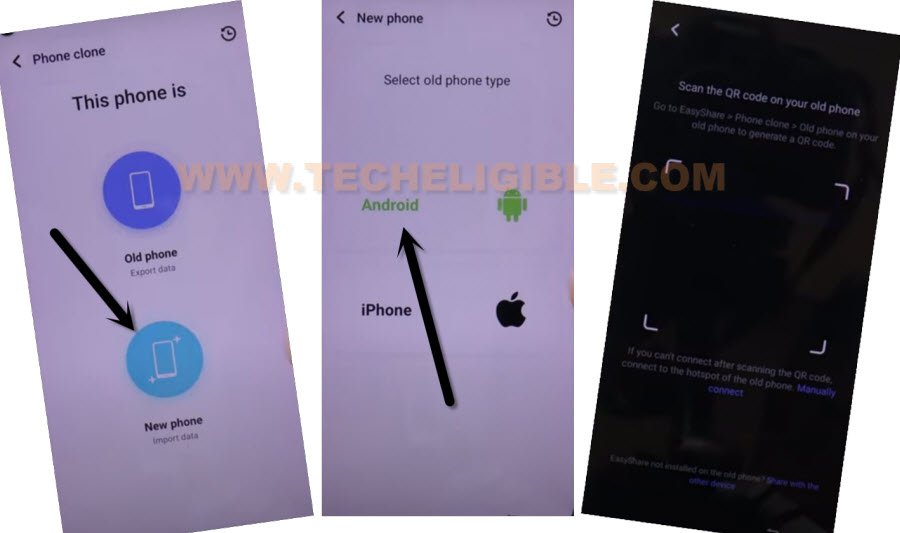
-Tap some times from popup window on > While using the app & Allow.
-You will receive a (QR Code scanner) screen after that.
Bring up Another Android Phone to Connect With:
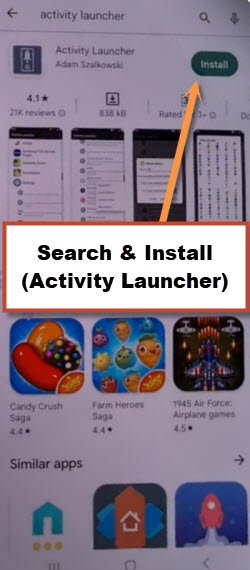
-We need one more android device here. We will download free (Activity Launcher) app in other device through google play store, after that, will transfer to our (VIVO YO3T) device.
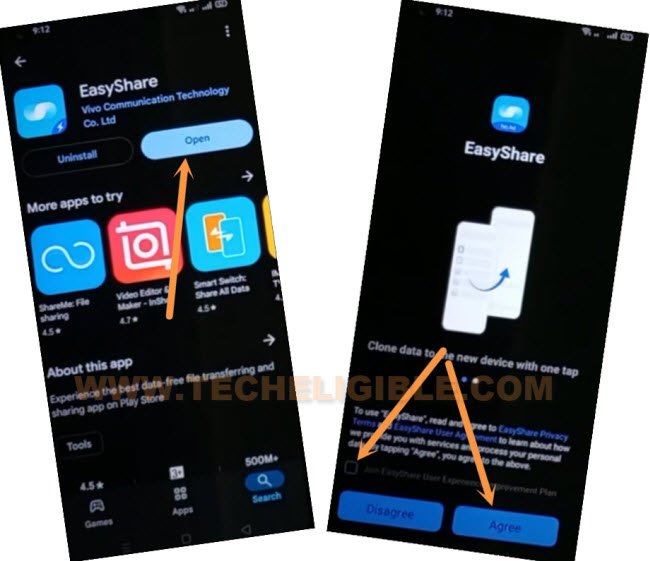
-In other android phone, download & install “Activity Launcher” app directly through google play store.
-Search and download another app “Easy Share” same as shown below.
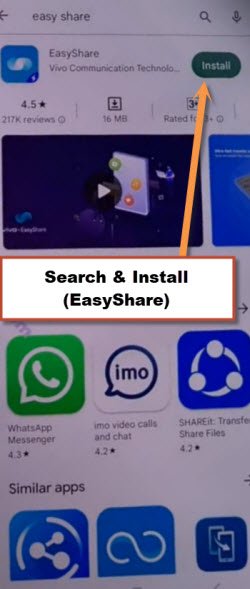
-Once the installation process is done, let’s launch (Easy Share) application by tapping on “Open”. We will connect our frp protected VIVO device using easy share application.
Note: To launch this easy share app completely and reach to (QR Code) screen, you will have to give some permissions in your device first. You can follow below steps accordingly, in your device model, some options could be changed.
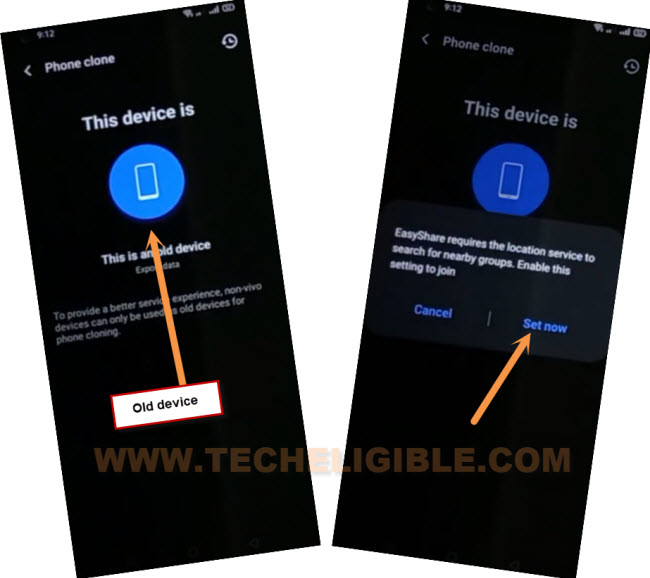
-Tap to > Phone Clone > This is an old device > Set now.

-Turn on location option or you may face some other options to turn on first before using this app. After giving all permissions and turn on some options respectively, just tap to “Back Arrow” icon from bottom to get back to main homepage of easyshare app.
-Tap again on “This is an old device” and tap to “Set now” option from popup.
-Turn on and allow some options from next page. After that, tap to “Back Arrow” icon from bottom.
-You may face again (Permission request) popup screen, just tap to “Set now” option again to Bypass FRP Account VIVO Y03T.
-Turn on “Easyshare” app from next screen. Tap again on “Back Arrow” from bottom.
-Tap again on > This is an old device > Got it > Allow only while using the app.
-Finally, the app is launched successfully and we have accessed to (QR Code) page.
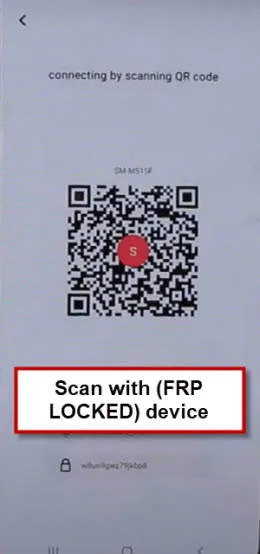
-Let’s scan this QR code page with our other (VIVO YO3T) device.
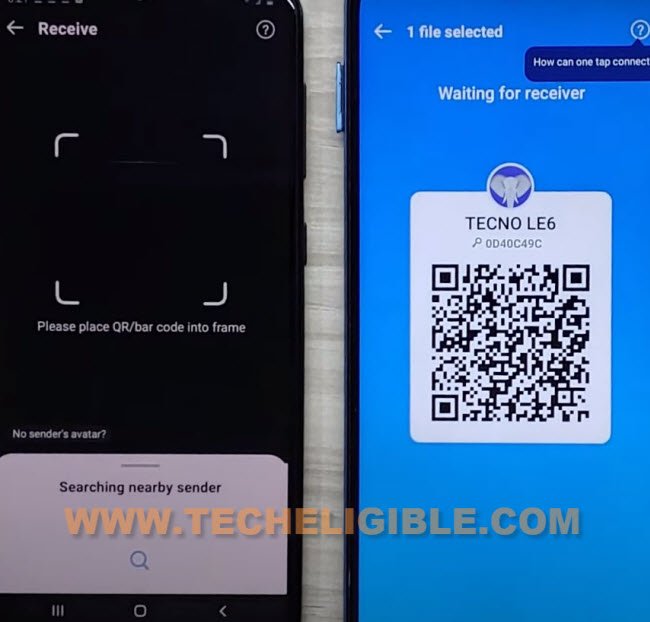
-After both devices connected together, you will see some options in your other android device, just tap to “Got it”. Tew times on “Allow” option.
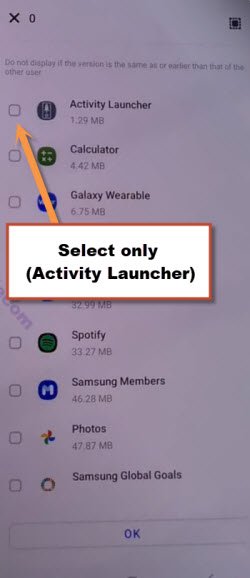
-After that, you will be displayed app list page there. Just un-check from top corner to de-select all options and get into the “Apps”.
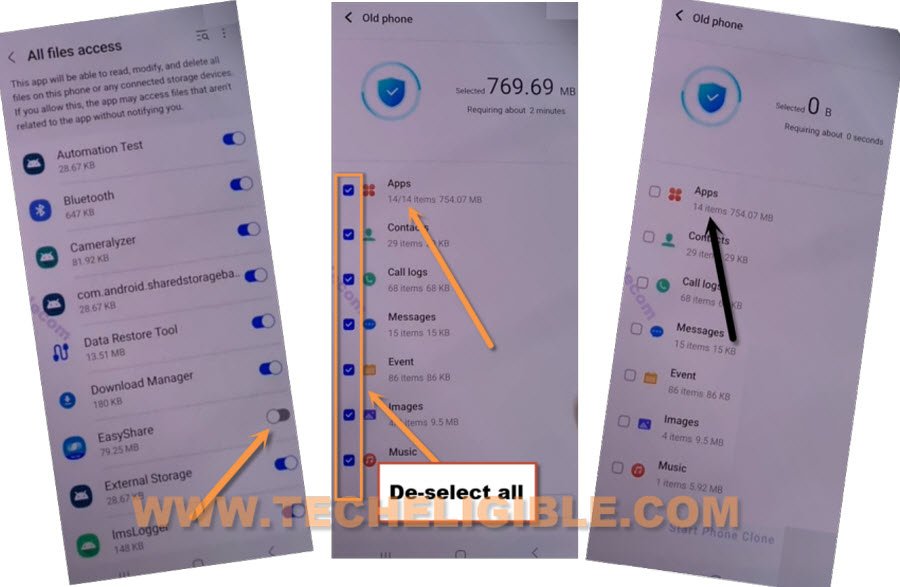
-Select only “Activity Launcher” app from there.
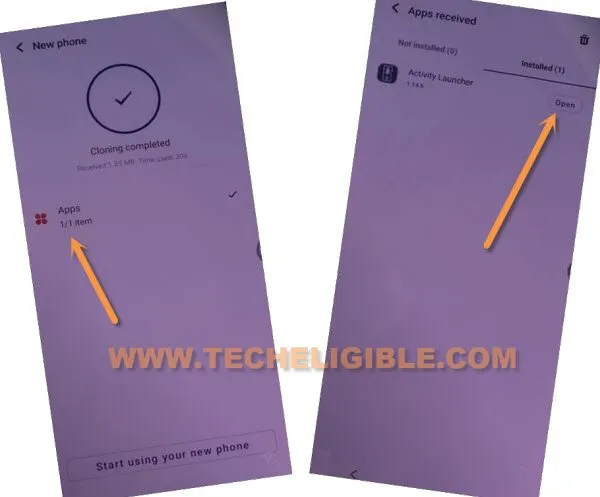
-Hit on > Ok > Next > Start cloning > Done.
-The app (Activity Launcher) has been delivered successfully to your (VIVO Y03T) device.
Follow Steps in VIVO Y03T Device:
-From VIVO device, tap to “Clock icon”.
![]()
-Tap on > Apps > Open.
-Hit on a “Ok” from popup window and wait for loading screen to be done.
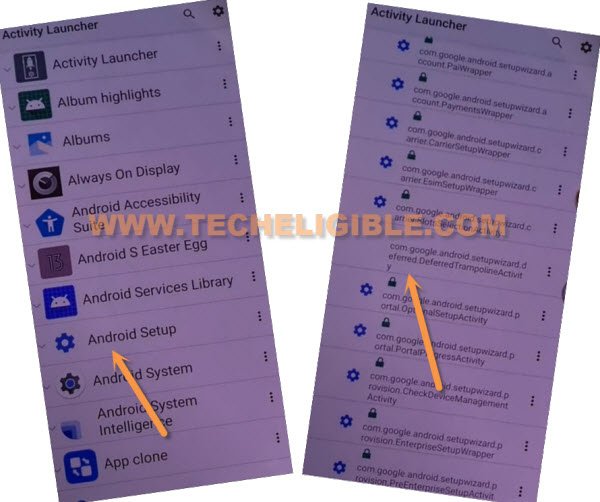
-Hit on “Android Setup”, you will see there a big list of too many android setup, just scroll down, and tap to “com.googel.android.setupwizard.deferredTramplineactivity” same as shown in below image.
-You will reach to (Finish Setup) page. From there, tap to “Start” option.
-If sim card inserted in your device, you may face (Mobile data preference) screen. From there, tap at any (SIM 1 or SIM 2) option. After that, again tap at any (SIM 1 or SIM 2).
Note: If no sim card is inserted, you will not face above options.
-After that, tap to > Next > Next > No Cable > Copy Without Cable > Next.
-You have a popup window of (Turn on talkback …), just tap to “Next Keyboard” option from there.
-After that, hit on a link ” Use my google account instead”.
-Tap to > Next > Next.
-You will have a (Verify your device) screen.
-You are required your (Other Android device) again to setup new google account on VIVO Y03T.

Setup new Google Account By Other Android Device:
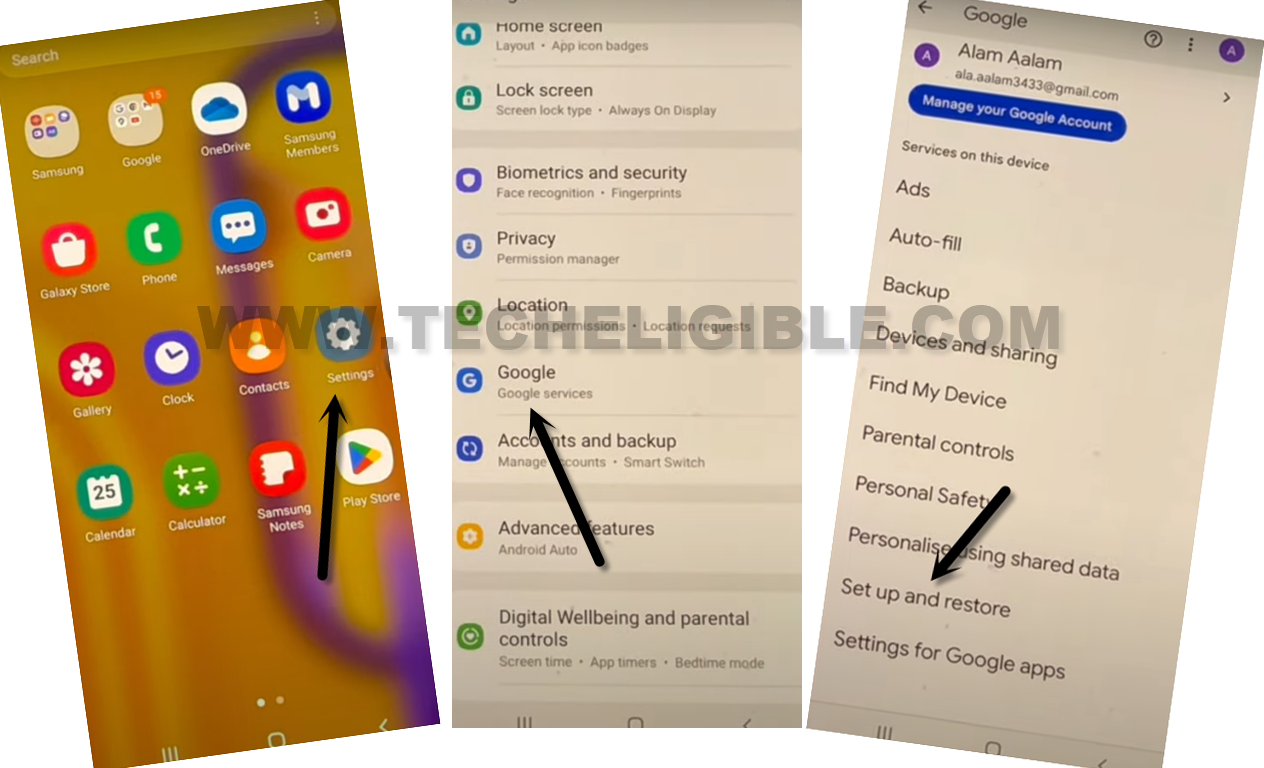
-In other android device, open your device “Settings.
-After that, tap on “Google”. Go to “Setup & Restore” option.
-Lets hit on a > Set up nearby device > Next.
-After that, you will see (Verify the shapes on your device) screen on both devices same as shown below.
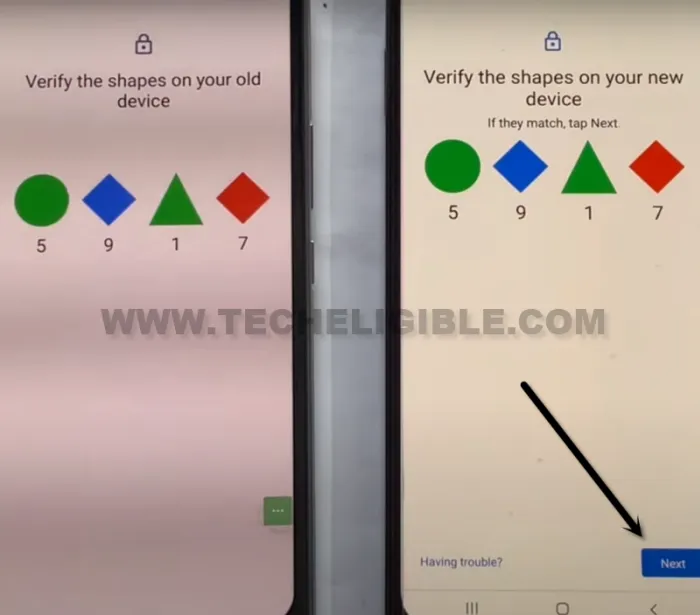
-In other android device, just tap to > Next > Copy.
-Give your other android device Pattern / PIN to complete verification process. After that, you will see (Copying your account…) page.

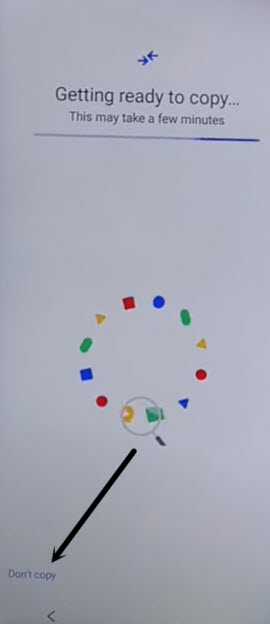
-You will see (Getting ready to copy) page on your VIVO Y03T phone.
-Go to > Don’t Copy > Don’t Copy > Next.
-Congrats, you are all done, the new google account has been setup successfully. You are all done from Bypass FRP Account VIVO Y03T.
-You can complete setup wizard steps easily. Just go to > Accept > Skip > Skip > More > Skip > Skip > No Thanks.
-After that, you will reach back to first (Hello) page.
-You can complete setup wizard steps again easily. If you face any difficulty, you can restart your device without any hassle.
