Bypass FRP Google Pixel 4, 4XL, 4A, 4A 5G [Updated]
These 4 methods are the best one, and working fine to Bypass FRP Google Pixel 4, 4XL, 4A, 4A 5G Android 13, 12, 11, 10 devices without using PC, you can apply both methods one by one according to your device android version, and if you can’t find out any solution to remember and get back your previously added google account, so you should follow up method from here to get back your Google Pixel 4 device.
Warning: Do not try this frp method on a stolen phone, this is a serious crime, if you are trying to bypass frp on a stolen phone, you may also be jailed, this process is for device owner and for educational purpose only.
Top 4 Methods to Removing FRP on Google Pixel 4, 4XL, 4A, 4A 5G:
| 1st FRP Method on Google Pixel 4, 4XL, 4A, 4A 5G [ANDROID 13] New |
| 2nd FRP Method on Google Pixel 4, 4XL, 4A, 4A 5G [ANDROID 12] |
| 3rd FRP Method on Google Pixel 4, 4XL, 4A, 4A 5G [ANDROID 11] |
| 4th FRP Method on Google Pixel 4, 4XL, 4A, 4A 5G [ANDROID 10] |
Method 1: Bypass FRP Google Pixel 4, 4XL, 4A (Android 13)
-Connect WiFi, and go all the way back to first (Welcome to your Pixel) screen, from there tap to > Get Started > Skip.
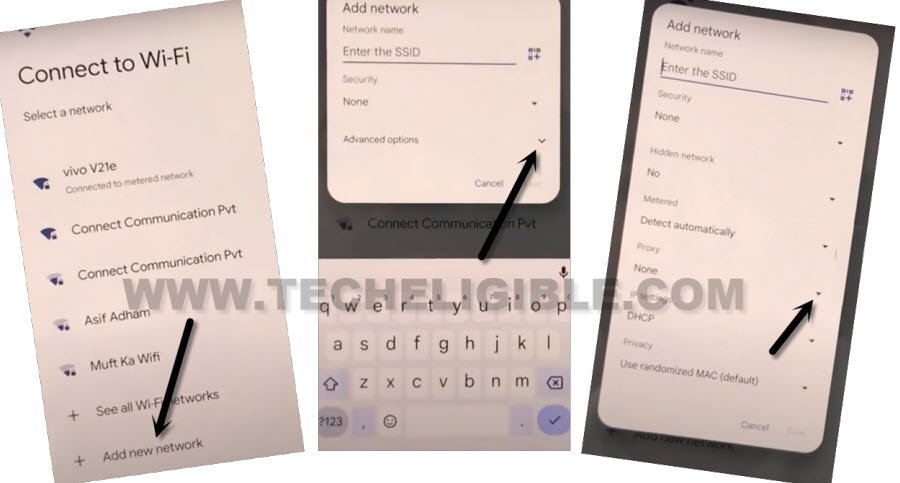
-Hit on “Back Arrow” from bottom, you will see there a (WiFi) screen, tap to > Add net network > Advanced Options > Proxy > Manual.
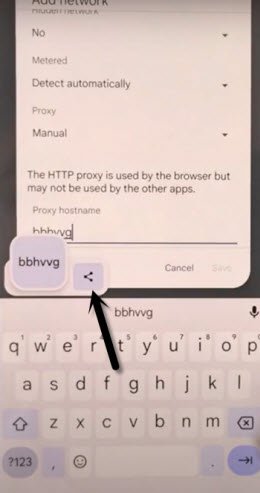
-Type any text there in (Proxy Hostname), and long tap on typed text, after that tap to “Copy”.
-Hit on “Share” .
-Tap to “Message” icon, and go to “New Message”
-Type any number in (TO) field tab, just type there “12345”, and tap to “Sent To” option.
-Now tap on “Camera” icon from message, and this will open a camera, now just take screen shot by long hold both (Volume Down + Power) button simultaneously.
-Once the screen shot is taken, you will see that image in your message, just tap that screen shot.
-After that long hold on screen shot, and tap to “Share”. (See below image).
-Tap to “Map” icon, and hit on “Allow” from popup message.
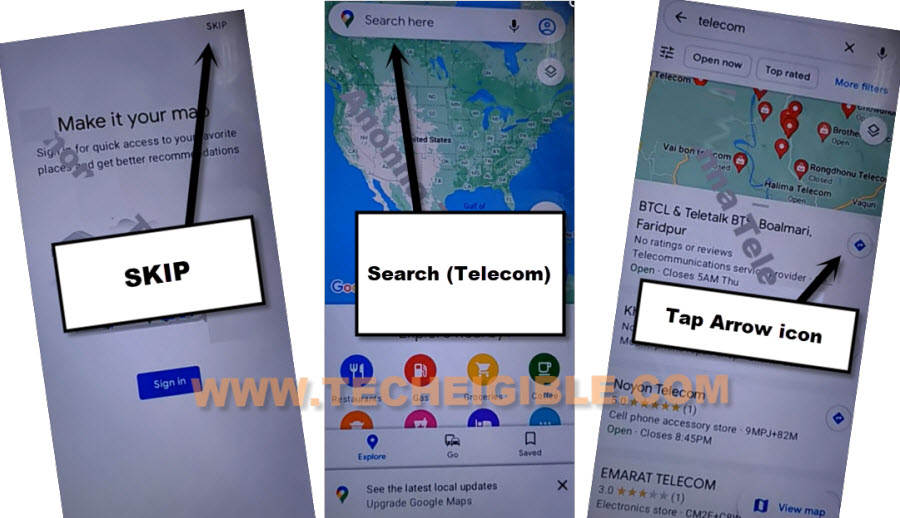
-There you will have another popup of saying (Make it your map), tap anywhere on screen to make it disappear, after that, hit on “Skip” from top right corner, and tap anywhere on screen again to disappear that popup message.
-Hit on “Cross icon” from top left corner, and tap to “Yes”.
-Search any food restaurant, or any telecom office in map, and this will show you all nearest location of their offices.
-Hit on “Blue Arrow” icon.
-Tap to > Start > Got it > Dismiss.
-Go to “Mic icon”, and hit on “Start Download” option, now wait on screen once the downloading process is done.
-Tap again again on “Mic icon” from Google map screen and speak loudly “Open Youtube”, this will launch youtube website, tap on “Allow” from popup message.
-After reaching inside Youtube official website, just tap “Profile icon” from top corner, and go to “Settings”.
-Go to > About > Youtube terms of service.
-After reaching chrome browser, tap to > Accept & Continue > Next > No Thanks.
Setup New Pattern Lock:
-Search in browser “Download FRP Tools“, and go to our website result, from there hit on “Setup Pattern Lock“.
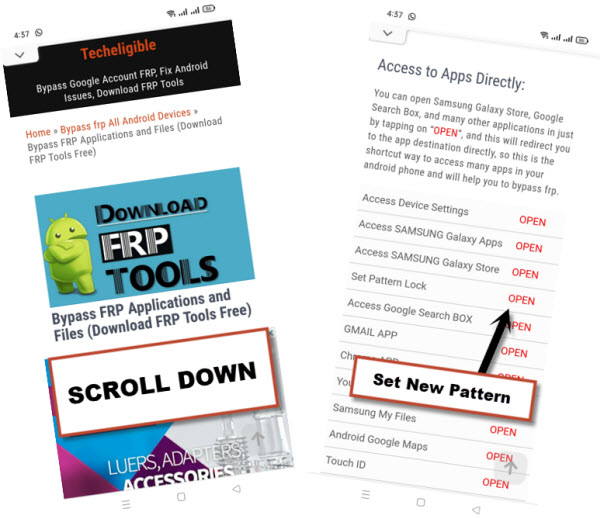
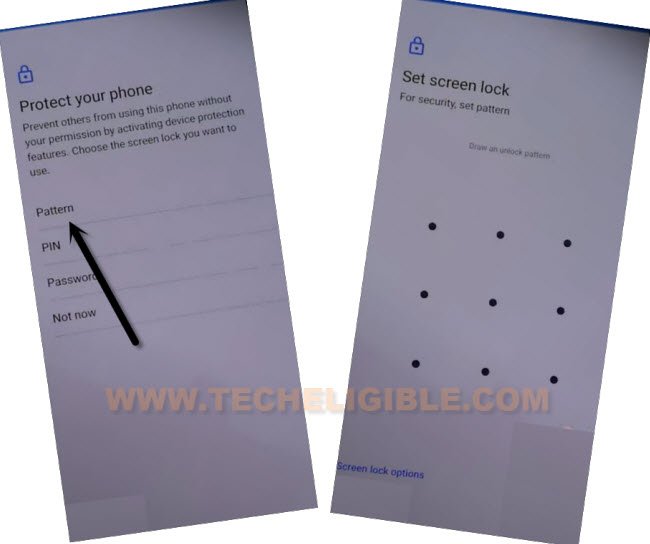
-Tap on “Pattern”, now draw your pattern twice time, and then tap on “Confirm”.
Note: After tapping on “Confirm” button, you must see next screen same as shown in below image, if you see this screen, that means the pattern lock has successfully been added, if you don’t see, that means you will have to setup pattern lock again, and you may have to repeat this for many times by going back to, and tap again on > Pattern> Draw pattern, and tap to “Next”, now draw same pattern and tap to “Confirm”. keep repeating like this until you see below same screen.
-Once you see below screen, that means the pattern has been added, now you are all done from bypass frp Google Pixel.
-Now tap to “Skip” from that screen.
-Go all the way back to first screen by tapping on back arrow multiple times, now finish your setup wizard easily without having any google sign in screen.
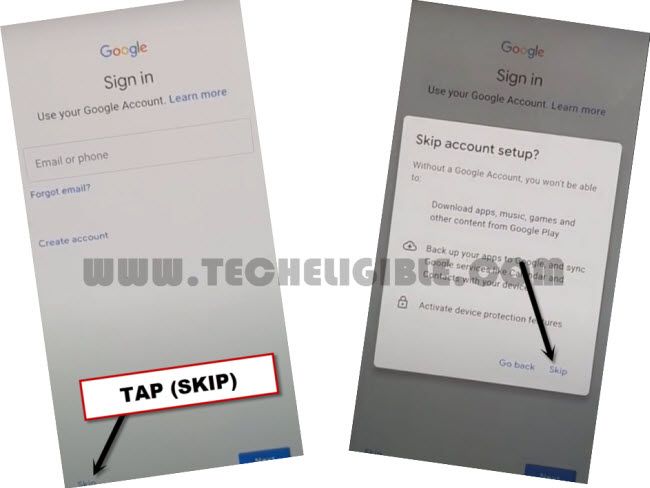
-You may see google sign in screen, but you will be able to skip that screen too, so tap to > Skip > Skip.
Method 2: Remove Google Account on Google Pixel 4, 4XL, 4A (Android 12)
-Turn on WiFi in a FRP locked device, and go back to (Welcome to your Pixel) homepage, from there tap to > Assistive Options > Vision Settings.
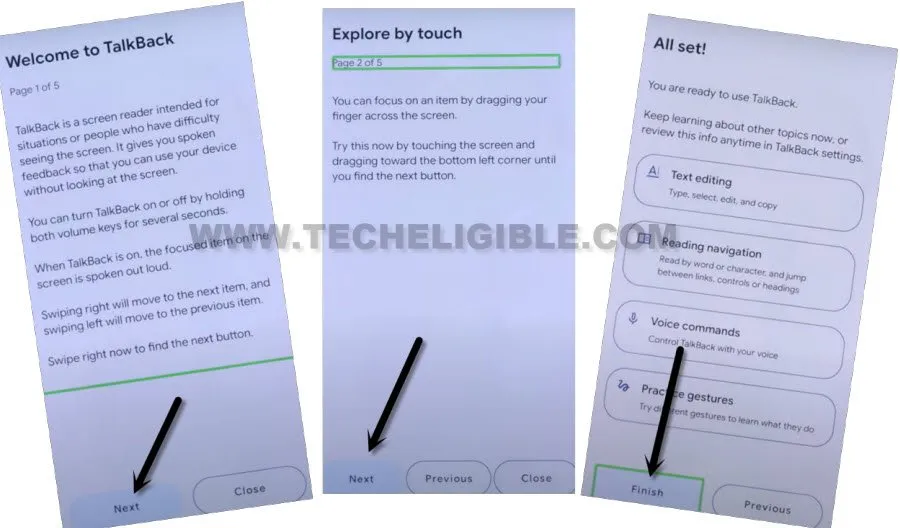
-Now go to > Talkback > Turn on (Use Talkback) feature to easily remove frp.
-After turning on (Talkback) feature, just double tap to > Next > Next > Next > Next> Finish > Allow.
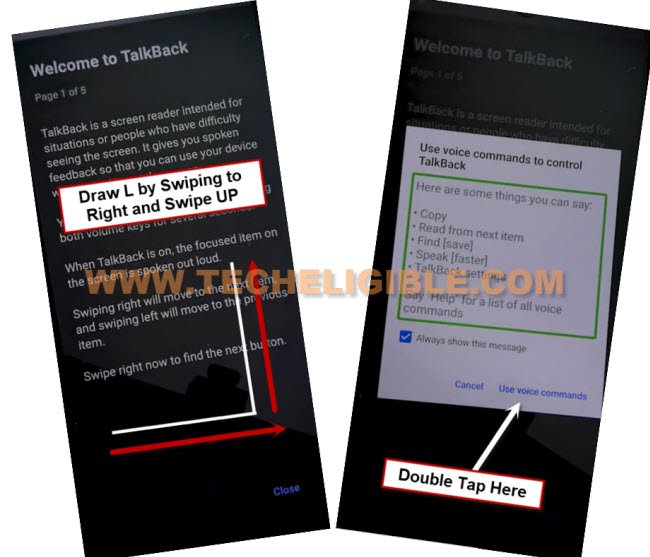
-Make a reverse “L” alphabet on screen by swiping from right to left and then swipe Up, see below image, after that double tap on > While using the app > Use Voice Command.
-Speak loudly “Open Google Assistant”, and you will see there another screen of saying (Your assistant needs additional downloads).
-Double hit on “Start Download”, now just wait until downloading process is done.
-Once downloading process is done, you will get back to (Talkback) screen.
-Make reverse “L” shape again, and double tap on “Use voice command”.
-After that, speak loudly again “Open Google Assistant”.
-You will see there a message saying (Hi, how can I help?), there must be a “Keyboard’ icon at the bottom right corner, just double tap on that “Keyboard” icon.
-Search and go to “Youtube”.
-After reaching inside Youtube official website, just tap “Profile icon” from top corner, and go to “Settings”.
-Go to > About > Youtube terms of service.
-After reaching chrome browser, tap to > Accept & Continue > Next > No Thanks.
Go to Device Settings Directly:
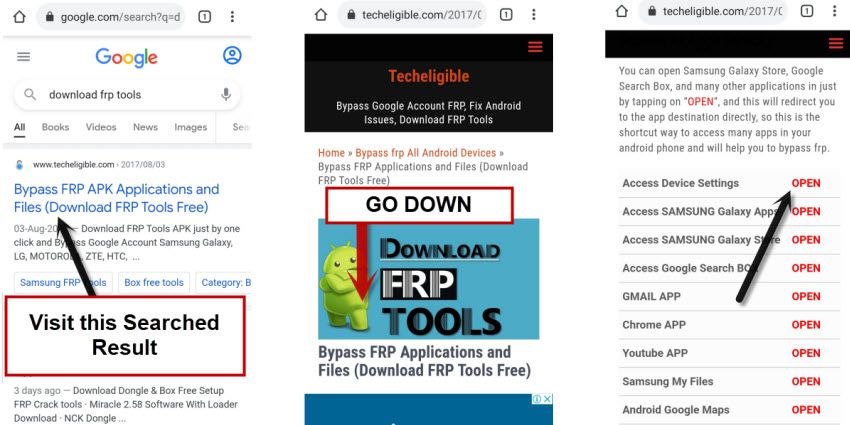
-Search in browser “Download FFRP Tools“, and visit our website searched result.
-From our website page, go down and tap on “Access Device Settings” option same as shown in below image.
-Let’s just turn off talkback by swiping down, and go to “Accessibility’, from there, tap to “Talkback”, now toggle off the “Use Talkback” option from there, after that, you won’t need to hit single option twice time.
-Go back to “Settings” by hitting on “Back Arrow” from up left corner.
-Now we have to turn on shortcut menu just by going inside again > Accessibility > Accessibility Menu > Turn on.
-Once you enable this, (3 dots) will just start popping up at bottom right corner.
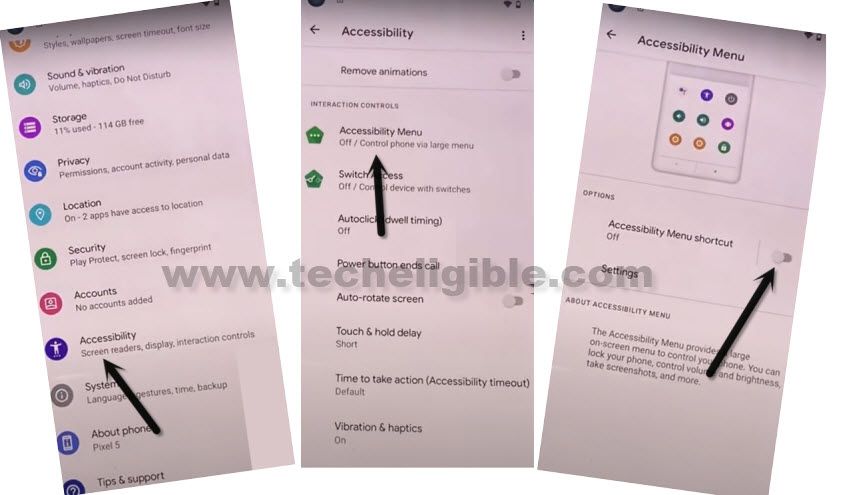
-We have to get back to “Settings”, from there tap on “Apps”, and then go to “See all apps”.
-Tap to “3 dots” from top corner and go to “Show system” same as displayed in below snap.
![]()
Force Stop & Disable Applications:
–Find and tap to “Android Setup” same as shown in below image, so just tap to > Force Stop > OK.
![]()
-We have to disable one main application, after that you will be able to easily finish setup wizard without signing with any google account, find and tap to > Google Play Services > Force Stop > OK, now hit on > Disable > Disable App.
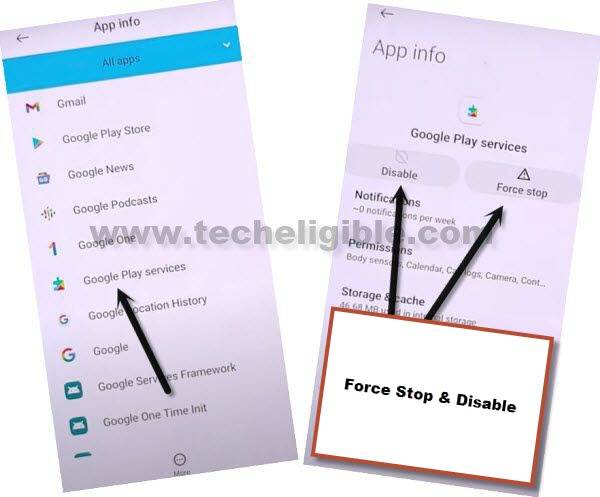
-Restart device, after that, from first (Welcome to Your Pixel) screen, tap on > Get Started > Skip > Don’t Copy, you will see a loading screen.
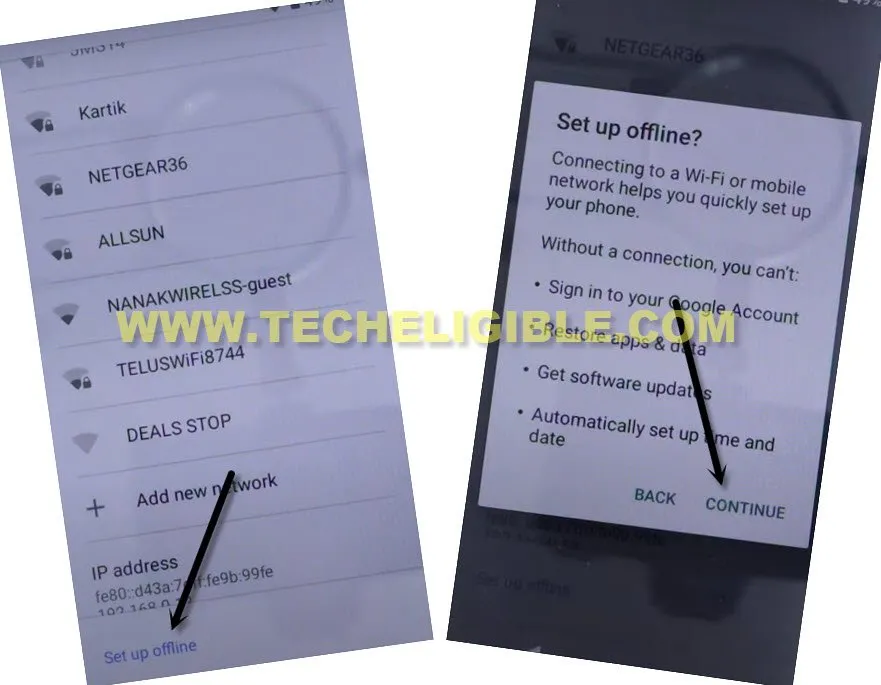
-Now Tap on “Back Arrow” 2 times to get back to WiFi screen, from there hit on > Setup Offline > Continue.
-Afterwards, the (Just a sec…) screen will start appearing up there, this screen will not go away until we turn on (Google Play Services) app again by following below 3 steps very quickly.
Apply 4 Steps very Quickly:
-Quickly hit on > 3 dots icon > Assistant > Bottom left icon > Settings.
Note: You may fail at first few attempts, just keep repeating until you hit all 4 options successfully, and you reach to (Google Play Services).
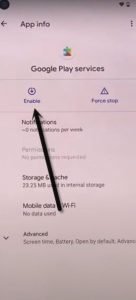
-Now tap to “Enable” button from google play services.
-Once you enabled google play services successfully, that means you are all done from Bypass Google Account on Google Pixel 4, Pixel 4A, 4XL, now we just have to tap on “Back Arrow” from bottom only one time, and there you will see a (Google Services) screen.
-Finish rest steps by yourself, because you are not required any extra help here, the FRP has been removed completely.
Method 3: Remove FRP on Google Pixel 4 | 4XL | 4A | 4A 5G [Android 11]
This method can also be applied on Google Pixel 4A (5G), Pixel 4XL, Pixel 4, Pixel 3XL, Pixel 3 (Android 11), just follow steps carefully in order add new FRP protection with your new Google Account.
1.Start with connecting wifi in your smartphone & go back to (Hi There) homepage.
2.Choose language same as shown in below image.
![]()
3.Hit on > Right Option > Left Option > Back Arrow.
![]()
4.Tap to > + Symbol > + Symbol (To open keyboard).
5.You have to long tap on (Space Bar) from keyboard, and tap very last “Option” .
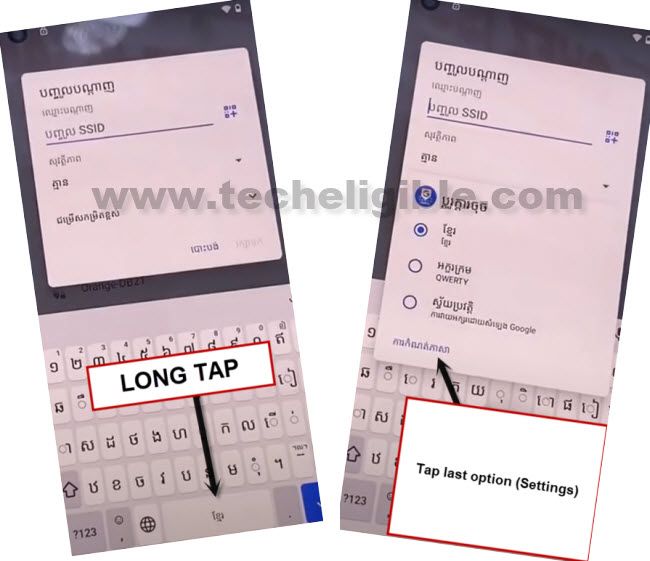
6.You have to tap on “Blue Button”, and then choose any language which contains an arrow symbol as well.
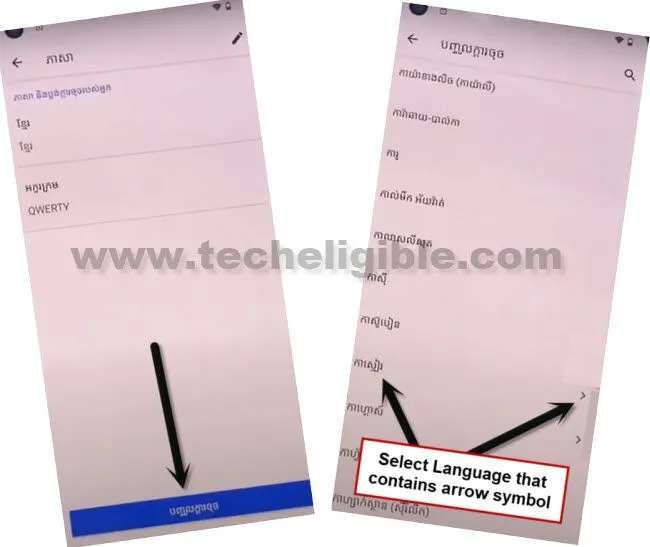
7.Hit on “3 dots” from the top right, and select “2nd option”.
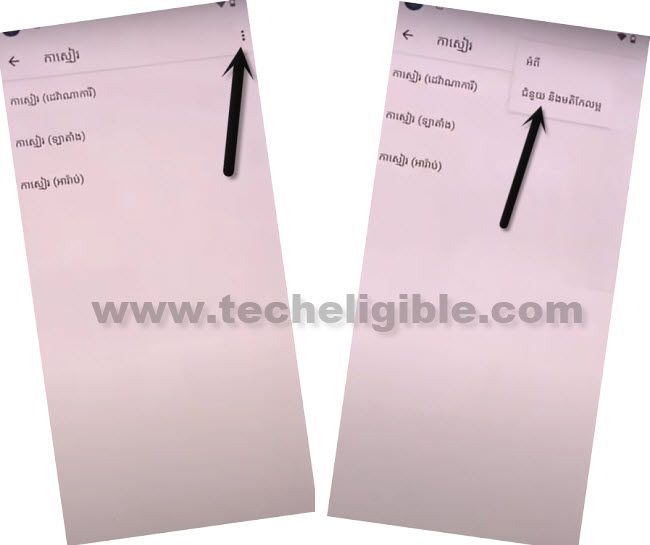
Access to Youtube Website:
8. Tap on “Android Switch Access for android”.
9. Tap on “Share Arrow” from top right corner, and then select “Message”.
![]()
10. After that, tap to “Right Option” from popup window.
11. Type any digits (123456), and then tap on “Check Mark” icon from bottom right corner of the keyboard.
12. Send message “www.youtube.com”, and the url will convert to a hyperlink, just tap on that hyperlink to open youtube website.
Access to Settings Pixel 4:
13. Search there “Download frp tools“, and go to our website searched result from there.
14 .Tap to “Access Device Settings“, this will redirect inside device settings.
Choose English Language:
15. Go Down & hit on > Exclamation Symbol > World icon > Language icon.
![]()
16. Tap to “+” option to add language & go to > English > United States.
17. Swipe the (English United States) language to the top.
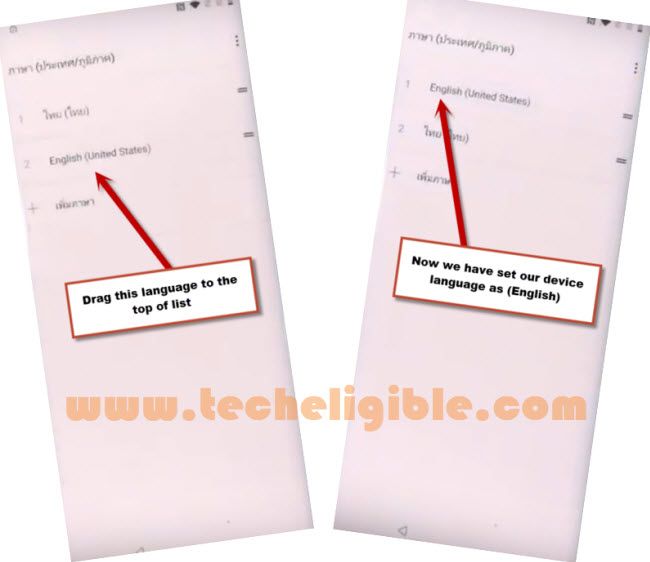
18. Go back to > Settings > Accessibility > Accessibility MENU.
Enable Shortcut Menu:
19. Turn on “Accessibility Menu Shortcut”

20. Allow > Got it, and afterwards, go to > Settings > Enable (Large Buttons).
![]()
Note: Do make sure this option (Large Buttons) has been turned on successfully, to verify, just swipe up from bottom of the screen 2-3 times smoothly, this will bring up for you 4 big icons which is called shortcut menu same as shown in below image.
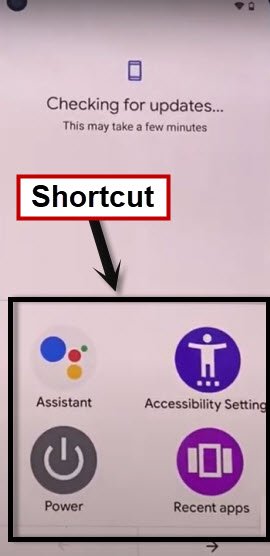
21. Go back to “Settings”, and then tap to > Apps & Notifications > See All Apps.
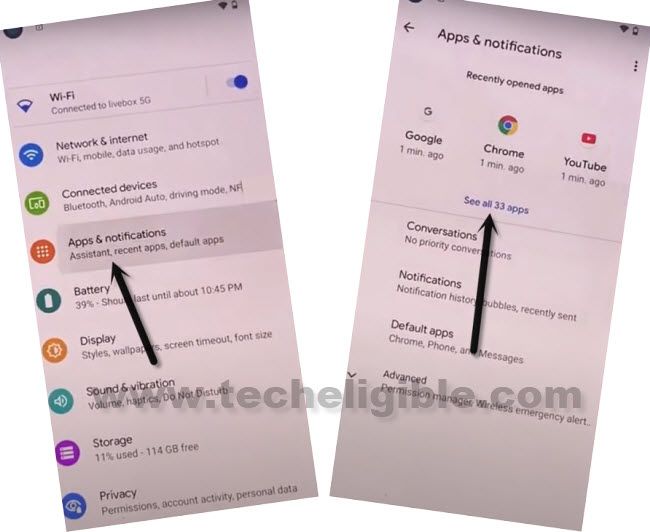
22. Hit on “3 dots” from top right, and tap “Show Systems”.
Disable Some Apps:
23. Search “Pixel”, and then go to “Pixel Setup”.
![]()
24. Hit on > Force Stop > Storage & Cache > Clear Cache.
![]()
25. Go back, and tap on > Disable > Disable App (Google Pixel Setup).
26. Go back to app list, and tap “3 dots” from top right corner, and hit on “Hide System”.
27. Find and Tap to > Android Setup > Force Stop > Storage and Cache > Clear Cache, and then go back to app list.
28. Tap to > Google Play Services > Force Stop > OK > Disable > Disable App.
29. Storage & Cache > Clear Cache.
Now we have successfully disabled and cleared cache of all 3 apps (Pixel Setup + Android Setup + Google Play Services), this will assist us to bypass frp.
Complete Initial Setup:
30. By hitting on back arrow several times, get back to (Hi there) homepage.
31. Start > SKIP > Don’t Copy.
32. Wait for 10-15 seconds on “Checking for update…” screen, and afterwards bring shortcut menu by swiping up from bottom of the screen.
33. From the shortcut menu, just go to > Assistant > Settings.
![]()
34. Now you just have to Enable “Google Play Services” in order to bypass checking for update.. screen.
35. Tap on “Back Arrow”, and then tap on “Not Now”.
36. Tap on > More > More > Accept.
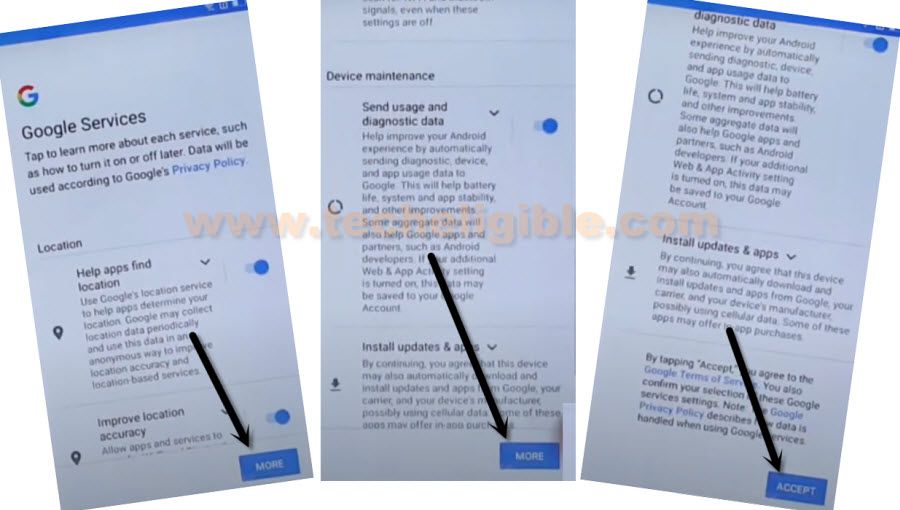
37. From the screen of Set Screen Lock, just hit on > SKIP > SKIP.
![]()
38. From review additional app, uncheck all options, and tap to “OK’, and hit on “Light”, and then go to “Next”.
Congrats, you have got accessed inside your device after finishing up setup wizard.
Sign in with Gmail Account:
39. Open “Google Play Store”, and tap to “Sign in” button & Sign with your any Gmail account.
![]()
Note: The FRP Protection has been removed successfully, so if you want to add new FRP lock, for that you will have to add your personal new Gmail Account by going into the settings of Google Pixel 4 Android 11.
Method 4: Bypass FRP Google Pixel 4 | 4XL | 4A | 4A 5G (ANDROID 10)
Latest way to Bypass FRP Google Pixel 4, Pixel 3, Pixel 2 XL Android 10, this method will work almost on All Google Pixel Android 10 devices, you don’t need any PC for this method, just connect internet in your device and start following all below steps to access your device and add new Gmail account to bypass google account permanently.
Warning: This method is only for Device Owner.
-Connect Wi-Fi first.
-Get back to very first “Hi there” screen.
-Tap on > Emergency Call > Emergency Information > Emergency Information.
-Tap on “Pencil icon” from the top right corner.
-Now tap on “NAME”, and after that you will get keyboard.
-From the keyboard, just long tap on “World icon”, after that you will receive popup window of “Change Keyboard”.
-Tap on “Language Settings”.
-Tap on “Add Keyboard”.
-There you will see a list of languages, just go down and tap on “French”.
-Tap on “3 dots” from top right corner and select “Help & Feedback”.
-Type in search box “Use Morse Code”.
-Tap on “Use Morse Code” from the search result.
-Now tap on youtube video “Play icon”, after that you will receive “3 dots” on the video.
-Just tap on “3 dots” on the video right corner and then select “Share”.
-Again tap on “3 dots” which is right after the Twitter icon.
-Tap on “Not Now” from the update window.
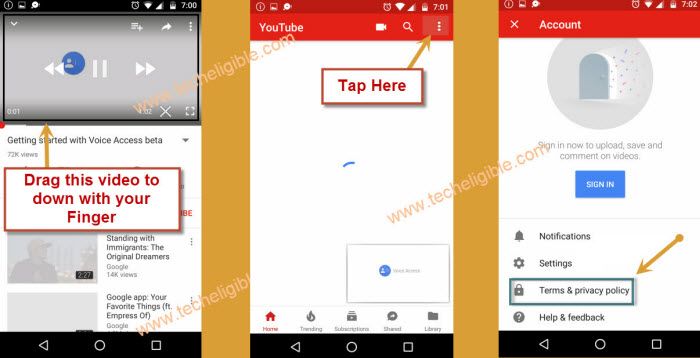
-Drag down the youtube video and then tap on “3 dots” from the top right corner.
-Select “Terms & Privacy Policy”.
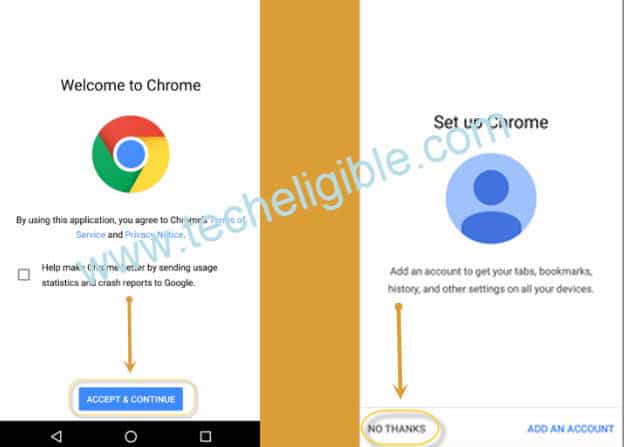
-From the welcome to chrome screen, just hit on > Accept & Continue > Next > No Thanks.
-Congrats, you have got the address bar top of your device screen, now we can easily download frp bypass app.
Download Google Pixel FRP Apps:
-Type in address bar “Download frp tools“.
-Visit 1st search result as show in below image.
-Download from there below 3 applications.
! Apex Launcher 3.3.3.
!! Google Account Manager 6.
!!! Account Login.
-Wait until downloading finish all 3 apps.
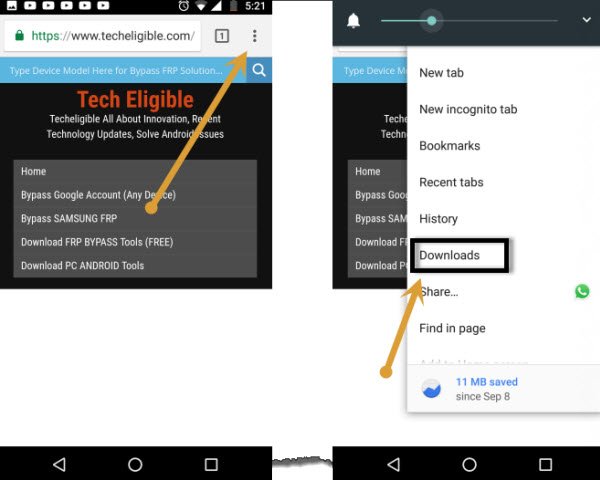
-Go to top, and there you will be able to see “3 dots” at the top right corner of the browser.
-Tap on “3 dots”, and select “Downloads”.
Note: If you do not see 3 dots, download any one app again, on downloading finihs, you will receive a popup window bottom of your screen, just tap on that to access download folder.
Install Apex Launcher:
-Tap on “Apex Launcher”.
-From the popup window, just tap on “Settings”.
-Enable the option of “Allow from this source”.
-Tap on “Back Key”.
-There you will see apex launcher popup window, just tap on > Install > Open > Continue.
-Go “MENU”, and open “Download” folder, where you will be able to see your all downloaded apps.
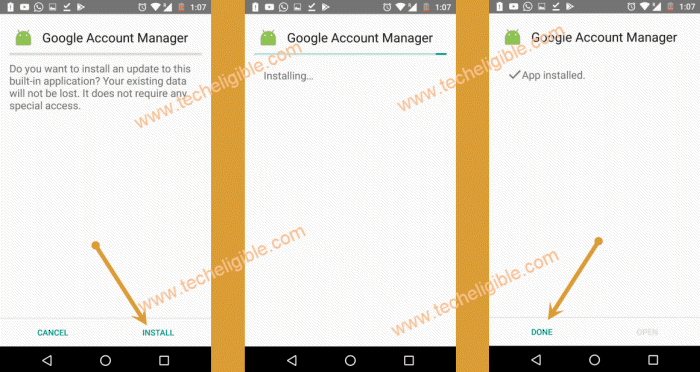
-Tap on > Google Account Manager 6 > Install > Done.
-Go back to download folder.
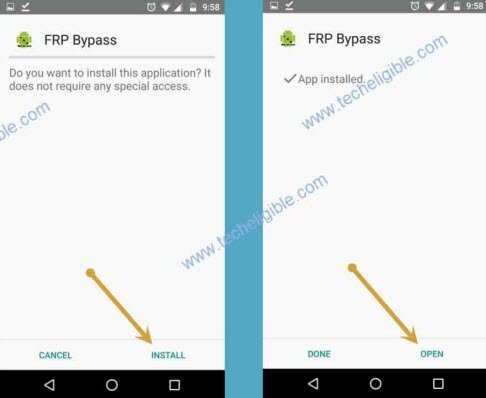
-Tap on > Account Login > Install > Open.
Add New Gmail Account:
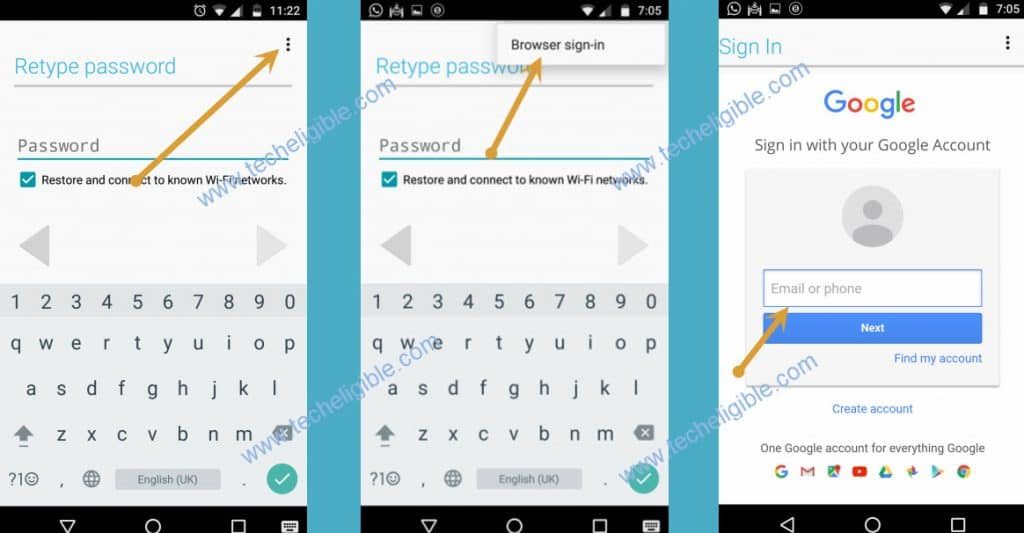
-Tap on 3 dots from top right corner.
-Select “Browser Sign-in”.
-Sign in there using your any active Gmail account to Bypass FRP Google Pixel 4/3/2 XL.
-Now go back to your device “MENU” by tapping on back key.
-Open “Chrome Browser”.
-Type in search box “Find My Device Google”.
-Tap on “Find Your Phone Google Account” from the search result.
-Tap on “Sign in to Start”.
-Sing in with your gmail account.
-Tap on “Google Pixel 4,3,2 XL” whatever model you have.
-Tap on “Locate”.
-Wait for 1-2 minute.
-Get back to “Chrome browser Search result” screen.
-Again search “Find My Device”.
-There you will see “Sign in” screen, just tap on that.
-Wait few seconds, and then tap on “Secure Device”.
-Set your any 4 digit password, this password we will use later to unlock device.
-After entering password, just tap on > Next > OK.
-After that type any random words in recovery message.
-Also give phone number and then tap on “SECURE DEVICE” button.
-After that, you will receive notification on your device screen, just tap on “BACK KEY”.
-Swipe up the screen to unlock.
-Give the same password, that you have set before.
-After that your device will be unlocked.
-Go back to “MENU”.
-Go to > Settings > System > Reset Option > Erase all data factory reset
Note: This will erase all your device, so get backup of your important contacts and data.
-Tap on “Erase all data” button.
-Re-inter your pin, the pin that you have set already as password.
-Again Tap on “Erase all data” button.
-It will take several minutes in resetting your device completely.
-Complete initial setup, while completing initial setup, you will have screen of “Verify Pin”, just give the same pin that you have already set before.
Read More:
Bypass FRP Google Pixel 3A (Android 11)
