Remove FRP Account Galaxy S21 FE Android 13, 12 By New Way
If you can’t access to device menu after hard reset device, that means, you need to follow this method to remove FRP Account Galaxy S21 FE (Android 12). Because, you have got a FRP lock, and you can’t bypass google verification screen till you enter old Gmail account. So to solve this problem, just follow steps from here and get back your device with updated Gmail account.
Disclaimer: This method is for educational purpose only, try this method only on your own phone, do not try this method only stolen phone, this is a serious crime, if you are trying to unlock stolen phone, you may also be jailed.
| Method 1: Samsung Galaxy S21 FE [ANDROID 13] New |
| Method 2: Samsung Galaxy S21 FE [ANDROID 12] |
Method 1: Remove FRP Account Galaxy S21 FE (Android 13)
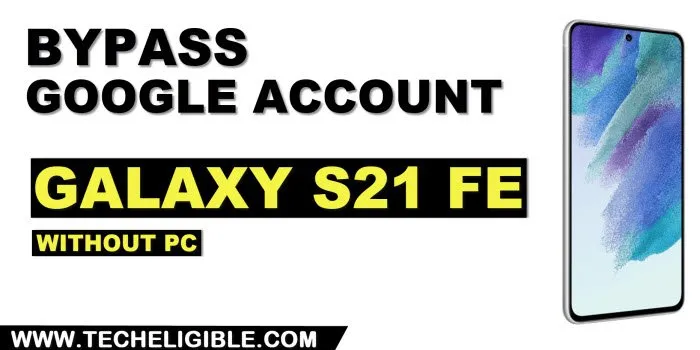
-Turn on your Samsung S21 FE phone & Connect to WiFi network.
-Go back on first (Welcome or Start) screen.
-Dial code *#0*# from emergency call option. After that, you will see (Blank Boxes) page same as shown in below image.
Connect Samsung Phone With PC:
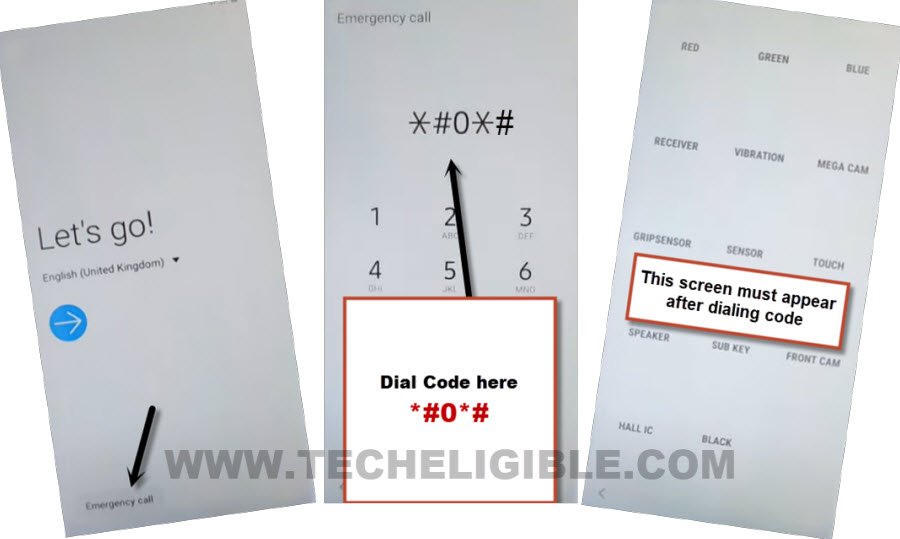
-Lets connect your device with PC using proper USB cable.
-Open “Device Manager” in your PC to check and confirm, that your device has been detected by PC successfully.
-If the device is not detected, in this case, download & install Samsung USB Drivers.
| ⇒ SAMSUNG USB Driver [DOWNLOAD] |
-Reconnect Samsung S21 Fe phone, and you will see your device info in device manager same as shown in below image.
-We are all done from Samsung phone side, lets get back to PC screen.
Use Zeroknox Tool to Remove FRP:
-Download & Launch (ZeroKnox Removal Tool) on PC to Remove FRP Account Galaxy S21 FE .
| ⇒ ZeroKnox Removal Tool V1.5 [DOWNLOAD] PASS: techeligible.com |
-Turn off your @ntivirus software before extracting this tool.
-Launch Zeroknox tool on PC, and click over “Enable ADB (june 2023) button.
Note: If this option is not working, you can try with other 2 more options from Zeroknox tool to enable adb mode.
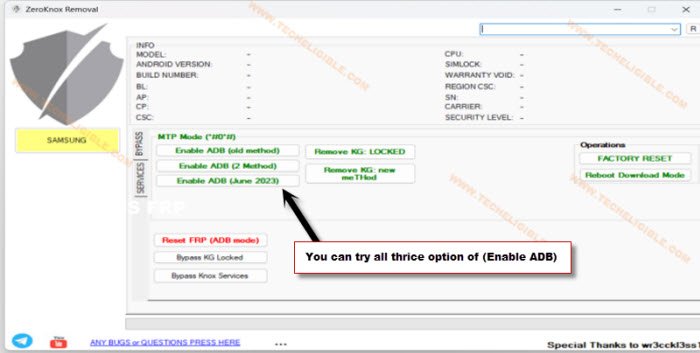
-Click to > Yes > Ok from popup window.
-The ADB Enabling… process will begin, you will receive allow usb debugging popup in Samsung galaxy device, just check mark option of “Always allow from this computer”, and hit on “Allow”.

-Wait till (Enabling ADB…) process is done. After that, tap to “Reset FRP (ADB Mode)”.
-This will take just 20-30 to remove frp. After that, your Samsung device will auto restart, and you are all done with this ZeroKnxo tool.
Method 2: Remove FRP Account Galaxy S21 FE
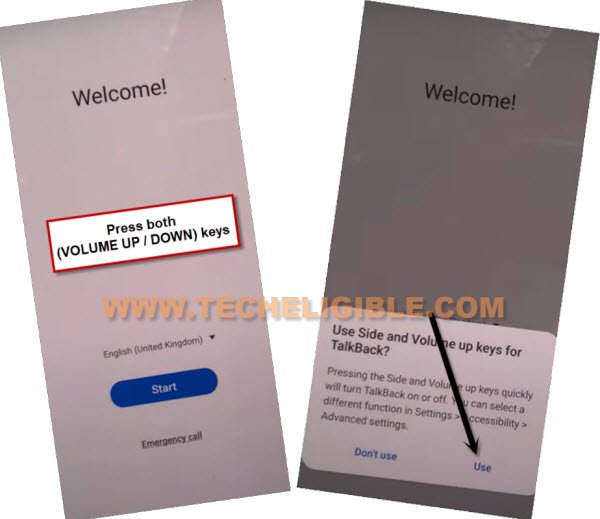
-Turn on device & Connect WiFi.
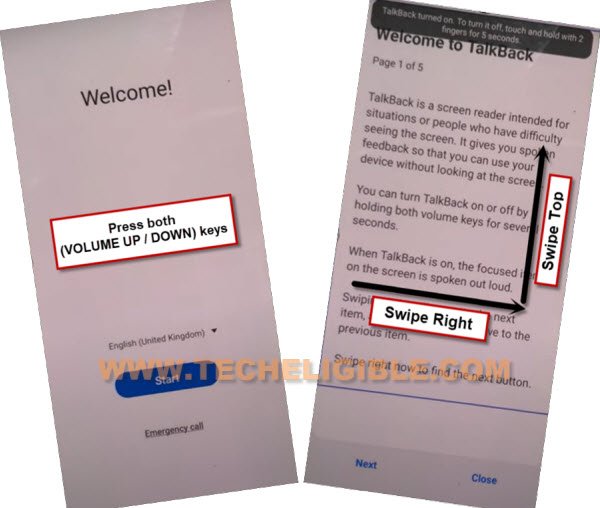
-Afterwards, go back to (Welcome) screen, and long press both (Volume UP + Down), and hit on “Use”.
-Let’s hold again both (Volume UP + Down), and then draw a reverse “L” same as shown in below screen shot.
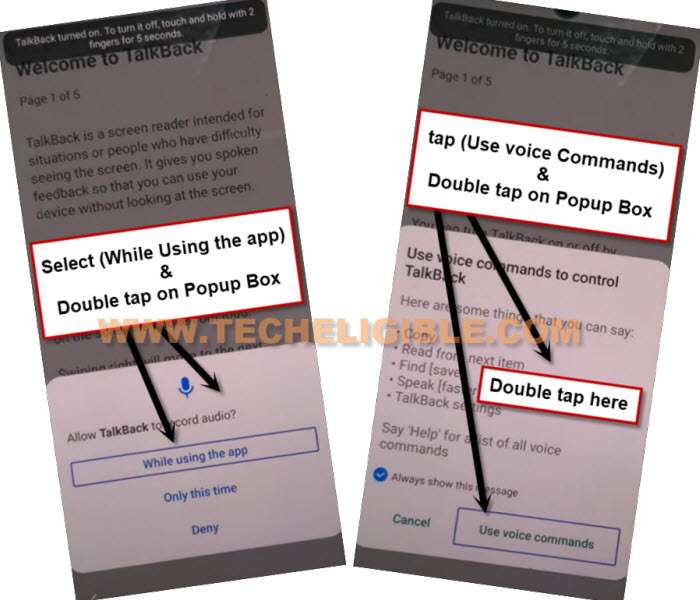
-After that, from popup box, just double tap to “while using the app”, and then double tap on “Use voice Command”.
-As soon you see green border, so speak there loudly “Open Google Assistant”.
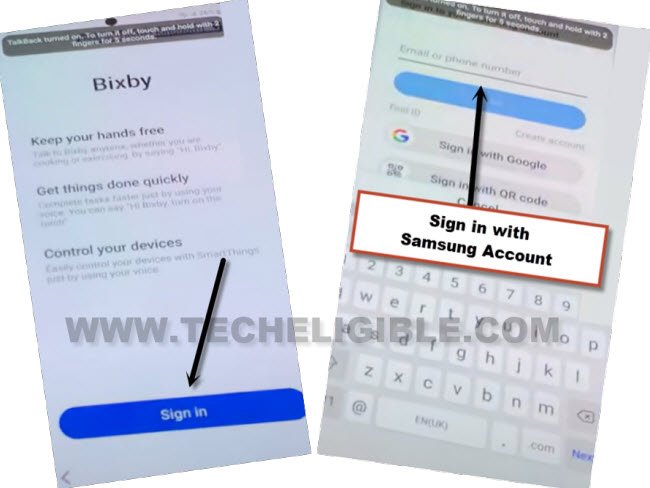
-You will be redirected to Bixby screen, from there sign in with your any Samsung Account, you can create this account in free of cost from Samsung official website.
-Hit on “Sign in” button from bixby screen and login with Samsung account.
-After signed in completely, you will see a popup window of (Want a faster way to sign in), just tap to “Cancel”.
-Tap on > Continue > Continue.
-There you will have keyboard icon, just tap on that, and type there “Youtube”, and hit on “Go” from bottom keyboard corner.
![]()
-You will be redirected to youtube website safely.
-Tap “Profile icon” from top corner, and go to “Settings”.
![]()
-Go to > About > Google Privacy Policy.
-After reaching chrome browser, tap to > Accept & Continue > Next > No Thanks.
Download S21 FE FRP Apps:
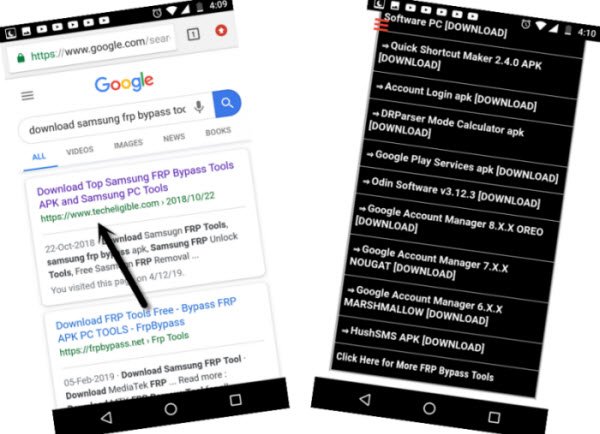
-Search in chrome browser “Download Samsung frp tools“, and visit our website searched result.
-Download from there below applications.
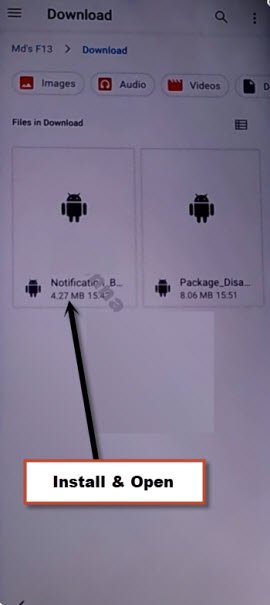
1/ Package Disabler Pro.
2/ Notification Bar.
-Now, we have download & install another app directly from galaxy store, this is very essential app to Remove FRP Account Galaxy S21 FE.
-Tap to “Open File Shortcut App” from same frp tools page, and you will be redirected inside galaxy store, if you are asked to update, just tap to “Update” button, this will start updating galaxy store.
-You may be redirect back to frp tools page, from there, hit again on “Open File Shortcut” app, and then tap to “Install”‘.
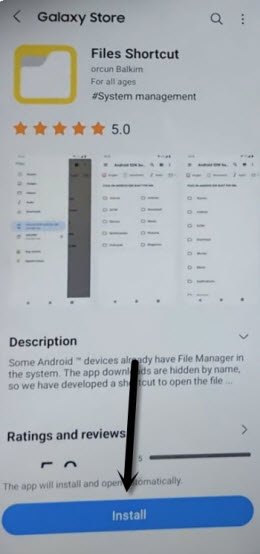
-After installing successfully “Files Shortcut” app from galaxy store, just tap to “Back Arrow” from bottom left corner to get back to Samsung frp tools page.
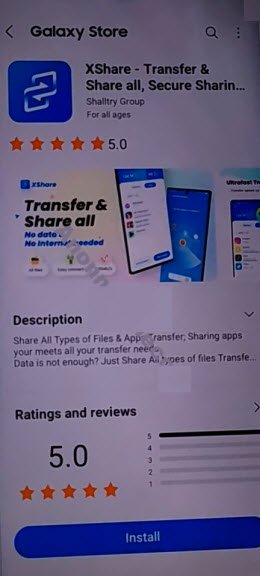
-Now tap on “Open XShare App“, and this is also required to be installed from Galaxy store.
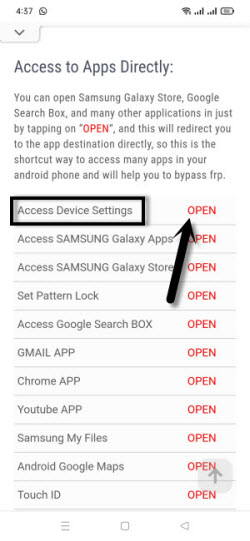
-After that, go back to “Samsung frp tools” page, from there tap to “Access Device Settings” link to reach directly inside your Samsung Galaxy settings.
-Scroll down, and go to > Privacy > Permission Manager > Files and Media.
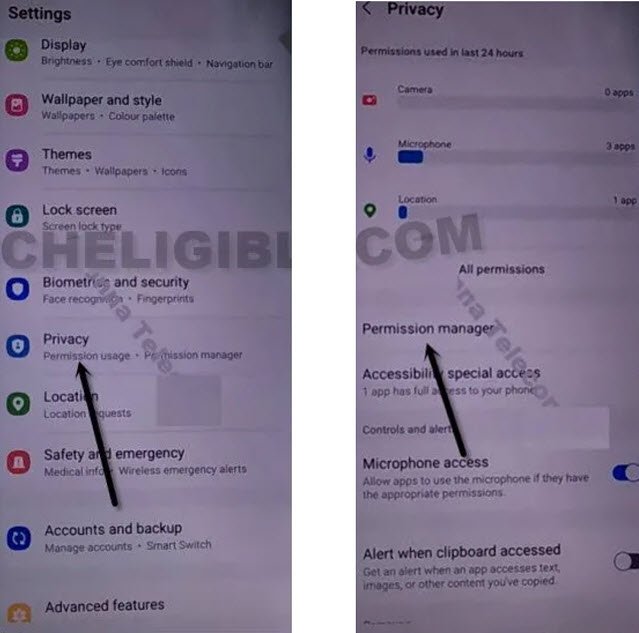
-Hit on “3 dots” from top right corner, and tap to “Show System”.
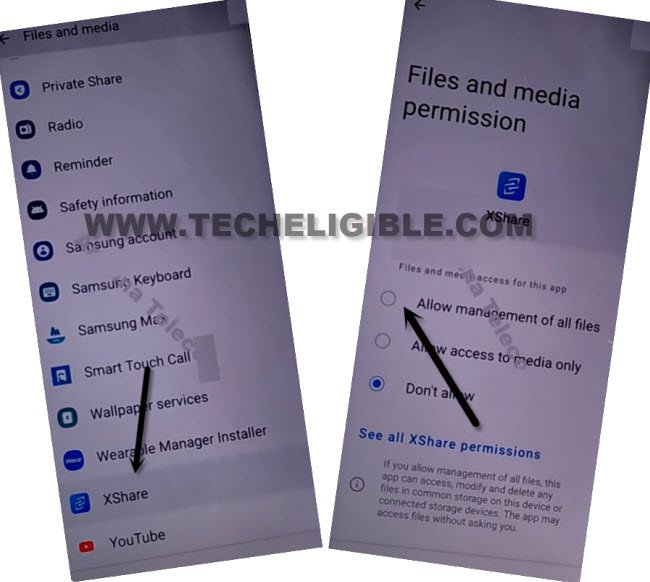
-After that, just go down, and hit on “Xshare” app from app list.
-Select “Allow management of all files”, and then hit on “Allow” from popup.
-By tapping on back arrow carefully, just get back to again “Download frp tools” page.
-From there, hit again on “Open Xshare App“, and hit on “Open” button from galaxy store to reach inside this app.
-Hit on > Agree and Continue > While using the app > Enter > Receive.
-From popup window, tap to 3rd option “Allow” from Access Camera, and then hit on “While using the app”.
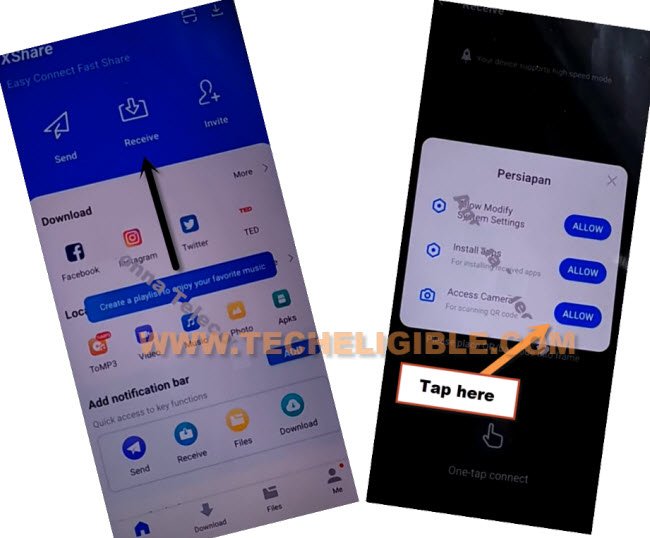
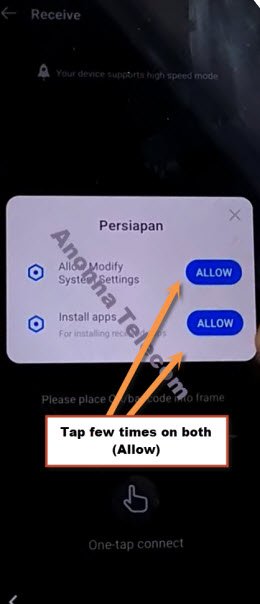
-Now, you will see there 2 option of “Allow”, so now hit 3 times on each (Allow) option.
-Go back by tapping (Back Arrow) from bottom left corner 2 times to reach back to (Xshare Galaxy Store) same as shown in below image.
-Search in galaxy store “File Shortcut”, and the tap to “Open” icon to launch this app.
-Hit on “Menu” icon from top left corner, and select your “Mobile Model” as storage.
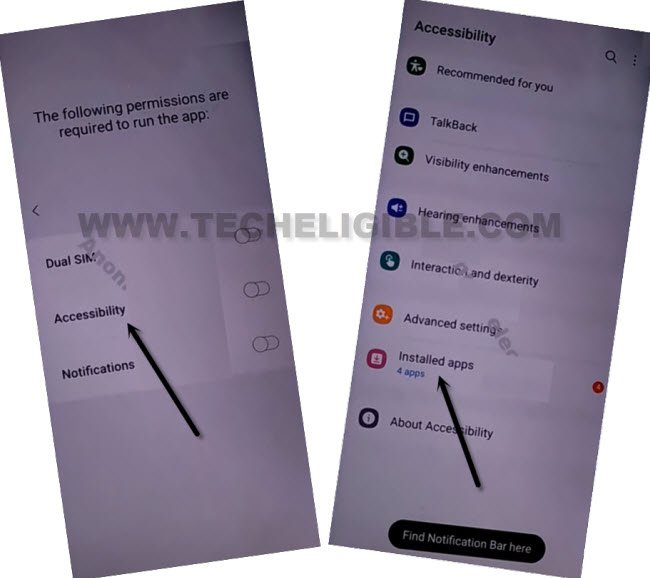
-Tap to “Downloads” option to reach inside the downloaded app folder, from there tap to > Notification Bar > Continue > Install > Open.
-Hit on > Accessibility > Installed apps.
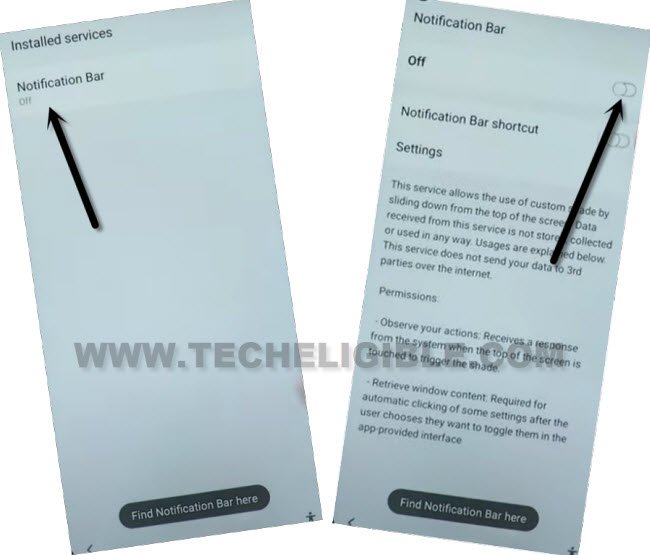
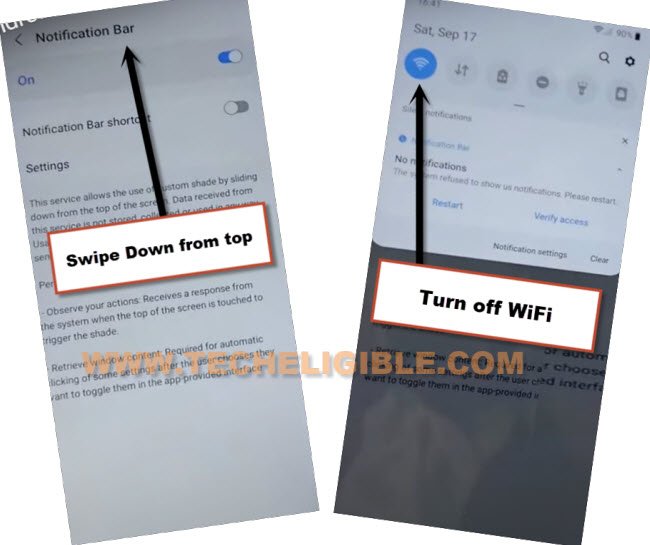
-Now hit on > Notification bar> Turn on > Allow.
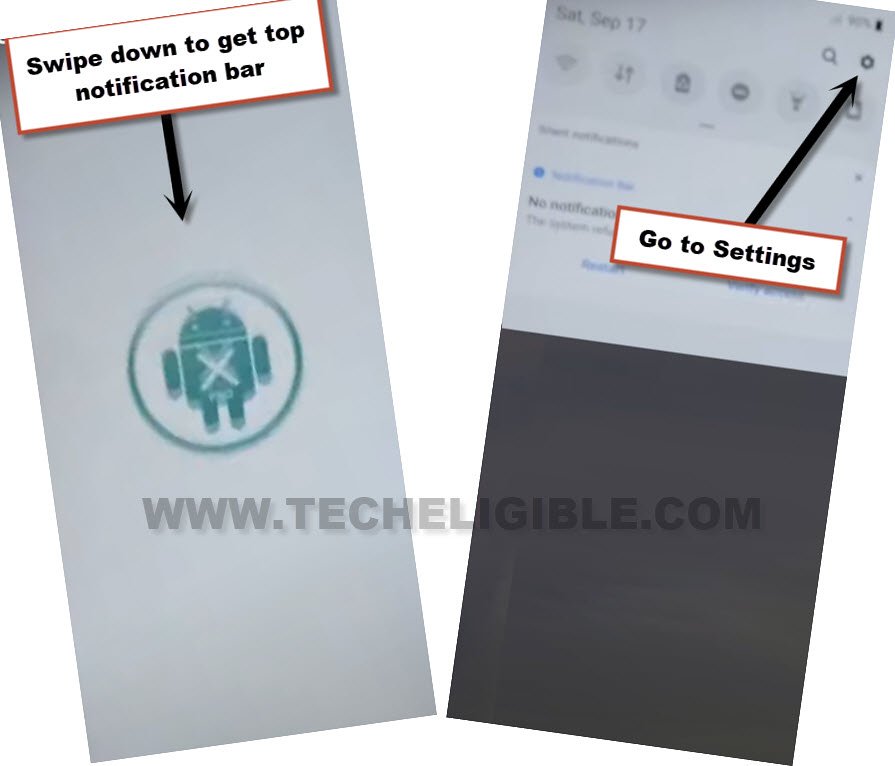
-Swipe down from top to get notification bar, and this will come out, now turn off “WiFi”.
-Tap 4-5 times on back arrow from bottom left corner to get back to download folder, where from we are gonna installed (Notification bar) app.
-Now tap to > Package Disabler Pro > Continue > Install > Open.

-Tap to “Allow”, and hit on white screen anywhere, the screen will just start blinking.
-Now you have to bring back (Notification) bar from top, and go to “Settings”.
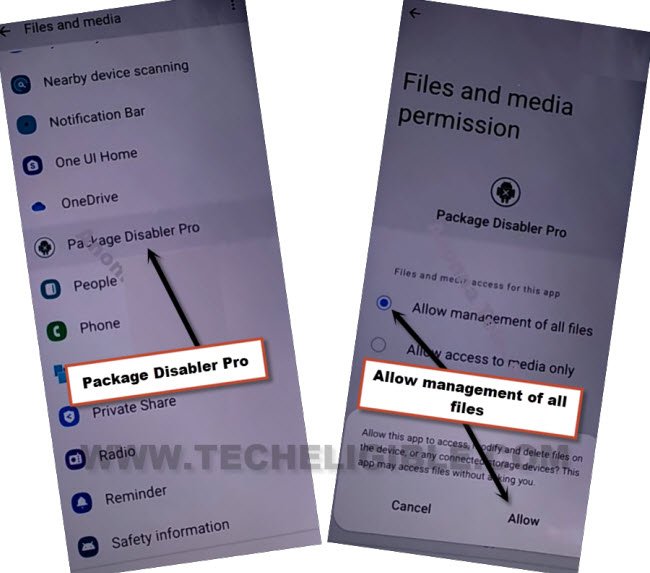
-Go to > Privacy > Permission Manager > Files and Media.
-Just go to “3 dots” from top corner, and tap to “Show system”, from the app list, just go to “Package Disabler Pro”
-Select “Allow management of all files”, and then tap to “Allow”.
-Tap to back arrow 2-3 times to reach back to “Settings” page.
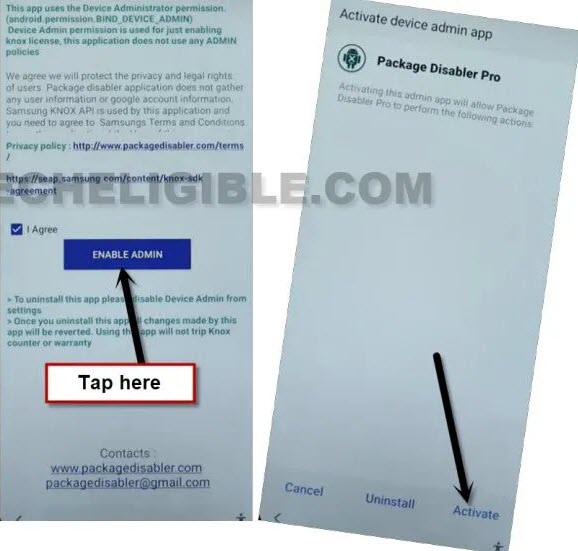
-Now tap to “Back Arrow”, and there you will have a same screen shown in below image, just hit on “i agree” option, and tap to “Enable” button.
-Tap to > Activate > Agree.
-Bring back notification bar, and turn on “WiFi” from there, and wait over there.
-Now hit on “Agree” button from package disabler pro app.
-You will see a flash popup “Knox license validation completed successfully”, we did this all effort just to activate this somehow, once you done this, now we are only few steps behind from completely remove frp Account Galaxy S21 FE.
Finish Setup Wizard:
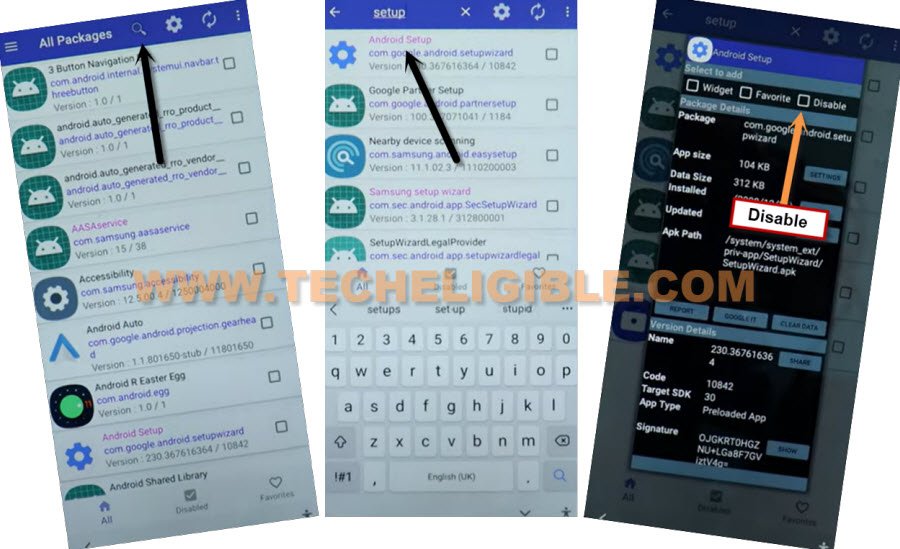
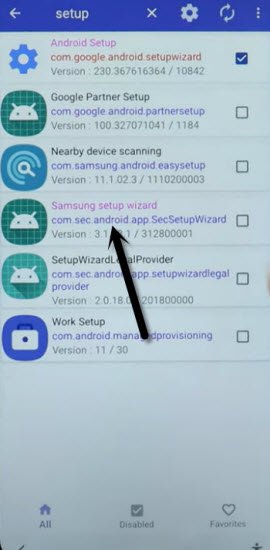
-Hit on “Search icon” from All packages screen, and Type “Setup”, and go to “Android Setup” from there, check mark top “Disable” option (Follow below image).
-Type “Setup”, and go to “Samsung Setup Wizard“.
-Just tap on “Clear Data” button, and the time will start appearing up at top bar.
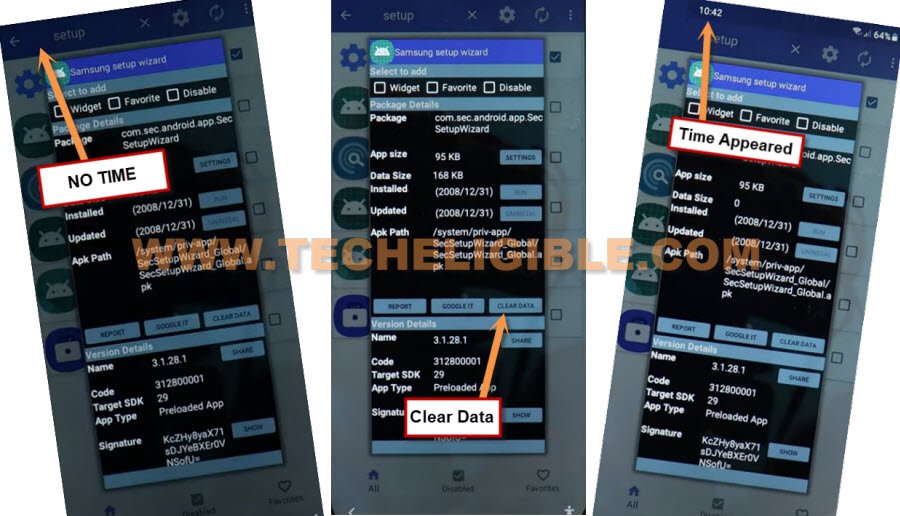
-After hitting on clear data button, just tap “2 times” on back arrow, and there you will see popup window, just select “Samsung setup wizard” and tap to “Always”.
-Tap to > Skip > Finish, congrats, you are all done from remove FRP Account Galaxy S21 FE.
-Go to your device > Settings > About Phone > Software information.
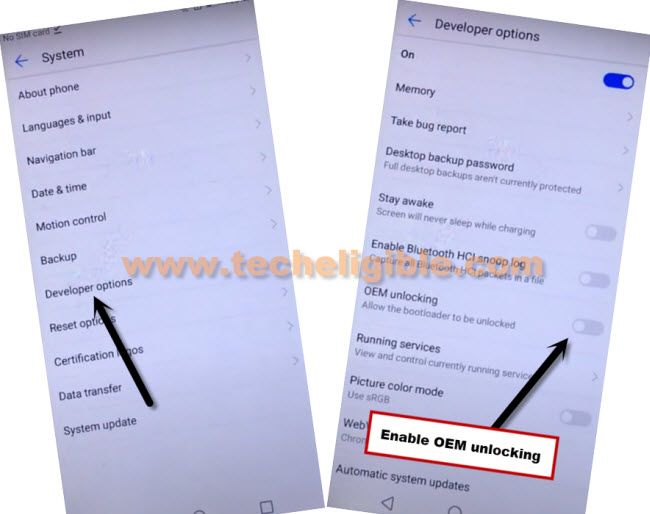
-Tap 7 times quickly on “Build Number” to enable developer mode.
-Go back to (Settings), from there tap to “Developer Option”, and turn on “OEM Unlocking”.
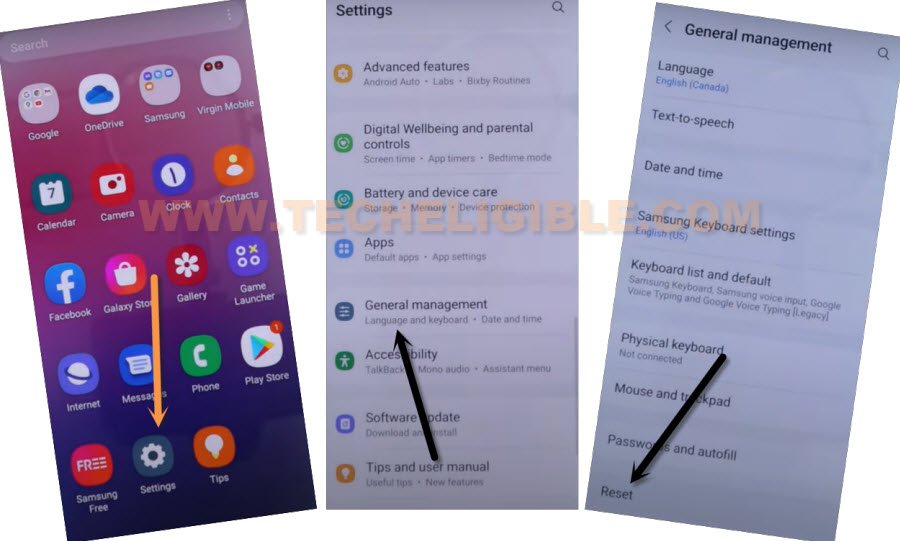
-Go to > Settings > General Management > Reset > Factory Data Reset > Reset > Delete All.
-Give your Samsung account password there to complete this process.
-The device will auto restart, and now your device is free of FRP, and old synced google account has also been deleted, thanks for visiting us.
Read More FRP Ways on Samsung Galaxy: