Have you hard reset your Huawei Y5 device after forgetting pattern lock? If you also don’t know your device previously setup google account, then, you won’t be allowed to regain access to your device main home-screen right after hard reset the device. That is happening with lots of people just because of negligence. To recover back your device, follow this way to Bypass FRP Huawei Y5 2019 & 2017 (Android 9,8) without using any paid tool.
Disclaimer: We highly recommend you to apply this method only on your own device, if you are not owner of this device, or you found this from some where, you must return to its real owner. This method is for educational purpose only.
Method 1: Bypass FRP Huawei Y5 2019 [Android 9] Without PC & Apps
-Turn on the phone & Connect to Wifi network. Once its done, go back on the first (Welcome) screen.
-Go to emergency dialing screen by tapping on “Emergency Call” option.
-Afterwards, dial the code 112, after dialing this code, without a second delay, you just have to quickly start tapping several times on the “3 number” digit.
-After that, you may see calling screen, just, tap to “Disconnect Call” button.

-Finally, you will see the (White Screen) same as shown in below image.

Note: If you don’t get this below screen, retry steps. Dial again 112 and quickly tap several times on “3 digits”.
-Once you reach the same below screen, from there, hit on the “Send Message” icon.

Access to Youtube Webpage
-Go to “3 dots” option from upper corner and then, tap on “Help & Feedback” option.

-Tap over the text “Send Photos, videos, voice message in Message”. In the next screen, you will see a youtube video. Just, hit on the play button from video.
-The video title will appear up, just hit on the video title (Find your message…) to access the official youtube webpage.

-You just need to drag down the youtube video.
Go to Gmail Notification Management
-Go to “Profile” option from upper corner. After that, choose the “Help & feedback” option.

-Search there, (Delete disable app), then, tap on the “Delete disable apps on…” from searched result.

-Hit on the link “Tap to go to application settings”.

-From app list page, find and go to > Gmail > Notification Management > More Settings.

-After that, just hit over the > 3 dots > Manage Accounts. You will directly access on the primary settings page of the device.

Reset Settings & Phone from System
-Then, go over the “System” option.
-We are going to reset the phone settings completely to delete the old forgotten google account as well. For that, tap to > Reset > Reset All Settings. Tap 2 more time on (Reset All Settings) from next page.

-Once the reset all settings process is completed, tap once on the “Back Arrow” icon from bottom to go back to (Reset) Page.
-From there, hit on > Reset Phone > Reset Phone > Reset Phone. The phone will auto restart to complete this action. Afterwards, you can complete all the setup wizard steps easily.

Method 2: Bypass FRP Huawei Y5 2017
-Switch on phone and connect WiFi. After that, get back to first (Select Language) screen.
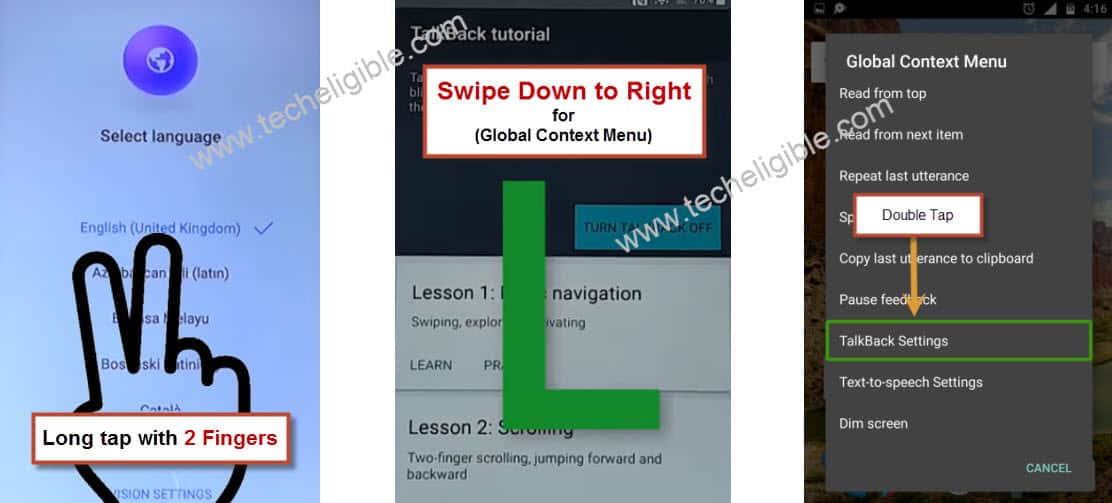
-Long hold with 2 fingers together until you have a (Talkback Tutorial) screen.
-Make (L) shape by swiping down to right.
-Lets tap twice over the “Talkback Settings” option from popup window.
-Once you reach to (Talkback Settings) page. We don’t required talkback functionality anymore. Lets turn off this now by long pressing both buttons (Volume UP + Down).
-Keep pressing both volume keys until you see a popup window of (Suspend talkback). From there, double hit on a “Ok”.

-Congrats, the talkback has been switched off now. Go all the way down and tap on “Terms of service”.
-From startup page, go to > Accept & Continue > No Thanks.

Search & Go to FRP Tools Page
-You have to type in chrome browse search bar “Techeligible“. After that, visit same searched result as shown in below screen shot.
-From official site, go to “Menu” icon from top corner and hit over the “Download FRP Tools” option to access to frp tools page.

-Download from there below mentioned applications.
1st: Google Account Manager 6.
2nd: Account Login.
-Wait until downloading process is done. After downloading is done, you will have a notification in popup at the bottom of the browser screen. Just hit on a “Open” link from there to get into the download folder.
-In download folder, you will be able to see your both downloaded apps. Let’s both apps one by one to setup new google account in our Huawei Y5 2017 device.
-Firstly, tap to “Google Account Manager 6”. After that, you will have a popup window (Install Blocked). From there, just hit on “Settings” and turn on “Unknown Sources” option.
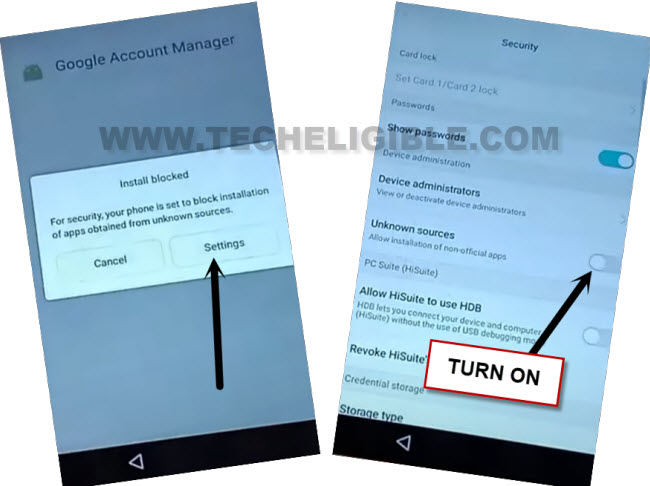
-Go back to download folder page by hitting once on the back arrow icon.
Install the Downloaded Apps
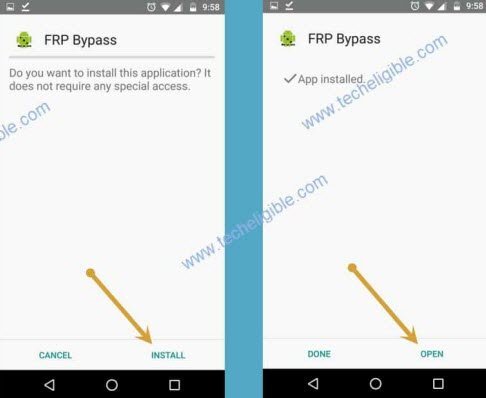
-Let’s tap again on > Google Account Manager 6 > Install > Done.
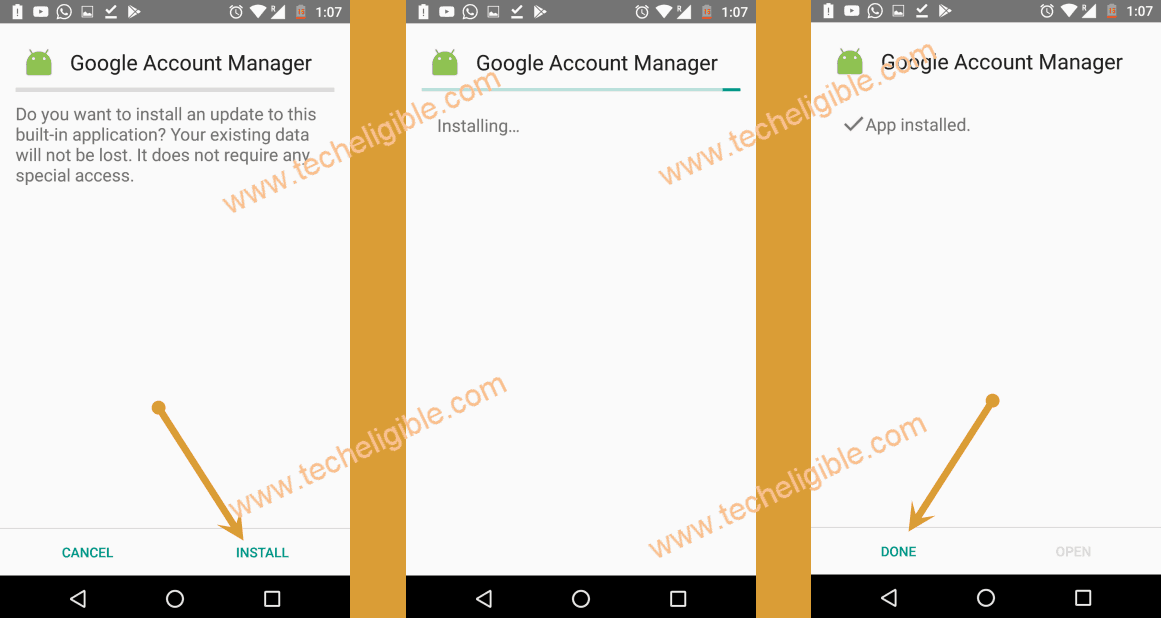
-Install 2nd downloaded app by tapping on > Account Login > Install > Open.
Login Google Account
-You will be taken to the google sign in screen. From there, go to > 3 dots > Browser Sign-in > Ok.
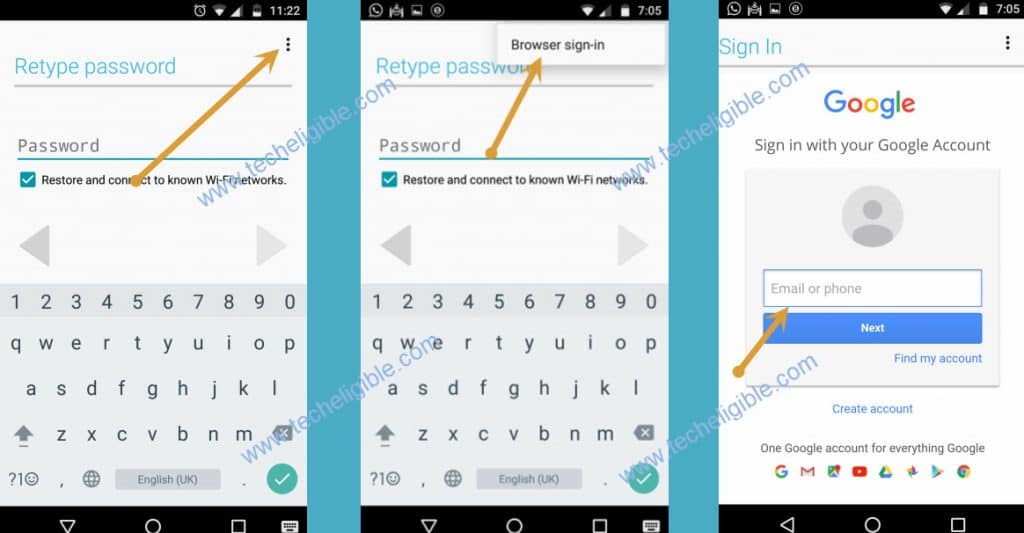
-Sign in with your any valid google account.
-Once the account is setup successfully, you can restart your device to complete startup steps again without stuck on google verification page.
The Verdict
We just followed up 2 different instructions for both Huawei Y5 2019 and 2017. In the first guide, we just used the emergency calling method, with the help of making call to 112, we reached on the message application page. Then, accessed on the youtube official site, from there, with the help of (Help & Feedback) option, we got into the gmail app info screen. After that, we did reset the phone settings and then, Reset the phone completely.
In the 2nd instructions, we used the talkback option and downloaded frp unlock apps. Then, we simply installed and opened the account login app to setup another google account.