
Have you lost access to your Samsung A7 device after performing the factory reset? That means, your deice is on FRP locked protection due to forgetting your previously synced google account. To get out of this situation, you will have to follow up 3 frp bypass guideline from here, one of them may work on your device to successfully bypass frp Galaxy A7 Android version 10 and Android version 7.
Disclaimer: We are creating this post to educate people about how to get back their lost device due to forgetting Google account. This method is only for device owner and for educational purpose only.
Method 1: How to Bypass frp Galaxy A7 By Pattern Lock Setup
1. Connect WiFi first, and then go back to first “Let’s Go” screen.
2. Go the screen of “Choose a Wi-Fi network”.
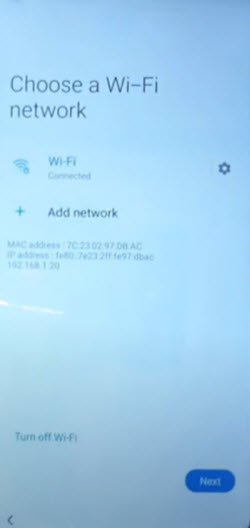
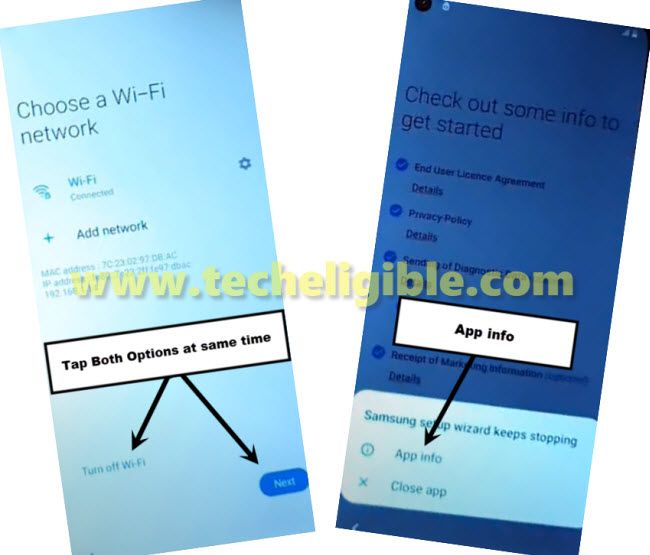
3. Tap on both options at same time “Turn off WiFi” & “Next“.
4. If you hit both options at same perfectly, you will see a popup window, just tap to “App info” from there (See below image).
Note: If you did not receive that popup window, so don’t worry about that, you may have to try that 4-5 times, then you will be able to get that popup window easily.
5. To repeat the steps, just get back to (Choose a WiFi network) screen, and then turn on WiFi, and try again to bypass google account on Samsung A7.
6. Right after hitting on “App info” option, you will see next screen which is of (Samsung Setup Wizard), from there, go to > Permission > Search icon.
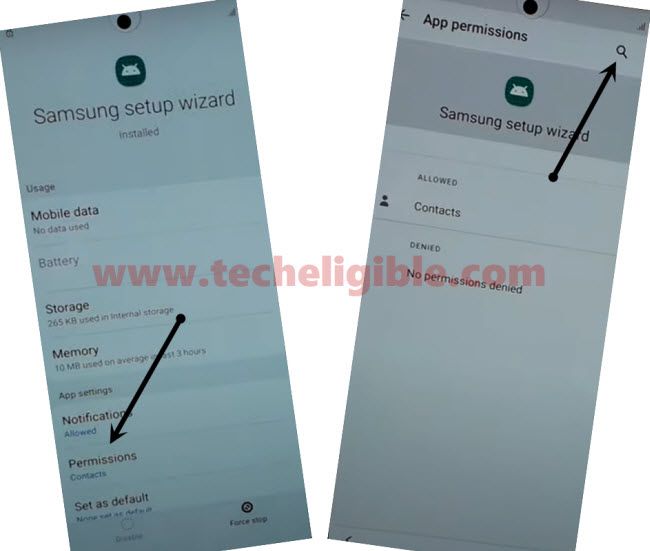
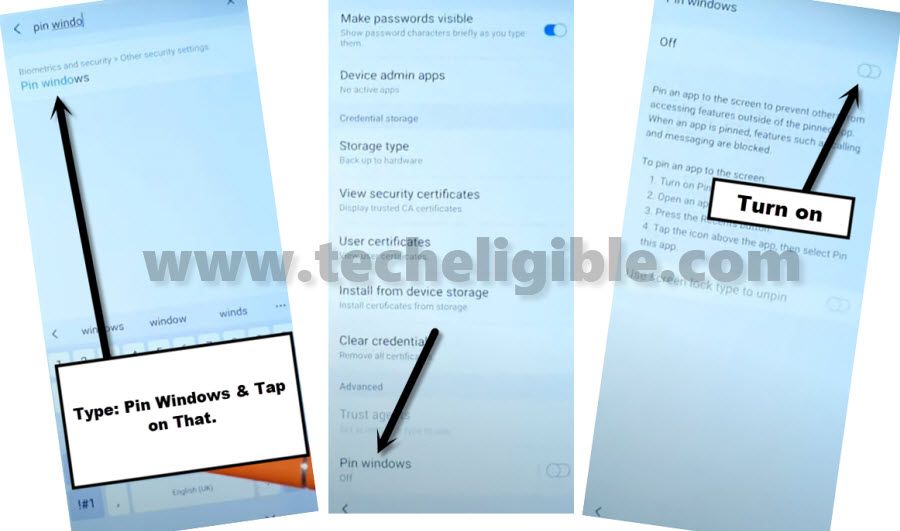
7. Search there “PIN Windows”.
8. Go to “PIN Windows” from searched result.
9. Swipe down and turn on “PIN Windows” by following below image.
Setup Latest Pattern:
10. From the same (Pin windows) screen, enable also “Use Screen Lock Type to unpin / Ask for pattern before unpinning” option, and then tap to “Pattern”.
11. Give your any desire pattern two times for the confirmation.
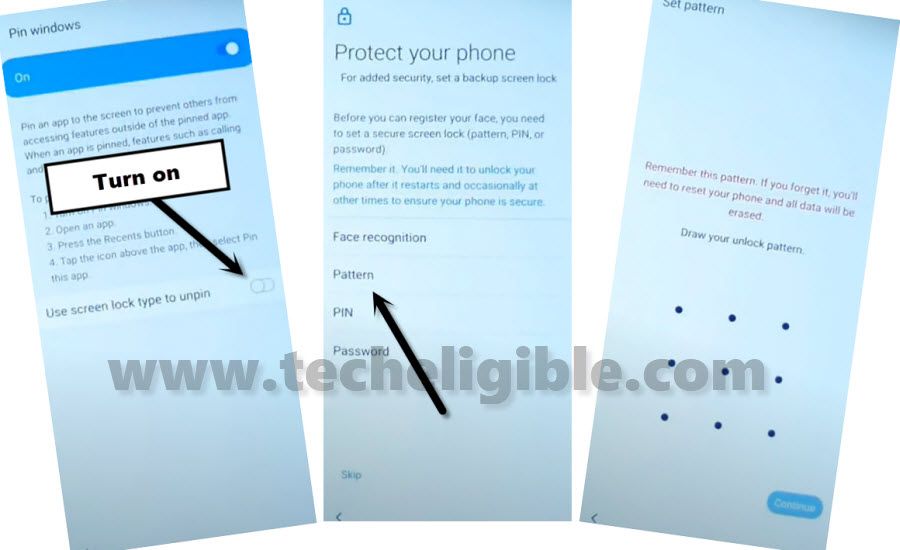
12. Restart your Samsung A7 device & finish initial setup wizard.
13. At the beginning, you will be asked for pattern lock, so give your already setup pattern lock there.
14. You might also have a (Google Sign in) screen while finishing up setup wizard, so you can skip this screen by tapping on “SKIP” from the bottom corner to bypass frp Galaxy A7.
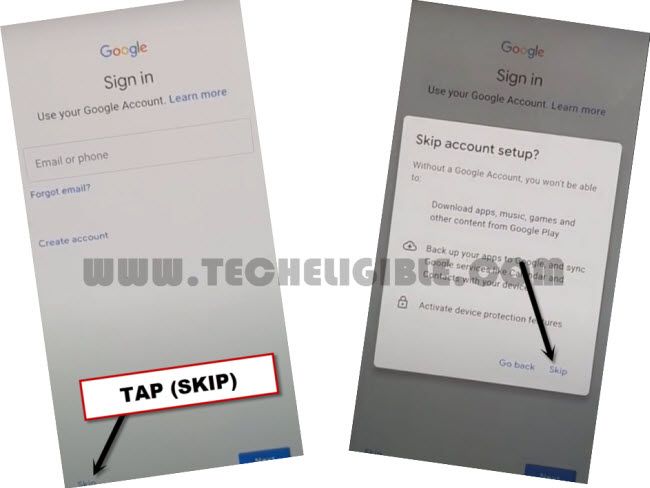
Method 2: Bypass FRP Samsung A7 By Screen Shot
This way has been applied successfully on latest security patch level to Bypass Frp Galaxy A7 Android 10, if you are also looking for new way, so you should definitely apply this method to have your device back with your new google account.
The factory reset protection is for our Galaxy A7 device security, and this feature prevent our device Samsung Galaxy A7 from data leaking and from accessing to personal data to our device, but in some cases we forget our own Gmail account, so in this case we go for frp bypass method.
Lets Start to Bypass FRP:
-Start with connecting Wi-Fi network in your phone.
-Afterwards, get back to (Let’s GO) window.
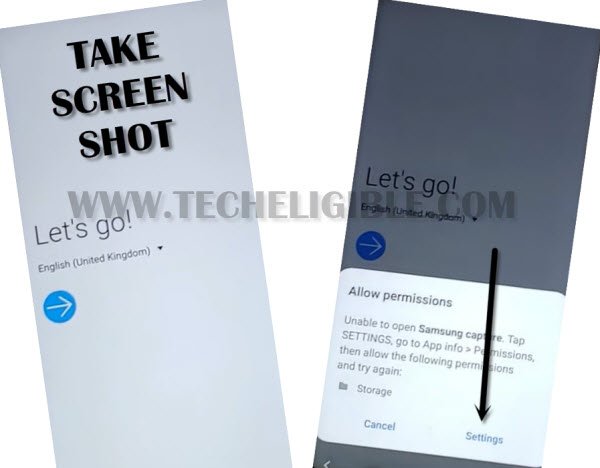
-Now we are going to take screen shot, for that, Press both (Power + Volume Down).
-From popup with (Allow & Deny) option, so just tap on “Deny”.
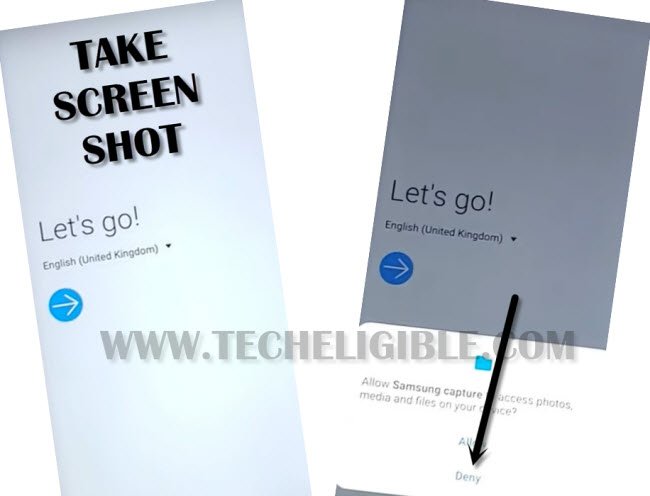
-Take screen shot again, and tap “Deny & Dont ask again”.
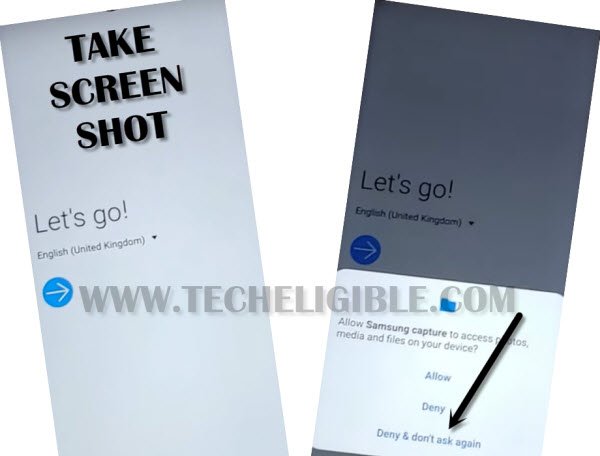
-You need to take screen shot one more time & tap “Settings”.
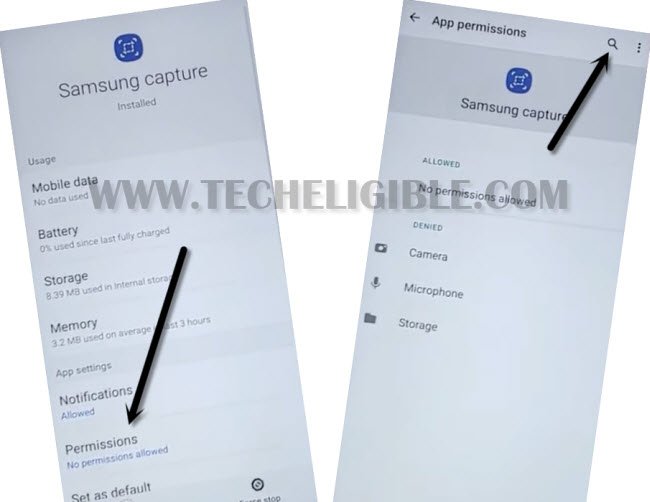
-Hit on “Permission”, and then tap “Search icon” from top right corner, just type there in search box “Google”.
-After that, tap on “Google App info“.
-Now tap on “OPEN” icon from the bottom of screen, and then tap on “No Thanks”.
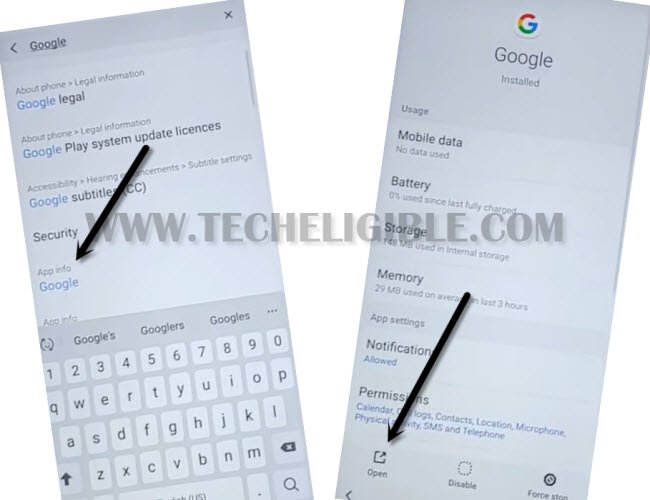
-Type in search box “Chrome”, and then tap on “Chrome icon” from the searched result to access chrome browser, after that we will be able for All Samsung Galaxy Android 10 Bypass Google Account.
-Tap on > Accept & Continue > Next > No Thanks.
Go for Downloading FRP Bypass Apps:
-You have to make search in browser with “Techeligible“. After that, visit 1st searched result from there same as instructed in below image.
-Hit on “Menu” option from top corner of the site & Go to “Download FRP Tools”.

-Go down & download from there “Apex Launcher“.
-Download also “Google Play Services“.
-So we have successfully downloaded both above apps, through these apps, we can bypass google account frp, lets do that.
-Go to top of the page, and then tap on “3 dots” from top right corner of your chrome browser, and then tap on “Downloads”.
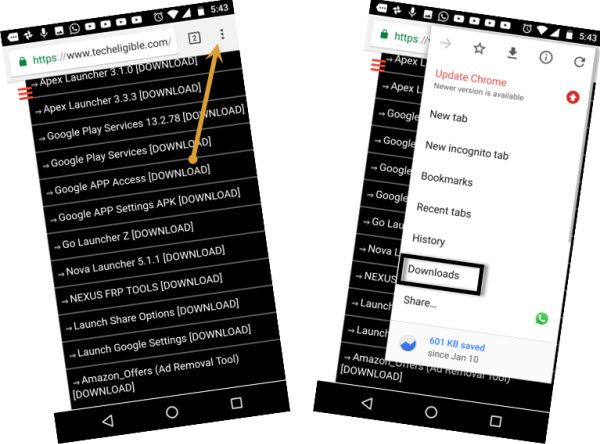
-Tap to > Apex Launcher > Settings > Allow from this sources.
-Go back by hitting on “Back Arrow”.
-There you will see your apex launcher installation process, just tap to > Install > Open > Continue.
Note: If you auto get back to download folder after installing apex launcher, don’t worry, reinstall and open apex launcher to access in your device home screen.
-Congrats, we have successfully accessed in our galaxy A7 home screen.
Install Other FRP App:
-Open “Chrome Brower” from your device MENU, and tap to “3 dots” from top right corner of the screen, and then hit “Downloads”.
-Tap > Google Play Services > Install > Done.
-Alright, after installing this app, we are going to disable 2 apps from our device app list.
Disable Apps:
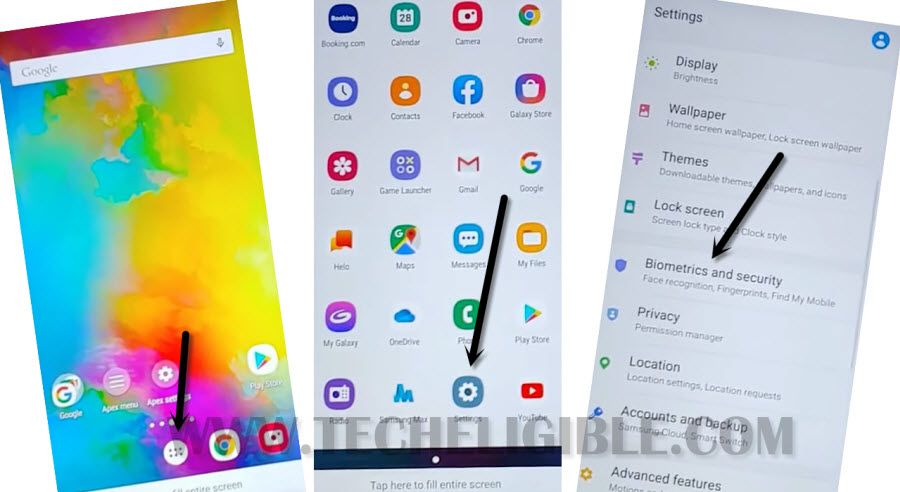
-From there go to > Settings > Biometrics & Security > Other Security Settings > Device Admin App.
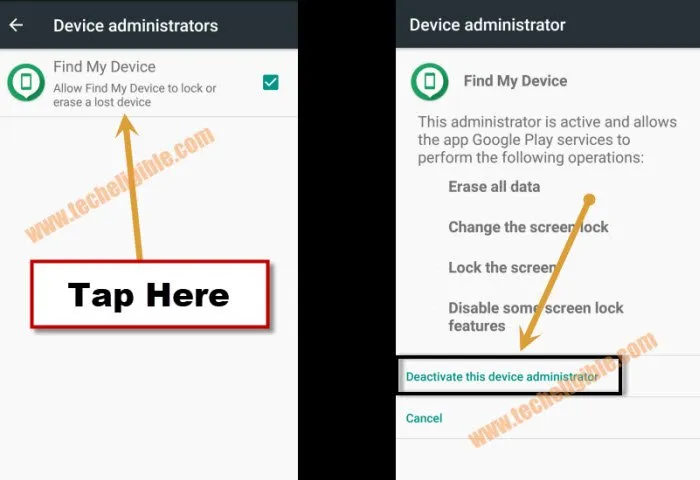
-Check there, whether your (Find My DEVICE) is disabled or enabled?, if this is enabled, then tap on “Find My Device”, and hit on “Deactivate”.
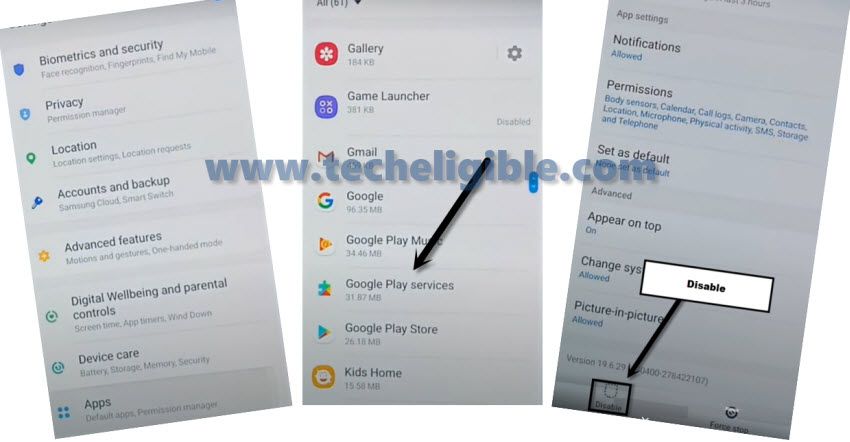
-Go to Galaxy A7 > Settings > APP > Google Play Services > Disable.
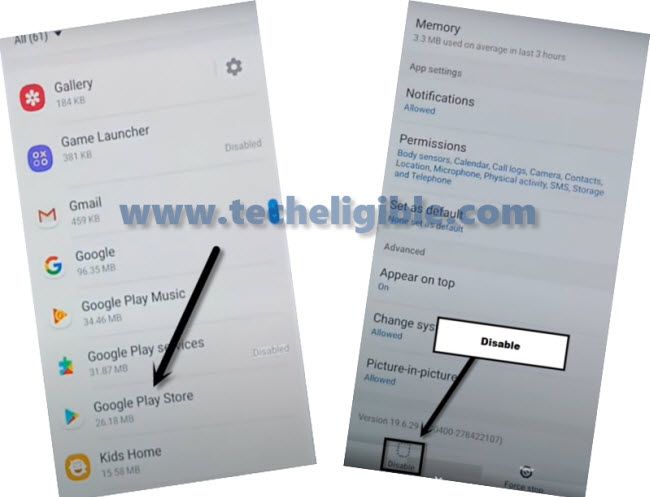
-From same app list, tap on “Google Play Store”, and then tap to “Disable”.
-Lets add our other Gmail Account to bypass frp galaxy A7.
-Go to > Settings > Accounts & Backup > Accounts > Google.
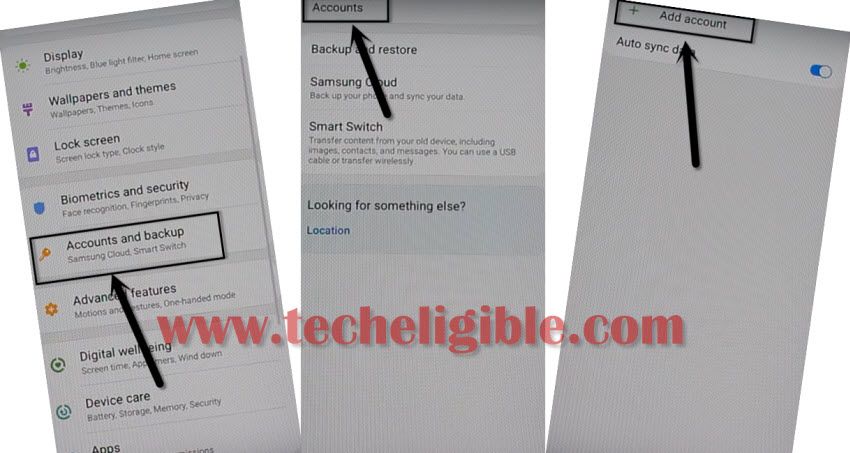
-If you see any error popup window, just ignore that, and tap anywhere on screen to close that popup window.
-Enter your Gmail ID and Password, and then tap to > Next > Skip > i Agree.
-Go back to “Settings, from there again tap on “APPS”, and then tap on “All Apps” from top left corner, and select “Disabled”, this will show you both previously disabled apps.
-Enable your both disabled apps in order to function your device properly.
-Restart Samsung Galaxy A7 phone, complete setup wizard, while completing setup wizard, you will be shown a (Verify Your Account) screen, but don’t worry, you don’t have to enter your Gmail account there, just tap to “SKIP” from bottom left corner, and then again tap “SKIP” from popup window. That’s all
Method 3: Bypass FRP Galaxy A7 By Odin Tool (Android 7.0)
This process is required some stock firmware file to be downloaded first. Because, we have to use Odin tool to flash our Samsung A7 phone for bypassing frp account. Stock firmware files of (SM-A720F) are available here.
Note: This frp method has successfully been applied on Samsung Galaxy A7 2017 (A720F), Android 7.1.
-To Bypass FRP, you have to download (Stock Firmware ) + (Combination File).
-Click below to download both firmware and Odin flasher tool in your computer.
Download Required Tool:
⇒SM-A720F Stock Firmware [DOWNLOAD]
⇒SM-A720F Combination Files [DOWNLOAD]
⇒ODIN Software V3.12 [DOWNLOAD]
-Once downloading finish, extract all 3 files from winrar archive.
Lets Flash Samsung A7 With Combination File to Enable ADB Mode:
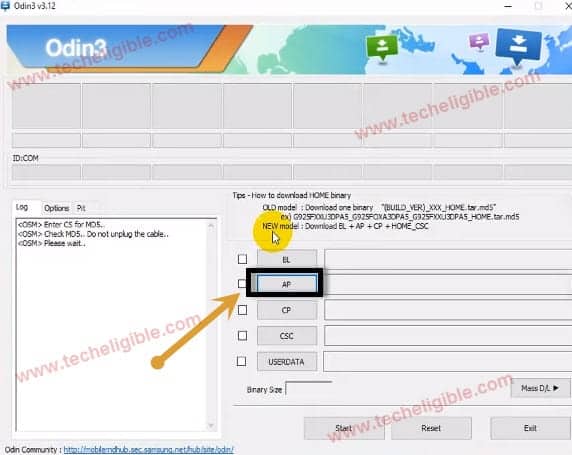
-Open “Odin Software”.
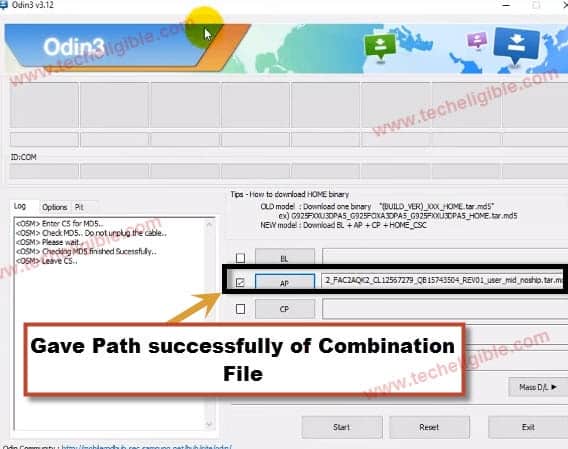
-Click on “AP” and give path of “Combination File”.
-Wait 1-2 minute until file successfully added in Odin AP field.
-Once file added successfully in odin tool, let reboot “Galaxy A7” in download mode.
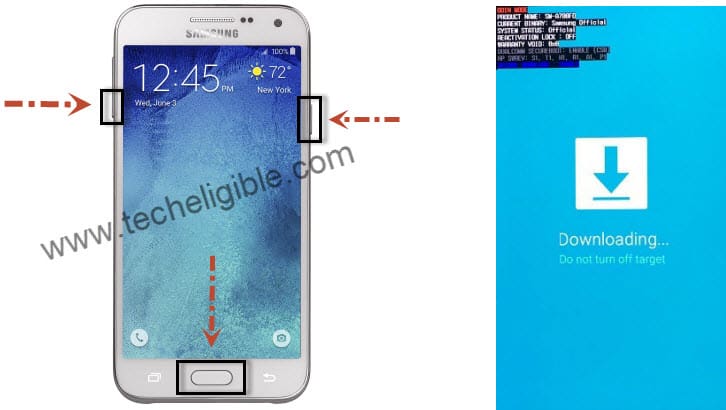
Put Galaxy A7 in Download Mode:
-Switch off Galaxy A7 device.
-Press & Hold (Power Key + Home Button + Volume Down Key) together until you see “Warning” error on your screen.
-Press (Volume UP) key to continue.
-Now you are in “Download Mode”.
-Connect Galaxy A7 to computer via good “Micro USB Cable”.
-Once you see in odin software that “ID COM” has converted to blue, that means your device has successfully connected to computer & Odin software.
-Now click on “START” button from “Odin Software” to flash with combination file.
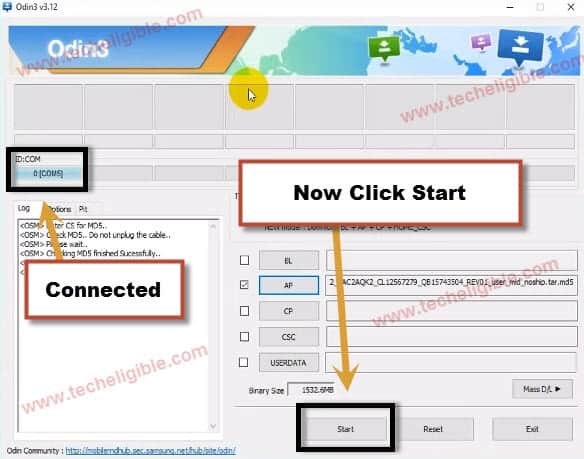
-Once you see sign of “Pass!” in Odin software, means you have flashed successfully.
-Disconnect device from computer.
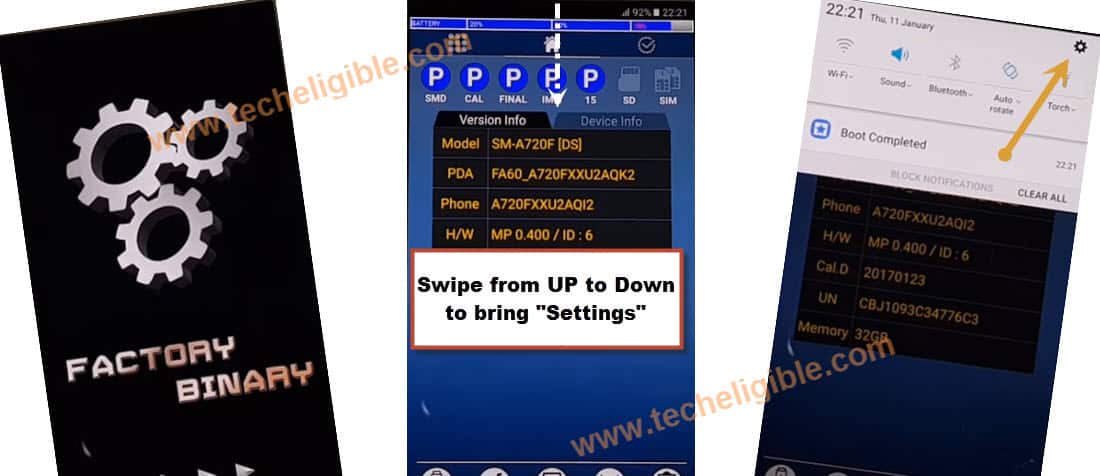
-Galaxy A7 will auto reboot to “Factory Binary”.
Enable Developer & Enable Mode:
-Bring “Menu” by swiping from up to down.
-Tap on “Settings Gear icon”.
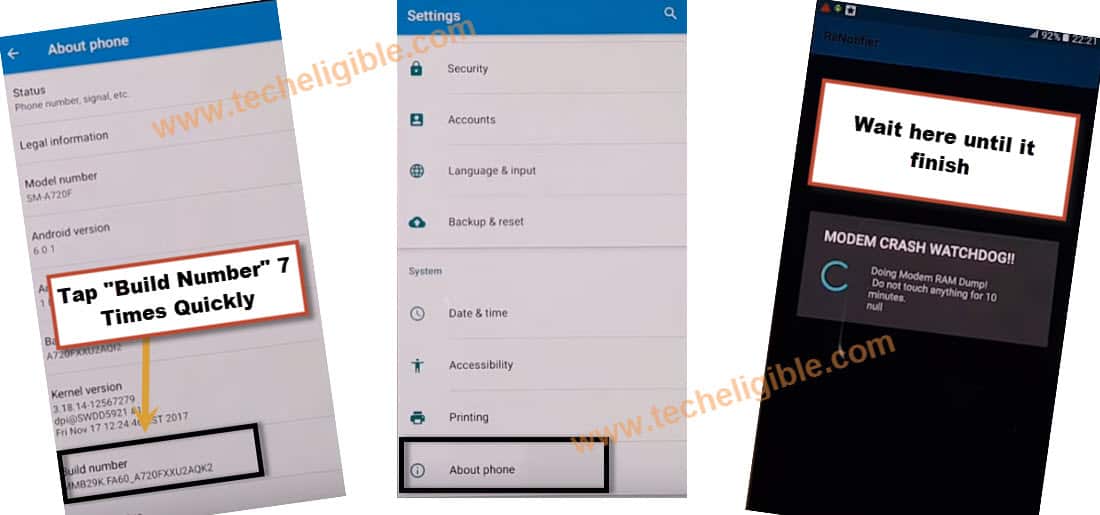
-After that, tap on “About Phone”.
-Now tap 7 times quickly on “Build Number” to enable “Developer Mode”.
-After that, you will see “Mode Crash Watchdog!”. Just wait here.
-Now you will see “CP Crash UPLOAD Mode“.
-Press & Hold (Volume DOWN + Power Key) until it shuts down.
-By pressing “Power Key” to switch on your device,
-Now again go to “Settings” by swiping from up to down.
-Now go to “Developer Options”.
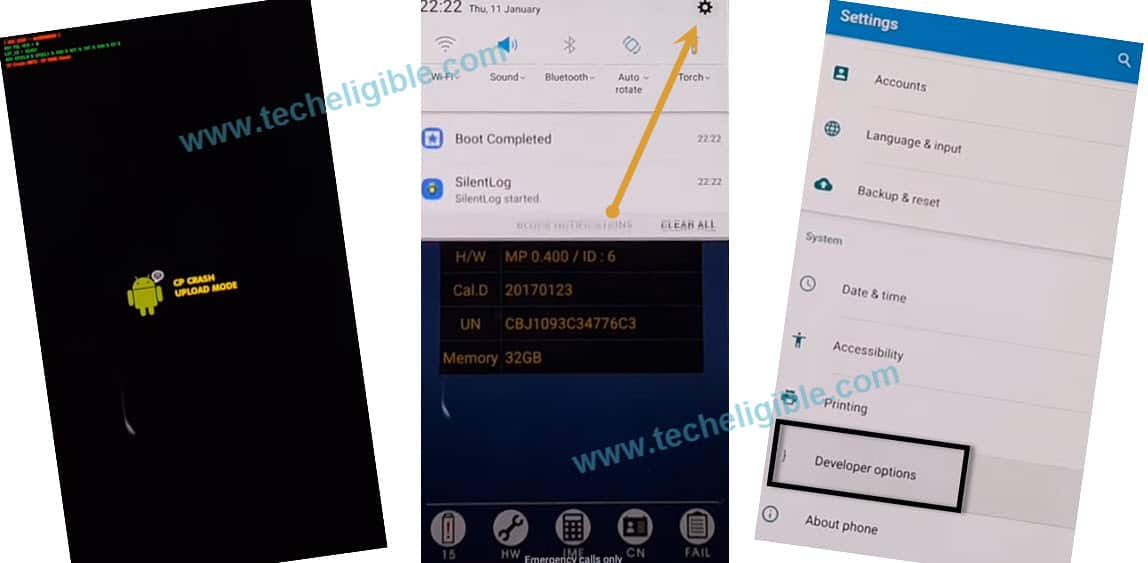
-Make sure “USB Debugging” is enabled.
-Switch off device by pressing power key.
Reboot Samsung Galaxy A7 into Download Mode:
-Reboot device into download mode again.
-Press & hold (Power Key + Home Button + Volume Down key) until “Warning” screen appears.
-Press (Volume UP) key to continue.
-Now you are in “Download Mode“.
-Connect device to computer using “Micro USB Cable”.
Start Flashing Process to Bypass FRP:
-Open “Odin Software” from Computer.
-Click on “BL” from Odin software, and then give path of “BL” file from downloaded “SM-A720F…” folder.
-After that, click on “AP” from Odin Software, and give path of “AP” file from “SM-A720F” folder.
-Now Click on “CSC” from Odin Software, and give path of “HOM CSC” file from “SM-A720F” folder.
Warning: Leave “CP” field empty, and make sure you’re giving “HOM CSC” file path in odin “CSC” field. (See Below Image).
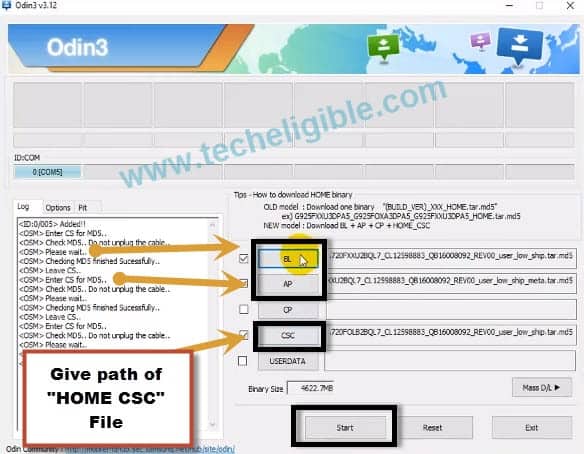
-Once all 3 files added successfully in “Odin Software”, click on “START” button to Bypass FRP Galaxy A7.
-Waiting until you see “Pass!” sign in Odin software.
-After that disconnect device from computer.
-Now wait until Galaxy A7 restart completely, after that complete initial setup to access your Galaxy A7 device.
FAQs About Samsung A7
Yes you can connect wifi, otherwise you won't be able to complete setup wizard steps If you have followed above steps carefully, then you will surely have a (SKIP) option there, just skip that. You can setup your own any desire new PIN or Pattern. If you do hard your device by from android recovery mode, then you will get frp lock, but you can use your previously added Gmail Account. You can't bypass frp without WiFi, because there are several steps those are required an internet connection.Can i connect WiFi while completing setup wizard/initial Setup
I am facing again (Verify Your Account) screen after adding Gmail account.
Can i add my new PIN/PATTER/Fingerprints while completing setup wizard
Will i get frp lock again if i hard reset my device
Can i bypass frp without WiFi
If you wanna know how to add new Gmail account or remove Gmail account, so you can follow below steps, otherwise you are all done from bypassing google account frp in your Galaxy A7 Android 10.
How to Add FRP Protection (FRP) in Galaxy A7:
This can easily be done by going into your device settings, if you bought brand new device, then you will have to add your own gmail account, and that account will be use for frp protection, no one can access your device galaxy A7 until he/she enter your gmail account.
-To add Gmail account, just go to > Settings > Accounts & Backup > Add Account > Google.
-Sign in there with your Gmail Account.
How to Remove FRP Protection in Galaxy A7:
-If you wanna sale your device to someone, in this case, you should remove your Gmail account, otherwise later on your device will be frp locked, and new owner of that device galaxy A7 won’t be able to have access in that phone, so put someone in trouble, better to remove Gmail account.
-For removing Gmail account, just go to > Settings > Accounts & Backup > Account > Select your Gmail Account > Remove Account.
Read More: Bypass Google Account Galaxy A5 2017 (Android 8).