
Have you stuck on the google verification screen after forgetting your google account and facing google frp lock protection? To fix up this issue, you can get help with frp bypass guideline. We have 3 different method here to bypass frp Moto G Stylus 5G (Android 14, 11,10). Follow up any one method by matching with the android version.
Disclaimer: We strongly suggest that you utilize this technique solely on your own gadget. In the event that you do not possess this gadget, or if you obtained it from another source, you should give it back to its rightful owner.
Method 1: Bypass FRP Moto G Stylus 5G 2024 (Android 14)
Remember: This method is only for those, whose Moto G Stylus 5G belong to (USA Services Provider), such as Verizon, T-Mobile, AT&T, U.S. Cellular. You must own a (Sprint USA SIM) sim card. If you don’t, you can purchase this online from (eBay etc).
-Turn on the phone and connect to WiFi network.
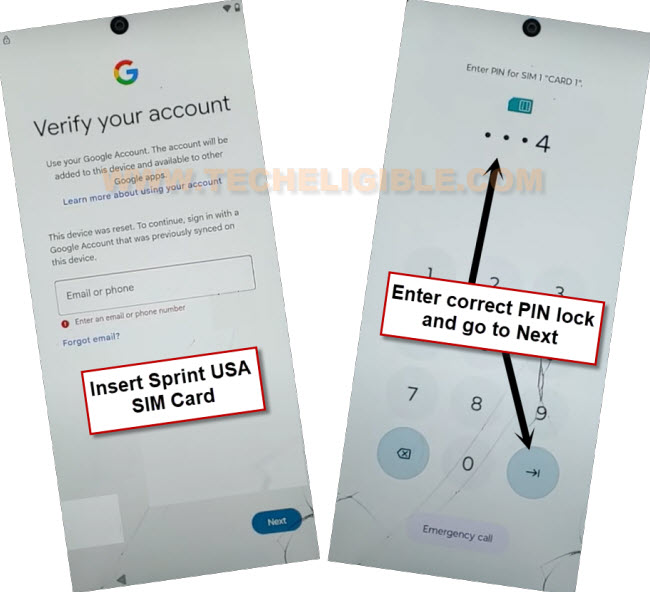
–Create 4 digits PIN code on your USA Sim card by any other android phone. Then, insert it back to your frp locked phone.
-Type unlocking sim card code and go to “Next”.
Note: Your Moto G Stylus 5G device must be from a USA carrier.
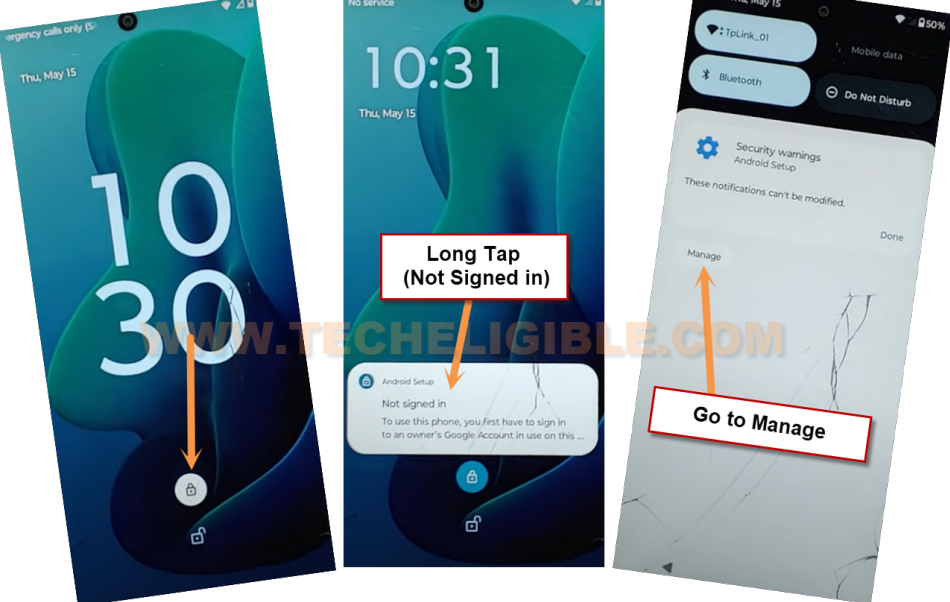
-Within few seconds, you will have another display of (Lock Screen). Tap to > Lock icon > Long Tap (Not Signed in) > Manage.
Note: If the screen you see differs from the one shown below, reinsert the SIM card and attempt the process again.
Save New Contact
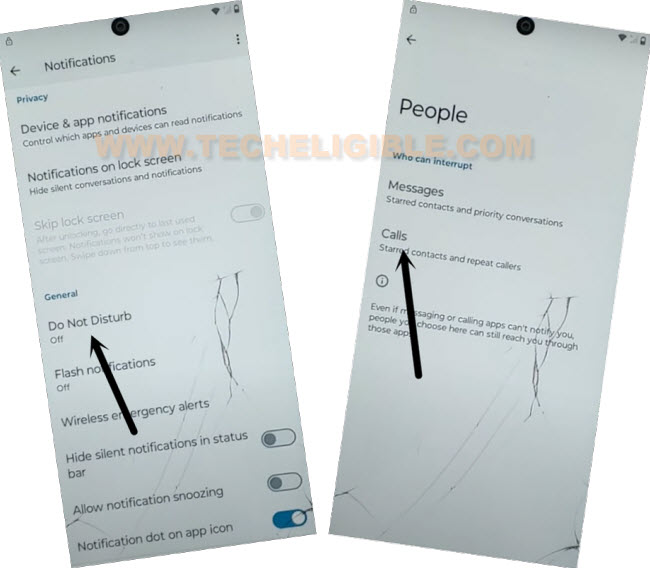
-We are gonna tap some of these options respectively > Do not disturb > People > Calls.
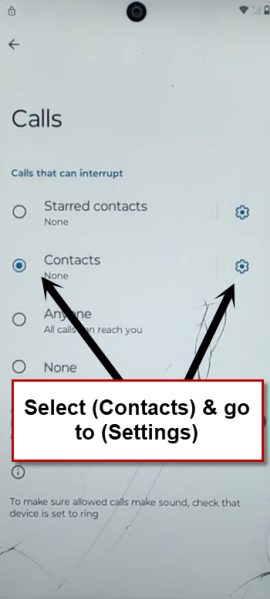
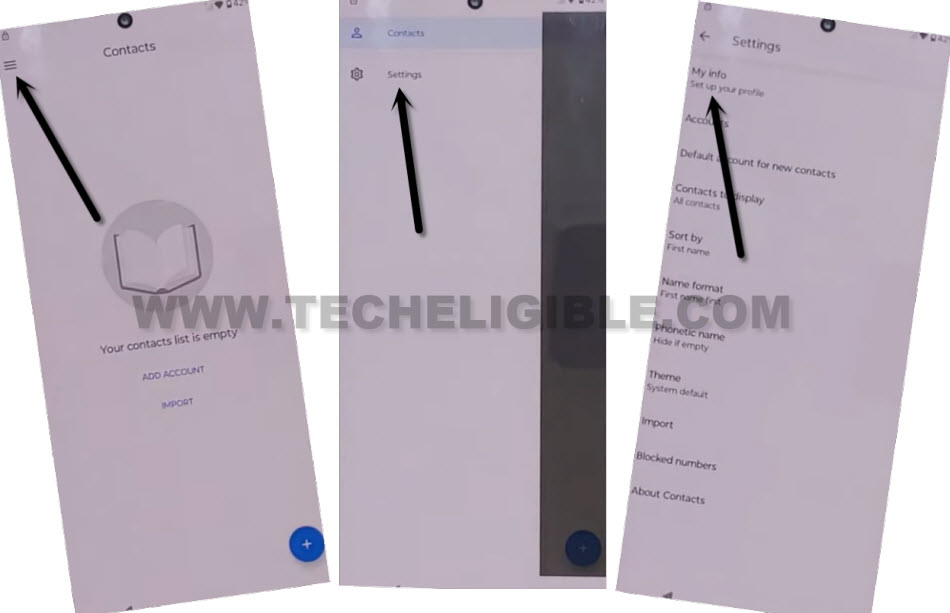
-Afterwards, tap “Contact” and go to “Settings” option same as shown in below image.
-We are choosing the “Allow” from popup and go to “Menu” icon from top corner. After that, simply tap at > Settings > My info.
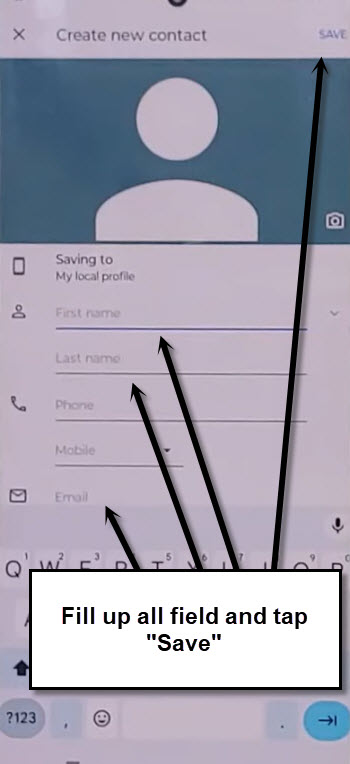
-Enter your any random name in name field.
-Enter Gmail account and tap to “Save” option.
Go to Gmail Help Page
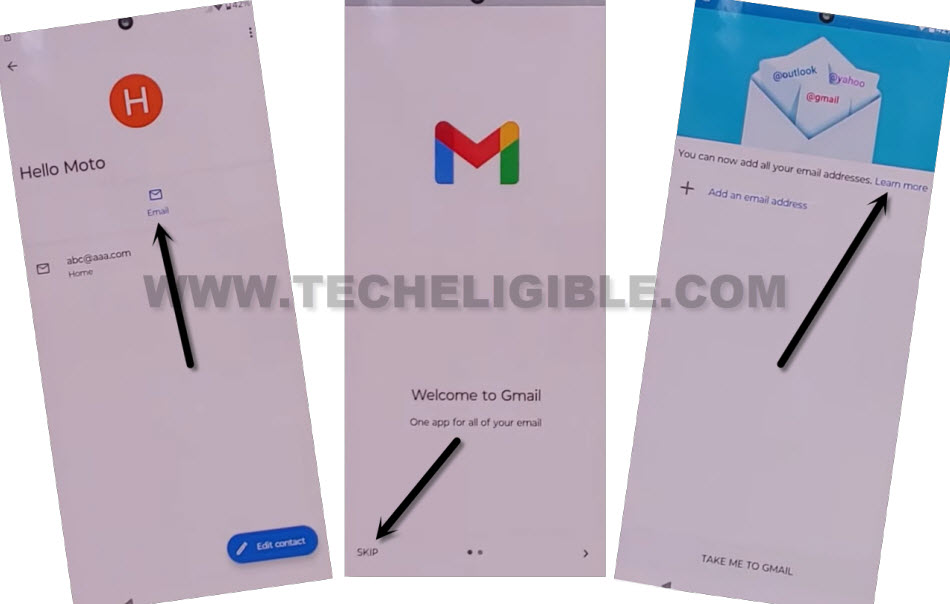
-You will be taken on the newly saved contact page. From there, just tap on “Email” icon from top. Then, go to “Skip”.
-Tap the link “Learn more” from top.
-Tap the following links > Learn how to add another email on your computer > Create an app password > 2 step verifications > Change this default preference in your account settings.
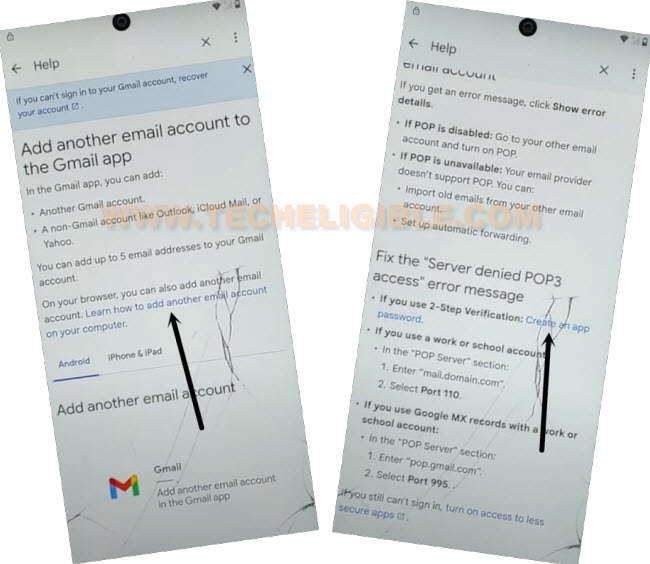
-Tap further links “Lost or stolen device” link to expand it. Then tap the link > Learn how to remove a passkey > Verify its you when you make sensitive changes.
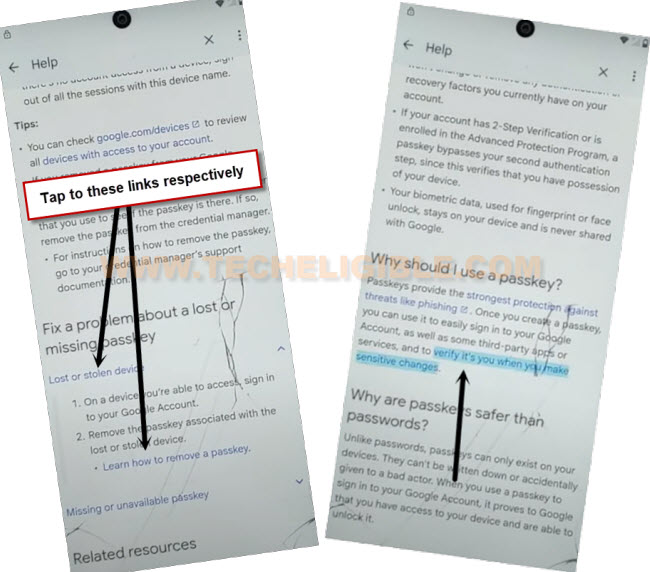
-Finally, a chrome browser will be launched, tap there “Use without an account”. After that, tap “No Thanks”.
Factory Reset through SIM Menu:
-From chrome browser, search with “Techeligible”.
-Visit the first searched result and go to techeligible official webpage.
-Tap > Menu icon > Download FRP Tools.

-Open up the dialer screen of the phone by tapping at “Open Dial Code“. After that, dial this code ##786#.
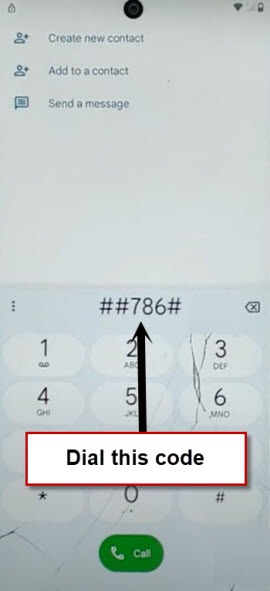
-You will be shown a black screen with some options listed there. Just, tap “Reset”.
-To accomplish this action, dial code 000000 and tap “Verify”.
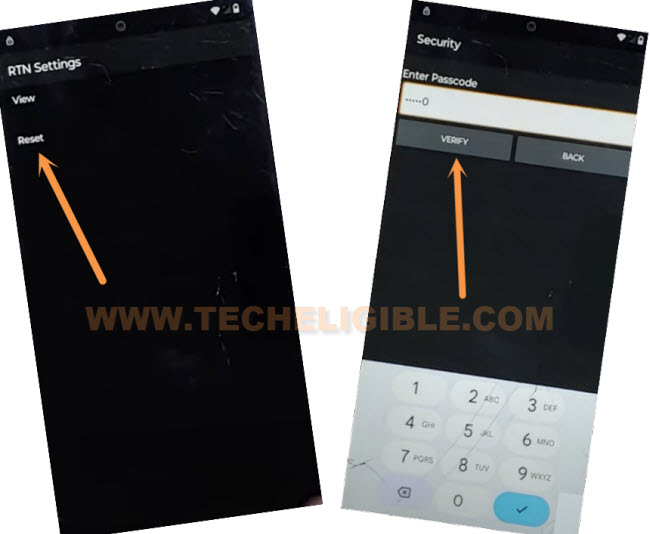
-Your device will be put on a factory reset and may take several minutes to be done. Just wait there.
-Continue to complete steps by tapping “Start” from (Hi there) screen.
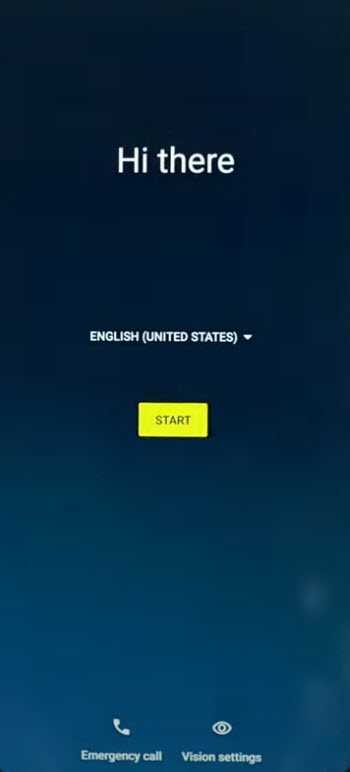
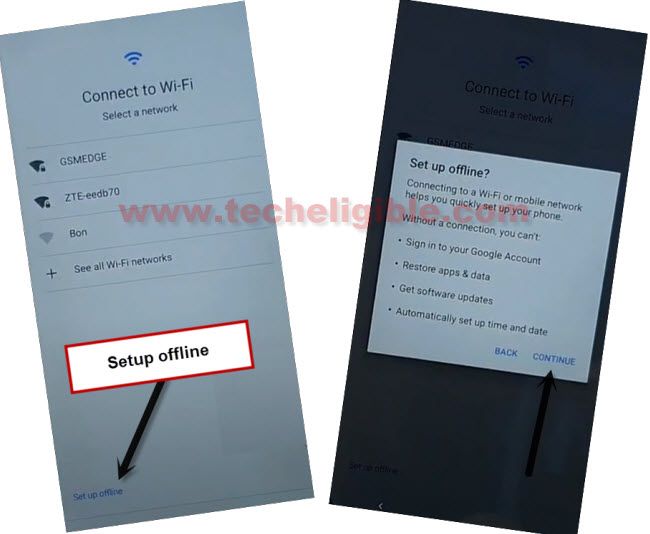
-Go to (Connect to WiFi) page and tap > Setup offline > Continue.
-After that, you can complete all startup steps easily and frp will be bypassed completely.
Method 2: Bypass FRP Moto G Stylus (Android 11/10)
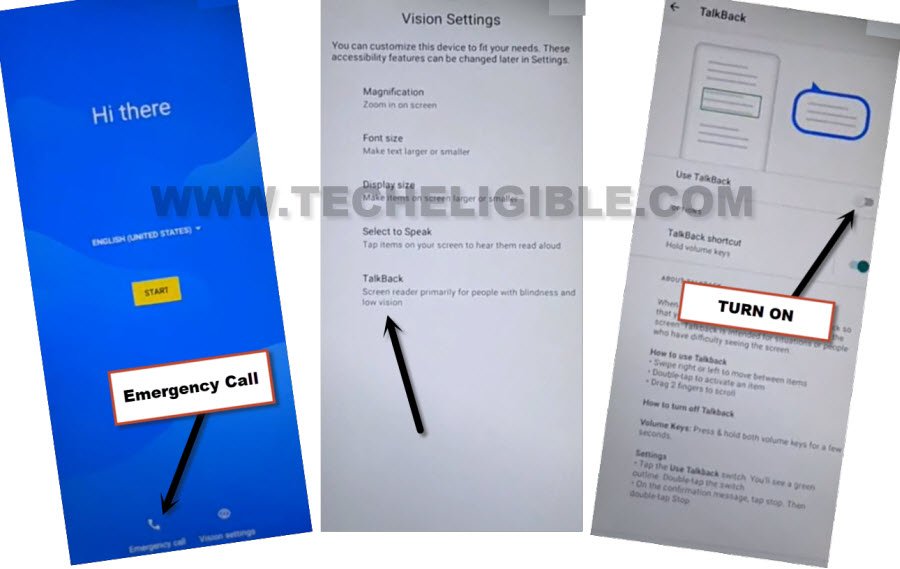
-Tap to > Emergency Call > Talkback.
-Turn on “Use Talkback” option from there.
-Double tap on “Close”.
-Lets just draw “L” letter by swipe down, and swipe right.
-Double tap > While using the app > Use Voice Command.
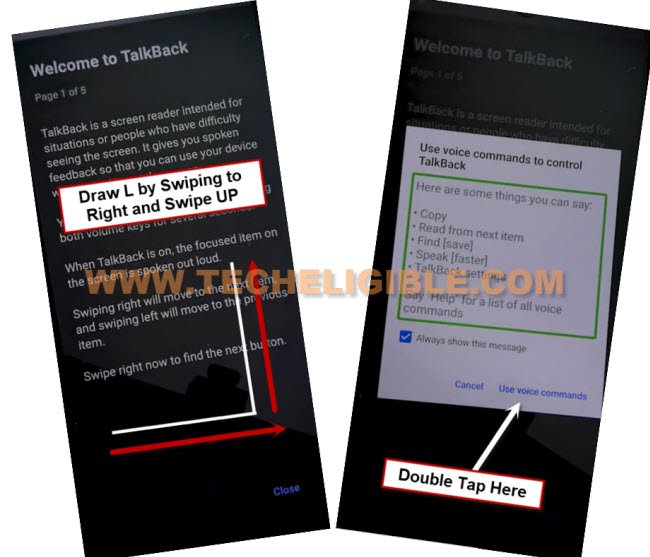
Note: If the (Voice Command) window do not popup, make “L” again on screen, and this time the popup window will appear up, so double tap on “Use Voice Commands”.
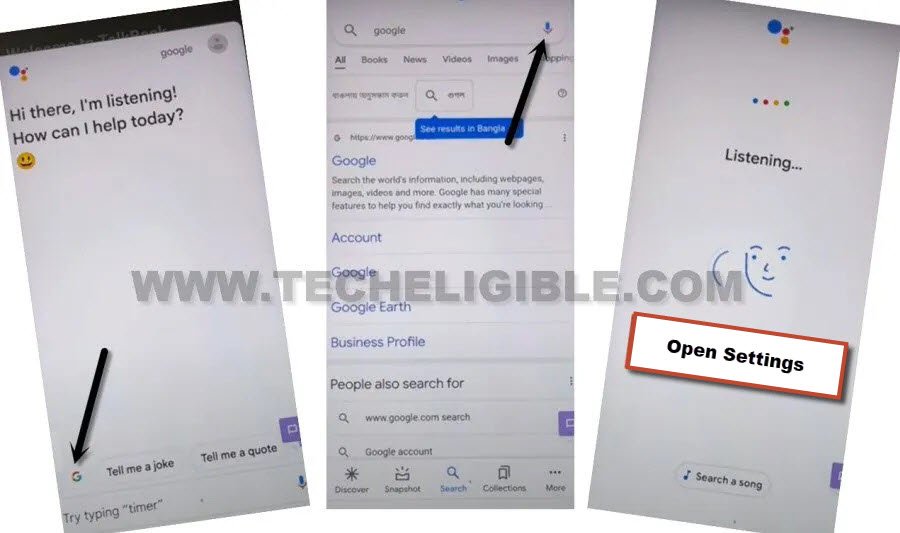
-Say loudly “Open Google Assistant” after seeing a green boarder around corner of the screen.
-A new (Try Saying) popup window will popup, speak loudly “Open Settings”, if settings do not launch, and you see there a screen of (Sign in to make a google assistant yours), in this case, just hit on “Back Arrow” once to get back on try saying screen.
-Hit on “Google icon”, tap to “Mic icon”, and say loudly “Open Settings”.
-From settings, go to > Accessibility > Talkback, now turn off “Use Talkback” option.
-Go back again on “Settings”, from there, go to > Accessibility > Accessibility Menu > Turn on.
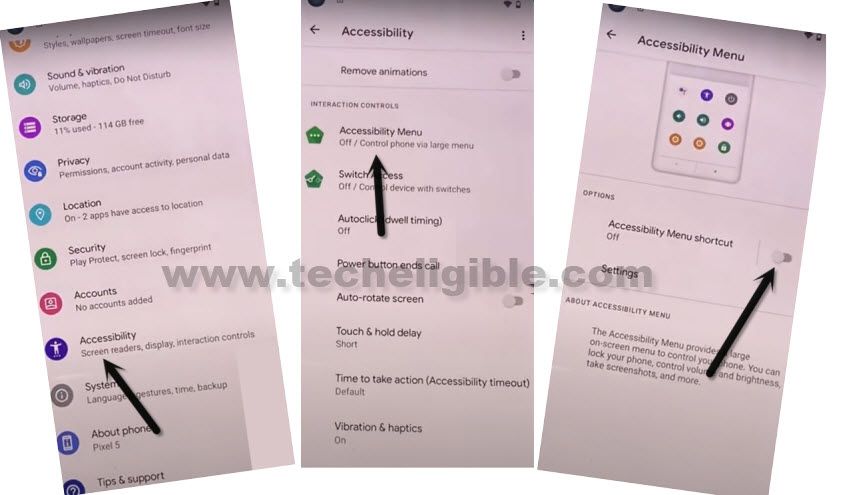
-We have to get inside app list, to do this, go back on > Settings > Apps > See All Apps.
–Find and tap to > Google Play Services > Disable > Disable App.
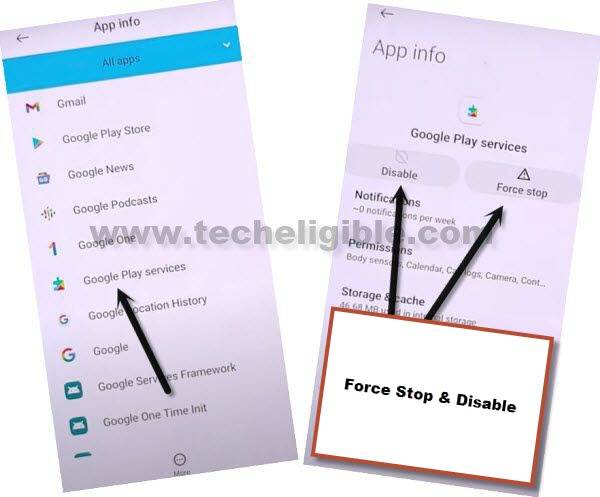
-Lets turn off WiFi, and forget WiFi network too by going back on > Settings > Network & Internet > Internet.
-Forget your connected WiFi, and turn off WiFi too.
-Go all the way back on “Hi there” screen by tapping on back arrow multiple times, from there tap to > Start > Skip.
Turn on Google Play Services:
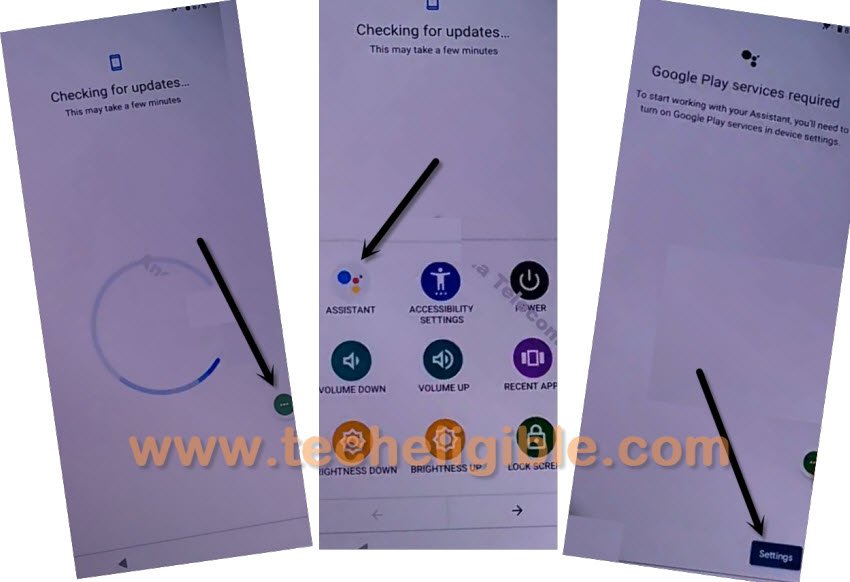
-In regards to turning on that google app successfully, we will have to quickly and repeatedly trying below 3 steps very fast as much as possible, otherwise you won’t be able to reach (Google Play Services) app, you may have to try below steps for almost 10-15 times or may be more, the more you will repeat, the more perfection will come and the more fast you will be able to do this.
Note: What would happen actually here, sometimes, you will miss “Settings”, so you have to hit 3 dots icon again and repeat all 3 steps, sometimes, you will not see “Settings” option, but keep trying, if you hit on “Settings” option successfully, the next screen would be of turning on (Google Play Services) app.
3 Steps to Do Very Fast ⇒ : Tap to > 3 dots icon > Assistant > Settings > Enable.
-Enable back the (Google Play Services) app from here, once you did that, you will be able to bypass google account.
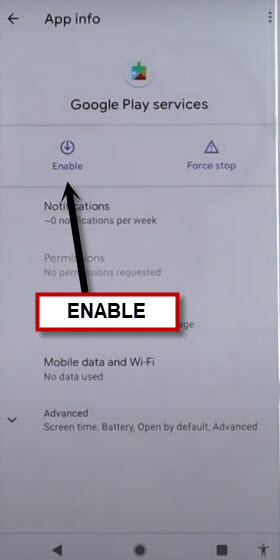
-After that, tap to “Back Arrow” from bottom, and finish setup wizard easily.
Method 3: Bypass FRP Moto G Stylus By Accessibility Menu (Android 11/10)
Bypass FRP with latest way without using computer or frp apps, just follow steps carefully to access inside (Settings), and disable some apps which does not let you to finish setup wizard. Once you disabled and cleared storge of those apps, you will be able to finish setup wizard and and easily add new google account to add new frp protection.
Everything has been mentioned below of this post with screen shot, so you can follow up all steps from below easily and if you find any difficulty in understanding any step, you can comment us as well.
Start FRP Steps:
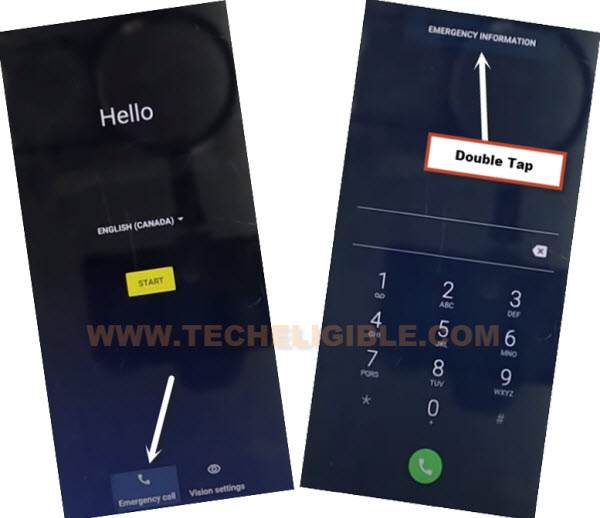
1. We are gonna Connect WiFi first, and then go back to first startup screen “HELLO”, tap to “Emergency Call”, and double tap to “Emergency Information”.
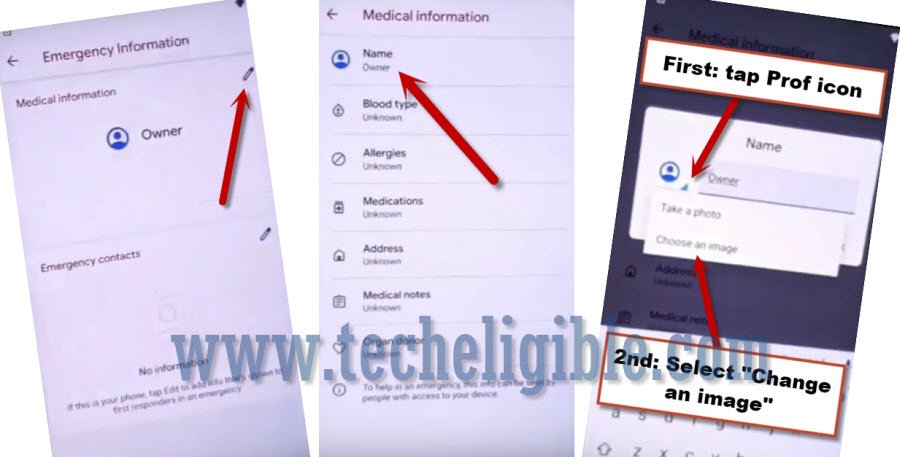
2. From the new homepage (Emergency information), you will have to hit on > Pencil icon > Name > Profile icon corner > Choose an image.
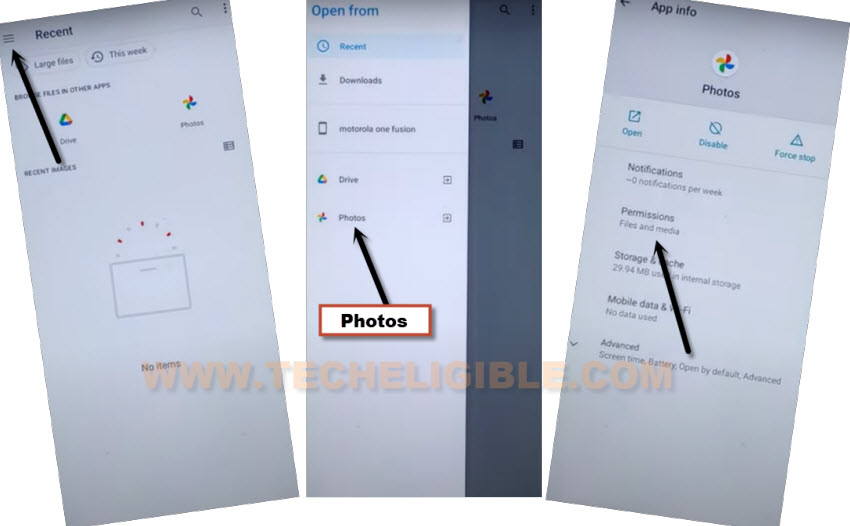
3. At the top left corner, there will be (MENU icon), just hit on > Menu icon > Photos > Permissions.
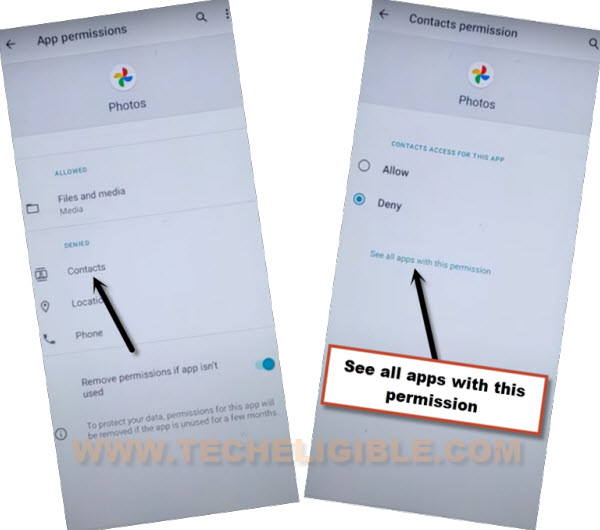
4. Contacts > See All apps with this permissions.
5. At the top right corner of the screen, there is an (search icon), so Hit on “Search icon”, and search there “Settings”, afterwards, tap to “Settings App info“, now hit on “Open”.
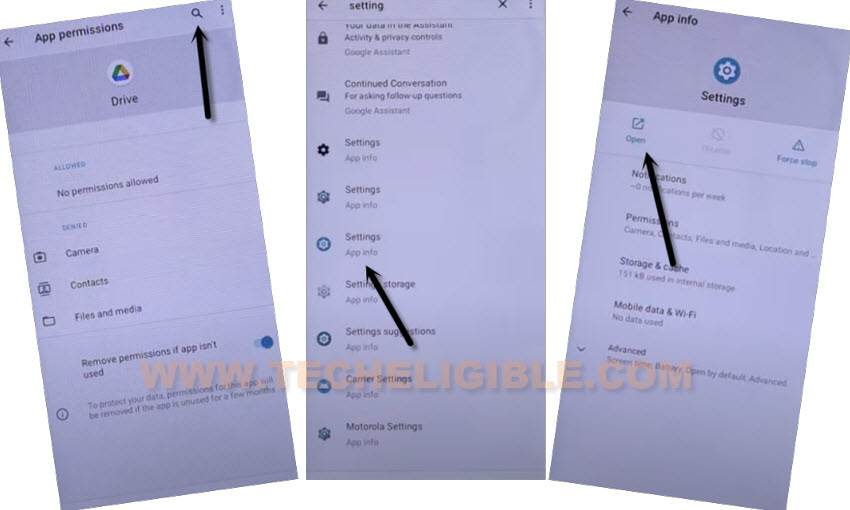
Enable Shortcut Menu:
6. Congrats, we have reached inside (Settings), now just go to > Accessibility > Accessibility Menu > Turn on.
Note: Just for verification, swipe from bottom to top using two fingers, and the MENU Shortcut will appear, that means you have successfully turned on this option. this will assist us to Bypass FRP Moto G Stylus.
7. Go back to (Settings), from there tap to > Apps & Notification > App info.
8. Now we are inside a (App List), from here we are gonna disable few apps, tap on > 3 dots > Show system Apps.
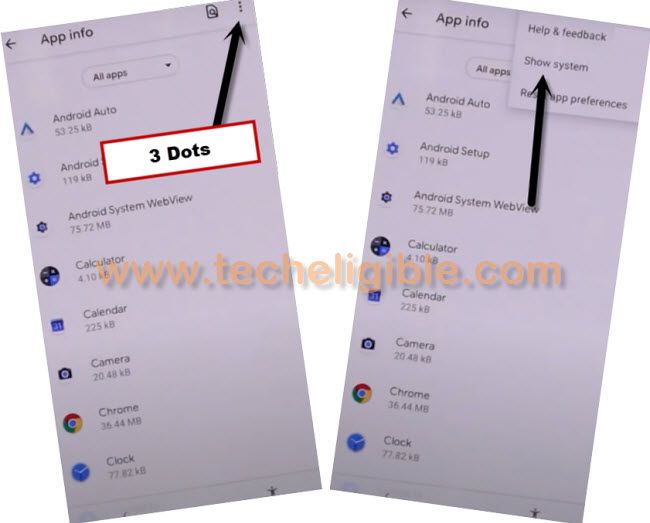
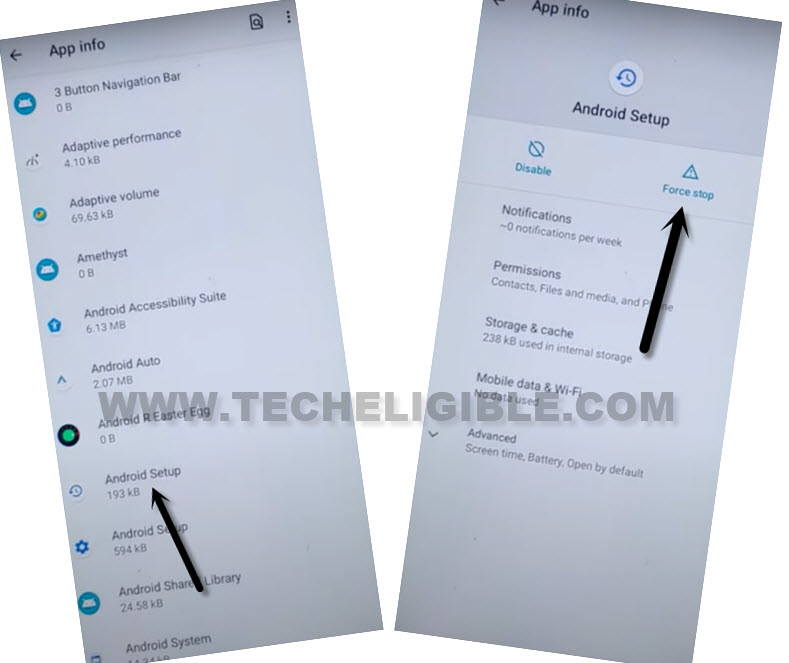
Disable Few Applications to Delete FRP:
9. Find and hit on > Android Setup (Clock icon) > Force Stop > OK.
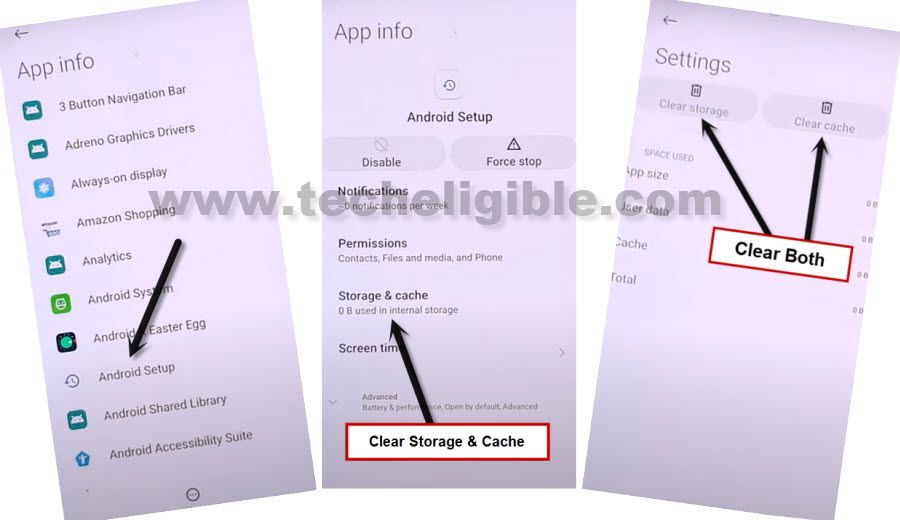
10. Clear both (Storage & Cache) by going to “Storage & Cache” option.
11. Finally, tap to “Disable > Disable App”.
12. Find blue color settings icon “Android Setup” same as shown in below image, so just tap to > Force Stop > OK.
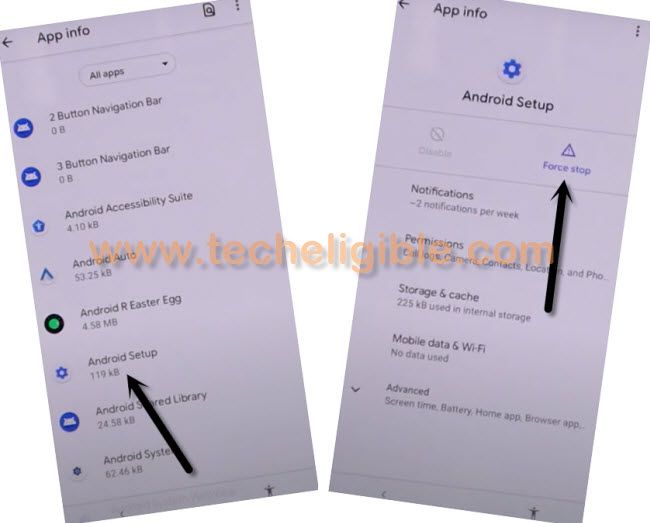
13. Tap to “Storage & Cache”, and clear also both storage and cache from of (Android Setup).
14. Find and tap to > Google Play Services > Disable > Disable App.
Note: Do not hit on “Force Stop” from this app.
14. After disabling and force stop above apps according to given instructions, let’s move on to next step to bypass frp account.
Enable Google Play Services to Finish Setup Wizard:
15. Tap to “Back Arrow” several times to get back to first “Hello” startup homepage, from there tap to “Start” button, and you will see continuously a loading screen there.
16. As soon as you see “Checking for update…”, just go back to (Connect to WiFi) screen.
17. Bring (Shortcut Menu) through Swiping up from the bottom of the screen using two fingers.
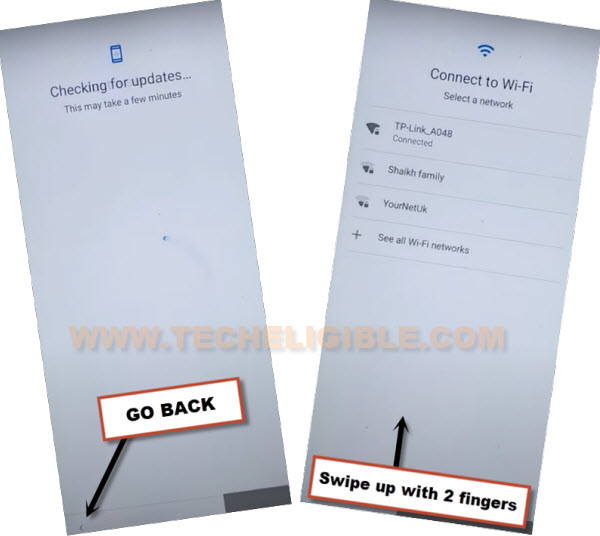
17. Quickly tap to > Assistant > Settings > Enable (Google Play Services).
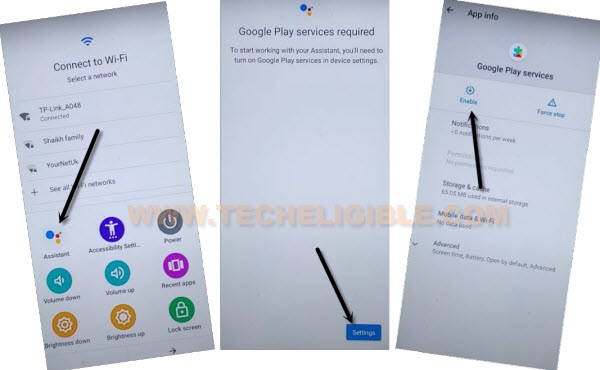
18. Go back, and tap to > Skip > Continue.
19. From there, tap to > More > Accept.
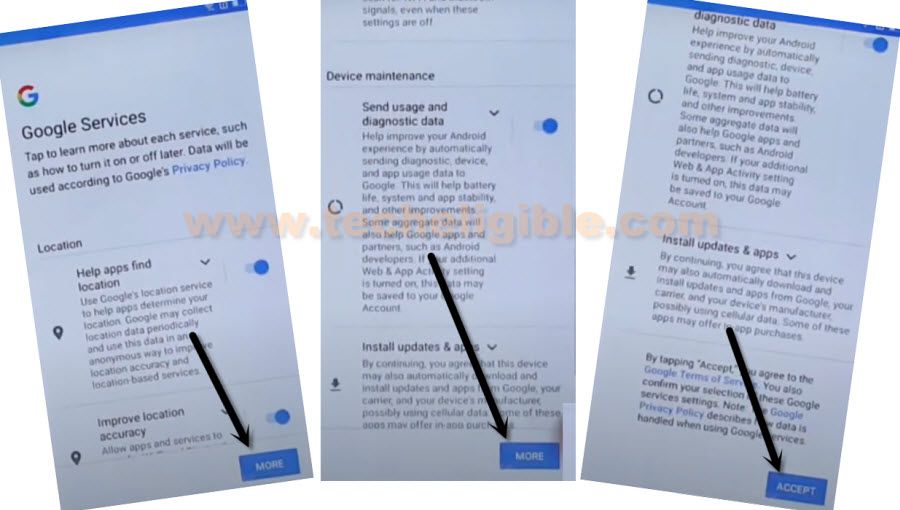
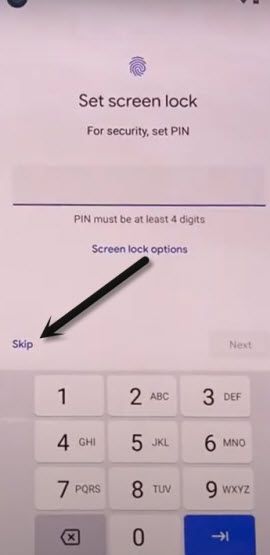
20. From (Set Screen Lock) screen, tap to > SKIP > SKIP > OK > Accept & Continue, finish remaining steps to reach homescreen.
Final Step: Go to > Settings > System > Advanced > Reset Option, now hit on “Erase (All Data) option 3 times.
You’re all done from Bypass FRP Moto G Stylus. Now, after finishing setup wizard or start-up screen, you can easily add your own new google account from the device “Settings”.
The Bottom Line:
Applied total 3 different frp bypass method on a (Moto G Stylus 5G & Moto G Stylus). In first (Method 1), we managed to reach the primary home screen on the Moto G Stylus 5G 2024 (Android 14) after overcoming the FRP lock security using the (Sprint USA SIM card). This SIM card is essential for utilizing and resetting the device. We just placed the SIM card into the phone and gained access to the FRP tools interface. At that point, we opened the dialer screen and made a call to retrieve the SIM card menu. From that menu, we simply selected the (Reset) choice to perform a factory reset and removed the Google account that had been forgotten.
In method 2 & 3, we simply used talkback and accessibility menu shortcut function for disabling some major applications, where your old forgotten google account details were stored. We simply forced stop and disabled those and complete setup wizard steps easily without stuck on google sign in screen.