
2 Ways to Remove FRP Galaxy S8 Plus, Galaxy S8 Android 9 [Updated]
You can find out all available frp methods in this single post to easily Remove FRP Galaxy S8 Plus, Galaxy S8 (Android 9), because, new security patch level is updated, the frp method is also required to be updated, that’s why, we have included some top frp ways in this single post, and the method-1 is the most latest one, we would recommend you to apply (Mehtod-1) first, and we hope, you will be able to setup new google account.
Warning: This method is only for device owner and for educational purpose only.
| Method 1: Remove FRP Galaxy S8, S8 Plus (BY PC) New |
| Method 2: Remove FRP Galaxy S8, S8 Plus |
Method 1: Remove FRP Galaxy S8 Plus, Galaxy S8:
-Start this method by Downloading SamFw tool V3.2 in your PC or Laptop [Download].
-After that, go to this tool folder, and double click on (SamFwFRPTool.exe).
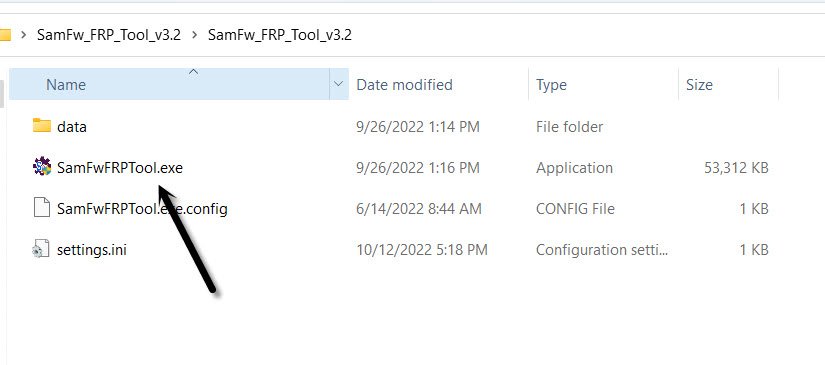
Note: you may have a popup of installing Samsung USB driver, so install drivers as well, so that you may not face any connectivity issue.
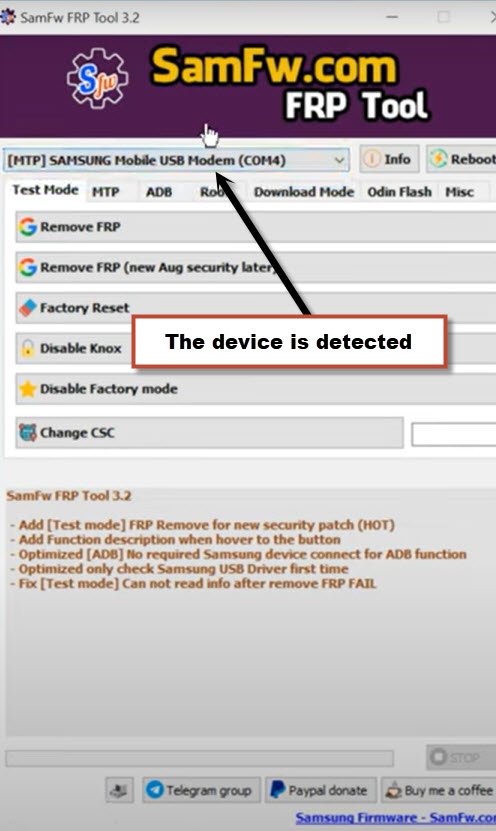
-Turn on Samsung S20 device, and connect with PC.
-Once the device is detected by tool, the device Com port will start appearing up in your Samfw tool same as shown in below image, if the device is not detected, do make sure proper Samsung USB drivers are installed, and also connect and disconnect device 2-3 times from PC.
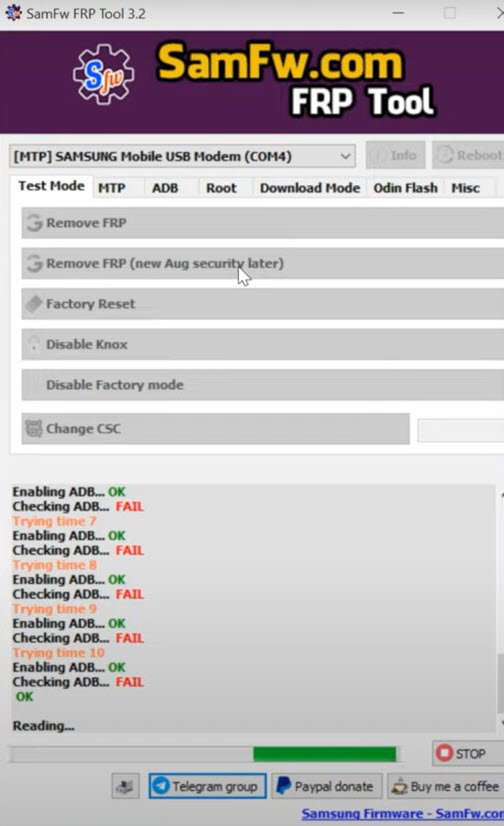
-Click on button from tool “Remove FRP (New Aug security Later)” button.

-Wait, the FRP Bypass process will just start, this process will take few minutes, once you see (OK) in samfw tool, that means the adb has been enabled successfully.
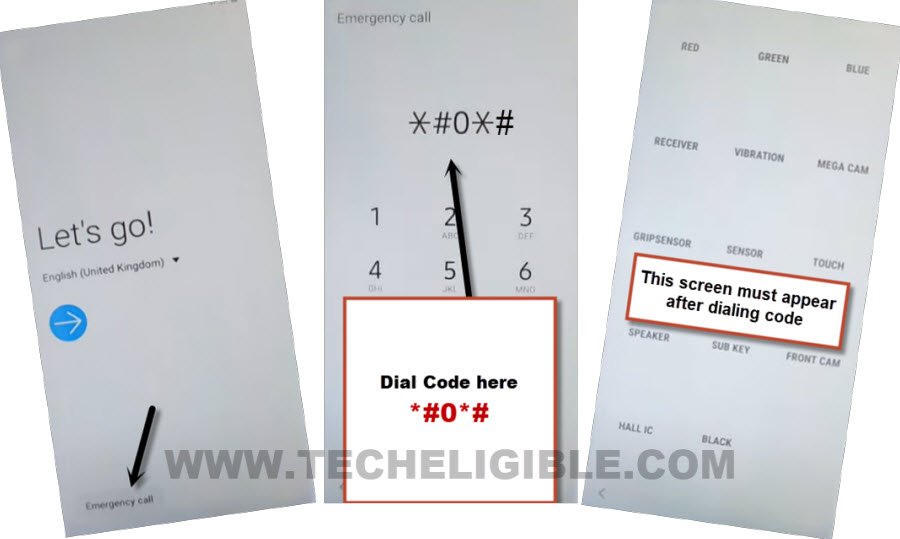
-Hit on “Emergency Call”, and dial this code there “*#0*#“, after that you will have there a blank box screen.
-Tap again on “Remove FRP (New Aug security Later)” button, and this time, this software will start reading all device info.
-You will receive a popup message, firstly check mark option “Always allow from this computer”, and after that, tap to “Allow” to Remove FRP Galaxy S8 Plus.

-From another popup window, tap to “Samsung setup wizard”, you will get into the device settings.
-Again hit on “Allow” from USB debugging popup message.
-After that, the device will just restart, and you will reach inside your device homescreen.
-Go to > Settings > General Management.
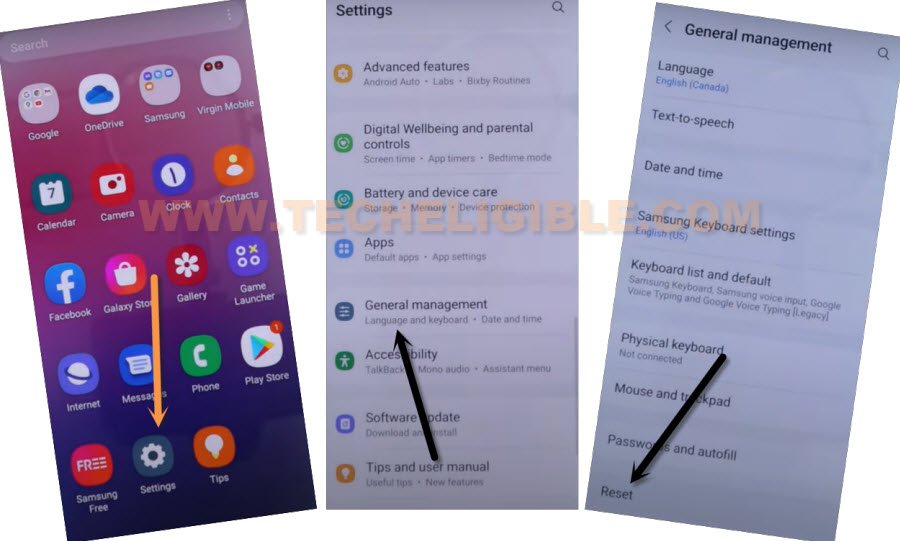
-Lets perform factory reset task from settings, for that go to > Reset > Factory Data Reset > Reset > Delete all.
-After that, the device will auto restart, and you are all done, just finish setup wizard and use your device without having any old google account signed in.
Method 2: Remove FRP Galaxy S8 Plus, Galaxy S8 [Android 9]
You don’t need to flash device by combination firmware, and most of the device firmware are also unavailable by free access, so this method suits to you if you are having difficulties in searching the combination files, just use any your working SIM Card and through that you can bypass google frp.
This method will work on your Android 9 version device, so before starting the process, do make sure you have Android 9 version, if you don’t the device version, so you can find out that by putting your device on recovery mode.
You just have to connect wifi in your phone, and after that access to YouTube website by following our steps, and download frp tools. Follow steps from below. (This method is only for Device Owner, those have forgot their Gmail account, and want their device back).
This method has successfully been applied on (SM-G955U) android 9. if you have other model or other android version, we hope you will be able to find out most nearest frp methods from below.
Tools You Need:
♦ Wifi Access.
♦ Sim Card. (Having PIN Locked)
♦ Sim Tray Removal PIN.
Note: If your sim card is not pin locked, that’s not a big deal, just set your any 4 Digits pin code by using any other phone and then use that sim for Galaxy S8 and S8 Plus.
Let’s Start FRP Removal Process:
-Turn on Phone & Connect Wifi.
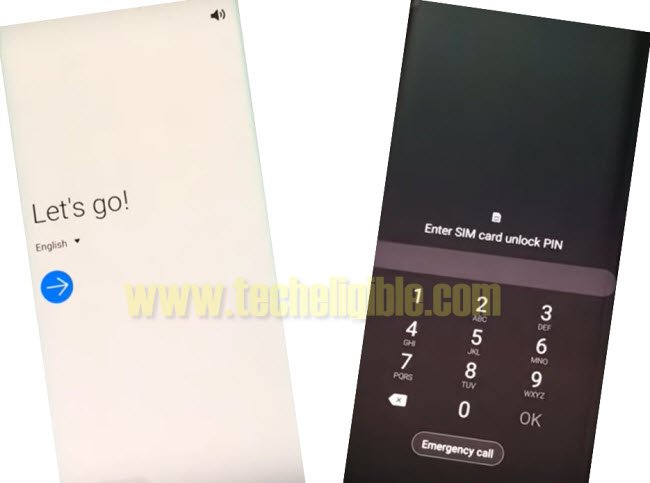
-Put device back to its first “Let’s Go!” screen.
-Insert active Sim Card, after inserting the sim card, you will see “Enter u
-Press “Power Button” & Remove “Sim Tray” simultaneously.
-Now press “Power Button” again to wake-up device, and there you go, there you will have the “Lock icon” on screen. same as shown in below image.

-If you do not see this screen, then you are unsuccessful, do apply this trick again until you get the lock. (Make Sure you are pressing power button and removing sim tray at same time.
-So lets do it again, because you wont be able to this at first time.
-Reinsert sim card.
-Press (Power Key & Remove SIM Tray) at the same time.
-Press (Power Key) again to wake up device, and see this time “Lock Screen” appears or not, if it does not, do repeat it again until you succeed.
-Once you get the lock screen same as shown in below image, lets go for the next step.
-Tap on > Lock icon > Notification Settings > See All to Remove FRP Galaxy S8 Plus.
![]()
-Now Tap on > Most Recent > All > Youtube > In App Notification Settings > About > Google Privacy Policy.
-Now tap on “Not Now” from the bottom popup window.
-Congrats, You have successfully accessed to the Samsung Internet Browser.
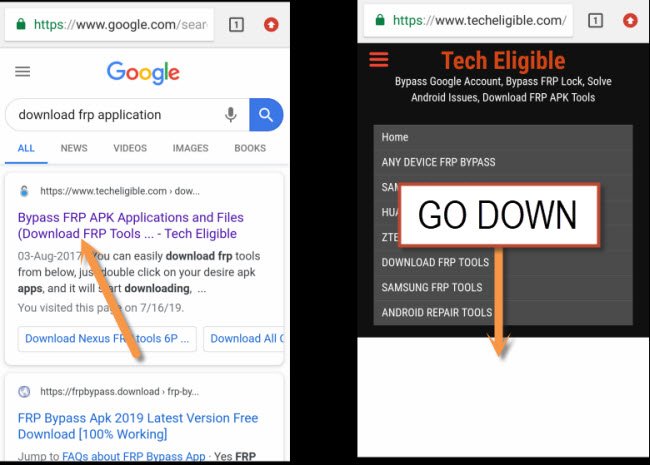
Download FRP Apps From Below:
-Type in address box “Download frp tools Techeligible“, and go to first searched result.
-Download from there “Apex Launcher 3.3.3“, and wait until downloading process finish.
-To access the download folder, tap on “MENU” icon from bottom right corner of the browser & select “Downloads”.
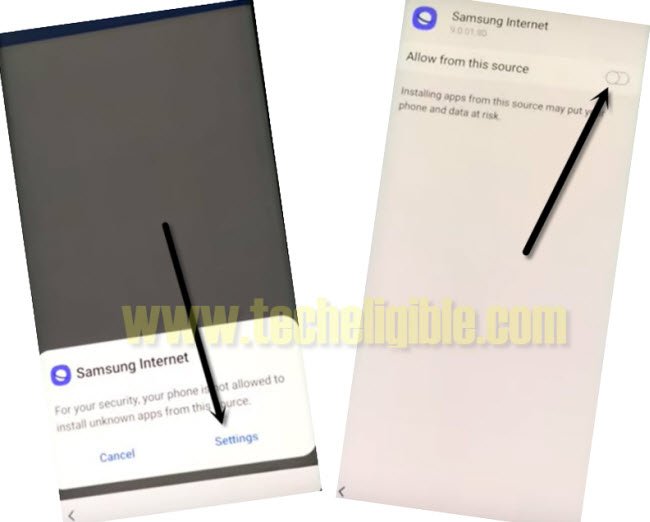
-Tap on > Apex Launcher > Settings > Allow from this source.
-Go back by tapping on back arrow.
-Tap on > Install > Open.
-Here you go, you are in your Samsung Galaxy S8 and Galaxy S8 Plus, but still some work need to be done.
Download & Install Google Acc Manager App:
-Go to device “MENU”.
-Open “Internet Browser”.
-This will surely show you same frp tools page.
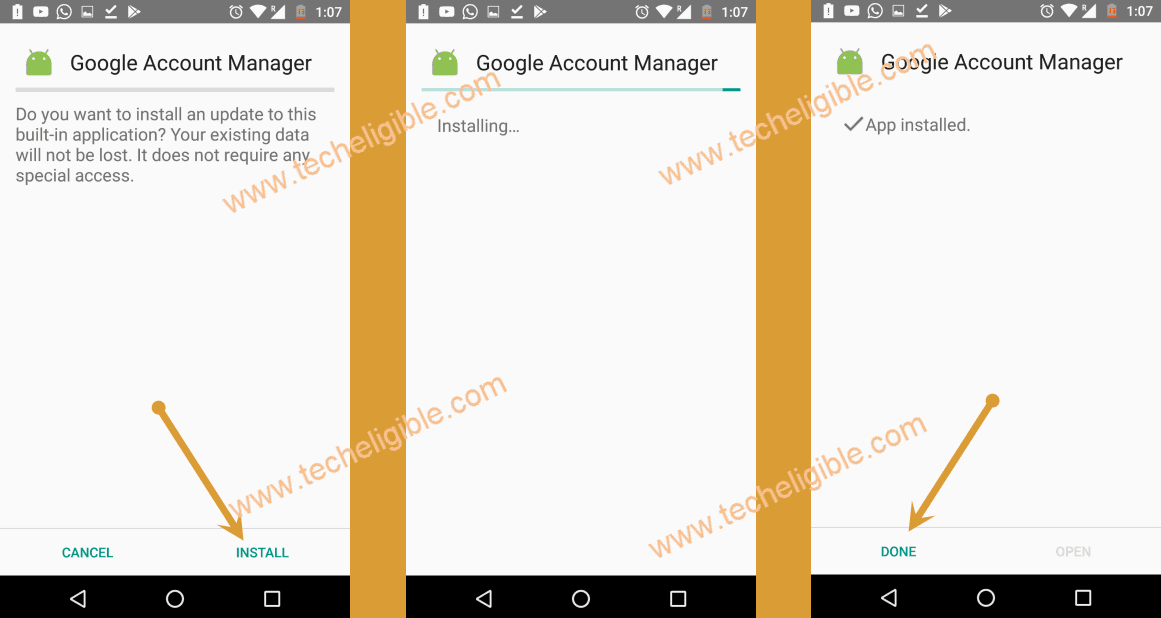
-Just download from there “Google Account Manager 6“.
-Tap on “MENU” icon from bottom right corner, and tap on “Downloads”.
-Tap on > Google Account Manager 6 > Install > Done.
-Now we have to install one more frp apps.
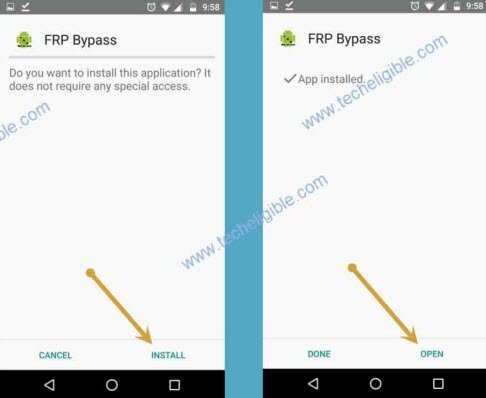
-Download Also “Account Login” app from the same frp tools page.
-To install this app, Access to download folder again by pressing on MENU icon and select “Download”.
-Tap on > Account Login > Install > Open.
-After successfully opening this app, you will see a screen of (Retype Password), just hit on “3 dots” from the top right corner and then tap on “Browser Sign-in” to access the sign in page.
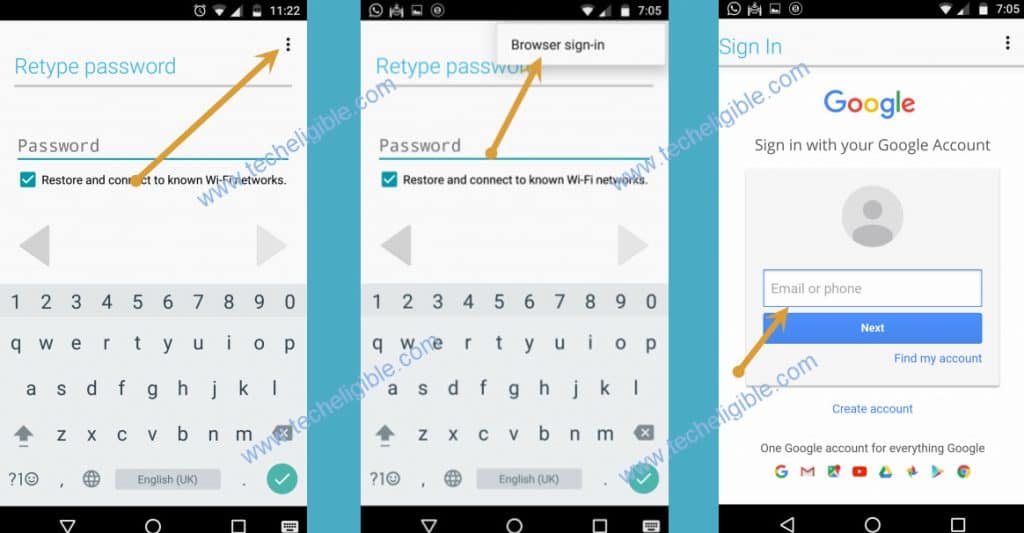
-Login in to browser using your valid and active Gmail account to finish this method.
-To verify that, has your Gmail account successfully added or not, just go back to “Settings”, and tap on “Accounts & Backup”, and then tap on “Accounts”, there you will be able to see your new signed in Gmail account, so that means you are all done from Remove FRP Galaxy S8 Plus.
-Restart your device, and then complete “Setup Wizard”, and this time you will not see any google verification screen, if you see that, there will be “Skip” option, just tap on that.
More FRP Ways on a Relevant Android Phone:
Samsung Galaxy S8, Galaxy S8 Plus
Remove Google Acc Galaxy S8 Plus, Galaxy S8 By Combination Files
Bypass Google Account Galaxy S8, Galaxy S8 Plus By PC Frp Software (Android 8)