
Remove FRP Account Galaxy S22, S22 Plus Android 13, 12, 11
We have updated another new way to Remove FRP Account Galaxy S22 Android 13, Android 12, Android 11 devices with below 3 methods. If you are still looking for a method to reach to your device with new google account, so follow steps from here. Without using any paid software, you will be able to remove frp on your own. This method is only for device owner and for educational purpose only.
Warning: Do not try this frp method on a stolen phone, this is a serious crime, if you are trying to bypass frp on a stolen phone, you may also be jailed, this process is for device owner and for educational purpose only.
| Method 1: Remove FRP Samsung S22, S22 Plus [ANDROID 13] New |
| Method 2: Remove FRP Samsung S22, S22 Plus [ANDROID 13] |
| Method 3: Remove FRP Samsung S22, S22 Plus [ANDROID 12 | 11] |
Method 1: Remove FRP Account Galaxy S22, S22 Plus [Android 13]
-You are required here a PC tool (VG Tool) to successfully bypass frp on Samsung S22 phone. Let’s download tool from below link.
-Re-visit this post after downloading & installing VG 3.6 tool.
⇒ Download & Install VG 3.6 Tool with Key [DOWNLOAD].
-Do make sure, your @ntivirus software is already off before using VG 3.6 tool.
-Install proper Samsung drivers in your PC before using VG Tool. You can also install (MTK + Driver 64) drivers in your PC using VG 3.6 tool as well.
Note: You can also install Samsung Drivers from here as well [Download]
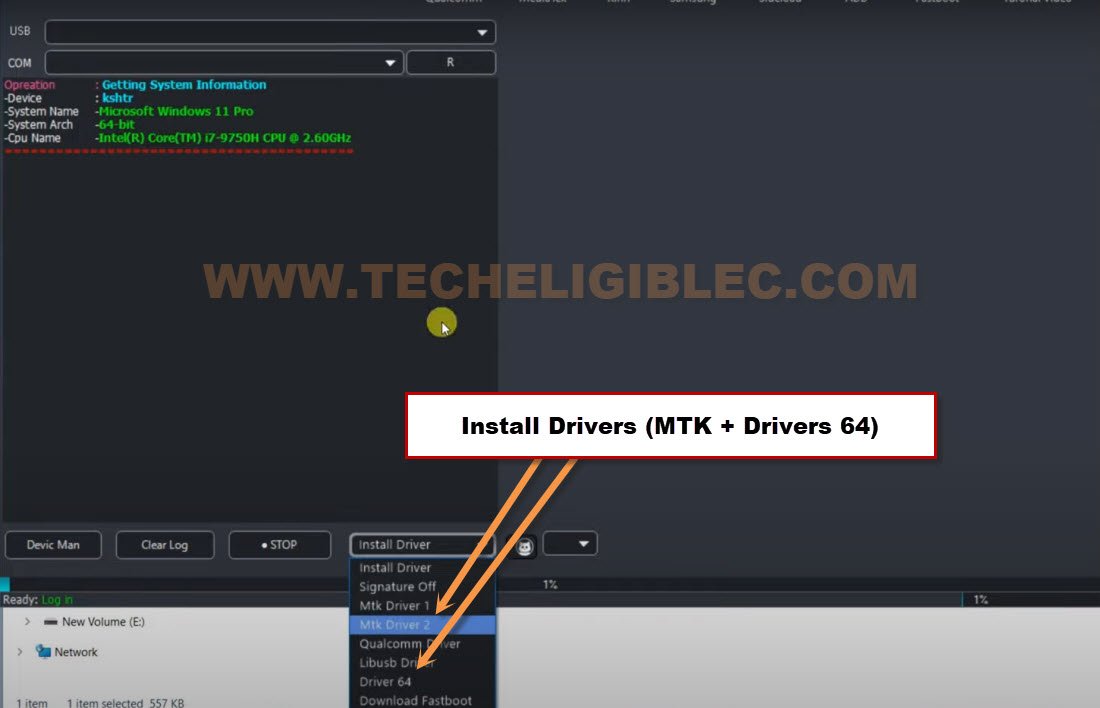
-After installing proper drivers, lets go to (VG Tool) screen. From there, click to > MediaTek > Universal > Auto Unlock.
-After that, click on “Broom” option from the tool.

Let’s Connect Samsung S22, S22 Plus with PC:
-Do make sure, the Samsung phone is switched on. After that, connect your phone with PC using USB Cable.
-Long hold all keys (Volume up + Down + Power).
-Once the device screen goes off & Black, release only “Power” key, while keep holding other (Volume up + Down) keys simultaneously.
-On (Warning) page, release (Volume up + Down) buttons too.
-Press just “Volume Down” button on (Warning) page.
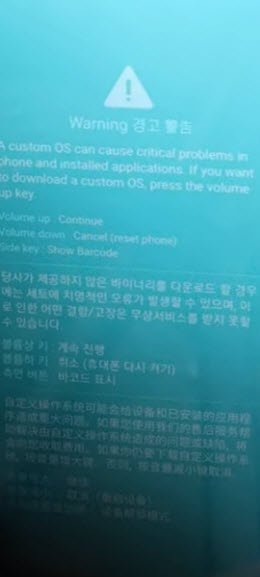
-We’ve successfully got into (Download) mode screen same as shown in below image.
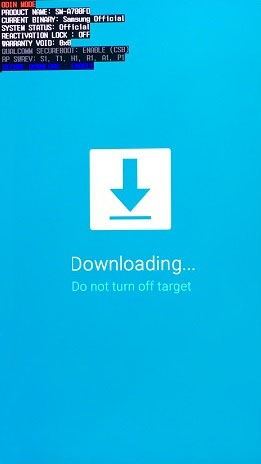
-Remove & Reconnect USB Cable to your Samsung S22 device.
-Long hold all keys (Volume up + Down + Power).
-Once the device screen goes off & Black, release only “Power” key, while keep holding other (Volume up + Down) keys simultaneously.
-Keep your eyes on (VG Tool) screen. As soon as the device is detected by VG Tool, just release (Volume up + Down) keys as well.
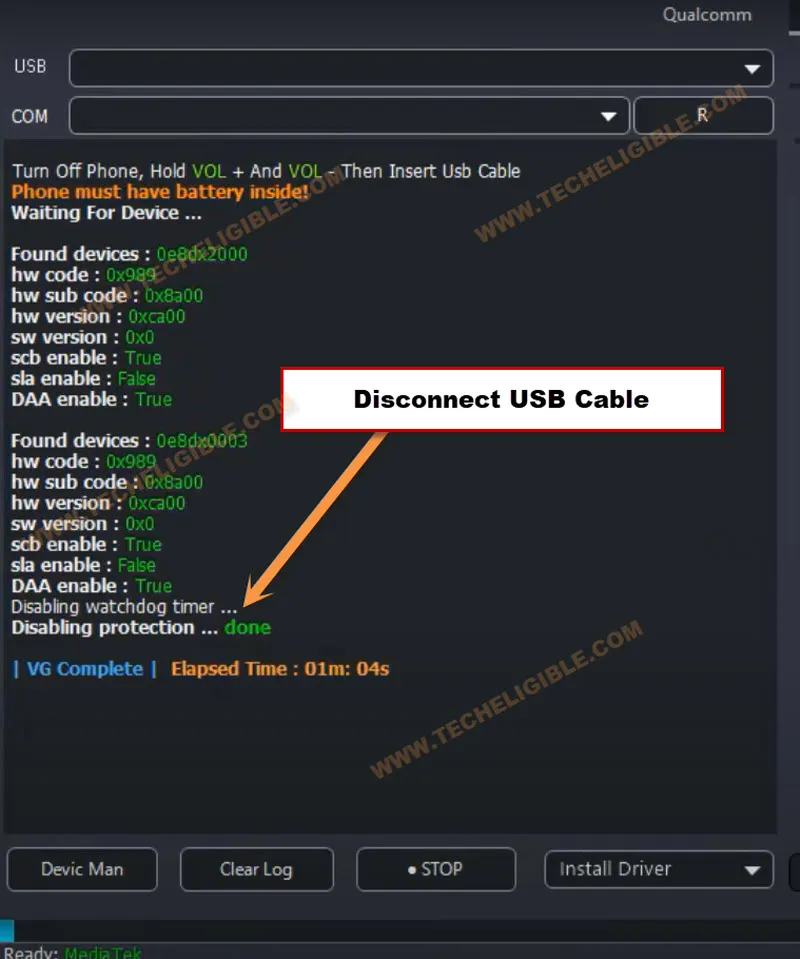
-The frp bypass process will continue in VG tool, after that, few moments later, you will have a message of (Disabling Protection….. Done).
-After that, you have to disconnect Samsung device from PC.
-This is the final step, we just have to click on “Erase Samsung FRP” button from VG Tool.
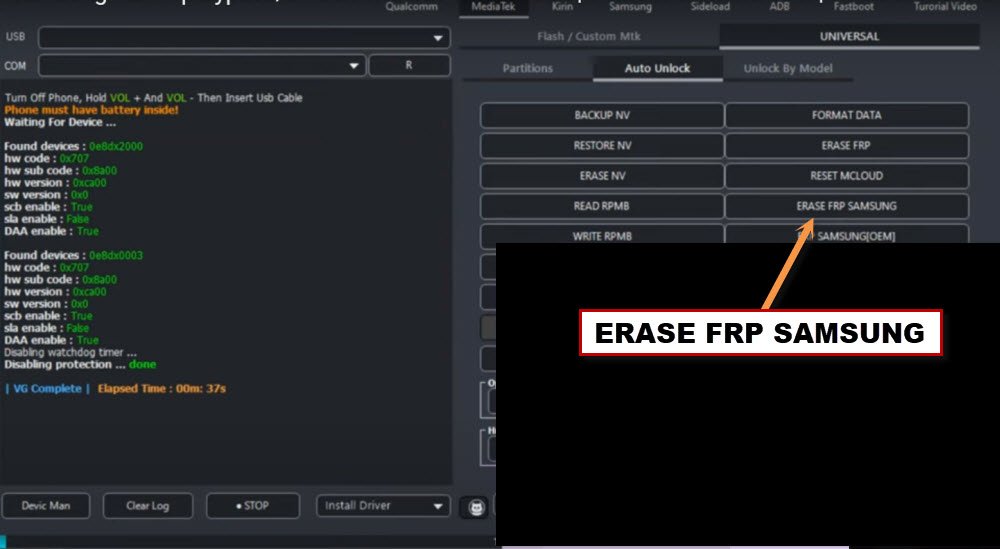
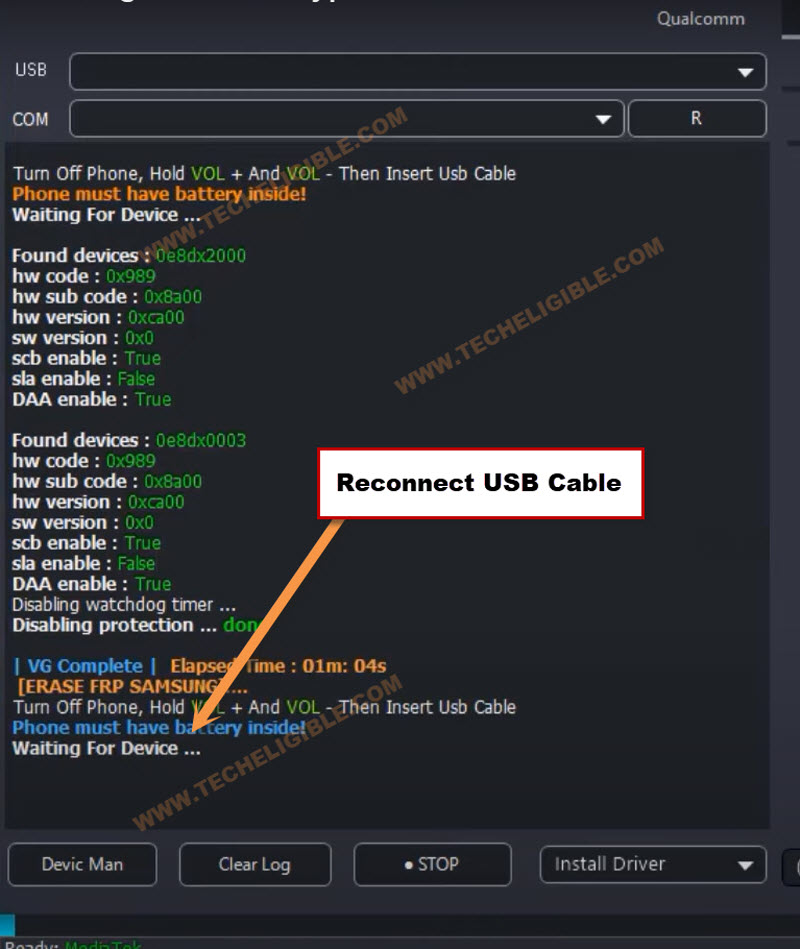
-Connect USB cable again with Samsung S22 device.
Note: If the device is not detected by VG Tool, re-connect USB cable.
-The VG tool will detect your device, and will start erasing Samsung FRP.
-Withing few seconds, your device will be free of FRP protection. And, you will have a message on screen (Erasing FRP protection…. done).
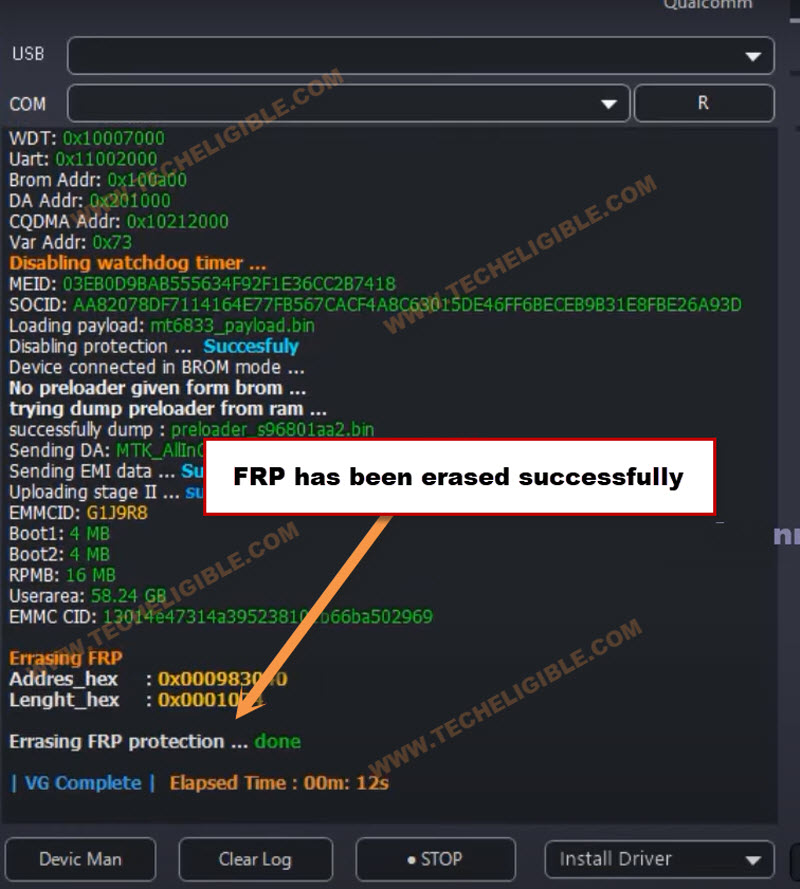
-Disconnect your Samsung device from PC. And, finish up setup wizard easily without facing any google verification screen. Thanks for visiting us.
Method 2: Remove FRP Account Galaxy S22, S22 Plus [Android 13]
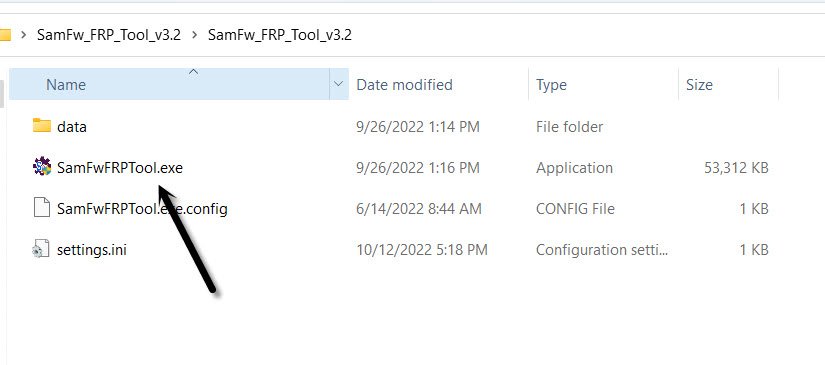
-First step is to Download SamFw tool V3.31 in PC [DOWNLOAD], after downloading finish, open this software in your PC same as shown in below image.
-Lets get back to Samsung Galaxy device, and connect this device with PC, do make sure the device is switched on.
-First of all, we will make sure our device has been detected by PC, to know this, right click on (This PC / My Computer), and click to “Manage”.
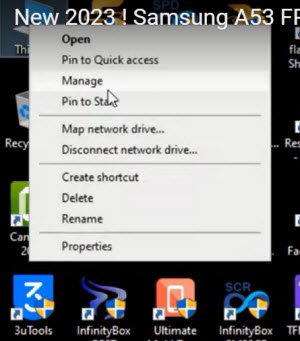
-After that click to “Device Manager”.
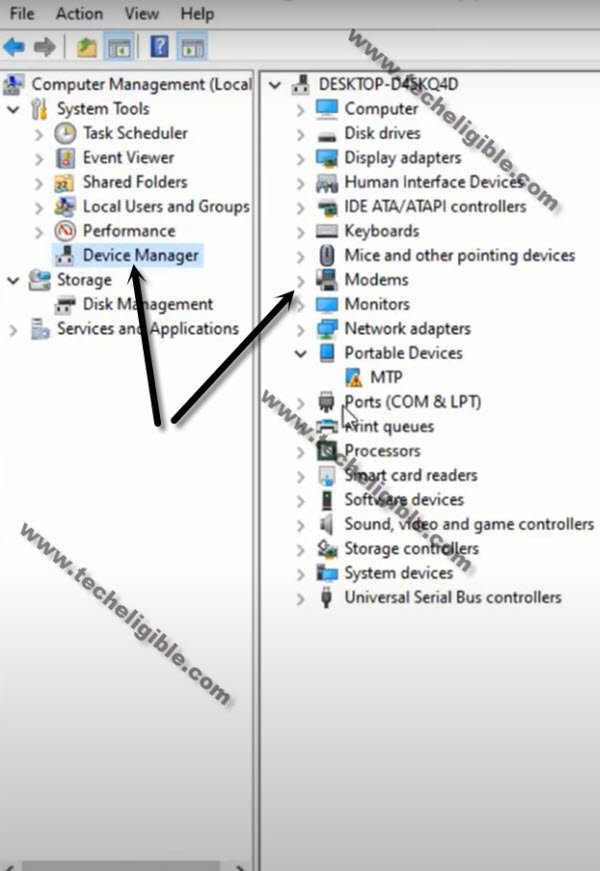
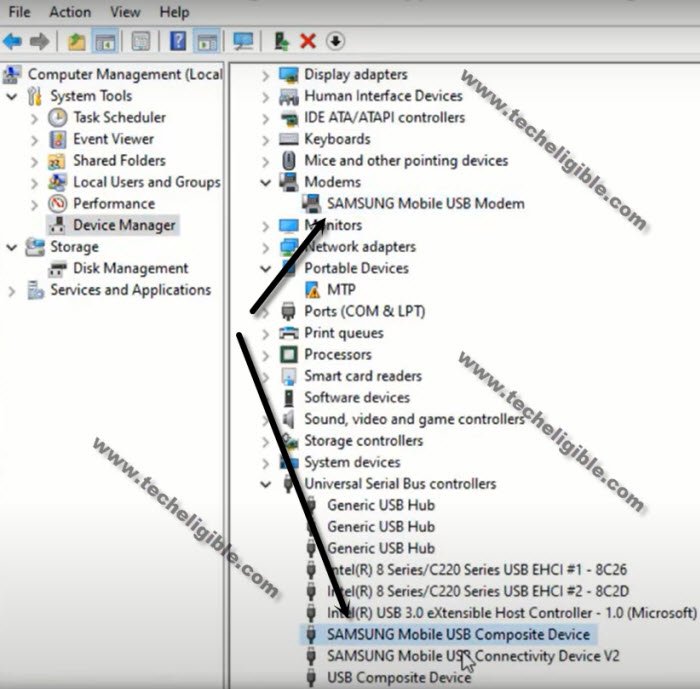
-There you will be able to see your device connected detail same as shown in below image.
Note: If you see there any (Exclamation Sign) on your Samsung USB modem hardware, that means your computer is required to install proper Samsung USB drivers, well, while opening (SamFw) tool, you must receive a popup message of installing Samsung USB driver, so you can install those drivers from there easily.
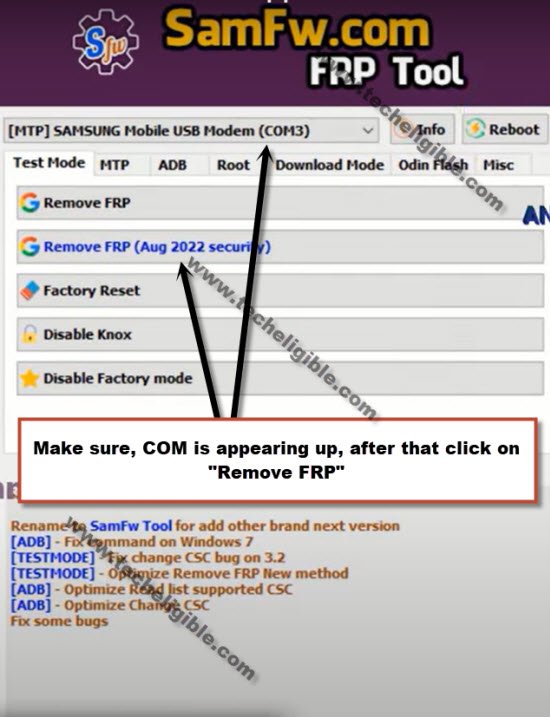
-After successfully connecting device with PC, just open your (Samfw) tool, and there you will have a proper Samsung com port appearing up, that means the device is detected by PC and tool successfully, and you can now easily remove FRP Account Galaxy S22, S22 Plus (Android 13).
-Click on button from tool “Remove FRP (Aug 2022 security)” button.
-You will be shown a popup message saying (Enable Test Mode), but do not click on “OK” button from that popup message, we will click this later on after turning on test mode from Samsung Galaxy device.
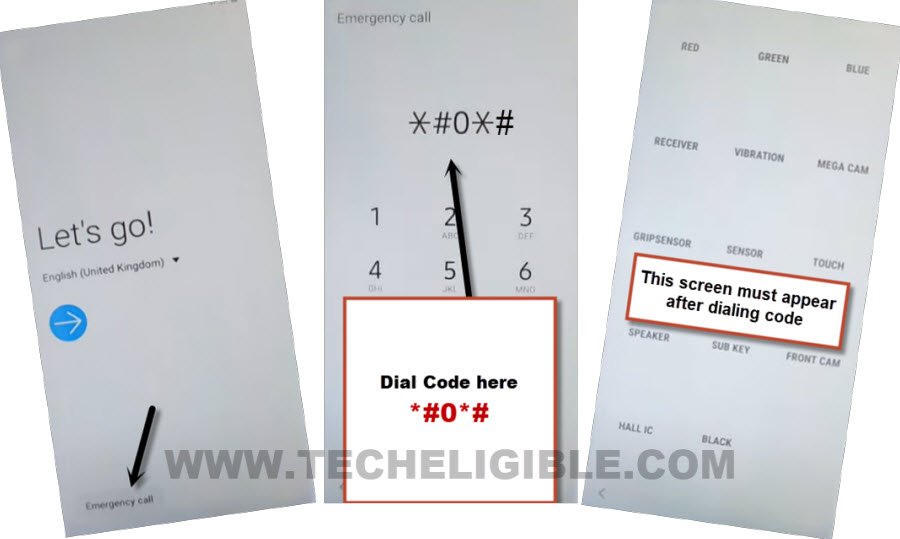
-From your Samsung Galaxy Android 13 device Hit on “Emergency Call”, and dial this code there “*#0*#“, after that you will have there a blank box screen, that means the code is working perfectly and you have successfully enabled test mode.
-Go back to your PC screen, and click on “OK” from enable test mode popup, after that you will receive another popup in your Samsung galaxy device screen saying (Allow USB Debugging?).
-Select option “Always allow from this computer”, and after that, tap to “Allow”.

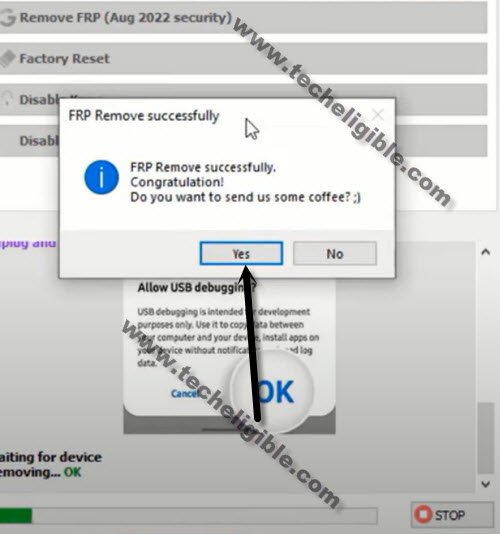
-Within few seconds or few minutes, you will receive popup in your PC screen saying (FRP Remove Successfully), just hit on “Yes” button to bypass google account.
-Your device will auto restart, after that, you will get inside your device homescreen without finishing up any setup wizard, just go to your device settings, and setup new Pattern or PIN, and also sign in with new google account, thanks for visiting us.
Method 3: Remove FRP Account Galaxy S22 [Android 12,11]
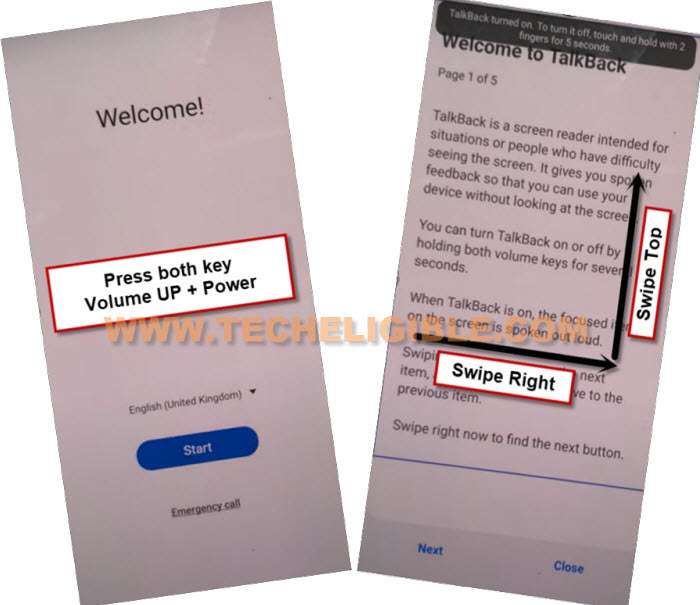
-We are going to turn o talkback to reach google chrome browser easily, so long hold both “Volume UP Buttons + Power Buttons” simultaneously, after that tap on “Use”.
Note: If (Volume UP + Power) do not work, then try with long press both (Volume UP + Volume Downs buttons) to turn on talkback, even then, if you are failed to turn on talkback, then you will have to go for an alternate method to Launch browser via PC.

–Keep holding both keys again (Volume UP + Power), and this time the talkback feature will turn on completely, you will also have a flash message on screen.
–Now just make “L” shape by swiping on screen from right to left, and then swipe top. (See below image).
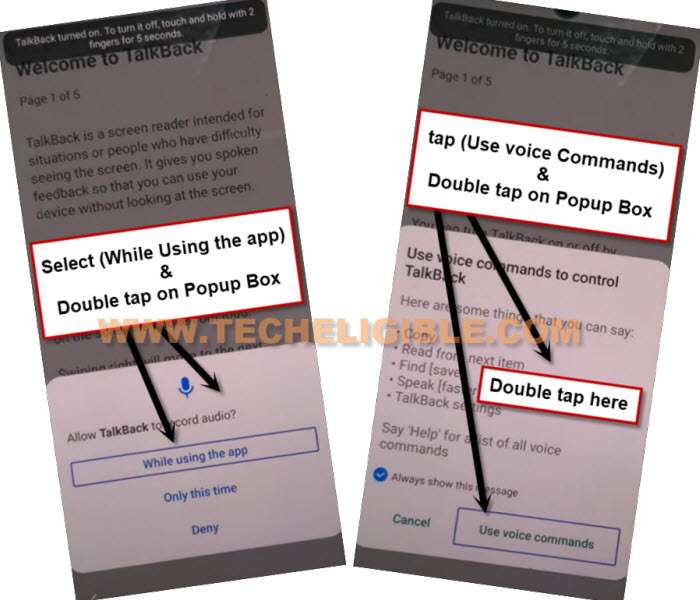
-Tap once on “while using the app”, now double tap on anywhere on screen.
-Tap once on “Use Command Voice” option, and again double tap on popup box.
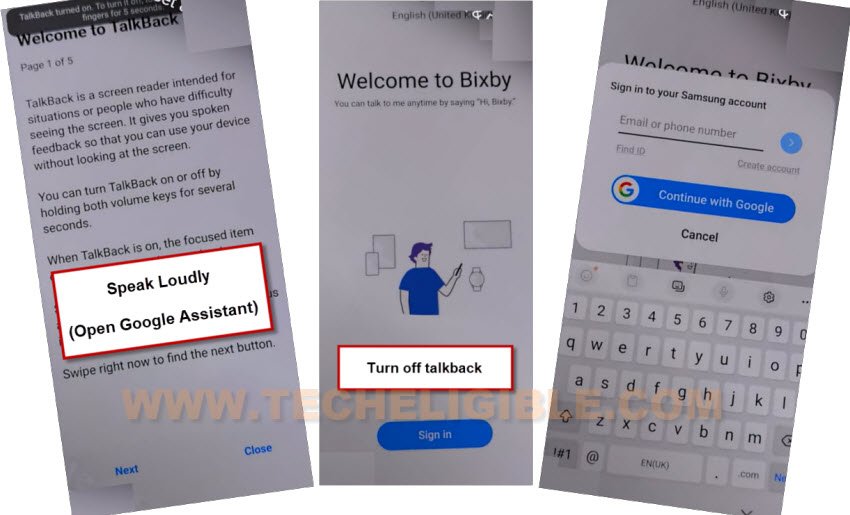
–You have to speak very loudly (Open Google Assistant).
-As soon as you reach to (Welcome to Bixby) screen, just Press both (Volume UP + Power) keys at same to turn off talkback.
-Hit on “Sign in” button, and sign in there with your registered Samsung account.
Note: If you do not have any Samsung Account, click here to create new acc.
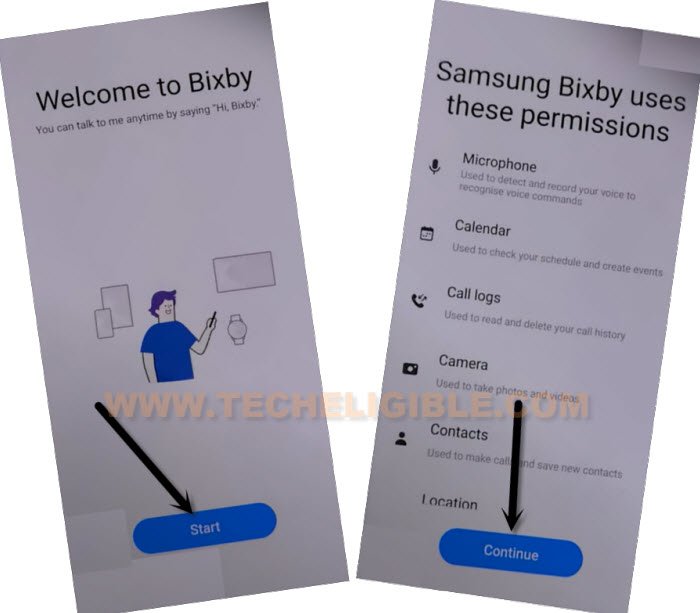
-Tap to > Start > Continue.
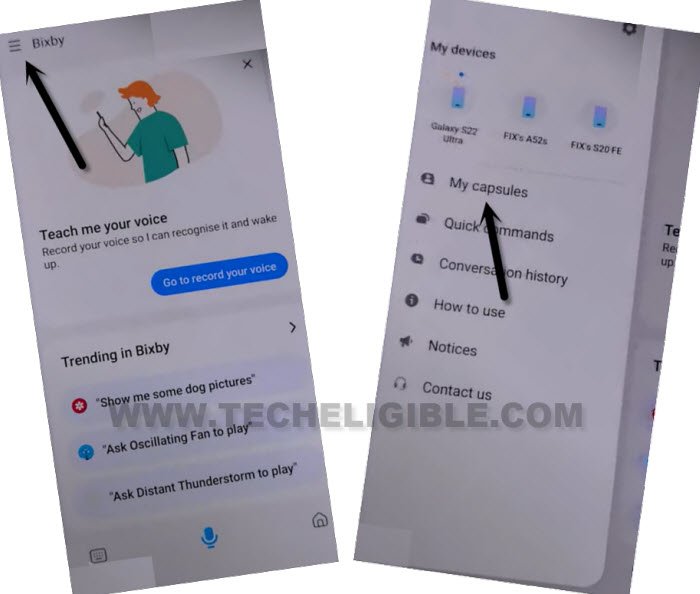
-Now tap “Menu icon” from up-left, and go to “My Capsule”.
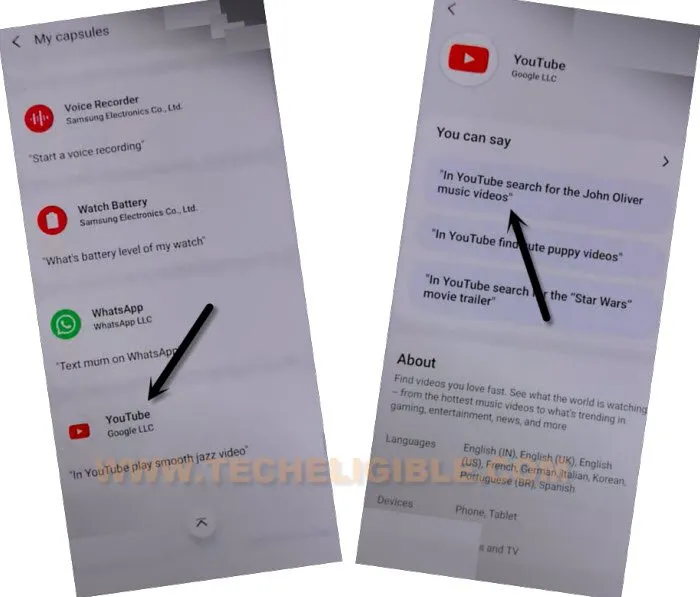
-Go all the way down and tap to “Youtube”.
Note: If after hitting on “Youtube”, you see an error of (This device was unlinked from bixby, Sign in again to use bixby).
-Just tap to “OK”, and hit on “Close”.
-Enable talkback again by press both (Volume UP + Power) button, and then tap to “Allow”.
-Turn off talkback by press both (Volume UP + Power), now hit on > Close > Start > Continue.
-Menu icon from up-left, and then go to “My Capsule”.
-Hit again on “Youtube”.
-Now tap from there on any message, we are going to tap on “In search for the john liver…..”.
-Now you will be redirected inside Youtube official website.
-Tap to > Home > Profile icon > Settings icon.
-Tap to > About > Google Privacy Policy.
-Now open chrome browser by hitting on > Accept & Continue > Next > No Thanks.
Install Alliance Shield from Galaxy Store:
-Search in browser “Download Samsung FRP Tools“.
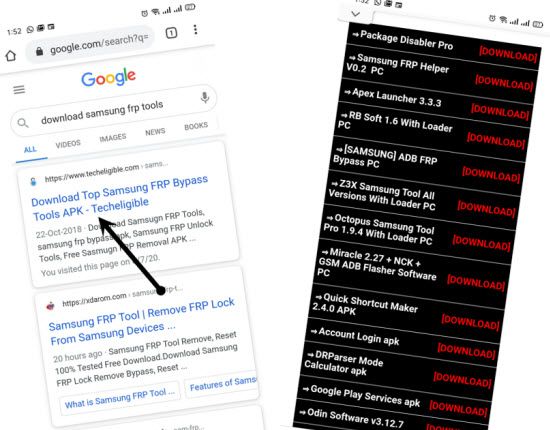
-Visit our website searched result, and from there tap on “Install Alliance Shield X from Galaxy Store” to Remove FRP Account Galaxy S22.
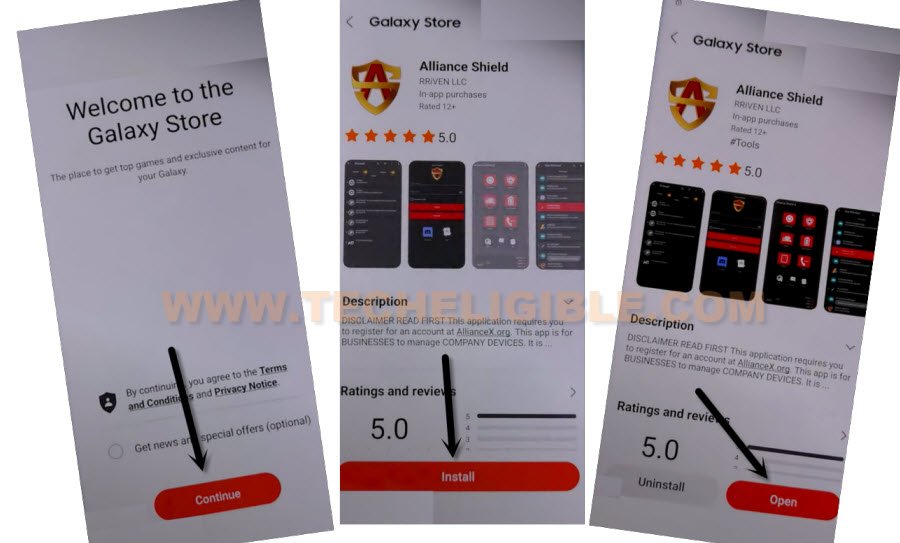
-You will be redirected inside Galaxy Store, from there hit on > Continue > Install > Open.
-Once you reach to Alliance Shield X app, tap to “Skip”.
-If you have registered your account already, so sign in there with your account, otherwise create your free account in (Alliance Shield X) app by hitting on (Register) button.
-Tap to > Next > Turn on (Device Admin) > Activate.

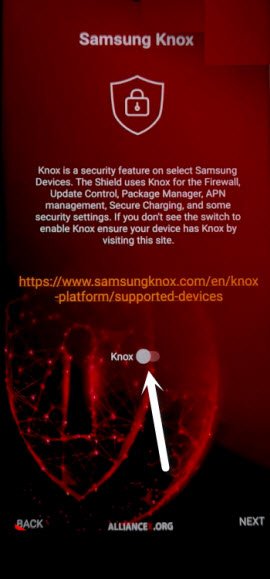
-Turn on (Knox) > Agree > Next > Finish.
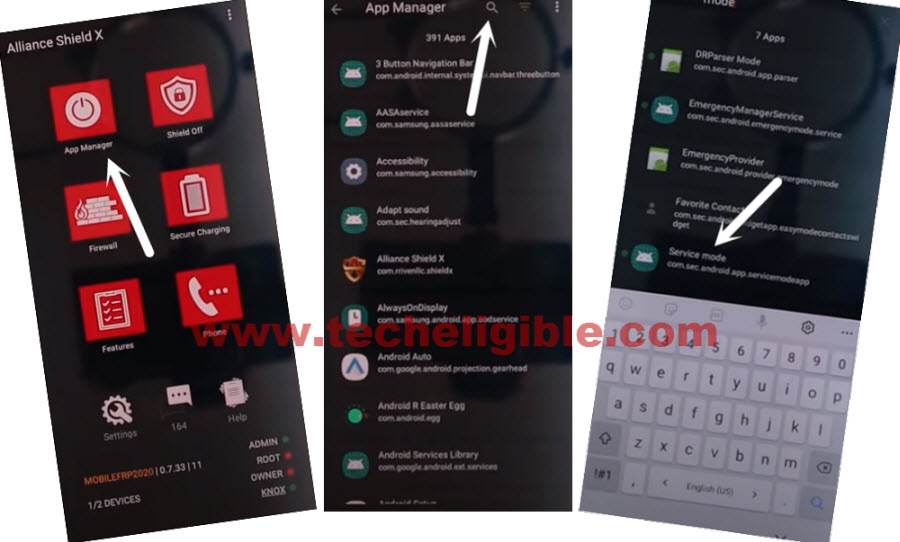
-Go to “App Manager”, and tap to “Close” from popup box.
-Hit on “Search icon” from top corner, and search there “Mode”, and tap to “Service Mode”.
-Tap to “Activities”, after that go all the way down, and tap on option (com.sec.android.app.modemui.activities.usb.settings).
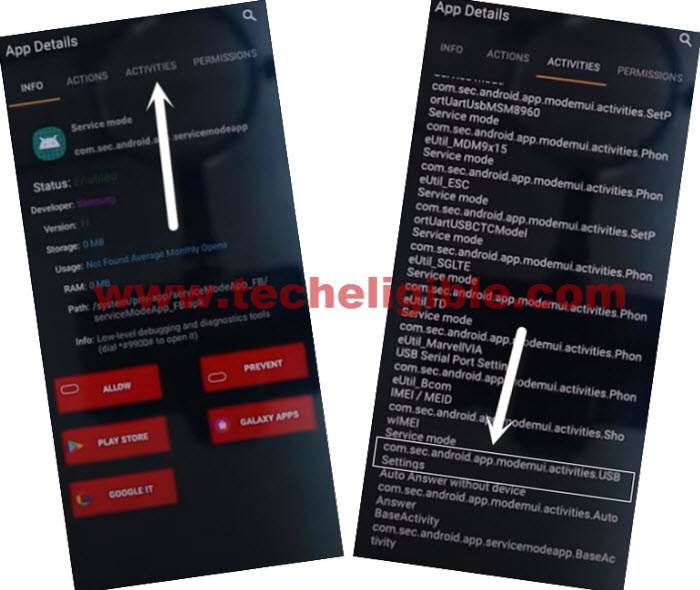
-Tap again on (com.sec.android.app.modemui.activities.usb.settings), and again hit on “OPEN”.
Note: But, you may not be able to Enable to Turn on (ADB) option from there, if you have an error of (Unable to Complete Action), just go back by tapping on “Back Arrow”.
-Go back to (Samsung FRP Tools) page by hitting on back arrow few times.
-Tap to “Open Samsung Settings“.
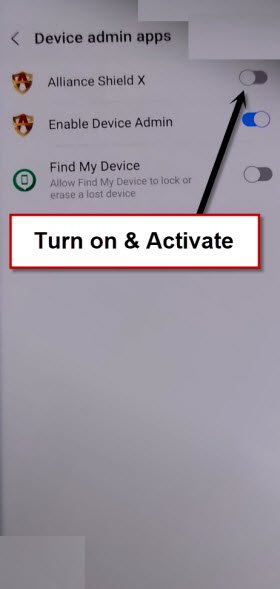
-Tap to > Biometrics & Security > Other Security Settings > Device Admin app.

-Tap to > Alliance Shield X > Activate.
-Go back to (Samsung FRP Tools) page by hitting on back arrow few times.
-Hit on “Install Alliance Shield X from Galaxy Store“, and then tap to “Open”.
-Go to “App Manager”, and tap to “Close” from popup box.
-Hit on “Search icon” from top corner, and search there “Mode”, and tap to “Service Mode”.
-Tap to “Activities”, after that go all the way down, and tap on option (com.sec.android.app.modemui.activities.usb.settings).
-From popup window, tap to “Open”.
-Turn on “MTP + ADB” option.
Remove Google FRP Galaxy S22 With ADB :
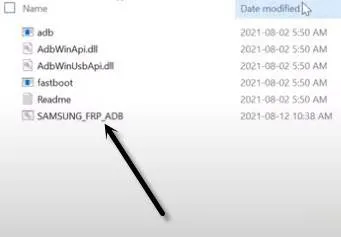
-Download & Open (Samsung FRP ADB) tool in your PC [DOWNLOAD]
-Connect your device Samsung S22 again to PC.
-Extract & Open “FRP Bypass ADB” tool in PC
-This tool will start automatically, and will Remove Google FRP Galaxy S22 in few seconds, wait until this process finishes.
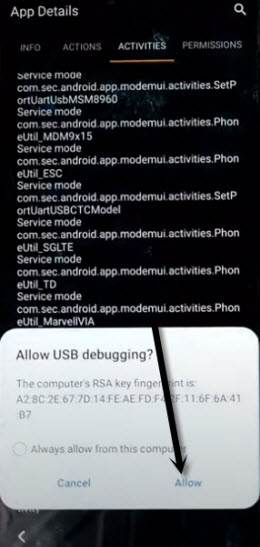
Note: In your Samsung Device, you will have a popup widow (Allow USB Debugging?), just tap to > Allow > Allow, afterwards, the ADB Tool will detect your device and will start bypassing frp lock.

-Now the device will be restart automatically, after that select the (Setup Wizard) icon, and boom, you are in your device HOME SCREEN, this is how you can easily Remove FRP Account Galaxy S22 Android 12, and android 11, thank you for visiting us.
More FRP Ways on a Relevant Devices: