Remove Google FRP Xiaomi Redmi 12 MIUI 14 (HyperOS & Android 14)
If you don’t remember your previously signed in Gmail account right after hard reset your Redmi 12 device. After that, you will stuck on google sign in page. The device will not allow to go to next screen until you get yourself verified as a device owner through Gmail account. To resolve this issue, and regain access with new Gmail account, follow up our guideline from here to Remove Google FRP Xiaomi Redmi 12 MIUI 14 (Android 14 & HyperOS) MIUI 14. We have mentioned 2 best methods in this single post. So, follow up any method as per your choice.
Warning: Do not try this frp method on a stolen phone, this is a serious crime, if you are trying to bypass frp on a stolen phone, you may also be jailed, this process is for device owner and for educational purpose only.
| Method 1: FRP Bypass Xiaomi Redmi 12 (HyperOS) New |
| Method 2: FRP Bypass Xiaomi Redmi 12 (Android 14) (Old) |
Method 1: Remove Google FRP Xiaomi Redmi 12 (HyperOS)
-Switch on your Xiaomi phone and connect WiFi first.
-From same (Connect to Network) page, just go to “Add network”. After that, tap to “Network Name” to get keyboard. From there, hit on “Share” icon.
-Hit on a “More” option to go to next page.
-From settings page, just go to “Human” icon from top right corner, after that, tap over “Check marked” option from default themes.
-You will be shown a share option, just hit on “Share”.
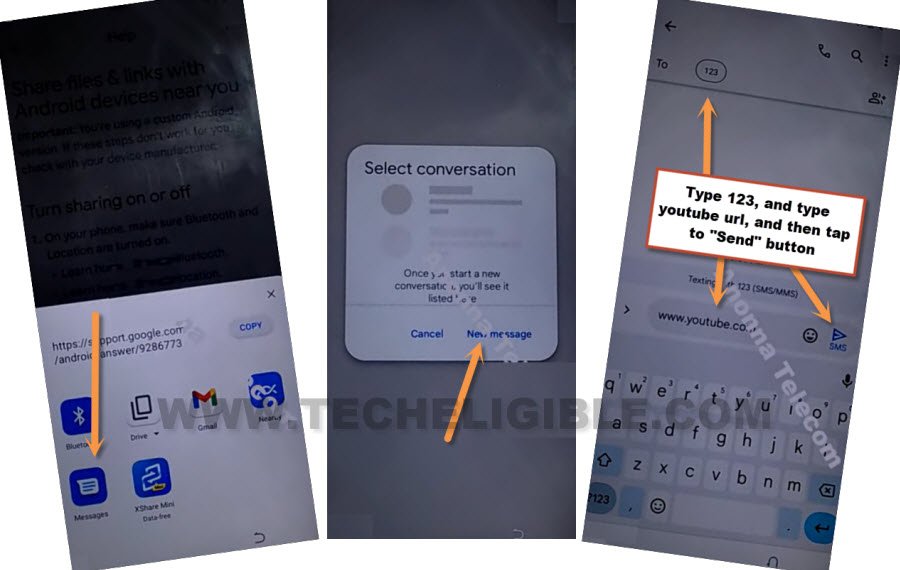
-You will be asked to choose share apps from popup window, just tap to > Message > New message.
-Let’s send “WWW.YOUTUBE.COM” url to any random number as a text message.
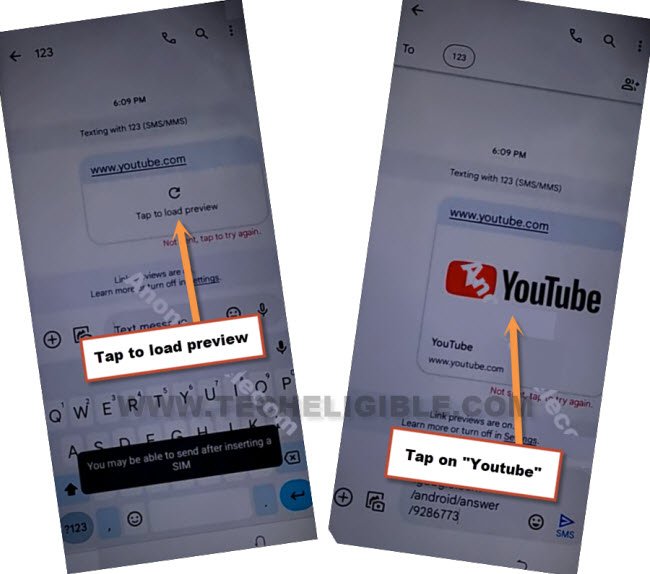
-Go to > Tap to load preview > Youtube.
-We have successfully accessed to youtube website, now we can easily get launched google chrome browser just by tapping over > Profile icon > Settings > History and privacy Policy > Yotube Terms of services.
-You will be shown a popup window, just tap over > Use without an account > No Thanks.
Turn on Accessibility Feature & Disable Few Apps:
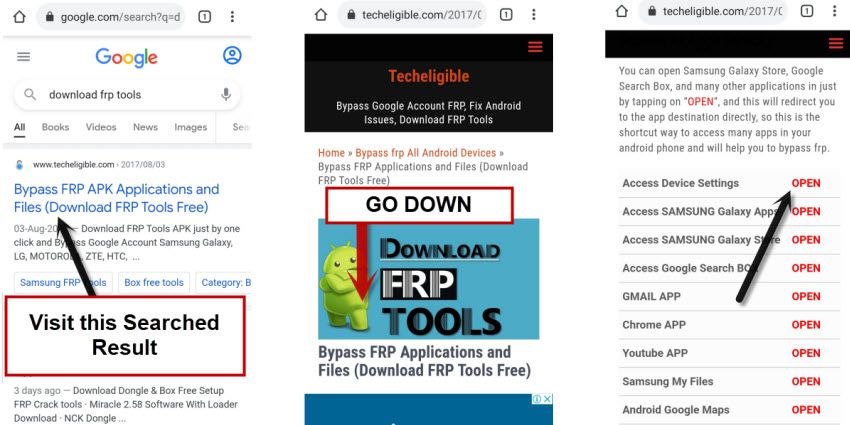
-Firstly, search with “Download FRP Tools“. After that, go to 1st searched result as same shown below.
-From our FRP Tools page, just hit on “Access Device Settings“.
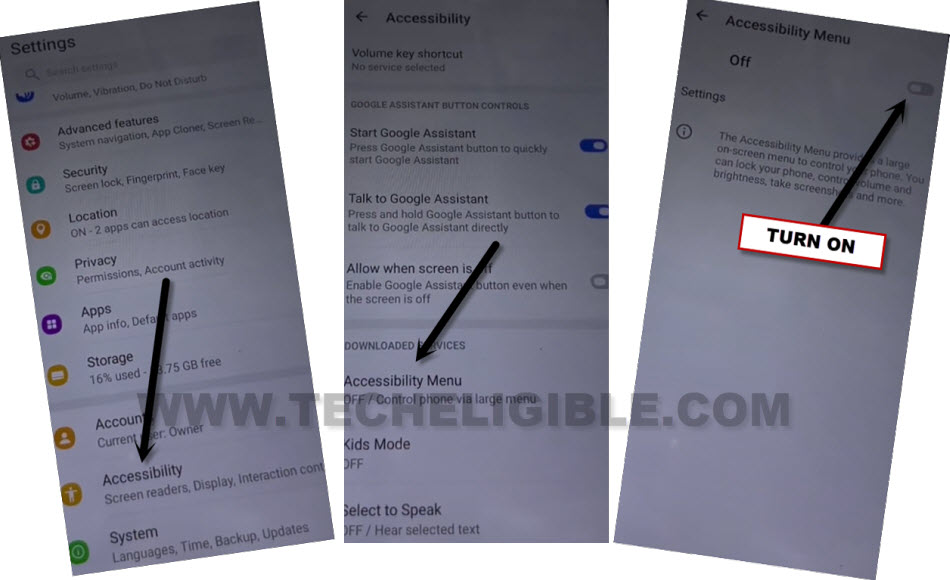
-From settings, go to > Additional Settings > Accessibility > Accessibility MENU > Turn on > Ok.
-Once the accessibility is enabled, you will have a (Human icon) at the ridge of the screen. Later on, we will use this option.
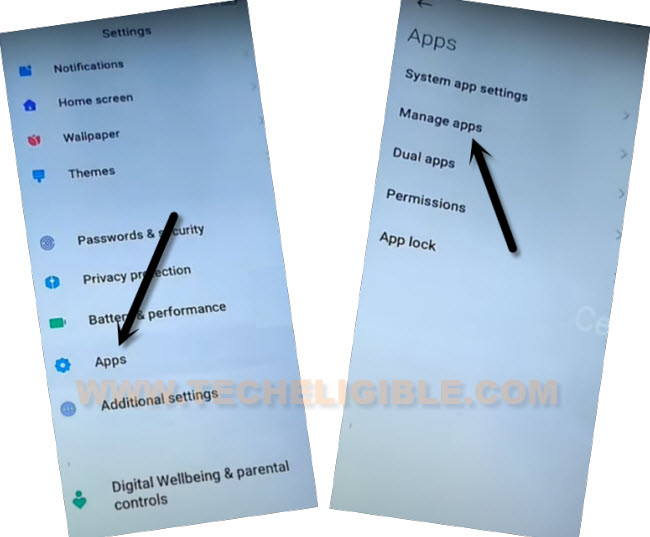
-Let’s disable few apps by going back to “Settings”. From there, go to > Apps > Manage Apps.
-Show some hidden apps by tapping at > 3 dots > Show all apps.
![]()
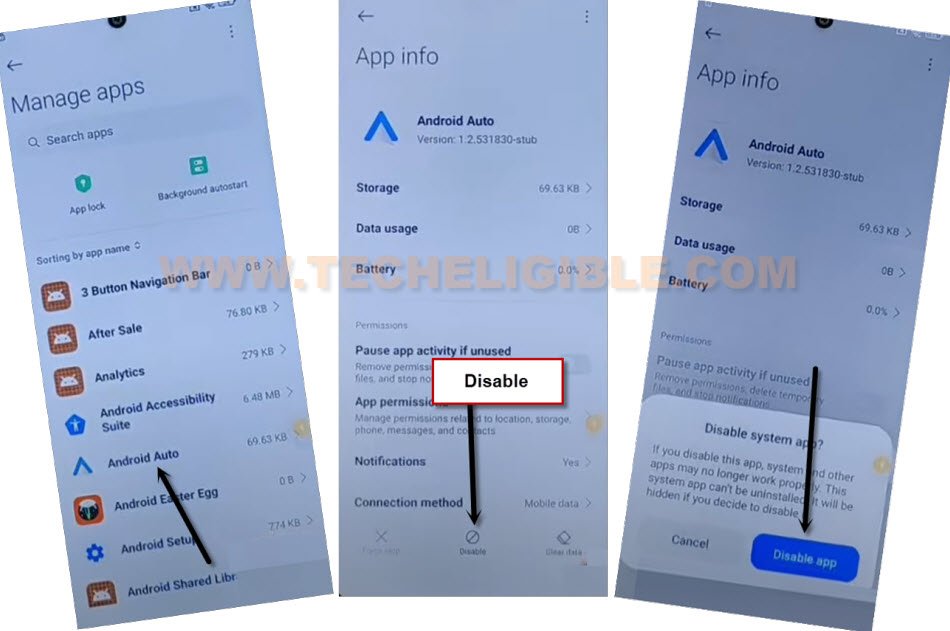
-Find and tap over “Android Auto”. tap on “Disable” option from bottom. After that, tap on “Disable App” from popup.
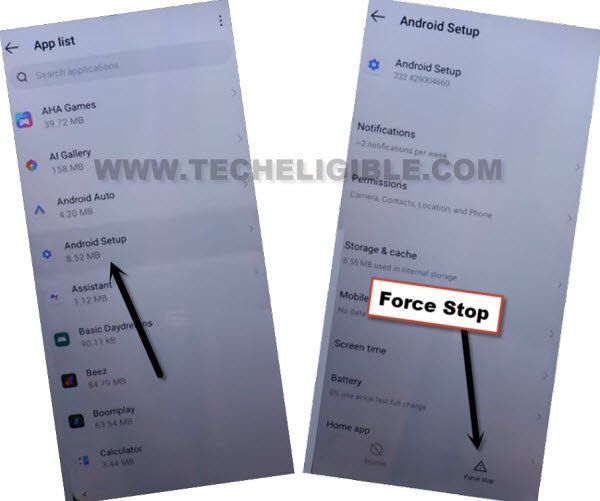
-Go back on “App list”, from there, find and tap to > Android Setup > Force Stop > Ok.
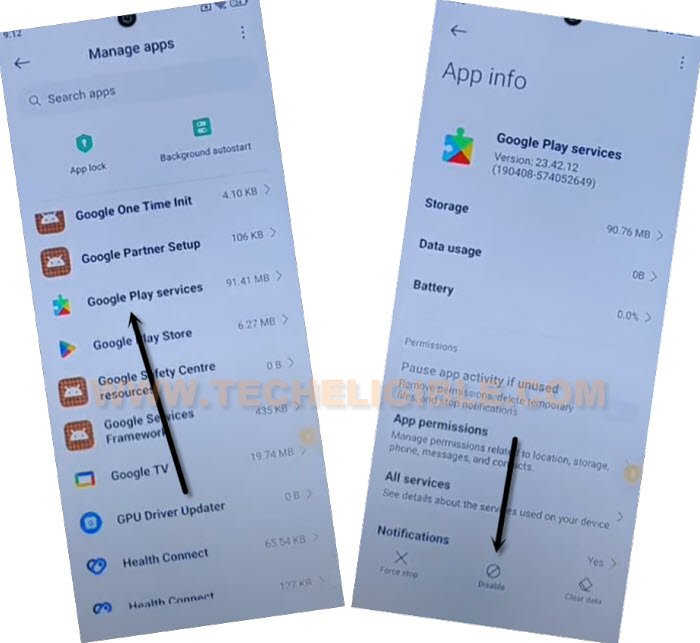
-Go back to app list again, find another app named “Google Play Services”. Tap to > Disable > Disable App.
-Now tap once on “Back Arrow”, and then tap to “Disable”, and “Disable App”.
-Restart your device. After that, from first start up page, just go to “Connect to Network” page. From there connect WiFi.
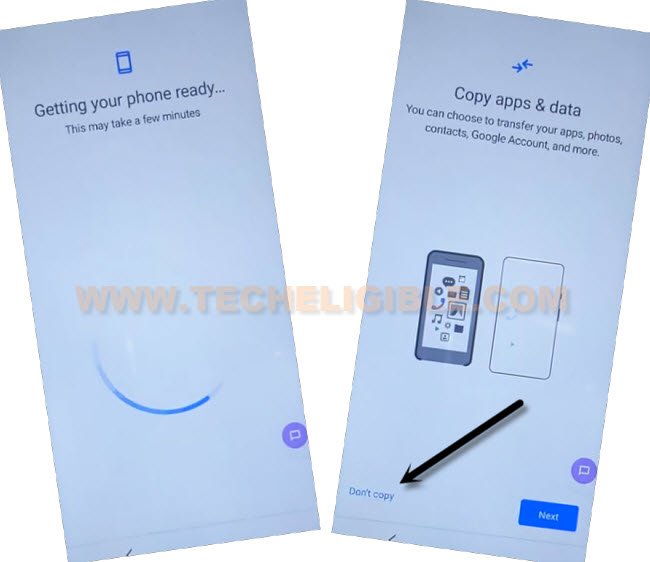
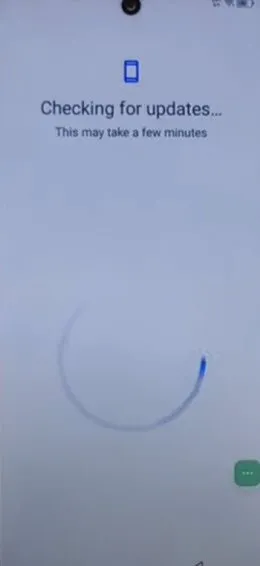
-After that, hit on “Next Arrow” from bottom. Tap to “Don’t Copy”. After that, the device will stuck on (Checking for update..) page.
-When you have a screen of (Checking for update…), here we have to enable “Google Play Services” app to finish setup wizard, otherwise this screen will stuck on this message, and you won’t be able to bypass this screen till you follow below steps quickly and repeatedly.
Follow Below Steps Rapidly/Fast:
-We have to follow up below 3 steps as fast as possible. You may have to try below steps for about 10-20 times. Once you hit on “Settings” option successfully, after that, you will be able to reach on (Google Play service) page.
Do Very Fast: Quickly tap to > Human icon > Google Assistant > Settings.
| Tip to hit on Settings: You will face difficulty in tapping at “Settings” option, the tip is here, keep your finger already on (Settings) appearing up. |
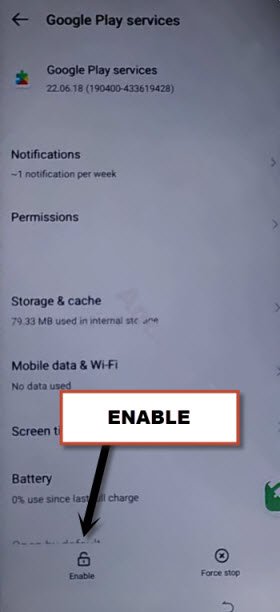
-Once you reach inside (Google Play Services) screen, quickly tap to “Enable” button from there.
-After enabling google app, just go back to (Checking for update..) page by hitting back arrow 2 times. After that, let this loading screen to be done.
-Now, you can easily finish up all setup wizard steps according your choice without facing any google sign in page. Don’t forget to setup new google account and new security lock after reaching to your device main home-screen before restarting device again. Thanks for visiting us.
Method 2: Remove Google FRP Xiaomi Redmi 12 (Android 14)
Have you forgot your google account ?, and you have hard reset the device, surely, you would be facing FRP protection on your device, if you don’t know google account and password. If you are a device owner, so you can follow up easy steps here to Remove Google FRP Xiaomi Redmi 12 MIUI 14. We don’t need to use here a PC, Paid tools, FRP tools. Just through a single PIN locked SIM card, the FRP issue can be resolved.
-First of all, we have to setup PIN code in Sim card using any android phone.
-If you are not aware of how to setup PIN on SIM, you can follow up easy steps here to Setup PIN.
-Turn on device & connect WIFI.
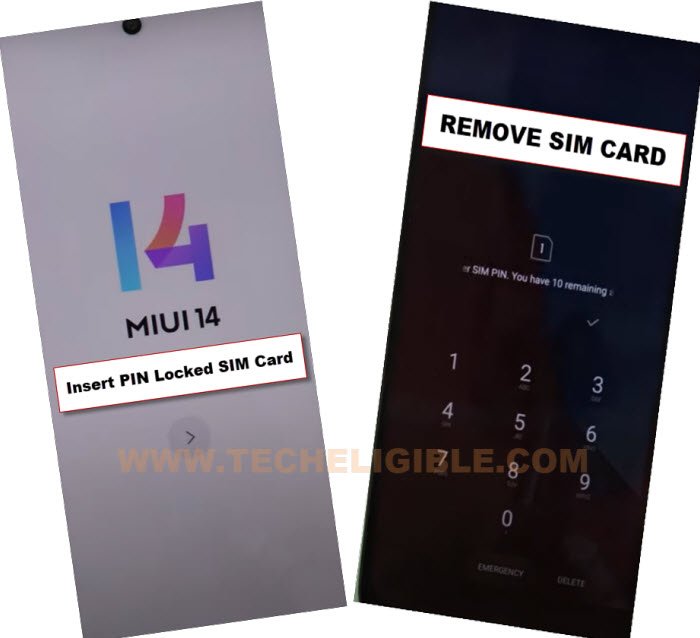
-Put xiaomi device back to first (MIUI 14) page, and insert PIN locked SIM card on it.
-Once you have a (SIM PIN) screen, just remove sim card.
-You will have a LOCK Screen there, just swipe down from top to bring top notification bar.
-Tap over “Settings” icon from top corner.
-After reaching to settings, we can now easily Remove Google FRP Xiaomi Redmi 12 (MIUI 14).
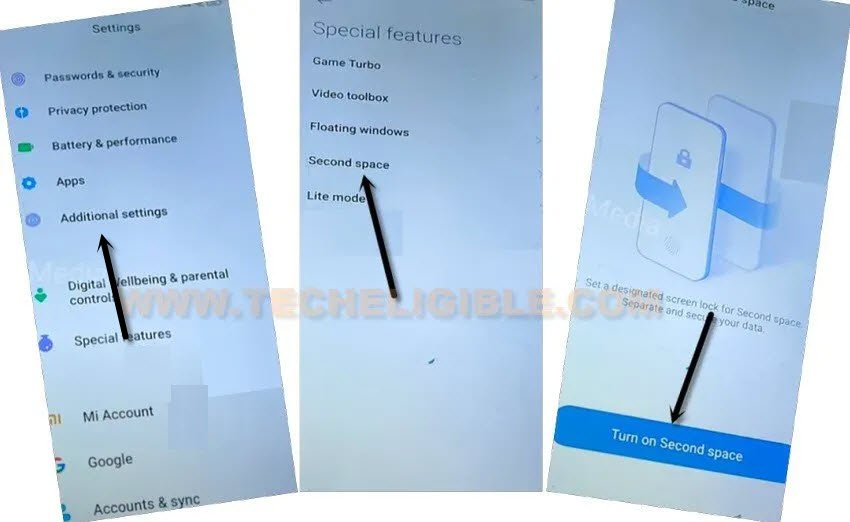
Let’s Turn on Second Space:
-Tap on “Additional Settings” from settings.
-From there, go to > Second Space > Turn on Second Space
-Wait on (Switching screen).
| Note: If your screen just got black, don’t worry, long press “Power key”, you will see there a Restart & power off option, just tap anywhere on screen, and then swipe down from top to bring top notification bar, and go to “Settings” from there. Repeat steps by tapping to > Additional Settings > Second Space > Turn on Second Space. |
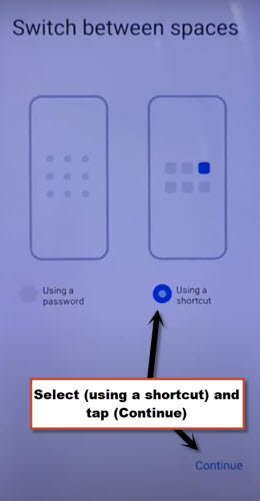
-Tap to > Continue > Using Shortcut > Continue.
-Hit on “Skip” from (Set Password) screen.
-Wait few seconds on loading screen, and then, hit on “Back Arrow” from bottom, you will get back to your device main (Home Screen) without google verification.
-You can happily restart your device without any fear, because the FRP has been bypassed completely, if you wanna setup new pin or pattern, you can do this from device settings. Thanks for visiting us.

