Bypass FRP TCL 40 SE Android 13, 14 Without Paid Tool
If you wanna gain full access to your device again with your new Gmail account after hard reset it. So, you can do that easily just through follow up our guideline to Bypass FRP TCL 40 SE (Android 13, 14) without using any paid PC tool. We will use only (PIN Locked) sim card to open further options on this phone to access main device settings page. From there, we can easily enable developer option and OEM option. Follow our guideline from below.
Warning: Do not try this frp method on a stolen phone, this is a serious crime. If you are trying to bypass frp on a stolen phone, you may also be jailed, this process is for device owner and for educational purpose only.
Let’s Start to Bypass FRP TCL 40 SE:
-Switch on device, after that connect WiFi first. Once the WiFi is connected, simply, insert PIN locked SIM card in your device.
Note: You have to setup 4 digits PIN locked code on your SIM using any other android device, if you don’t know, how to setup?, you can follow up guideline here to setup PIN code first.
-After inserting SIM card, you will be shown a (Enter SIM PIN) screen.
-Eject SIM tray. After that, you will have a (Not Signed in) screen. From there, swipe right the “Camera” from bottom.
-Choose “While using the app” option from popup. After that, the camera will start. Capture any random image.
-Tap on your captured image from bottom image circle.
-Tap few times on “Allow”. After that, your captured image will be launched. Touch the captured image screen, and go to “Share” option.
-Select “Google search image” from popup sharing box.
-Google search image page will be launched, from there, go to “3 dots” icon from top corner, and tap to “Terms of service”.
-Google chrome browser will be launched, from there, tap to “Use without an account”.
-Tap over “MENU” icon from top, after that, go to “Chrome web store”.
-Tap over > Share > Chrome > No Thanks.
Access to TCL Settings Page:
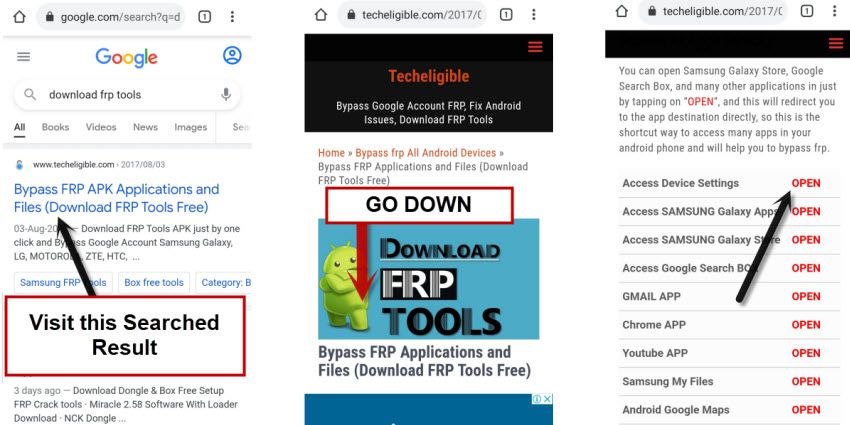
-Search in top search bar “Download frp tools“, and go to our website searched result from there.
-Go down, and tap on “Access Device Settings” to access main settings page. From there, we can easily Bypass FRP TCL 40 SE.
-Go to > Home Screen & Lock Screen > Default home app. After that, select “Launcher” option.
-Tap over > i agree > Skip. You will get back to (Connect to WiFi) screen. Just wait on that screen for a minute or for few seconds, after that, you will be redirected automatically into your device main home-screen.
Enable Developer & OEM:
-Congrats, we are now inside our device main home-screen. Let’s enable developer option and OEM unlocking.
-Simple, go to > System > About Phone. From there, tap 7 times on “Build Number”.
-You will be asked to (Allow development Settings), just tap to “Ok” from there.
-Let’s get back to (System) page by hitting back arrow 1-2 times. From there, tap to “Developer Options”.
-Toggle on “OEM unlocking” and hit on “Enable” option.
-Go back to “System” page again by tapping “back arrow” from bottom.
-From there, tap to > Reset > Erase all data > Erase all data > Erase all data > Ok.
-After that, your device will auto restart to complete factory reset process. After that, you can easily finish up all setup wizard steps on your own without facing any google sign in page after Bypass FRP TCL 40 SE.
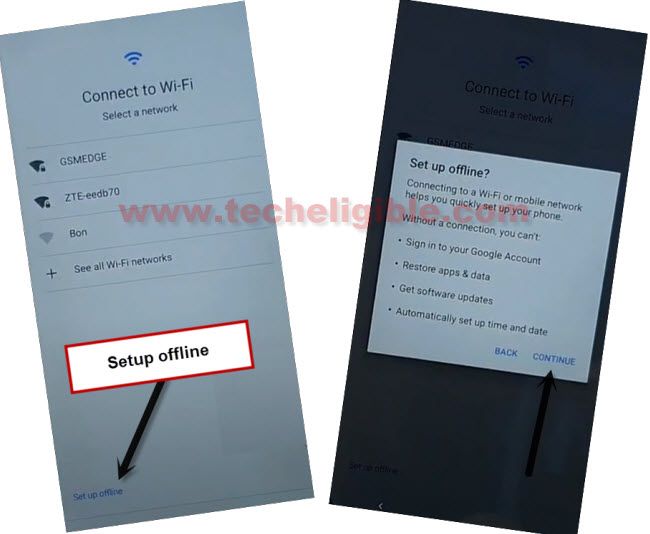
| Note: While completing setup wizard steps, you will have a (Setup offline) option on (Connect to WiFi), just tap to > Setup offline > Continue from there. See below screen shot. |


