
Are you still looking for a way to fix up your device accessing issue due to frp lock protection is triggered on vivo android 15 phone? FRP lock protection works only, when you don’t remember your logged in google account and unable to sign-in again while you set up the phone again after perform hard reset task. To resolve this, you can follow up safe method from here to Bypass FRP All VIVO Android 15 without any help of paid frp bypass services.
Note: We have added extra part of how to login google account after bypassing frp account and accessing back to main home-screen in guest mode. We hope, you could setup new google account and pattern lock. But its not guaranteed.
Disclaimer: We highly recommend you to apply this method only on your own device, if you are not owner of this device, or you found this from some where, you must return to its real owner. This method is for educational purpose only.
How to Bypass FRP All VIVO Android 15
We’re going to use another phone and 2 main applications (EasyShare + Activity Launcher) for bypassing frp from VIVO Android 15. Initially, we will download and install both apps on other android phone. After that, with the assist of (EasyShare) app, the 2nd downloaded (Activity Launcher) app will be transferred to the VIVO phone using the same WiFi network. Then, we will be able to perform further frp bypass steps with ease. Follow up steps below.
Tools, you need:
1- WiFi connection
2- Another Android Phone (VIVO + Other Phone) should be on same WiFi network.
3- FRP Locked VIVO Android 15 Phone.
FRP Steps:
-Firstly, turn on the phone and connect to proper WiFi network. Once its done, just go back to first startup screen. From there, you have to turn on (Talkback) function.
-Let’s hit over the “Accessibility” option from main startup screen. After that, choose the “Talkback” option and then turn it on.

-Once it successfully turned on, a (Welcome to talkback) screen will popup. draw “L” shape there by swiping down to right. (See below illustrated image).
-By making correct L shape on screen, you will have a talkback menu popup, from there, select “Screen Search” option by double on it.

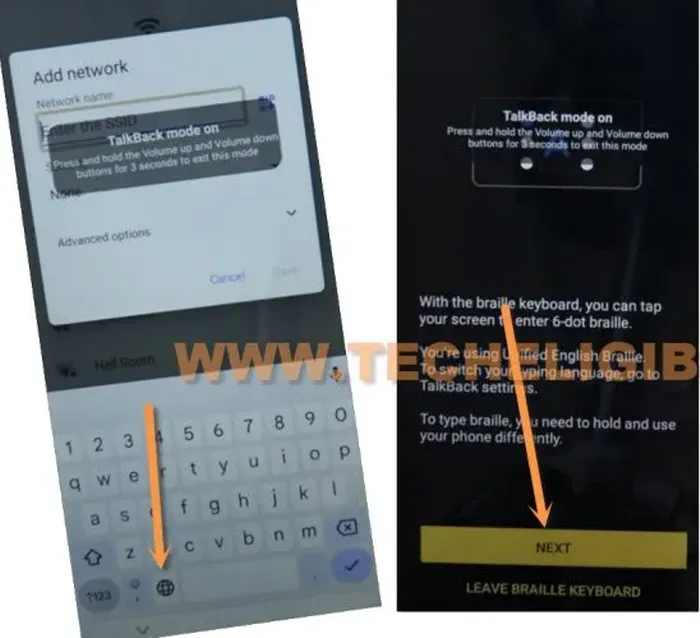
-From a keyboard display, double at “World” symbol. Then, double hit on “Next”.
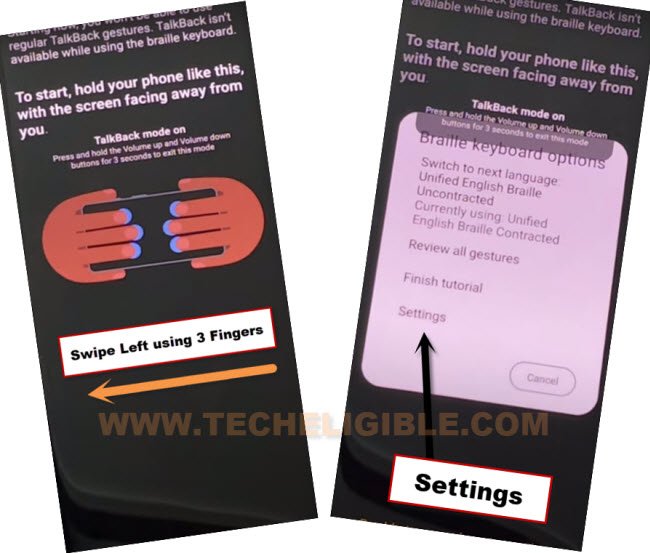
-Bring up the (Braille keyboard option) popup menu by swiping with 3 fingers from extreme right to left.
-After swiping correctly, a menu will popup, from there, choose “Settings” option by double on it.
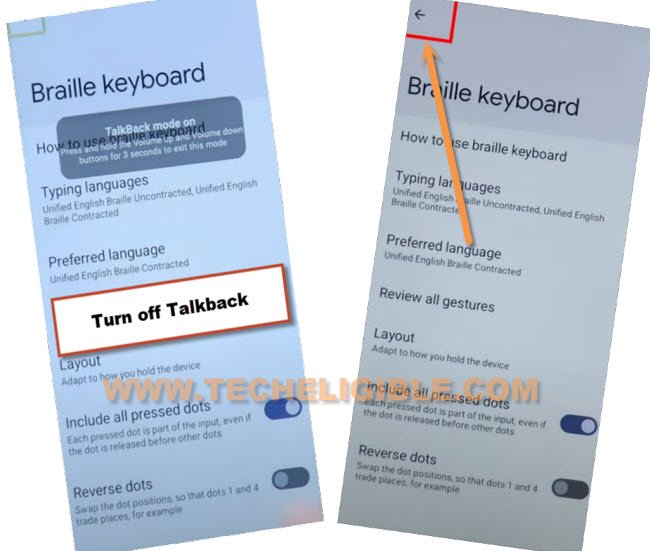
-Its time to disable the talkback function by long holding keys (Volume UP + Down) together.
-After successfully turning off the talkback, just hit on “Back Arrow” from top left corner.
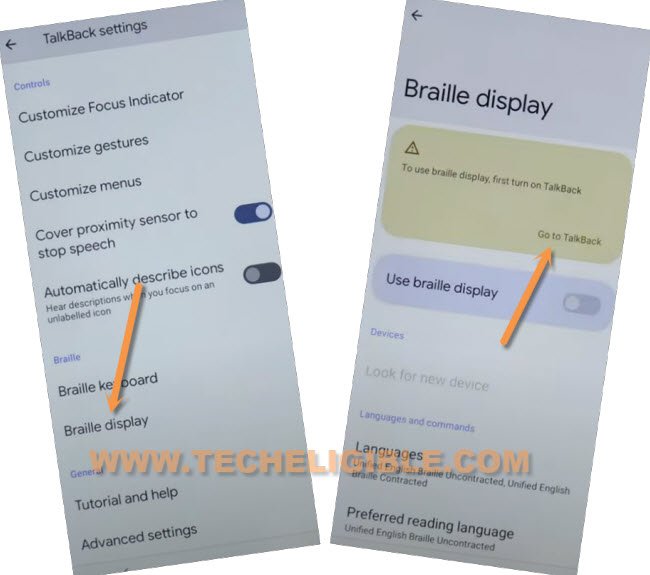
-From talkback settings age, tap these respectively > Braille Display > Go to Talkback.
Let’s Enable the (Accessibility Feature):
-We need use (Accessibility function). For turning on this function, just tap to > Accessibility > Accessibility MENU > Turn on (Accessibility Menu Shortcut).
-Afterwards, a popup screen will be displayed, just tap on > Allow > Got it.
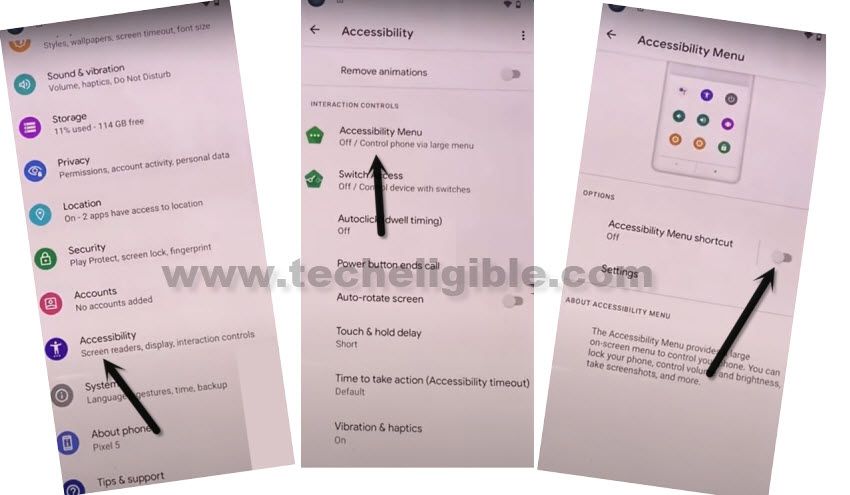
-Hit on “3 dots” icon and go to “Assistant” option.
-We have to launch the easy share app by speaking loudly “Open Easy Share”.

Get QR Scanner Code By EasyShare
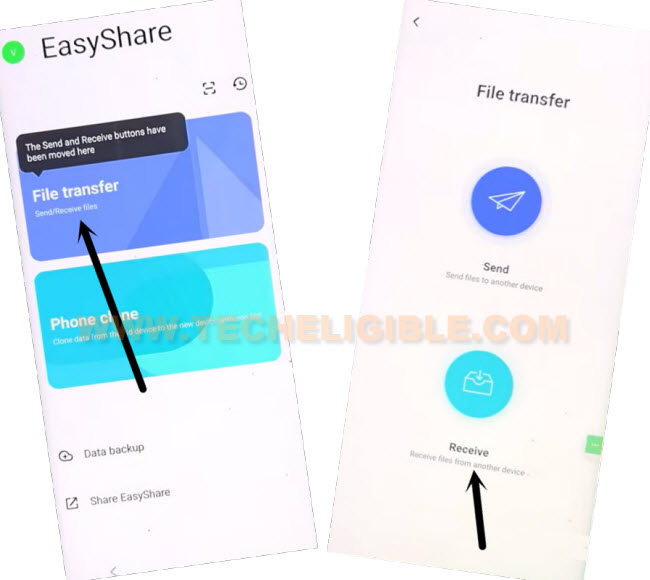
-Tap to > File Transfer > Receive > Got it.
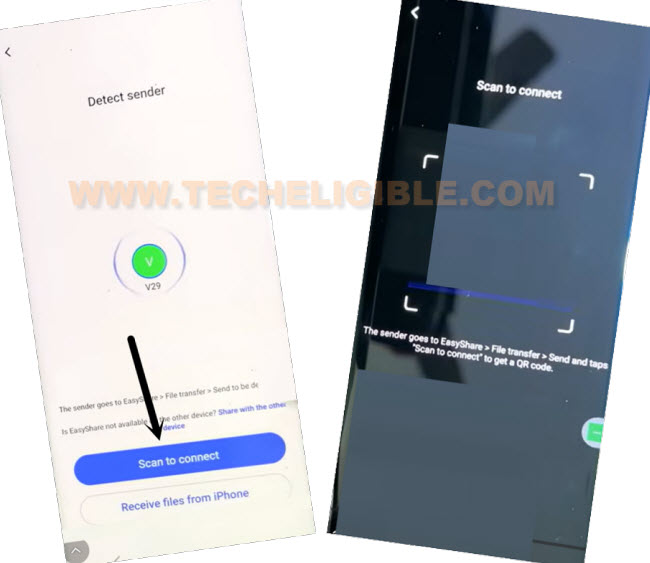
-After granting permissions by tapping (Allow or While using the app), just tap at > Scan to Connect > Got it.
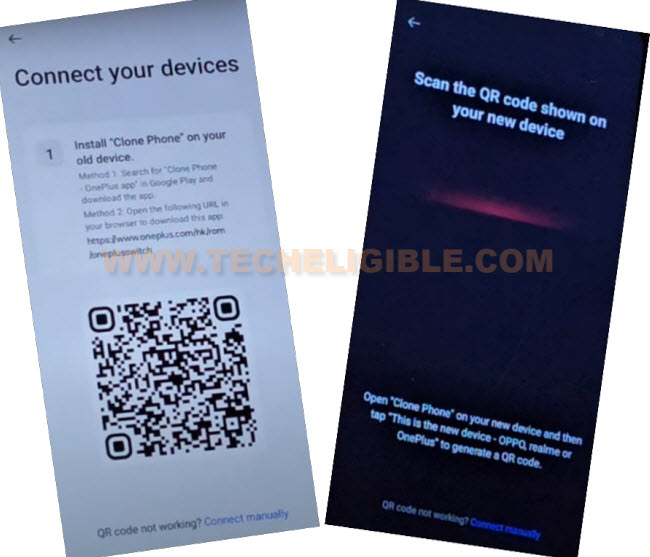
-Then, a QR Code scanner will be displayed to you.
| Note: You are required another android phone, in other android device, we will install this same (Easy Share) app to connect both devices together for bypassing frp account easily. |
Follow-Up Steps on other Android Phone
-You’ve to use here one more android phone. On your other android phone, open the google play store application, then search there “Easy Share” app. Tap to “Install” option to start installing this application.
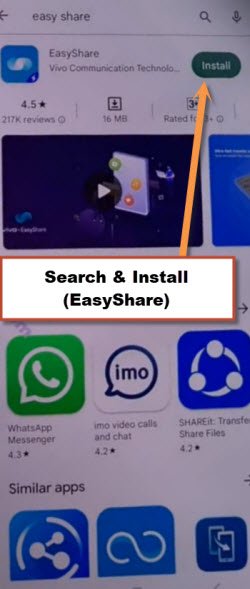
-Search & Install another app “Activity Launcher“.
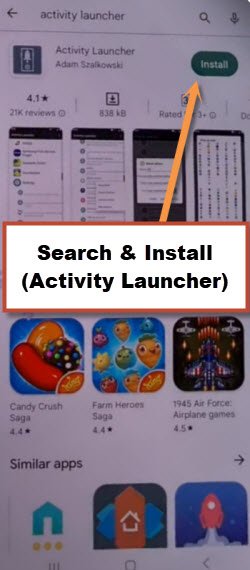
-Keep your both android devices (Other Android Phone & VIVO Android 15) on same WiFi network.
Open Easy Share App on other Android Phone:
-Let’s open “Easy Share” application on other android device.
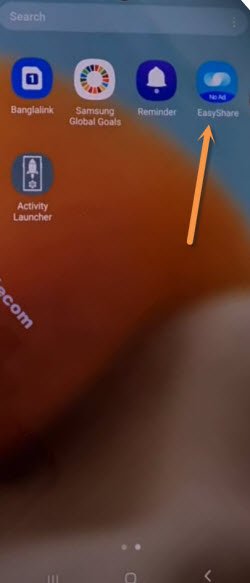
-Tap these > File Transfer > Send.
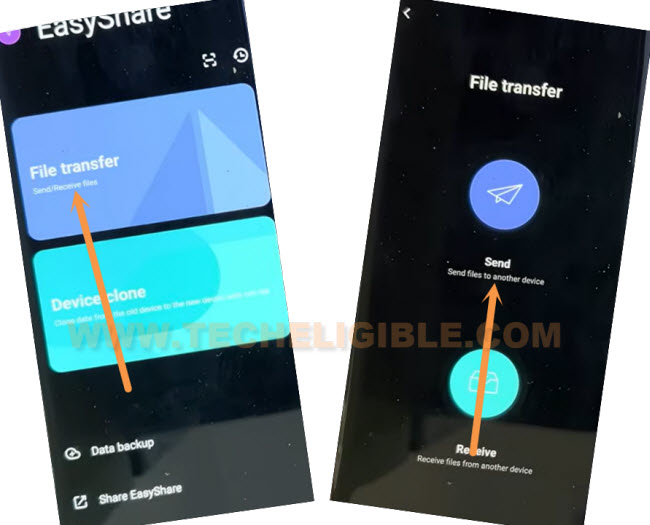
-Then, choose the (Activity Launcher) from apps, and tap to “Send” option from bottom.
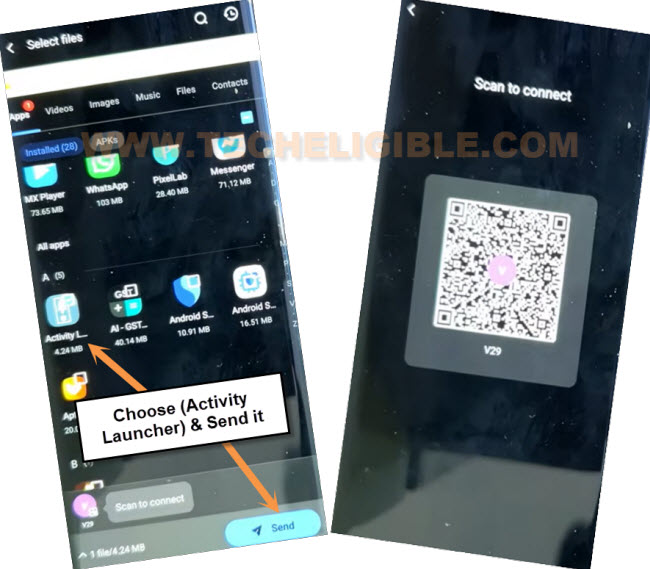
-Scan the QR Code with your frp locked VIVO Android 15 device.
Let’s install and Launch Received App (Activity Launcher):
-Let’s use this app now for bypass frp vivo android 15 phone. Taping > Install > Open.

-We have to access to the main home-screen of our VIVO device. Let’s find and tap on “System Home Screen” option. Then, go to > Launcher > Launch Activity.

-Once you reached to the main home-screen, from there, use accessibility menu shortcut function to access back to the easy-share application. Just, hit on > 3 dots > Assistant.

-Hit on the “Keyboard” icon and type “Easy-Share”. Then, tap to “Next Arrow” icon.
-Tap to “Keyboard” icon from bottom right corner of the popup screen, type there “EasyShare” and hit on “Next Arrow” icon from the keyboard.
-Once you reached to the (App received) page, hit on “Open” option from there.

-Tap two times on “Back Arrow” icon from top corner to reach back to the main screen of activity launcher.

Turn on (Easy Touch Menu) & Add Apps:
-We need to turn on the (EasyTouch) feature, let’s find and tap on “Easy Touch” application.
-After that, go to “FloatingBallSettingsActivity”. Hit on “Launch Activity”.

-You have to turn on the “Toggle” button to enable the easy touch app.
-Then, go to > Customize Menu > Tap to Add.
-Check mark two apps named (Activity Launcher + Chrome).

-Tap 2-3 times on “Back Arrow” icon from top corner.
-After that, get back to main home-screen of your device by tapping on (Back Arrow) icon from bottom.
Note: While tapping on back arrow, if you see popup of (Some Apps are incompatible), just tap anywhere on screen to close this window.

Enable Swipe to Navigate Option:
-Bring up the (EasyTouch) menu by tapping on the easy touch icon, that is stick on the right edge of the screen.
-Launch back the (Activity Launcher) application.

-Scroll down, find and tap to “Android Setup”. After that, hit on “Search” option from top corner.
-Search there with “Navigate” and then, go to “Swipe to navigate”.

-Tap to “Launch Activity”. This will start showing you bottom menu bar. If it does not, try again by tapping 3-4 times on “Launch Activity” option again and again with 15-20 sec interval.

-Go back to home-screen by hitting back arrow icon.
-Let’s launch google chrome browser, then, tap to > Use without an account > No Thanks.

-Keep the phone into landscape posture, then return it back to portrait posture.

Turn on Auto Rotate Option from Top Menu Bar:
-Swipe down from top to get top notification bar, then, turn on (Auto Rotate) option.

Rotate Device into Landscape Posture:
-Keep the the phone in (Landscape) posture. Then, swipe down again from top to get notification bar.

-Hit over the “Human” icon from there.

-Let’s switch the user mode into the guest mode by tapping on “Guest”. This may take time in switching the user mode.

Let’s exit the Guest Mode:
-Let’s use the phone now in portrait posture.
-Open “Settings” and go to “User & Account” option.

-From user and account page, tap on “Multiple User” option.
-Finally, hit on > Exit Guest Mode > Exit.

-After exiting the guest mode, you will be redirected back on (Hello!) startup page.
Complete initial Steps:
-Go to (Getting your phone ready…) page by hitting at > Start > Next > Next…

-As soon as, you see (Getting your phone ready…) page, simply, tap to “Back Arrow” bottom to go back to WiFi screen.
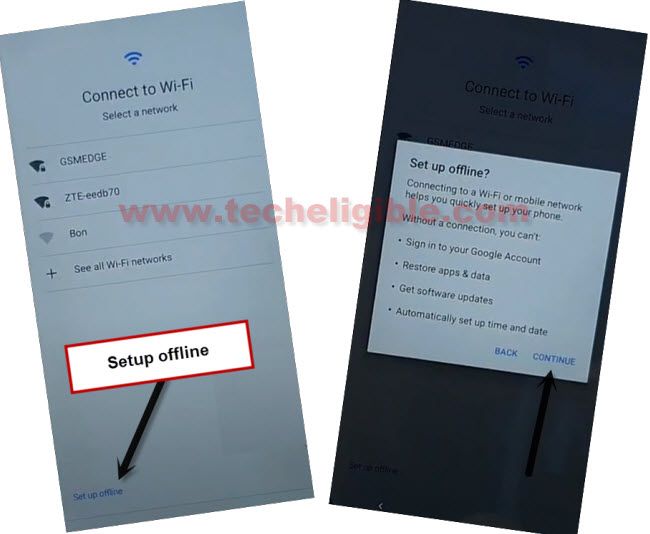
-Let’s setup the phone in offline mode by tapping on > Setup offline > Continue.
-Skip the (Unlock Method) screen.
-From google services page, just hit on > More > More > Accept.

-Finish up all other remaining startup steps on your own.
Login Google Account After FRP Bypass Completed
-If you have successfully managed to bypass frp all vivo android 15 phone, and accessed to the main home-screen of your device. There, main step is to login google account. This is the issue coming on many vivo android 15 phone, that, people are unable to login back other gmail account. Let’s try to add this using different method.
-Scroll down from top to see all notifications list. There, you will see “Finish Settings up your device”, just tap on this notification.

-Tap to > Start > Skip.

-After that, go to “Android device” option. Then, QR Code will be displayed.

-From your other android phone, tap to “Image” icon from google search bar to scan QR Code.
Note: Make sure, both devices are already connected on same WiFi network.
-Complete verification process from other android phone. Then, follow some more steps by given on screen instructions, finally, the other phone google account will also be logged in on your VIVO Android 15 phone as well.

FAQs
Can i setup google account after bypassing frp account?
We have already mentioned, how to login back your another google account using another android phone. After accessing back to main home-screen, just bring all available notifications by scrolling down from top, there, you will have a (Finish Settings up your device) notification as well. Just tap on that, and login with other device gmail account using the (Set up my phone) method. These steps are already mentioned above under the heading of (Login Google Account using other android phone).
Is this temporary frp bypass solution?
If you are unsuccessful in setup your Gmail account and pattern lock after bypassing the frp lock protection, then, you will not be able to use your google play store etc. After performing factory reset, the device will revert back to frp lock protection status.
What to do, if i can't set up my google account after bypassing frp?
You can use your device without setup google account and pattern lock setup and wait until new frp bypass method launching.
Can i use this frp bypass guide on any VIVO Android 15?
Yeah, you can use on all VIVO Android 15 phones.
Conclusion
Arranged all required tools such as (Other Android device + Activity Launcher + Easy Share apps). After that, connected our both phone on same WiFi network. Then, installed manually both mentioned apps on other android device. Finally, we just turned on the talkabck function on our VIVO Android 15 phone to receive files from other android device. Lastly, we just accessed to our device main home-screen and completed setup wizard steps using the (Guest Mode).