
Are you finding it difficult to take back control and use your phone again after completing a hard reset? This is a frequent issue encountered by individuals, particularly those who have bought a second-hand device or have forgotten their own Google account that they recently used. The Factory Reset Protection lock is designed to keep devices safe from unauthorized access, and those who cannot verify their identity by signing in to their most recent Google account are also affected. Refer to our instructions to unlock and Bypass FRP Samsung A53 Android 16, 13, 12.
There are 4 methods available to on frp bypass topic without PC, and with PC (Android 16. 13, 12). We used different PC free software for enabling adb and bypassing frp with one click. Check out all steps on your own.
Method 1: Bypass FRP Samsung A53 5G [Android 16] New
-Initially, set up Android Utility V200 tool on your computer along with the USB Driver. For this, you can download both from here.
Note: This technique works effectively with Samsung A53 running Android 16 version.
Setup Tool & Driver on PC
-Let’s get the Android Utility Tool V200 on computer. Additionally, we must install the appropriate Samsung USB driver to avoid any issues when linking the phone to the computer. Once everything is set up, we are ready to proceed with the FRP bypass using a single click.
-After the tool has been downloaded and installation completed, return to this article to continue with the next steps.
⇒ Android Utility Pro V200 [DOWNLOAD] ⇒ Samsung USB Drivers [DOWNLOAD] Pass: gsmprime |
-Next, install the Samsung USB driver on your PC. You must need to install this driver, so that, you don’t face any issue in linking the phone with PC.
-We are gonna run the downloaded (Android Utility Tool) by extracting from winrar archive and then, go to extracted folder and run it on PC.
-When the interface of your tool appears as shown in the image below, simply click on “Samsung” option from there.
-After that, hit on “Main” option.

Link Phone with PC
-Turn on the Samsung A53 device and connect it to a WiFi.
-Once this is completed, keep the device screen on the page that shows (Choose a Wi-Fi network).
-Time to link our phone with PC using a working USB/DATA cable.
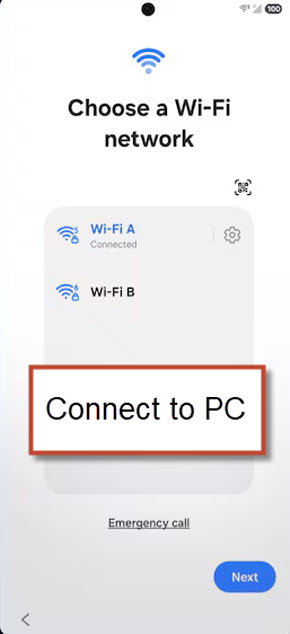
Use the tool to Unlock FRP
-Then, select the option “Samsung Remove FRP Android 16 (December 2025) (MTP)” from the tool.
-After waiting 30-60 seconds, you should start seeing all the information of the connected device on the tool’s screen, indicating that the phone has been successfully detected and the FRP bypass process is ongoing.

Important Tips
Remember: The process for completing the FRP bypass could take several minutes, so it’s crucial to be patient. Initially, you will notice (Switching mode), which typically requires about 1-2 minutes to complete. Subsequently, (Installing ADB enabler) will also take 1-2 minutes. At the conclusion of this process, you will receive the (Finalizing) notification.
Tip 1: If the software takes an extended period on any specific step, such as getting stuck on (Finalizing) for over 2 minutes, simply disconnect and connect phone again. If the issue persists, you just disconnect the phone, restart the software, and click again on the “Samsung Remove FRP Android 16 (December 2025) (MTP)” option. After that, reconnect your phone to the computer, ensuring the device is powered on.
Tip 2: If the tool encounters a problem during any specific frp bypass stage, simply touch an empty area on the WiFi screen without selecting any options, as that may alter the display. Keep the phone display on and on same WIFI page.

Complete Setup Wizard Steps
-After completing the FRP process successfully, you will have a message of (FRP Removal Complete).
-The Samsung phone automatically restart. Afterward, remain on the main home screen for 5-10 minutes. Upon completing all frp steps, you will be redirected over the (welcome) screen.

-Once you get the (Welcome) display appears, you are allowed to remove the device from the PC and setup the device by hitting at “Start” option.
-When you arrive at the Choose a WiFi network page, simply select the Skip option to configure the phone in offline mode.
-Follow all the steps as directed, and you will access the main home screen of your device. The frp bypass process is now complete.
Method 2: Bypass & Unlock FRP Samsung A53 By Android Service Tool (With PC)
We will use a (Android Service Tool) to bypass frp from this device, because this is a new tool, and working smoothly on Samsung Latest version devices, the tool can be downloaded from below.
-Download tool in your PC from below.
⇒ Android Service Tool V1.2 [DOWNLOAD] ⇒ Winrar Pass: techeligible.com |
Note: Don’t forget to turn off your @ntivirus software before extracting and running this tool, otherwise you won’t be able to use this tool freely, once you used this software, you can enable back your @ntivirus software.
-Extract tool from winrar archive, and run as administrator this tool in your PC.
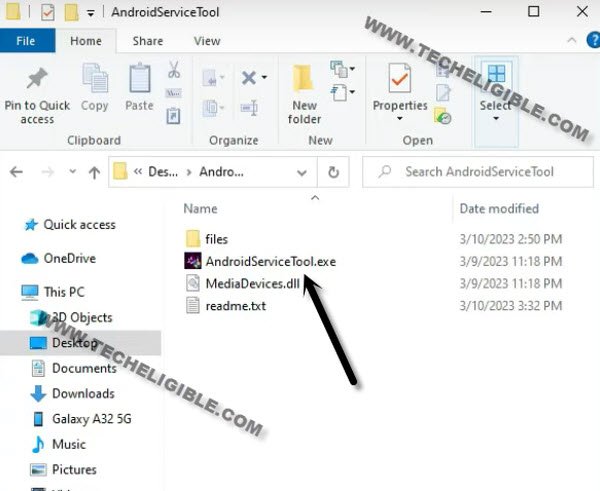
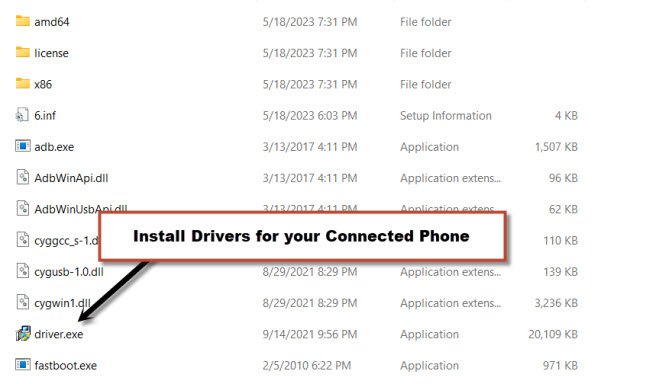
-If your PC do not have any Samsung USB driver installed, then go to your extracted folder, from there go to “Files” folder, and install “Drive.exe” file in PC.
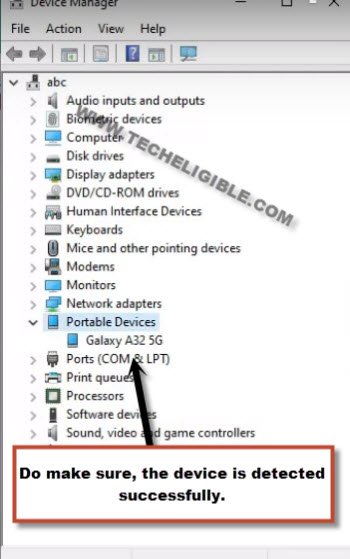
-Connect Samsung A53 device with PC, do make sure, your Samsung device is switched on, and connected to a WiFi.
-Go to PC (Device Manager > Portal Device), and check your connected device detail there just to make sure, that the device has been detected by PC, and we can now easily use Android Service tool.
Use Android Service tool
-Hit on “Direct ADB Enable (Samsung)” button.
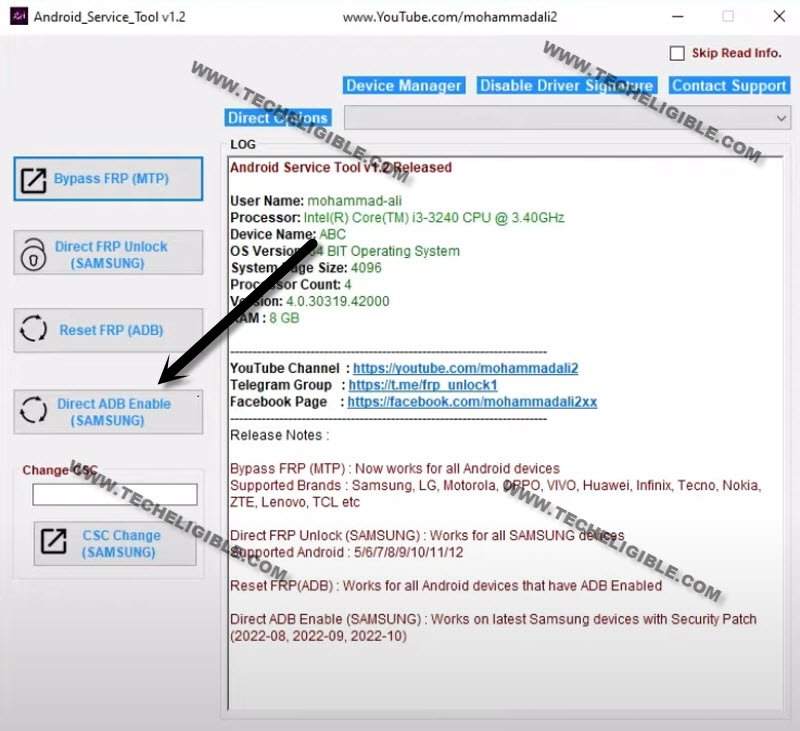
-Afterwards, you will be asked to dial a code from Samsung A53 device in order enable USB debugging mode.
-From first welcome screen, tap to “Emergency Call” option, and dial this code there (*#0*#), after that, blank boxes will be displayed.
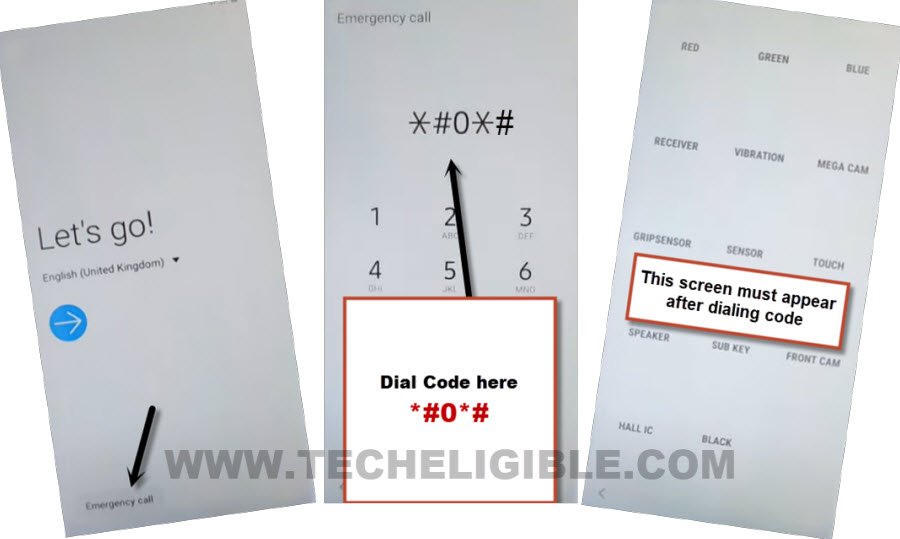
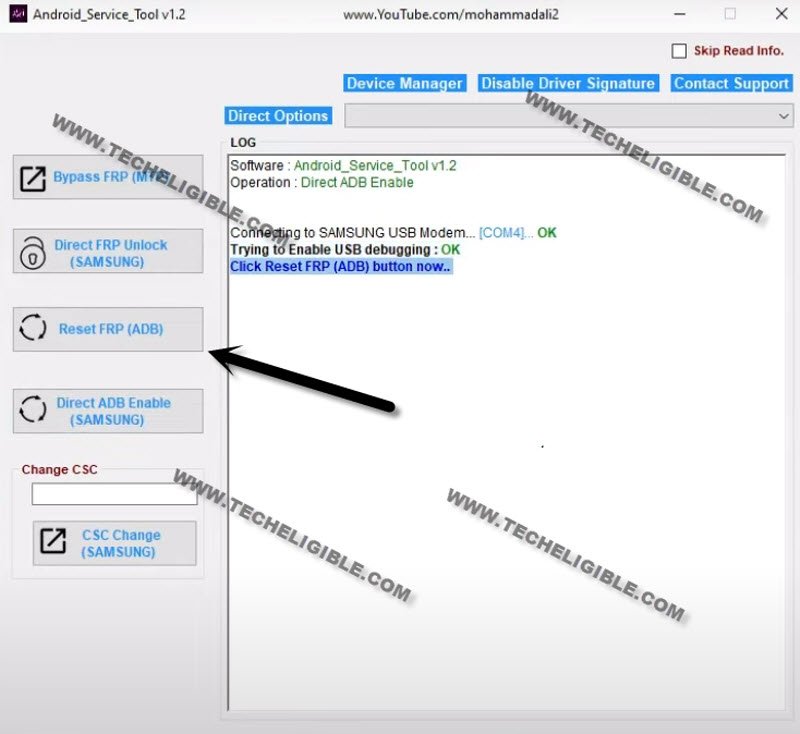
-Hit on “Ok” from your android service tool popup box, and then, this tool will start enabling USB debugging mode in Samsung device.
Note: Android service tool will try to enable USB debugging mode few times, if it does not, then click again on “Direct ADB Enable (Samsung)” button.
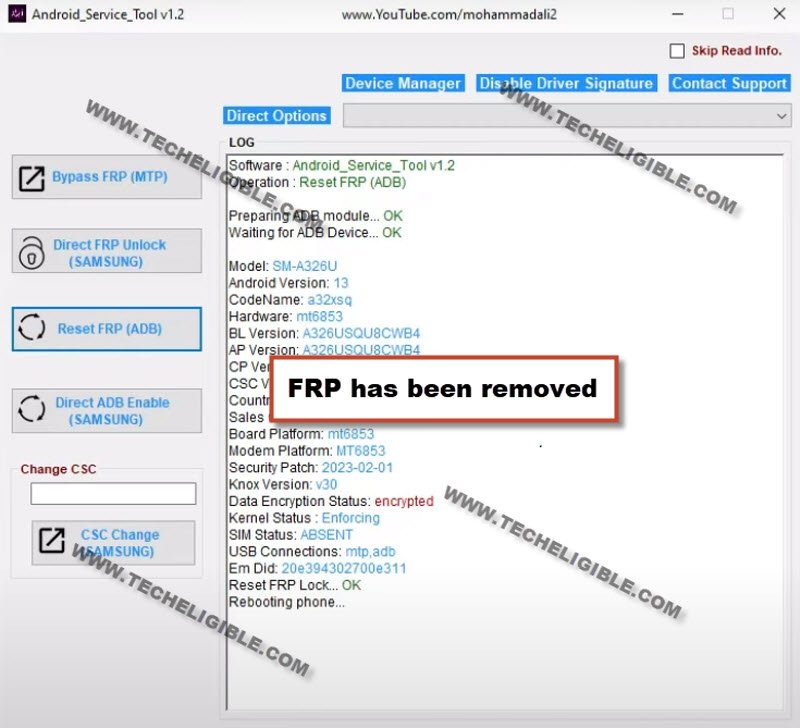
-Once your tool has successfully enabled (USB debugging) mode, you will be instructed to click on “Reset FRP (ADB)” button.
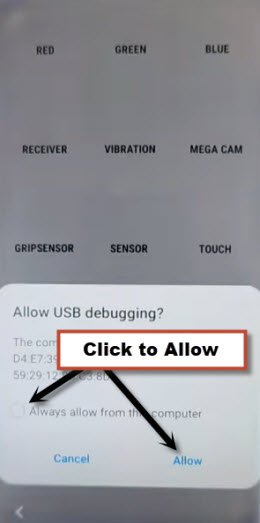
-Hit on “Allow” option from Samsung A53 device to allow USB debugging, once you did that, the means, now you can easily Bypass FRP.
-Within few seconds or minutes, the FRP will be bypassed automatically through this great (Android Service tool), and then, the device will be restart automatically.
Reset Samsung Device from Settings
-Once restarting process is done, you will be redirected to your device (Homescreen), wait till all apps load completely.
Note: Factory data reset will delete all data from your device, if you don’t want to perform this task, you first try to add your new google account, and setup new pattern lock or pin lock, if you did that all successfully, then most probably you won’t require to perform factory data reset task.
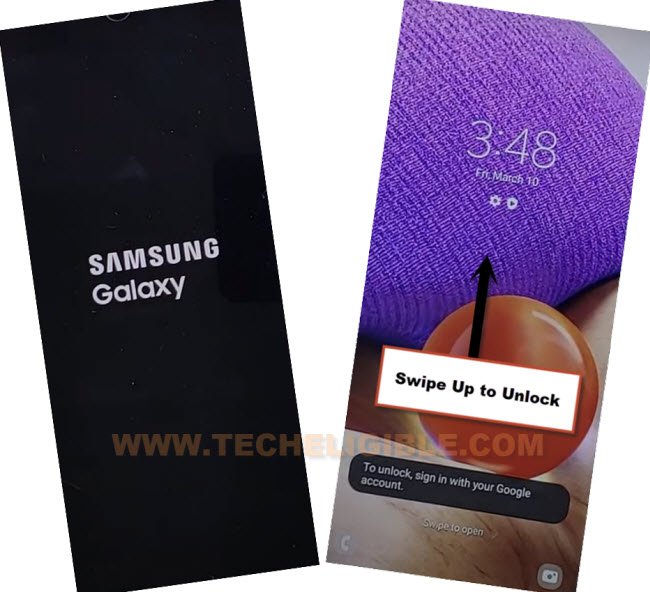
-Swipe up screen to unlock.
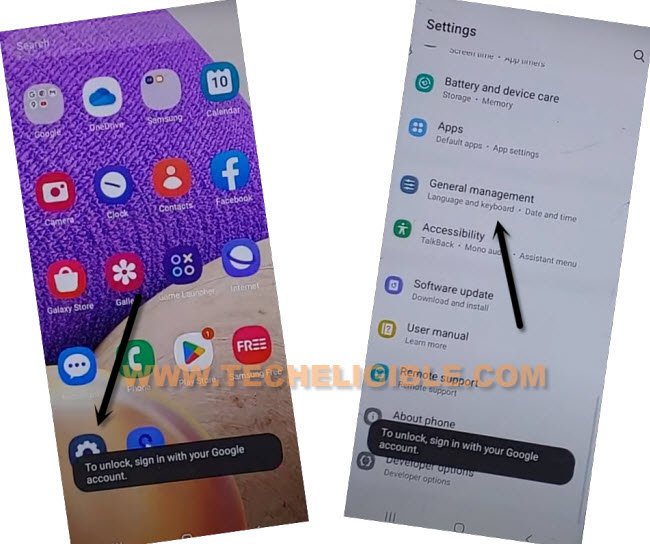
-Go to > Settings > General Management > Reset > Factory Data Reset > Reset > Delete all.
-The device will auto restart, after that, just finish setup wizard on your own without facing any google sign in screen, because old added account has been removed permanently, and you can now setup your own latest account with full permission.
Method 3: Bypass FRP Samsung A53 5G [WITH PC]
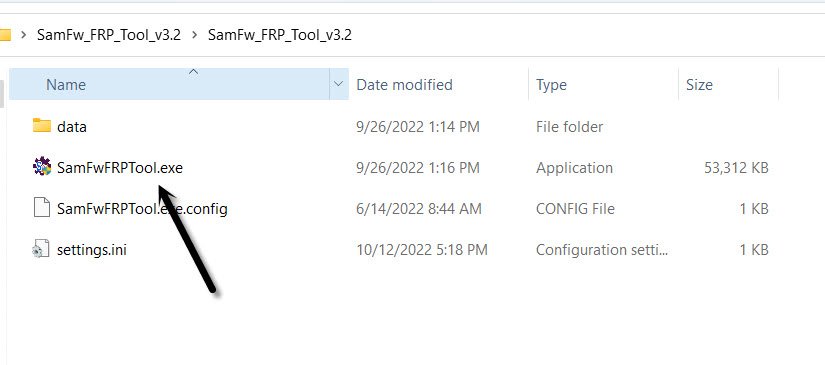
-Download SamFw tool V3.2 in PC [Download]
-Open this tool, you may have a popup of installing Samsung USB driver, so install drivers as well, so that you may not face any connecting issue.
-Turn on Galaxy A53 device, and connect with PC.
-Once the device is detected by tool, the device Com port will start appearing up in your Samfw tool same as shown in below image, if the device is not detected, do make sure proper Samsung USB drivers are installed, and also connect and disconnect device 2-3 times from PC.
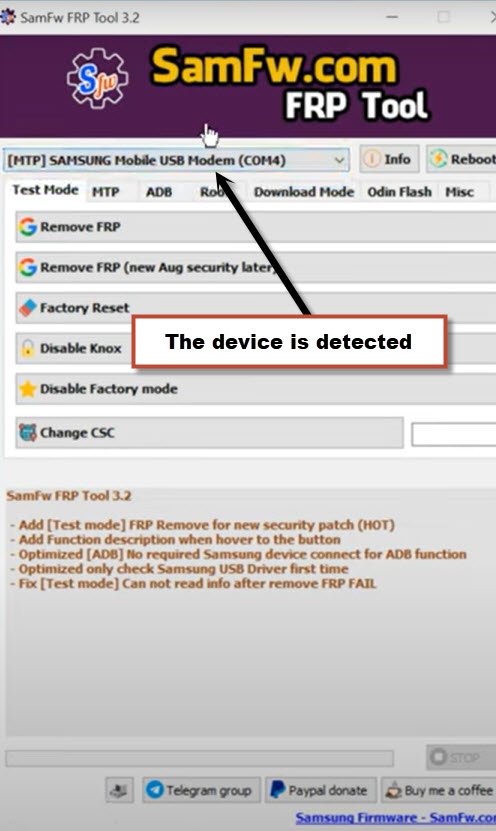
-Click on button from tool “Remove FRP (New Aug security Later)” button.
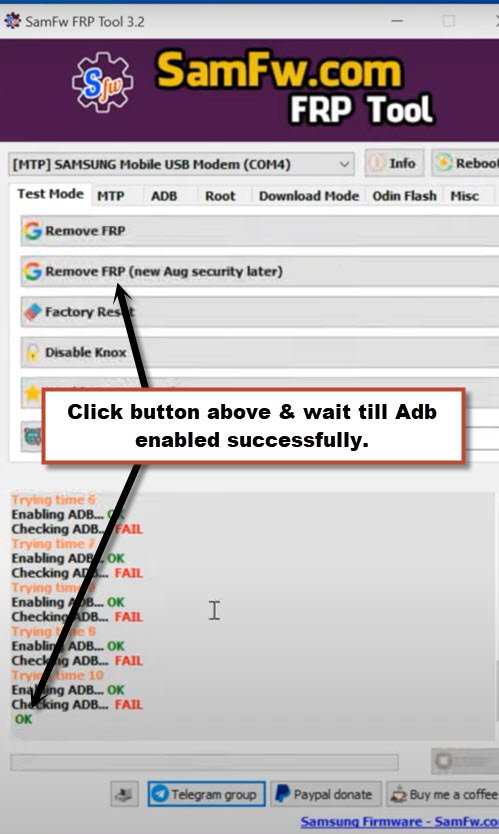
-Wait, the FRP Bypass process will just start, this process will take few minutes, once you see (OK) in samfw tool, that means the adb has been enabled successfully.
-Hit on “Emergency Call”, and dial this code there “*#0*#“, after that you will have there a blank box screen.
-Tap again on “Remove FRP (New Aug security Later)” button, and this time, this software will start reading all device info.
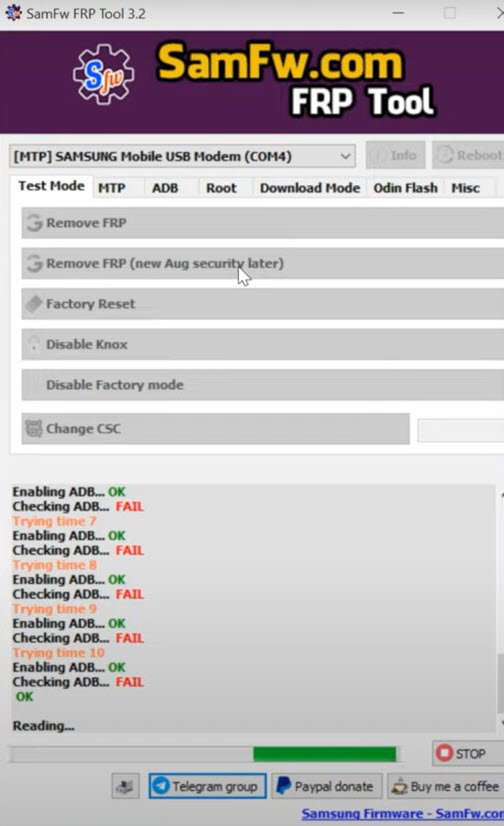
-You will receive a popup message, firstly check mark option “Always allow from this computer”, and after that, tap to “Allow”.
-From another popup window, tap to “Samsung setup wizard”, you will get into the device settings.
-Again hit on “Allow” from USB debugging popup message.
-After that, the device will just restart, and you will reach inside your device homescreen.
-Go to > Settings > General Management.
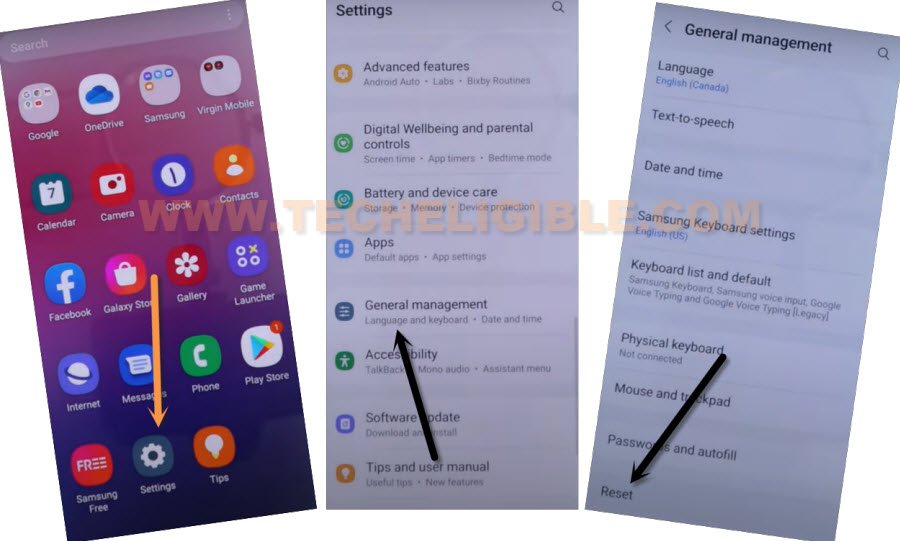
-From there, tap on > Reset > Factory Data Reset > Reset > Delete all.
-This is how you can permanently bypass frp, and remove old google account.
Method 4: Bypass FRP Samsung A53 With Alliance Shield X App (No PC)
With this amazing method without paying anything to anyone with the help of a free (Alliance Shield x) application, which will allow you to easily bypass the google verification screen just by force stopping some apps from Samsung A53 device installed apps.
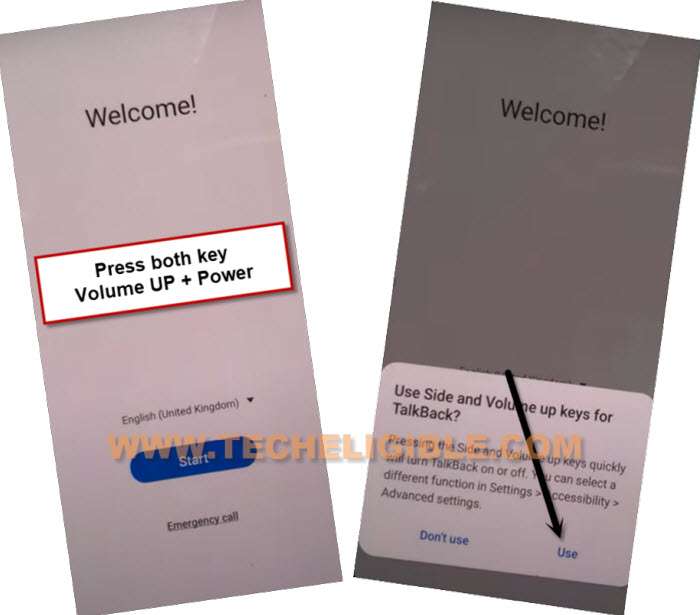
–Turn on device, and Connect WiFi, after that, go back to (Welcome) setup wizard screen, and then, turn on talkback by long hold both (Volume UP + Power) buttons same time, and hit on “Use” option from popup box.
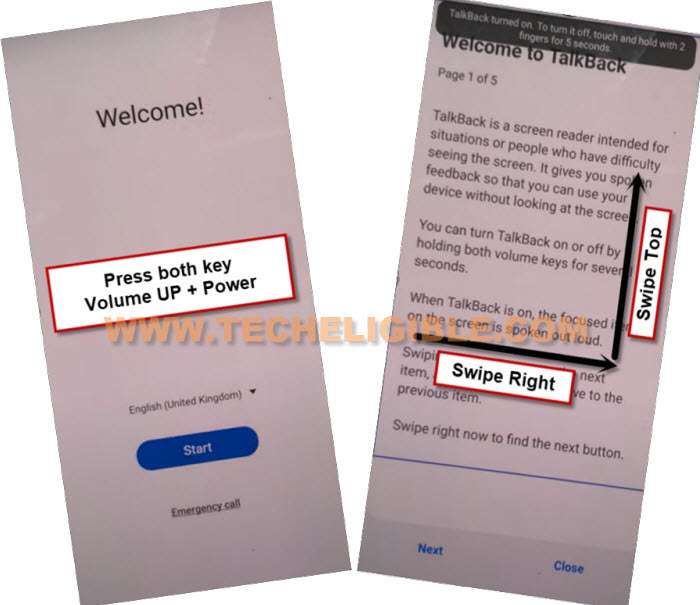
–Hold both keys again (Volume UP + Power) buttons, and you will see popup flash message of (Talkback turned on….).
–Let’s Draw a letter “L” by swiping on screen from right to left, and then swipe up having seen below image.
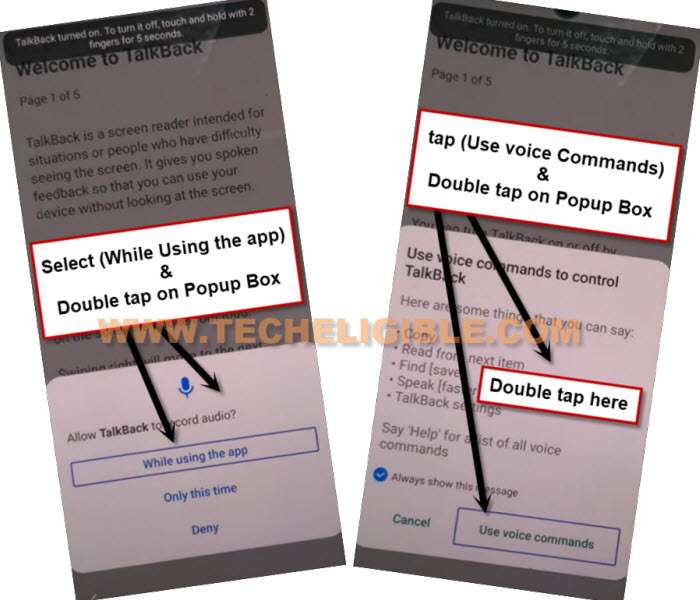
–Tap once on “while using the app”, now double tap anywhere on screen.
–Tap once on “Use Command Voice” option, and again double tap on popup box.
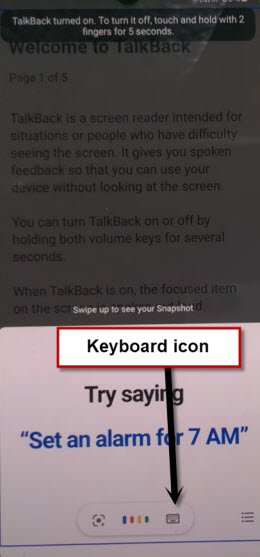
–Lets open google assistant by Speaking loudly (Google Assistant).
–After having a popup window of google assistant, just long press both (Volume UP + Power keys) to turn off talkback.
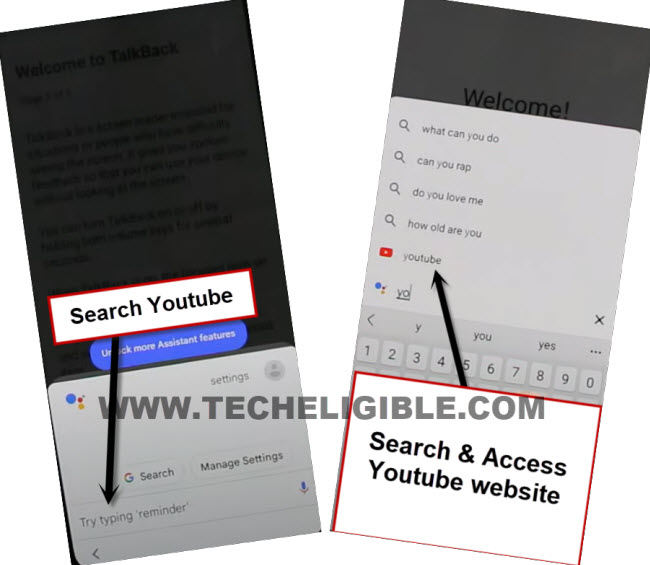
–Now tap to “Keyboard icon”.
–Type “You”, and hit on “Youtube” icon to reach Youtube website.
–From up-right, hit on “Profile icon”, and tap on “Settings”.
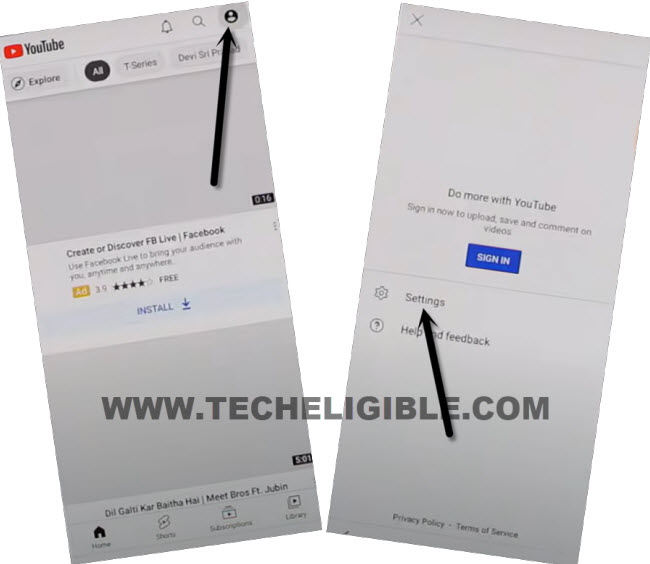
–Go to > About > Youtube terms of services.
–From chrome browser, hit on > Accept & Continue > Next > No Thanks.
Install Alliance Shield X app
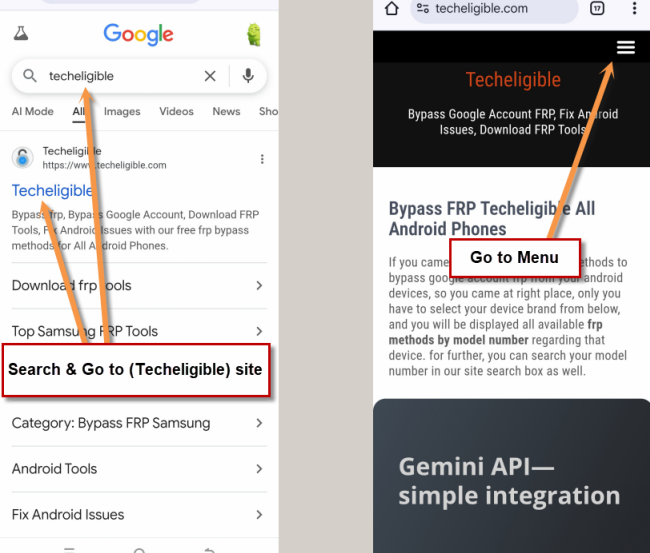
-Search in chrome search bar with “Techeligible“. After that, go to 1st searched result to reach to techeligible site.
-Let’s tap over the “Menu” option from there.
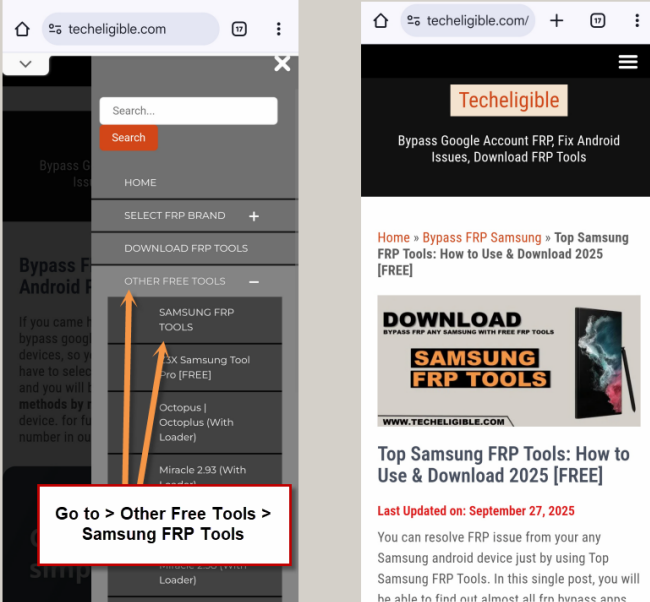
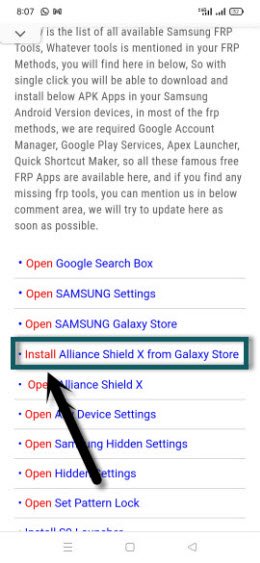
-Navigate to Samsung frp tools screen by going to > Other Free Tools > Samsung FRP Tools.
–Go to “Install Alliance Shield X from Galaxy Store”.
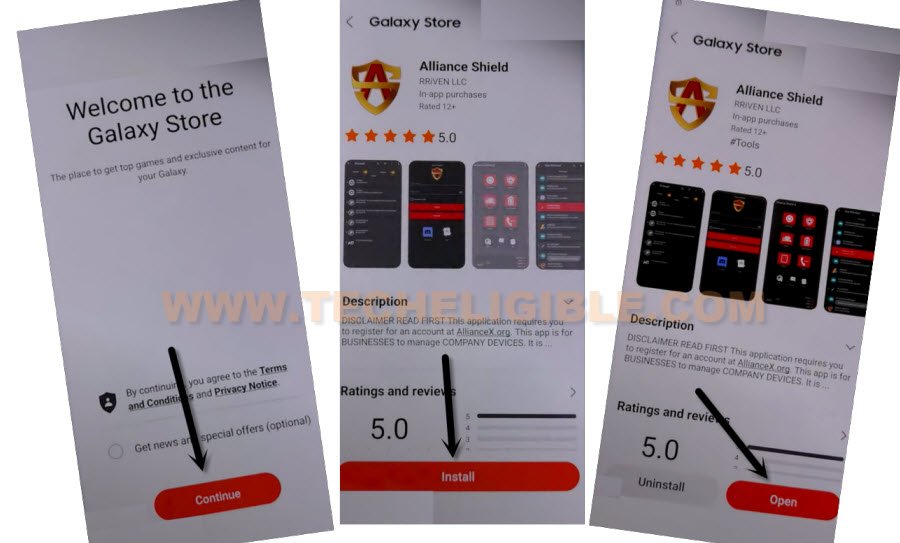
–Tap to > Continue > Install > Open.
–Once you reach to Alliance Shield X app, tap to “Skip”.
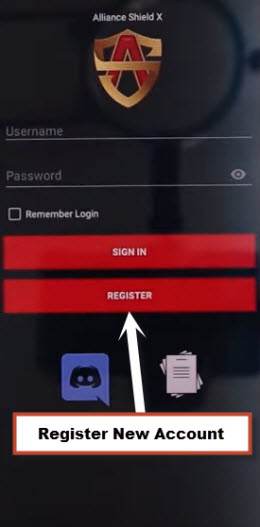
–If you have registered your account already, so sign in there with your account, otherwise create your free account in (Alliance Shield X) app by hitting on (Register) button.
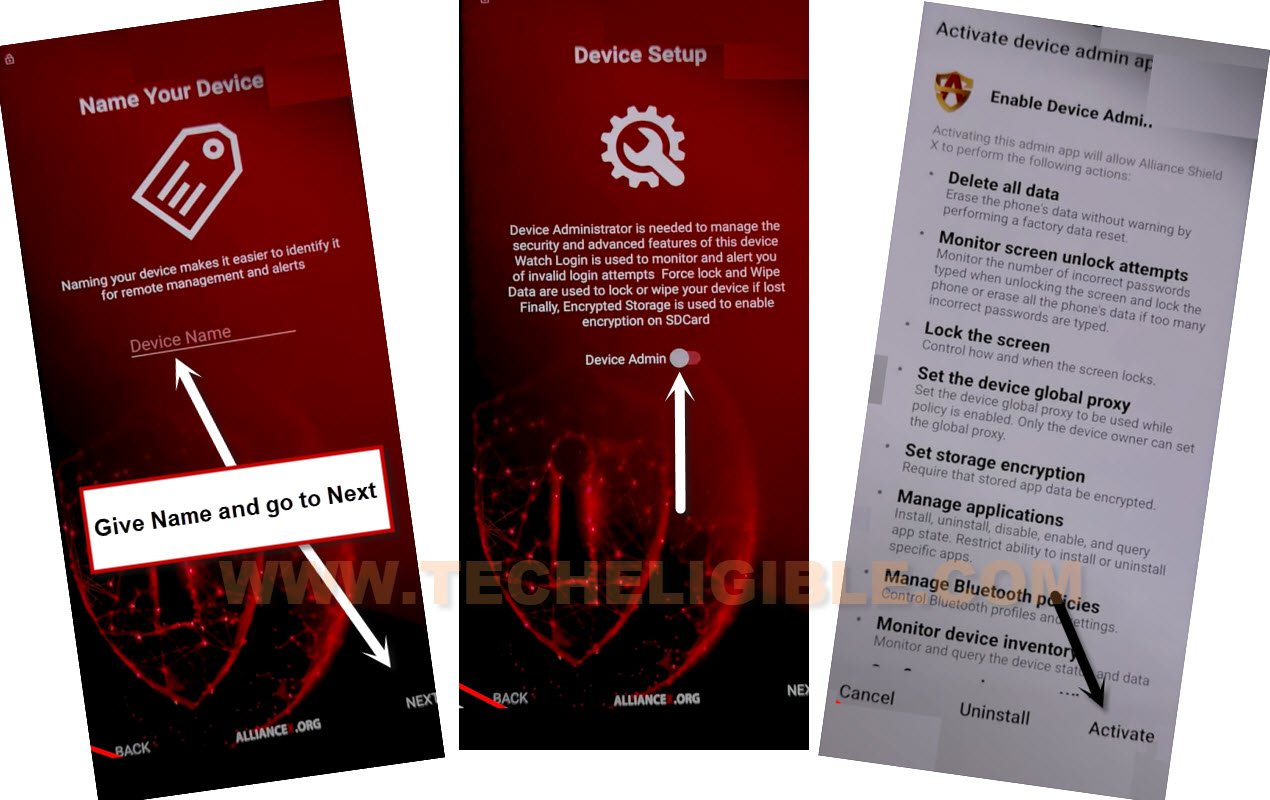
–Tap to > Next > Turn on (Device Admin) > Activate.
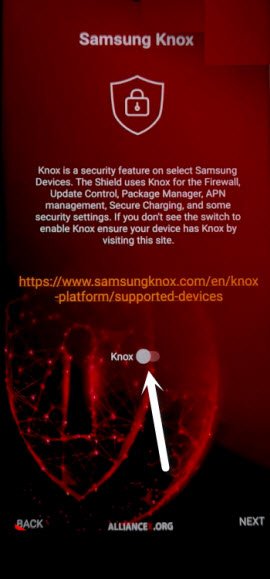
–Turn on (Knox) > Agree > Next > Finish.
Lets Disable Some Apps
–Tap on “App Manager”.
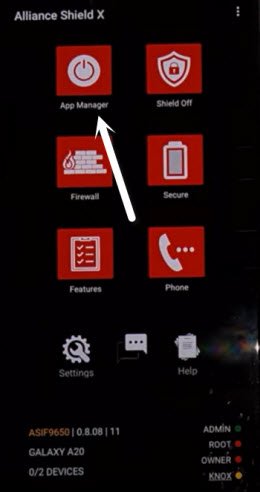
–You will have a (Search icon) at up-right corner, just tap on that.
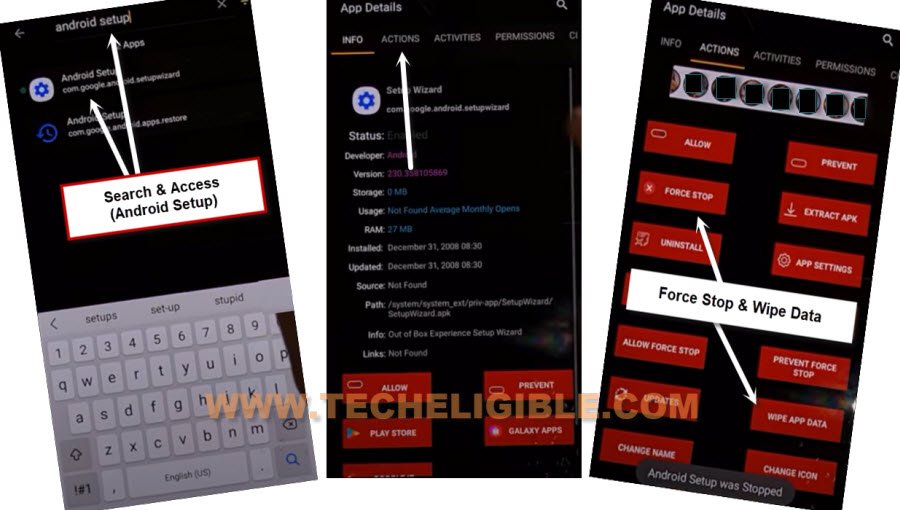
–Search & Tap on “Android Setup”, and tap on “Actions”.
–Force Stop & Wipe Data from there.
–Go back by tapping on back arrow.
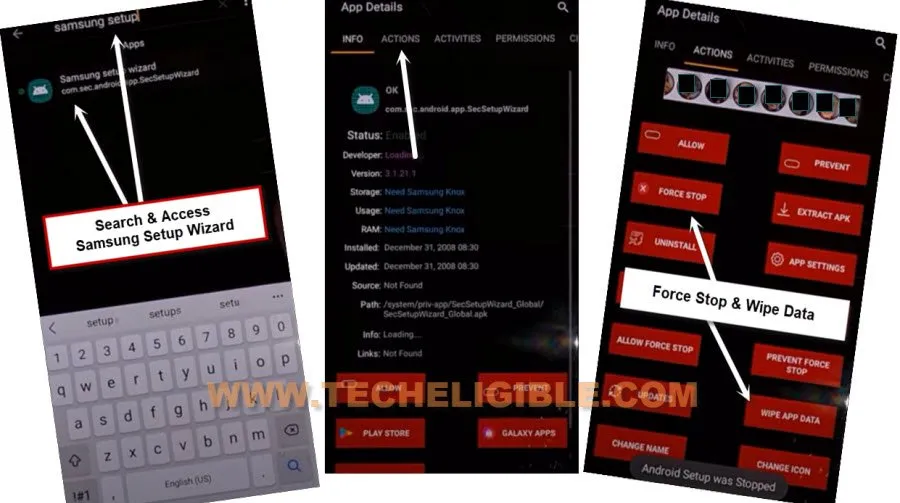
–Type in search area “Samsung Setup Wizard”, and go to “Actions”.
–Hit on “Force Stop”, and after that, tap on “Wipe Data”.
–Go back by tapping on back arrow.
Disable Google Play Services
–Now Search there “Google Play Services”
–Go to “Actions”.
–Now tap on “Force Stop”, and after that, tap on “Wipe Data”.
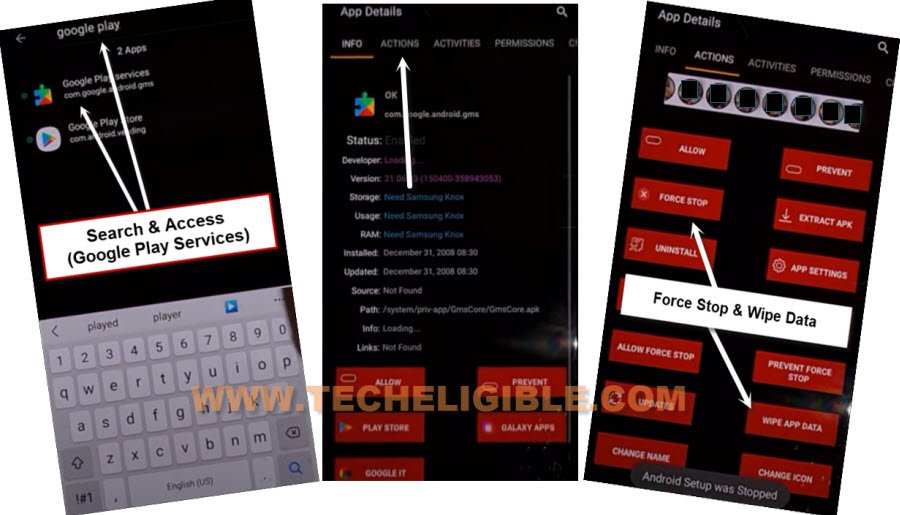
–Go back by tapping on back arrow.
–Search there “Samsung Setup Wizard”, now tap on “Activities”, and then tap on 1st (com.sec.android.app….) same as shown in below image.
–Now you will see (Configure) popup window, just tap on “Open”.
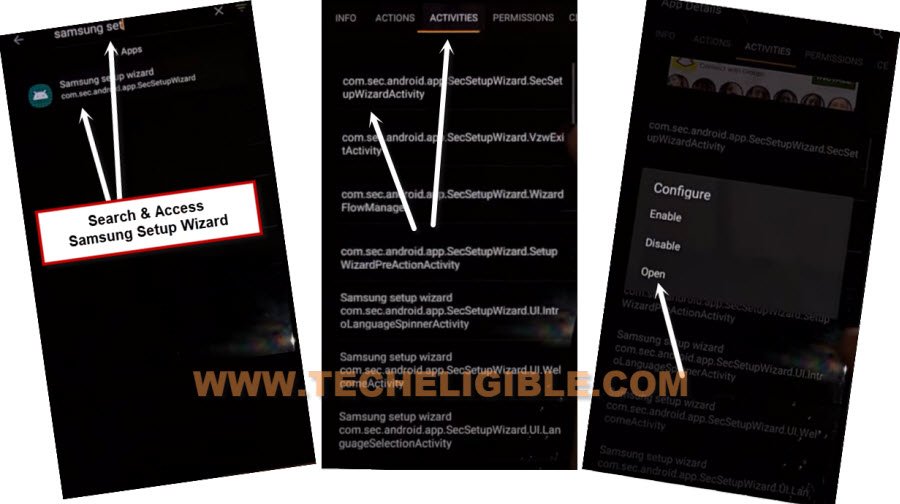
–Just over (Please Wait…) screen, and then tap to > Skip > Finish.
-You can sing in and add latest pattern in your device for future frp protection, and do not forget your google account this time. Because this method may not work later on, if the device security patch level or android version is upgraded.
The Bottom Line
We applied different methods on Samsung A53 phone according to its android version. With latest (Samsung A53 5G Android 16) device, we used a simple (Android Utility Pro Tool). We just downloaded and installed this tool on PC. Installed the drivers as well. After that, simply, connected the phone with PC and with one click on (Remove FRP) option, we just got removed the FRP account.
We also applied further method, for the Android 13 or 12 version, we used some other PC tool and Alliance shield x app as well. Although, this is a lengthy post, but, you check out your device android version and follow the method accordingly.