
2 Methods to Bypass FRP Galaxy J5 Pro Android 9, 8, 7 [Updated]
The most latest method, which is now working on all android version of J5 Pro to bypass frp easily is the (Dialing Code) method, and this latest method can easily achieved jus by using a free PC software, the link is mentioned in this post, you can easily Bypass FRP Galaxy J5 Pro Android 9, 8, 7 without using any paid tool.
The 2nd method is just for android 8 version devices, if you don’t wanna use software, and you wanna go for different method, and if you have J5 Pro Android 8 device, then you can try 2nd method as well.
Warning: Do not try this frp method on a stolen phone, this is a serious crime, if you are trying to bypass frp on a stolen phone, you may also be jailed, this process is for device owner and for educational purpose only.
| Method 1: Remove FRP Galaxy J5 Pro (Android 7, 8, 9) New |
| Method 2: Remove FRP Galaxy J5 Pro (Android 8) |
Method 1: Bypass FRP Galaxy J5 Pro [New]
-Firstly Turn on Samsung device, and connect WiFi, after that put your device back to first homescreen.

-Go to Computer screen, and download below tool in your computer.
⇒ Amazing FRP Tool 2022 [DOWNLOAD]
Pass: techeligible.com
-Once downloading process done, just turn off your windows defender @ntivirus software or also turn off all active @antivirus software, because, otherwise you won’t be able to use this tool.
-Extract the tool from WinRAR archive using 7-Zip or WinRAR software.
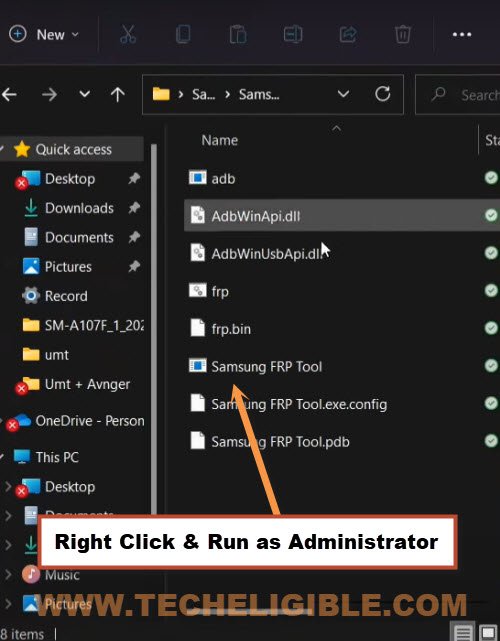
-Afterwards, go inside the tool folder, and from there right click on “Samsung FRP Tool“, and run as administrator.
Note: Do make sure, you have installed all relevant USB drivers in your PC, so that you may not face any connectivity issue with your device.
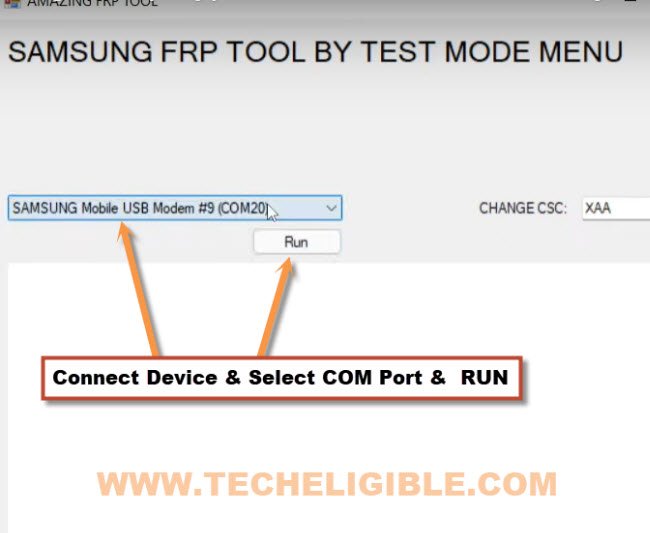
-Connect device with computer using USB Cable.
-From the software, click to drop down arrow, and select your Samsung device com port, after that click on “RUN” button.
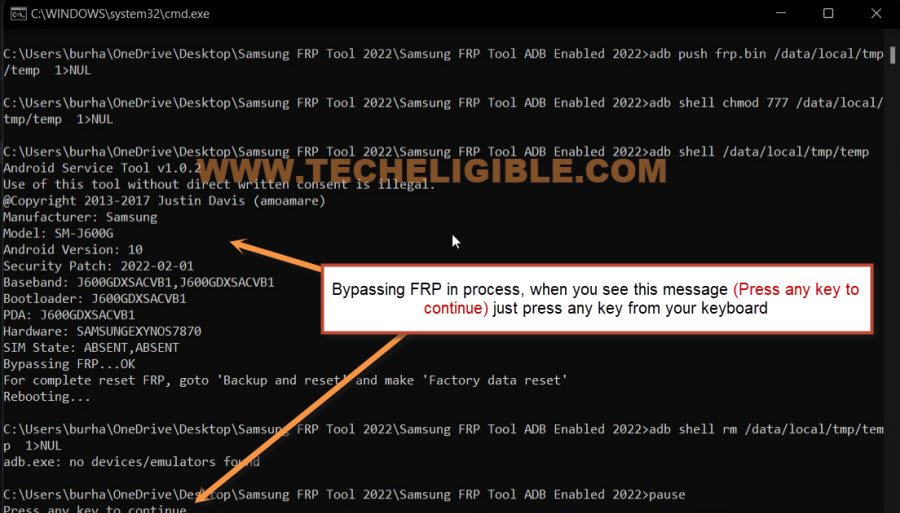
-You will receive a popup window in the software, there are some instructions to dial a code in Samsung device.

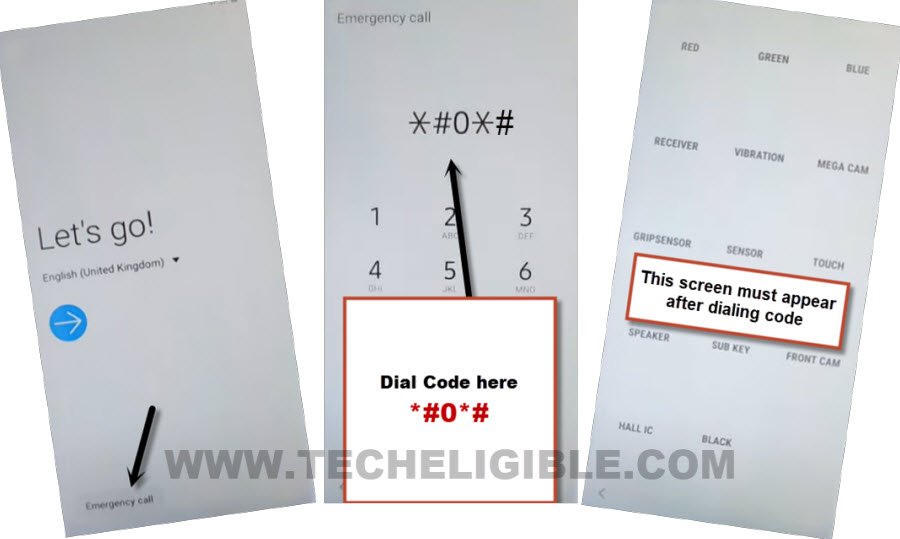
-So tap on “Emergency” option from your Galaxy J5 Pro, J5 Pro Plus device, and the dial code *#0*#, After dialing this code, you will get there a screen with some small white boxes same as shown in below image, if this screen appeared on your device as well, that means this tool will work perfectly.
-Get back to software, and click on “RUN” button again.
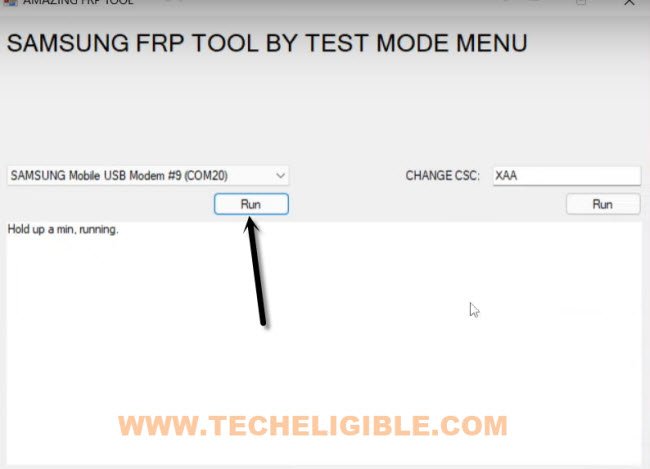
-Hit on “Allow” option from popup window of your J5 Pro screen.

-Command prompt screen will be displayed in PC, just wait there till the bypassing FRP process completes, after that press any key from your keyboard to continue, and again wait, in few seconds or minute your device will be free of FRP.
Method 2: Bypass Google Account Galaxy J5 Pro [Android 8]
This is a very simple method, and we hope this method would work on your all J5 Pro models, if you are J5 Pro device owner, and you have mistakenly hard reset your device or forgot your Gmail account password and unable to recover it by any how, so what you do next? surely you will need to Bypass Google Account on J5 Pro, so follow below all steps very carefully to successfully bypass it.
Note: This FRP Bypass method has successfully been tested with Samsung Galaxy J5 Pro Android 8.1 (J530Y/DS).
-Connect Wi-Fi to your J5 Pro device.
-Go back to “Welcome Screen”.
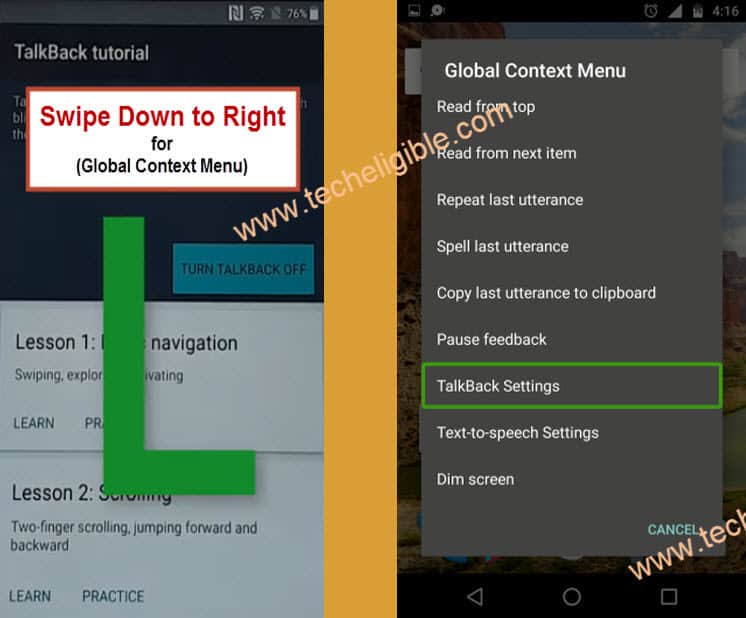
-Now we need to enable “Talkback Feature”.
-Press (Home Button) 3 times quickly and wait 10-20 sec until you have a screen of “Talkback Tutorial”.
-Draw “L” on your Talkback Tutorial screen, this will show you another popup window of “Global Context Menu”.
-Double tap on “Talkback Settings”.
-Press (Home Button) 3 times quickly again to disable talkback.
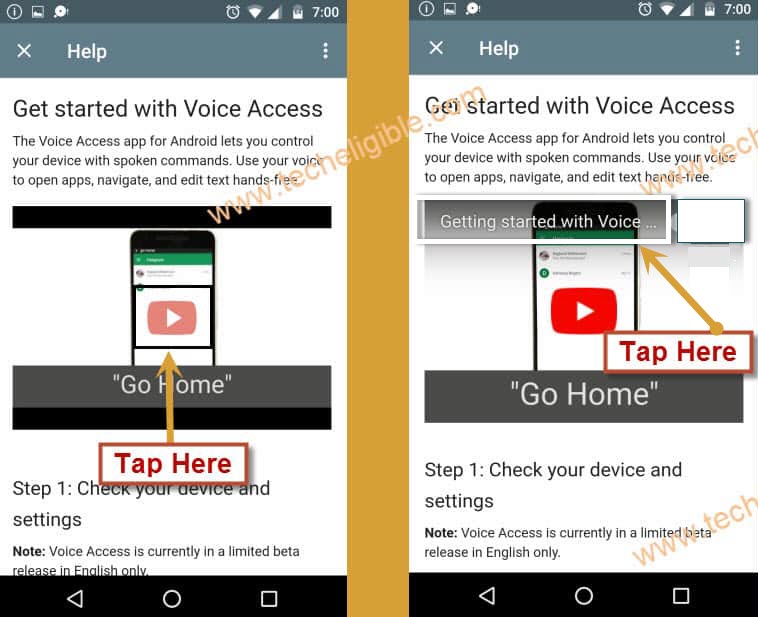
-Now Tap on “Help & Feedback”.
-Tap on “Get Started With Voice Access”, this option would take you to the “Youtube Video” screen.
-Simply tap on Youtube Video “Play icon” and wait few second until you get the video “Title”.
-Once you get “Youtube Video Title”, just tap on that title.
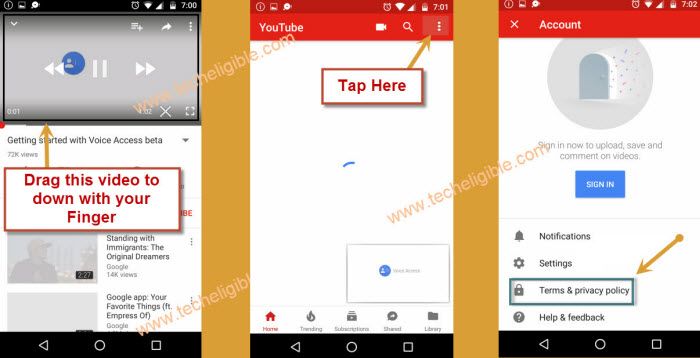
-You will be redirected to the “Youtube Offical Website”.
Note: If you see “Update” screen, just select “Not Now”.
-Long press on Youtube Video, and Drag it down
-Now tap on “Profile icon” from top right corner of the youtube site, and select “Settings > About > Google Privacy Policy” (See Below image).
-Now you will have “Samsung Internet” screen, just tap on “START”, and then tap on “Cancel” if you see Update Popup window.
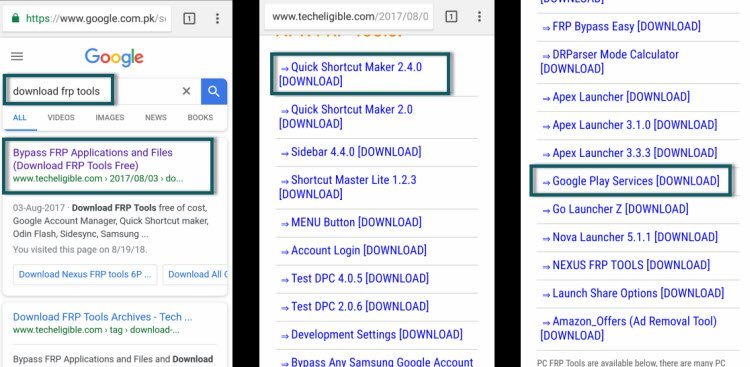
Download FRP Tools:
-Type in google search bar “Download FRP Tools“.
-Go to very first search result, that will belong to “Techeligible.com”.
-Once you access there, Go down and download below 2 APK Apps (See Below image).
1- Quick Shortcut Maker 2.4.0
2- Google Play Services
-Wait until downloading process finish, now tap on “BookMarks” from your browser bottom bar, and then tap on “Cancel” from Samsung Account Sign in popup window.
-Now tap on “History”, and then go to “Download History”.
-Perfect, now you have will be able to see your downloaded apk tool there.
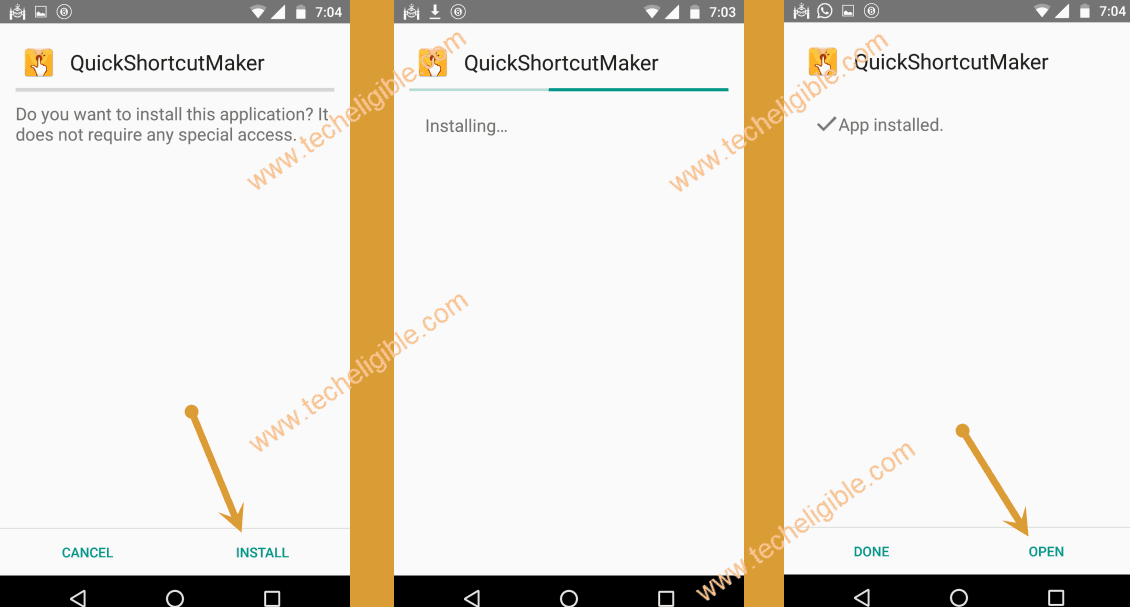
-Tap on “Quick Shortcut Maker”, after that you will have installation blocked popup, just tap on “Settings’ from that popup.
-Enable option of “Allow From This Source”.
-Tap on “Back Key”, and then tap on “Install” to install quick shortcut maker, once installation finish, tap on “OPEN”.
-You have accessed to “Quick Shortcut Maker” app.
-Tap on “APPLICATION” from top bar of the quickshortcut maker app.
-Type in search bar “Settings”, after tap on “Settings” from the results.
-Now tap on “TRY” (See Below image).
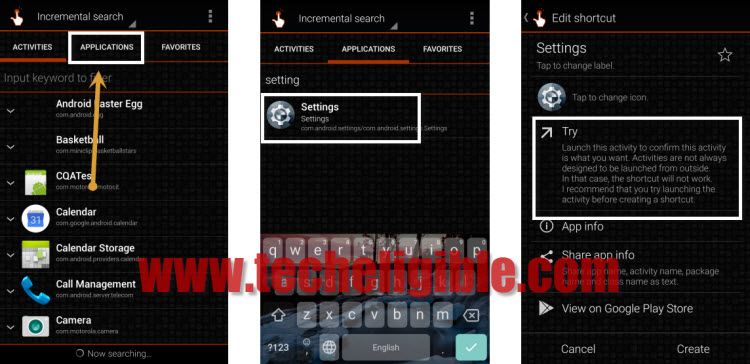
-You will be redirected to the Galaxy J5 Pro Settings.
-Go down, and then tap on “Biometrics and Security”.
-Now again go down, and then Tap on “Other Security Settings”.
-Tap on “Device Admin Apps > Fin My Device > Deactivate”.
-Go back to “Settings” by tapping on “Back Key” 2-3 times.
Disable Some Apps from Settings:
-We have to disable some Applications to easily Bypass FPR Galaxy J5 Pro.
-From Settings, tap on “APPS”.
-Tap on “3 dots” from top right corner, and select “Show Systems”
-Go to “Google Play Services”, and then tap on “Disable” button .

-Tap on “Back Key” to go back to APP List.
-Go to “Google Services Framework”, and then tap on “Disable” button.
Let’s Install Google Play Service APK Apps:
-Tap 4-5 times on “Back Key” to go back to “Download Folder”.
-There you will be able to see “Google Play Services”, this app you have already downloaded.
-Just tap on “Google Play Services” app to install it.
-Once the installation finish, tap on “OPEN”.
-Now tap on “Back Key” 2 more times to access back to “Download Folder”.
-Install again “Quick Shortcut Maker” app from there/.
-After installation done, just tap on “OPEN”.
-Tap on “APPLICATIONS” from top bar menu of the quick-shortcut-maker app.
-Type in search bar “Settings”, and then tap on Settings from the search result.
-Tap on “TRY” to access J5 Pro “Settings”.
-Now go to “Cloud & Accounts > Accounts > +Add Account > Google”.
-After that you will have “Just a sec..” screen, just wait.
-Now you will have “Gmail Sign in” screen, just add your any valid Gmail Account.
-Once you entered your Gmail id detail there, just tap on “Next > I Agree”.
-Wait few seconds, after that you will “POPUP” on your screen, just ignore that, and tap on “Back Key” to go back to “Settings”.
Let’s Enable Back the Disabled App:
-Go to “APPS”.
-Tap on “ALL APPS” from top left corner, and then select “Disabled”.
-Now tap on “3 dots” from top right corner, and select “Show Systems”.
-Now you will be able to see your both disabled apps there, 1-Google Play Services, 2-Google Services Framework.
-Enable both applications from there.
-Once you are done, just go back to “Settings”.
-We have to enable “Android Device Manager” as well.
-From “Settings”, go to “Biometrics and Security > Other Security Settings > Device Admin Apps > Android Device Manager > Activate”.
-Now go back to “Settings” by tapping on back key multiple times.
-Long press “Power Key”, and then tap on “Restart” to reboot your Samsung Galaxy J5 Pro.
Let’s Soft Reset Samsung Galaxy J5 Pro:
-Go to > Settings > About Phone > Software Information.
-Tap 7 times rapidly on “Build Number” to enable developer mode.
-Go back to “Settings”.
-Tap on “Developer Option”, and enable “USB Debugging” & “OEM Unlock” from there.
-Go back to > Settings > General Management > Reset > Factory Data Reset > Reset > Delete All.
-This will take several minutes in resetting J5 Pro device, wait and then complete initial setup to access back your device and use your device freely just by adding your any valid Gmail Account there.
Read More: