Remove Google FRP TCL 30 Z, Use this Device with New Gmail ID
We can easily have access to our FRP protected TCL device without using google account, if you are device owner, and wanna get back your device with your other remembered google account, so that is possible now. You will have to Remove Google FRP TCL 30 Z just by using talkback feature. Because, this feature remain available always, and can easily turn on from first (Hi there) screen.
Disclaimer: We highly recommend you to apply this method only on your own device, if you are not owner of this device, or you found this from some where, you must return to its real owner.
Let’ Start to Remove Google FRP TCL 30 Z:
-Start methods by switching on TCL device & Connect with WiFi first.
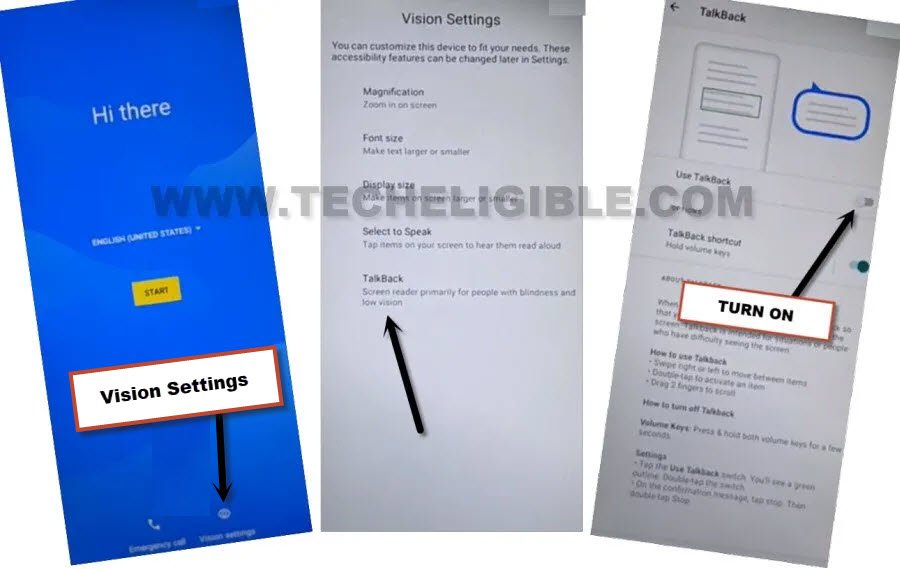
-Put your device back on a first (Hi there) page, from there, we will turn on (Talkback) feature, that can be accessed from > Vision Settings > Talkback.
-Toggle on “Use Talkback” option, and hit on “Allow” from popup. This will turn on talkback.
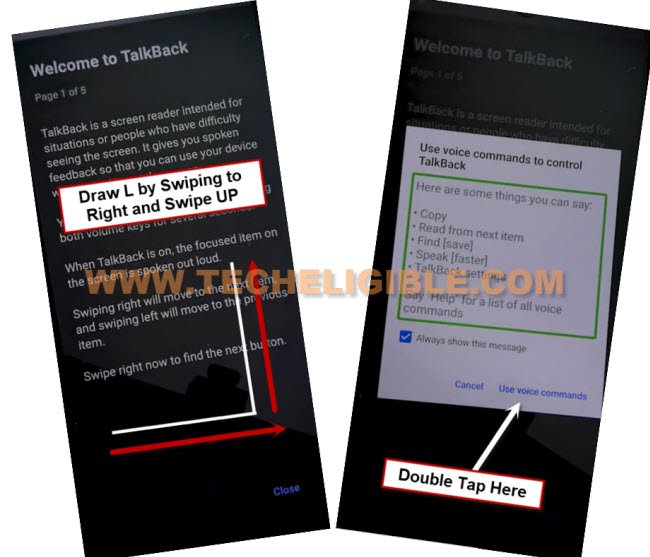
-After accessing to talkback page, just make reverse “L” letter by swipe right and swipe up on screen.
-Double tap on > While using the app > Use Voice Command.
-After that, you have to speak loudly “Open Google Assistant”.
-The new try saying window will popup on screen, just double tap over “Keyboard” icon.
![]()
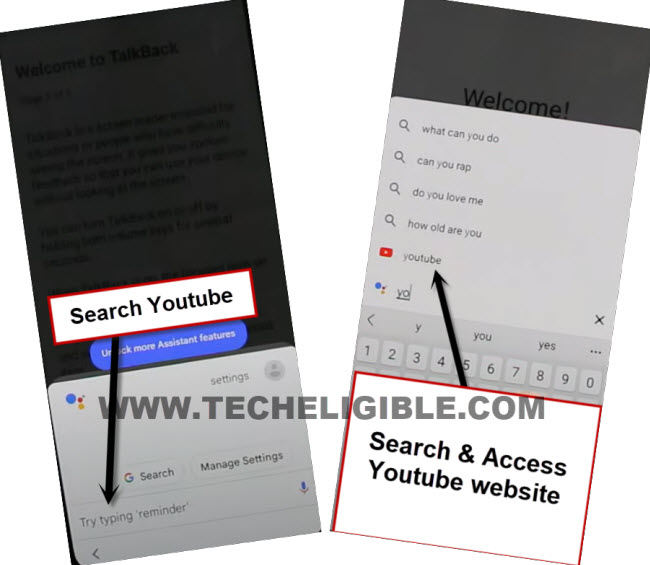
-Lets search for youtube and access to youtube website, just type in search box “Youtube”, and double tap over “Youtube” from searched result, this will redirect you automatically to the Youtube official website.
-Double tap over > Profile icon > Settings.
![]()
–Double tap to > About > Google Privacy Policy > Accept & Continue > Next > No Thanks.
-Congrats, the google chrome browser is now launched, and we can now easily access to this device settings.
Access TCL 30 Z Settings:
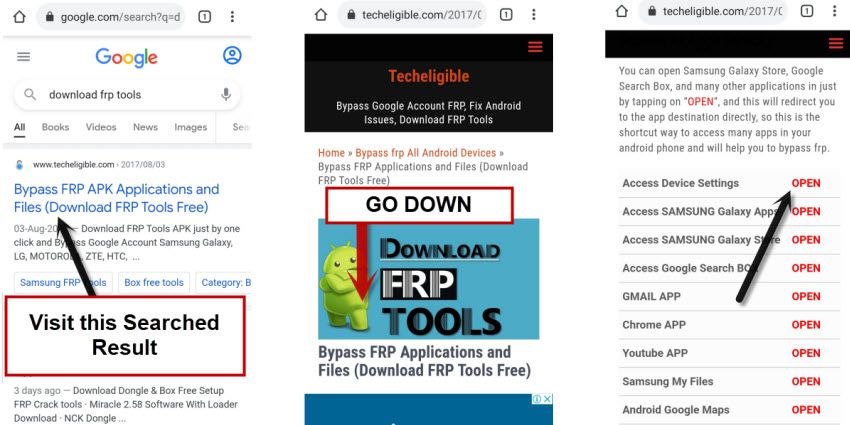
-Search for “Download FRP Tools“, and double tap over first searched result same as shown in below image.
-Scroll down, and double tap over “Access Device Settings” from there.
-Double tap over > Accessibility > Talkback.
-Lets double tap over “Use Talkback” option to turn this off to Remove Google FRP TCL 30 Z.
-From popup window, double hit over “Stop” option, now the talkback has been disabled successfully.
-We’re not required to hit any option twice, just lets hit over “Back Arrow” from top left corner to go back.
-Go to “Accessibility MENU”, and turn on “Accessibility Menu Shortcut” option.
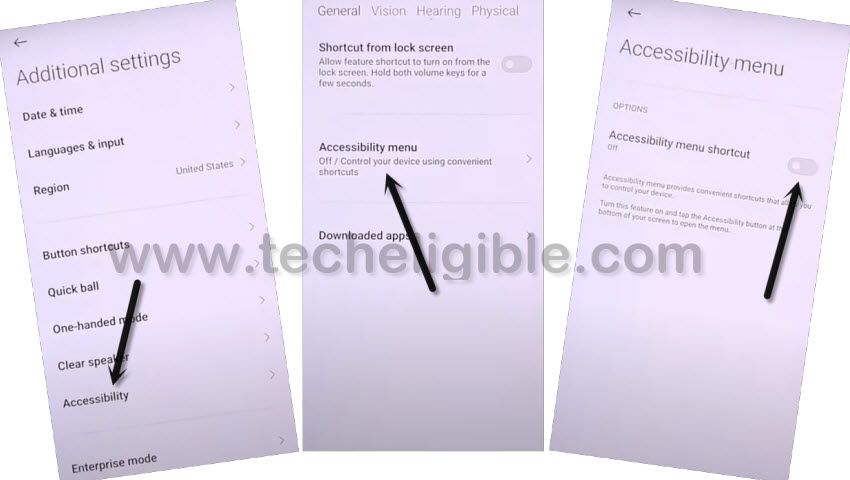
-Hit on “Allow > Got it” from popup, now the green colored “3 dots” will stick at the right edge of the screen.
![]()
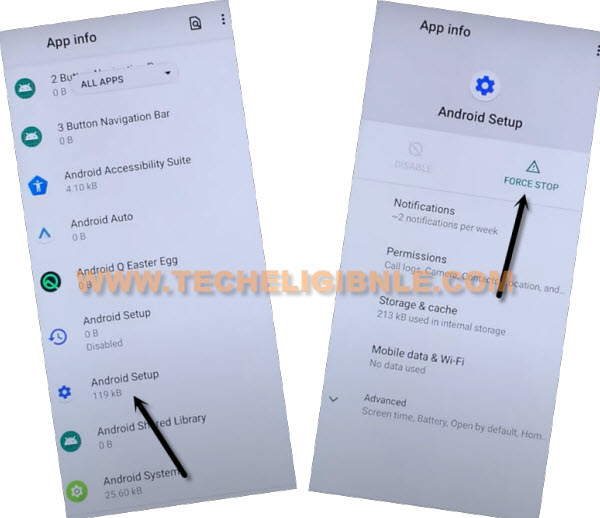
-Let’s go back to settings, and from there, tap to > Apps > View All Apps.
-Go to > 3 Dots > Show system.
![]()
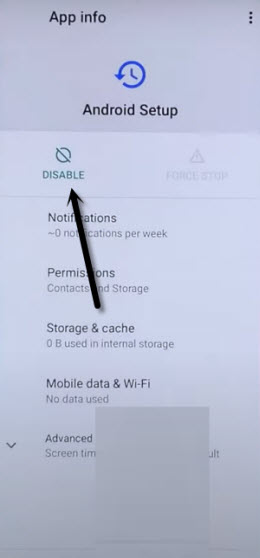
-We’ve to disable some applications from here, just find and tap to > Android Setup (Clock icon) > Force Stop > Ok.
![]()
-After that, tap over > Disable > Disable App.
-There is another android setup, that is with a (Settings Gear icon), just tap over that > Android Setup > Force Stop > Ok.
-We are now only few steps behind from completely Remove Google FRP TCL 30 Z, just go all the way back on first (Hi there) screen.
-Tap to “Start”, and wait on “Checking for update….” loadings screen for almost 30 sec.
-Afterwards, hit on “Back Arrow” 1-2 times, and this will take you back on (Connect to WiFi) screen.
-Go to > 3 dots > Assistant > Settings > Enable (Google Play Services).
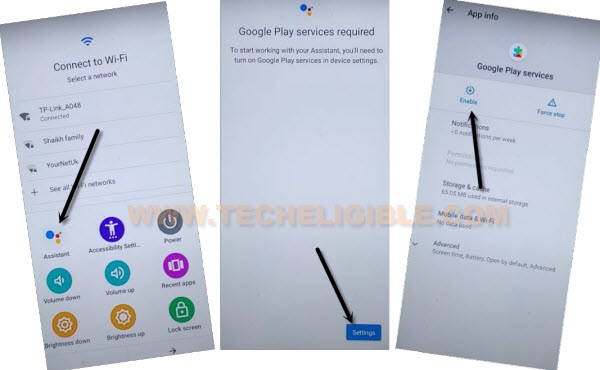
-Once you enabled (Google Play Services), just go back by hitting on (Back Arrow) only one time, and tap to > Setup Offline > Continue.

-Finish other steps on your own, after accessing inside device homescreen, just go to > Settings > System > Reset > Erase all data (factory reset).
-Now tap 2 more times on “Erase all data”, and this will remove old signed in google account, you will lose your all device data after performing this operation. After that, you can easily setup your new google account and pattern lock.
Note: If you don’t wanna erase your device data, you can try by setup new google account and pattern lock from device settings first instead of going for (Factory Reset) process.