Have you lost your google account passcode and stuck on a google verification scree? You’re looking for a working method to get rid of FRP screen and sign-in with other Gmail account? Through this method, you can get a full information about how to Bypass FRP Galaxy J7 Core Android 9/7. Follow up this guideline from below on your Samsung J7 Core.
Disclaimer: We highly recommend you to apply this method only on your own device, if you are not owner of this device, or you found this from some where, you must return to its real owner. This frp bypass guideline is only for educational purpose to teach device owner how overcome this FRP locking challenge on his own device.
Two FRP Guides on Samsung Galaxy J7 Core:
Based on the compatibility of your device, you may select the best FRP bypass technique from the list below on Galaxy J7 Core. This post explains 2 different FRP Bypass techniques to let you retrieve your device with an updated Google account.
| ⇒ Method 1: Samsung Galaxy J7 Core [Android 9] |
| ⇒ Method 2: Samsung Galaxy J7 Core [Android 7] |
Method 1: Bypass FRP Galaxy J7 Core Using a SIM Card [Android 9]
New frp method to Bypass FRP Galaxy J7 Core without any PC or Laptop, 1st step is bit difficult, but once we access to chrome browser, after that you are almost done to bypass google account frp lock from your device, so follow all steps from below carefully, and stay with us till the end of this method. This method has successfully been applied on SAMSUNG Galaxy J7 Core (SM-J701F) U7/BIT7/REV7 Android 9. This method is only for Device Owner.
Tools We need to Complete This Method:
-PC Mouse.
-Micro USB OTG Cable.
-PIN Locked SIM Card.
Start FRP Bypass Guides:
-First of all connect “Wi-Fi” to your J7 Core device.
-Power off J7 Core device.
-Insert PIN Locked SIM Card.
Note: if you don’t have pin locked sim card, don’t worry, you can set PIN Lock code in your any active SIM Card using other android device.
-Power On J7 Core device.
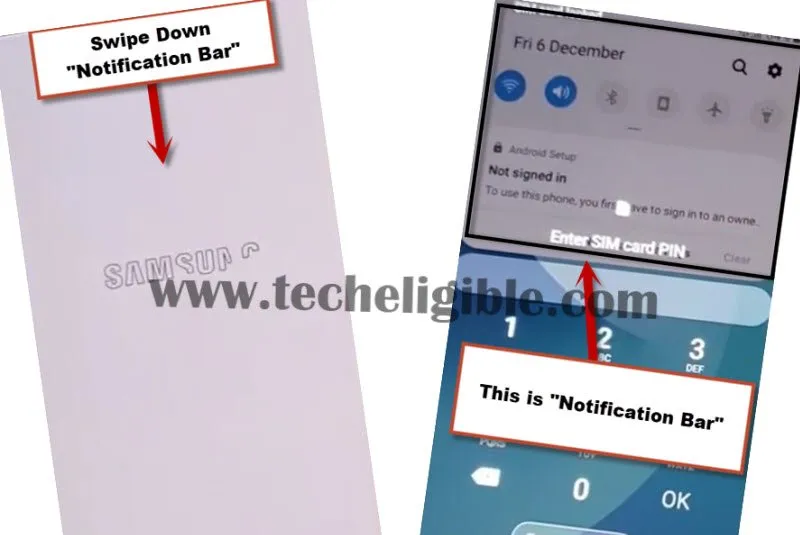
-When you see “SAMSUNG” logo on your screen, just start Swiping down the “Notification BAR”. keep swiping down multiple times, once you see “Enter SIM Card Pin” screen, at that time you will surely get your “Notification BAR”.
-Connect PC Mouse to your J7 Core device using Micro USB OTG Cable.
-Now you will get your Mouse cursor on your Galaxy j7 core screen.
-Keep the cursor on “Search icon”.
-Type your 4 digit SIM Card pin, but do not tap on “OK”.
-At the same time you have to tap on “OK”, and the press left click of mouse on “Search icon”.
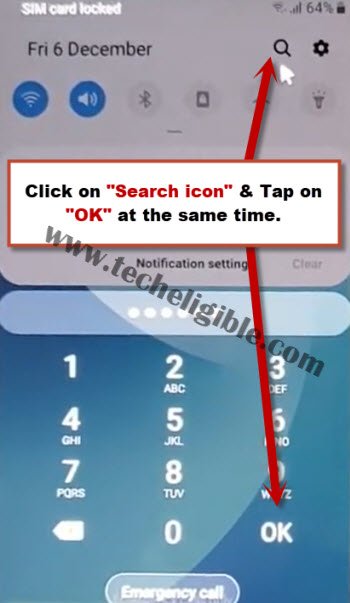
-Make sure you tapping on “OK” and click on “Search icon” at the same time, otherwise it won’t work.
-If this does not work for you, don’t worry just restart your device and repeat all above steps again, this may take 2-3 tries but you will succeed in your 2nd or 3rd try. So just repeat all steps and don’t be panic.
-After successfully clicking on “Search icon”, you will receive new black window with some icons.
-Disconnect OTG Cable and Mouse from your device.
-Now we can easily Bypass FRP Galaxy J7 Core.
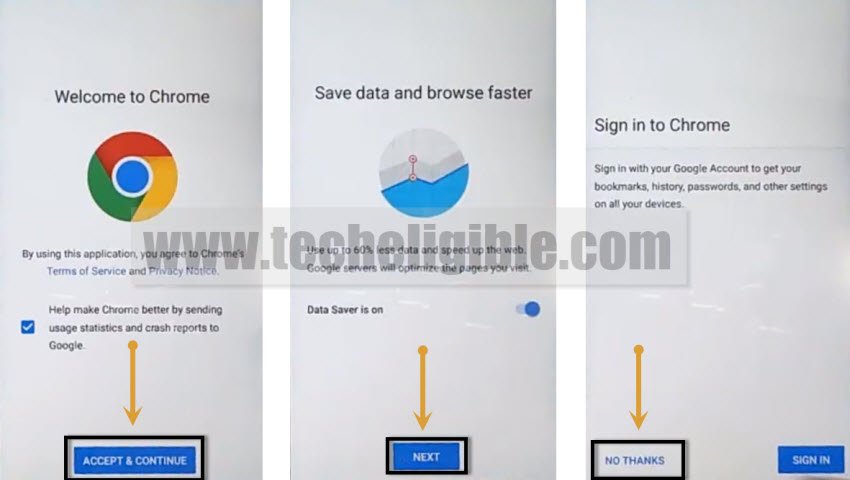
-Type in search bar “Chrome” and then tap on “Chrome icon”.

-Now ta on > Accept & Continue > Next > No Thanks.
-Type in search bar “Google.com” and search that.
Download FRP Apps on Samsung J7 Core:
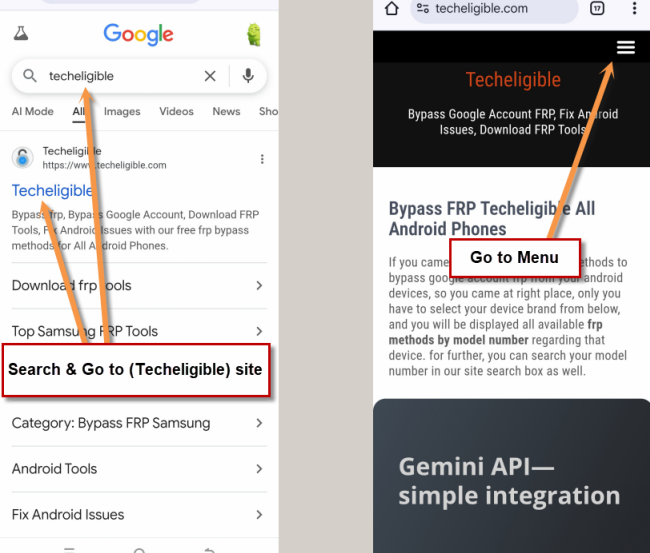
-Search in google chrome browser “Techeligible” and visit techeligible official site. Go to “Menu” option from top corner.
-Tap on > Other Free Tools > Samsung FRP Tools.
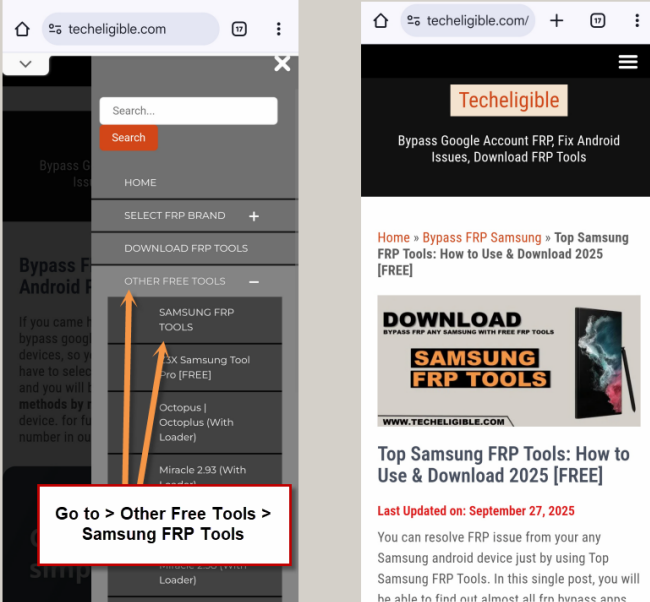
-Download from there below 2 apps.
1-Google Account Manager 6.0
2-Account Login App.
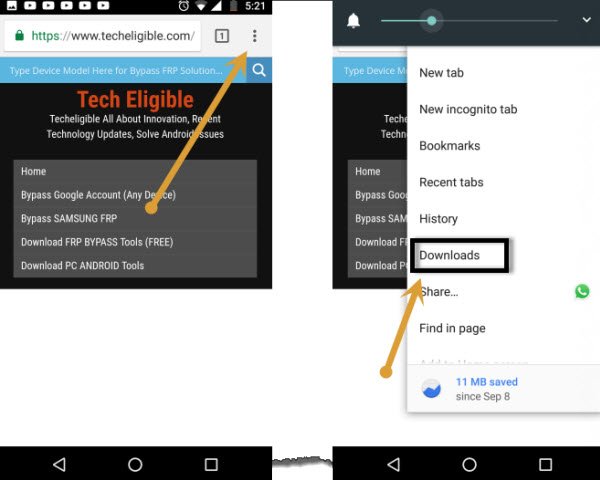
-Go to top of the site & tap on “3 dots” from top right corner of chrome browser and selsect “Downloads”.
Install FRP Bypass Apps:
-There you will be able to see your downloaded apps, if the apps are in downloading process, just wait until download process finish.
-Tap on “Google Account Manager 6”, and then tap on “Settings” from the chrome popup window.
-Enable option from there “Allow from this sources”.
-Tap on “Back Arrow”, and then tap on > Install > Done.
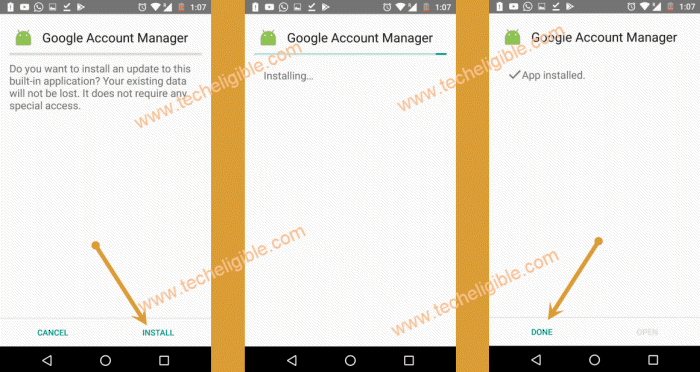
-Congrats, you have installed successfully google account manager, now we have to install last app to completely to Bypass FRP Galaxy J7 Core (SM-J701F).
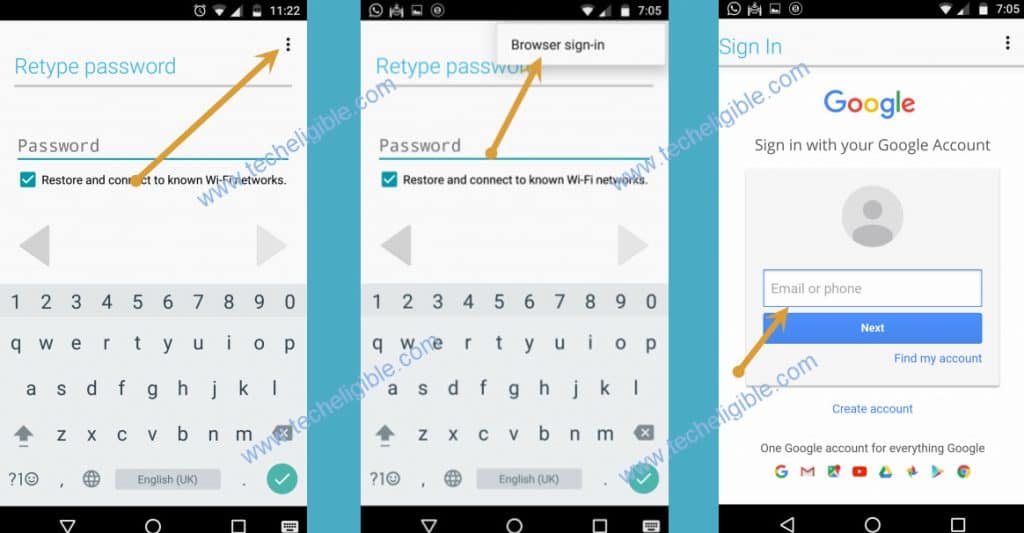
-Tap on > Account Login > Install > Open.
-Tap on “3 dots” from top right corner & select “Browser Sign-in”.
-Now just sign in there with your any valid Gmail account.
Method 2: Use Talkback to Bypass FRP Galaxy J7 Core [Android 7]
We will use talkback function and access to Galaxy Store application using (Text to Speech Settings) option. After that, you have to go to (Samsung MY Files) directly from galaxy store. Insert SD card on your device and install FRP removal apps to get your device free from FRP protection. Check out complete J7 Core FRP bypass guide below.
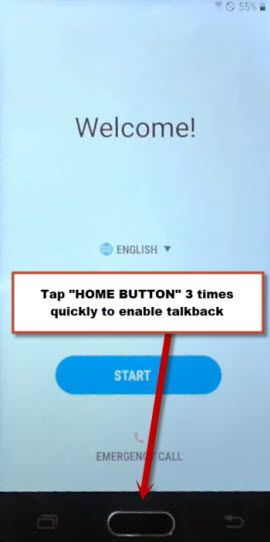
-Start up frp bypass steps on J7 Core by connecting WiFi first. After that, go back on first (Welcome) home-screen. From there, press (Home) button 3 times to enable talkback function.
-Swipe down to right on talkback tutorial page and double tap on “Talkback Settings”.

-Turn off “Single-tap Activation” option by double tapping on this.
-Turn on again “Single-tap Activation” option by double tap on.

-Bring up the talkback tutorial screen again by swipe down and swipe right on screen.
-Double tap to “Text-to-speech settings” option.
-Let’s double hit over the “Settings gear icon”.

-Double tap on “Settings from Samsung Text to speech..”.
-Keep tapping on (3.0.00-55) for few seconds, after that, you will be redirected on (Galaxy Store) screen.
-Let’s turn off talkback by pressing 3 times (Home button).
Open Galaxy Store App to Reach Samsung My Files:

-Swipe down from the screen and check mark “All Options” box and tap to “Agree” button.

-You will reach to next galaxy store app screen. From there, tap to “Search” icon and search there with “Fi” and go to “Samsung My Files”.

-Download and open “Samsung My Files” application to Bypass FRP Galaxy J7 Core.

-Open “google.com” in your pc browser and go to techeligible official site. After that, tap on “Download FRP Tools” option to access official frp tools page.

-Download from there 2 apps (Google Play Services) and (Apex Launcher 3.3.3).
-Copy both downloaded apps into your SD Card.
-Insert that SD Card in your Samsung Galaxy J7 Core.
-From Samsung my files screen, go to “SD Card” option.

-After that, go to downloaded frp tools containing folder.
-Let’s install “Google Play Services” app by tapping on this application. From popup window, go to “Settings” and turn on “Unknown Sources” option. Tap over the “Ok” from popup window.
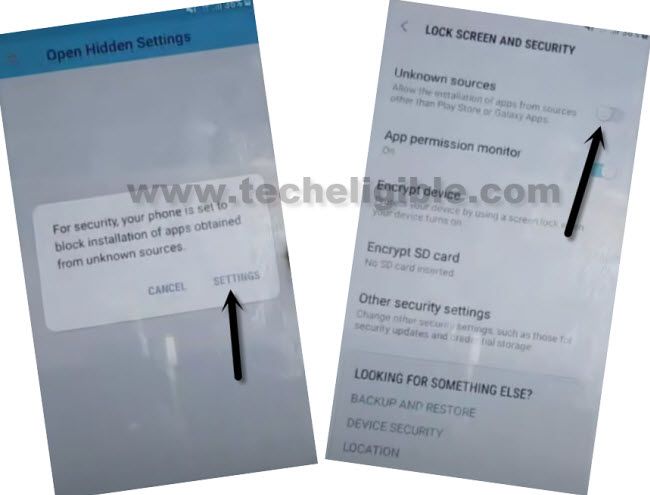
-After that, tap to > Next > Install > Done.
-Let’s install another app by tapping on > Apex Launcher > Settings > Turn on (Unknown Sources) > Ok.
-From installation page, go to > Install > Open.
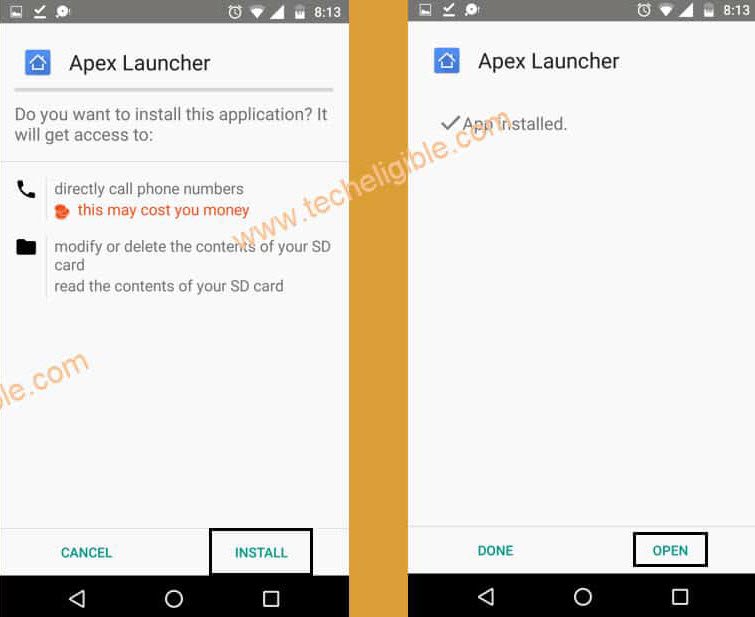
-Within a seconds, you will be taken to your Samsung J7 Core main home-screen.
-Go to “Settings” screen of your device. From there, tap to > Lock Screen and security > Other Security Settings.
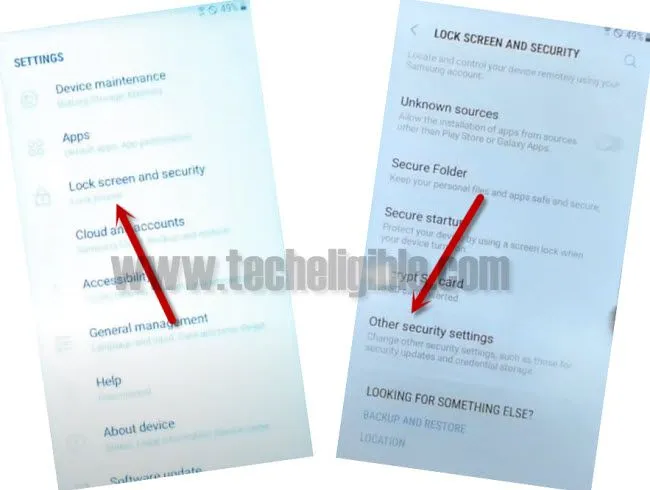
-Let’s enable disable find my device by going to > Device Administrators.
-Tap over the > Find my device > Deactivate.

-You have to get back to main “Settings” page again. From there, tap to “Apps”.

Disable Apps to Bypass FRP J7 Core:
-After accessing to app list page, from there, find and tap on “Google Play Services” app from app list screen. After that, tap on > Google Play Services > Disable > Disable app.
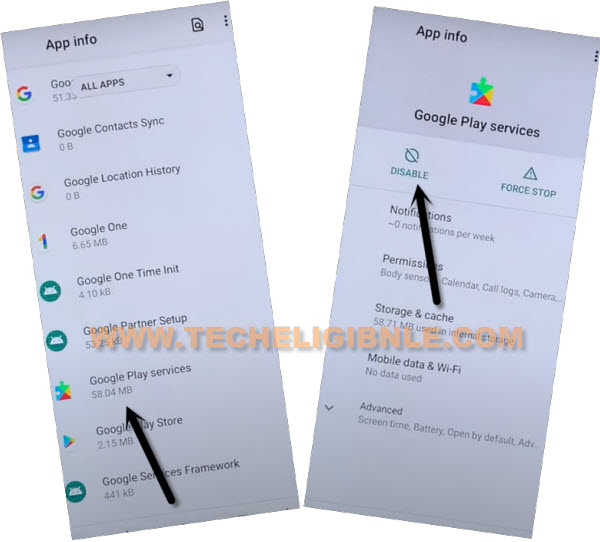
-Go back to app list screen again.
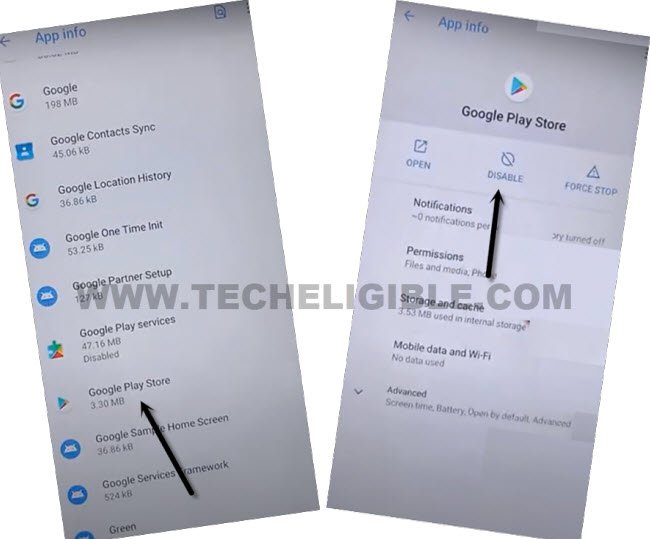
-You have to do same thing with google play store application. Just tap to “Google Play Store” application.
-Disable this app as well.
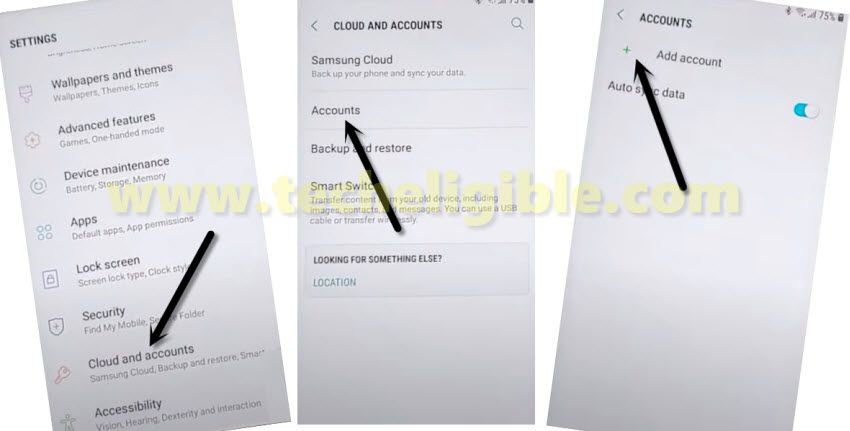
-Let’s get back on main (Settings) page. From there, tap over the “Cloud & Account” option.
-We can easily sign in with new google account to Bypass FRP on J7 Core. Let’s hit on > Accounts > Add Account > Google.
-You setup google account successfully, lets’ go back to main “Settings” screen again. From there, tap on “Apps”.
-Enable back previously disabled google apps. Hit over the “All Apps” option from top left corner, after that, go to “Disabled” option to get displayed previously disabled applications.
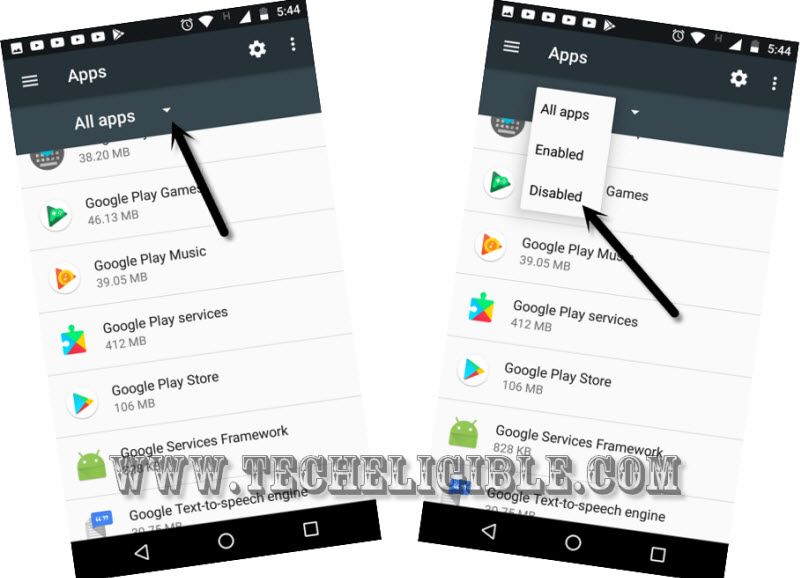
-Go to > Google Play Services > Enable.
-Go to > Google Play Store > Enable.

-Restart your device, after that, complete start up steps on your own.
-After reaching to main homes-screen of Samsung J7 Core. You might see some apps flashing on top bar menu. This is because, we installed google play services app while bypassing frp account.
-Let’s go to main “Settings” screen, from there, tap on “Apps”.
-From app list screen, find and tap on your recently installed “Google Play Services” app. After that, hit on > Uninstall > Ok.
-Its all done, you can use your device again. The frp has been bypassed successfully.
Related Posts: