FRP security lock measure works great when it comes into the protecting the phone from illegal access right after someone go for factory reset on Samsung J7 Pro to break pattern and PIN lock code. Because, this feature is already linked with the owner recently configured gmail account. That is why, while completing the startup steps, its mandatory step to login again with the same Gmail account credential that was setup earlier on this phone. If you are legitimate owner and got locked out with FRP lock protection because of forgetting the google account, you are welcome here to Unlock and Bypass FRP Samsung J7 Pro Android 9, 8, 7 versions phones.
Disclaimer: We are creating this post to educate people about how to get back their lost device due to forgetting Google account. This method is only for device owner and for educational purpose only.
Method 1: Bypass FRP Samsung J7 Pro (Android 9)
-Firstly, remove any working sim card from your phone.
-Then, turn on the device and dial the 112 emergency number by going to (Emergency Call) option. The call will not be connected due to no sim network. Only, we have to dial this number 112 to get in the recent list. After that, disconnect the call.

-Firstly, connect to WiFi network. Then, get back over the first (Lets Go) page. From there, simply, tap to “Next Arrow” option.
-From the next page, select an option “I have read and agree all of the above”. After that, go to “Next”.
-Select another option “Skip this for now”. Then, go to “Next”.
-From WiFi page, scroll down and tap on last “Add network” option.
-From the bottom keyboard popup, hit over the “Settings” gear icon.
-Then, simply, go to > Keyboard Layout and Feedback > Key-tap-feedback.
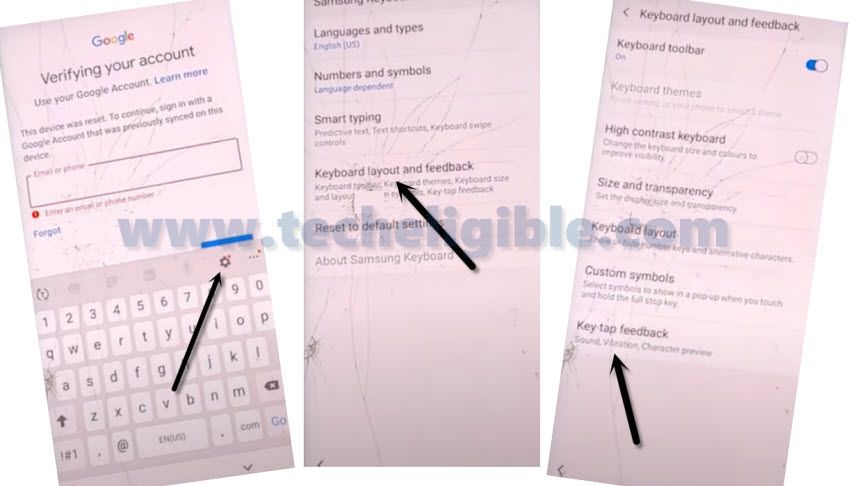
-Afterwards, hit over the blue link “Sound and Vibration”.
-Go all the down and tap over the another link “Answering and ending calls”.
Tap 2 options together
-Let’s turn on the “Answer Automatically” option.
-Then, tap on the “Answer Automatically”. You will be taken on the page of (Answer automatically).
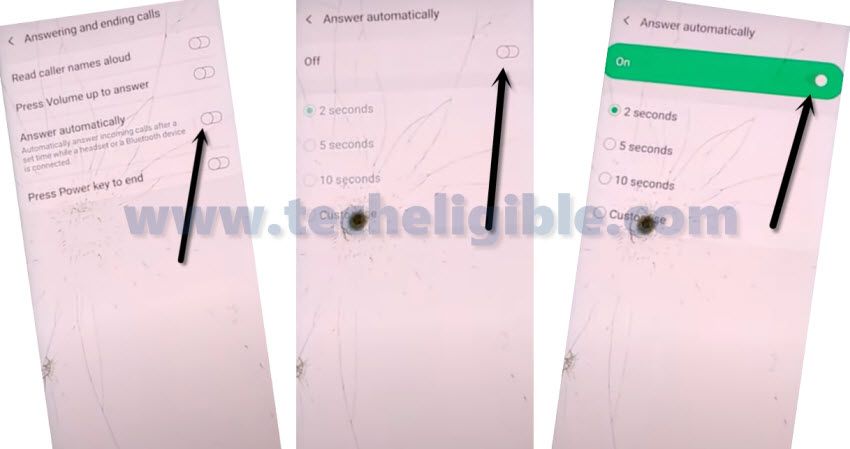
-We have to hit over the 2 options (2 seconds + Customize) option simultaneously. By tapping both options at the same time, you will see the popup window.
Note: If you did not hit both options at the same time, you will be taken to back screen, from there, tap again on > Answer and ending calls > Answer Automatically.
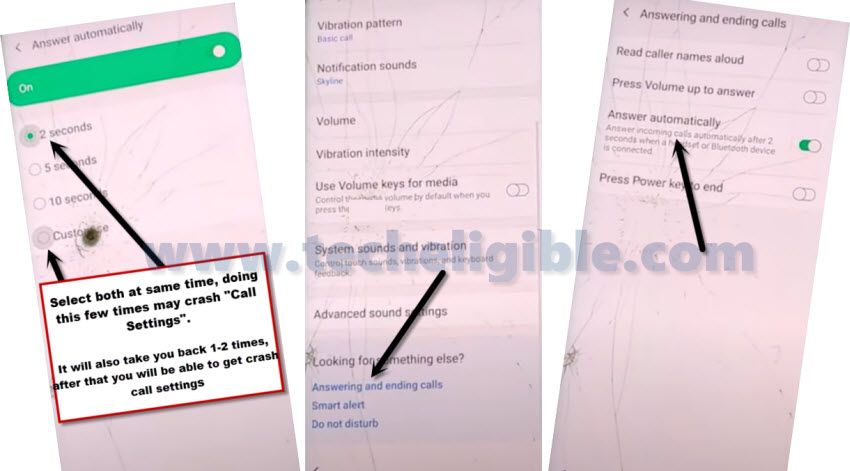
-Let’s repeat steps now, tap again any both option at the same time, yon can tap both (2 sec + 10 sec) at the very same time. If you did this perfectly, you will get a popup screen. Just, hit over the “App info” option.
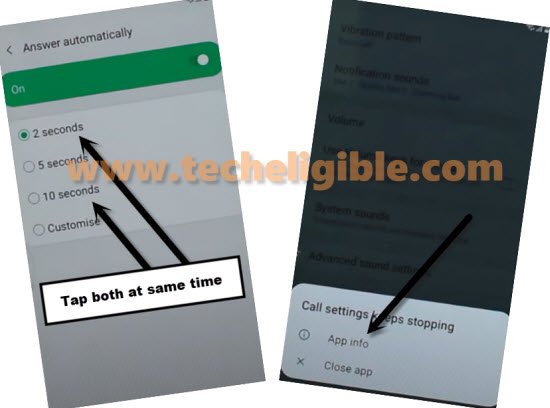
-After hitting over the (App info) option, you will reach on the phone app page. From there, go to “Settings” icon and then, hit on > Block Number > Recents. There, you will be able to see your recently dialed emergency contact.

-Let’s long hold for 3 seconds only on “Emergency number” and then, long hold on the gray color “Emergency Number” from top.
-You will reach over the emergency contact detail page, from there, hit on the “Message” icon.

-Go over the “3 dots” icon from upper right corner and then, go to “Add or remove people”.

-Type any number, such as “12345678” and then, tap to “Add” option to add this new number.
-Long hold on the gray color “12345678” number from top same as shown in below image.

Go Over the Youtube Site by Creating New Contact
-After that, tap to “Add” option from bottom and then, go to “Create contact”.

-You will be taken on the new contact saving page, just scroll down and tap to “View More”.
-Go down to see the (Web address) field tab. Type there the url (www.youtube.com) and then, tap to “Save” option.

-Let’s access to youtube webpage directly by hitting on the “World icon”.

-After accessing on the youtube page, just, open up the channel from there.
-Tap over the > 3 dots > Terms & Privacy Policy.

Note: If you get the popup window of (Update Samsung internet), just choose the option “Cancel”.
Search & Access to FRP Tools Page
-Search the “techeligible” text on top search bar and you will be displayed official techeligible searched result. Just, go to 1st searched result.
-Then, go to “Menu” option from upper corner and choose the “Download FRP Tools” option.
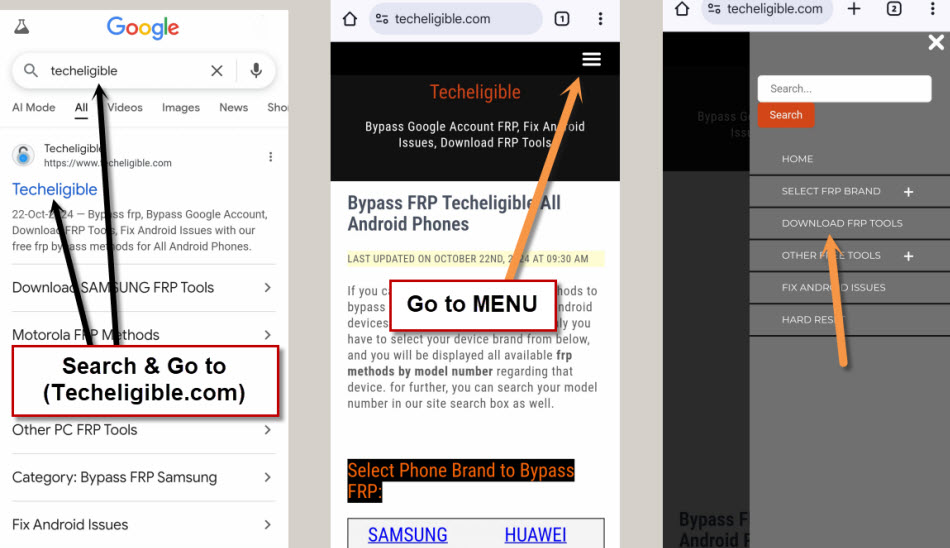
-You just scroll down and download 2 main applications
1st: Google Play Services.
2nd: Apex Launcher.
-Once its done, go to download folder to install this app. For this, just tap to “Menu” icon from bottom corner of the Samsung browser. Then, tap on “Downloads”.

-You will have both recently downloaded apps. Let’s install first app by hitting on “Google Play Services”. If you get the popup window of (Samsung internet), just tap to “Settings” and turn on the “Allow from this source”.
-Hit once on the “Back Arrow” to get back on the installation page. From there, go to > Install > Done.
-After you are done from the google play services installing process. Let’s install next app.
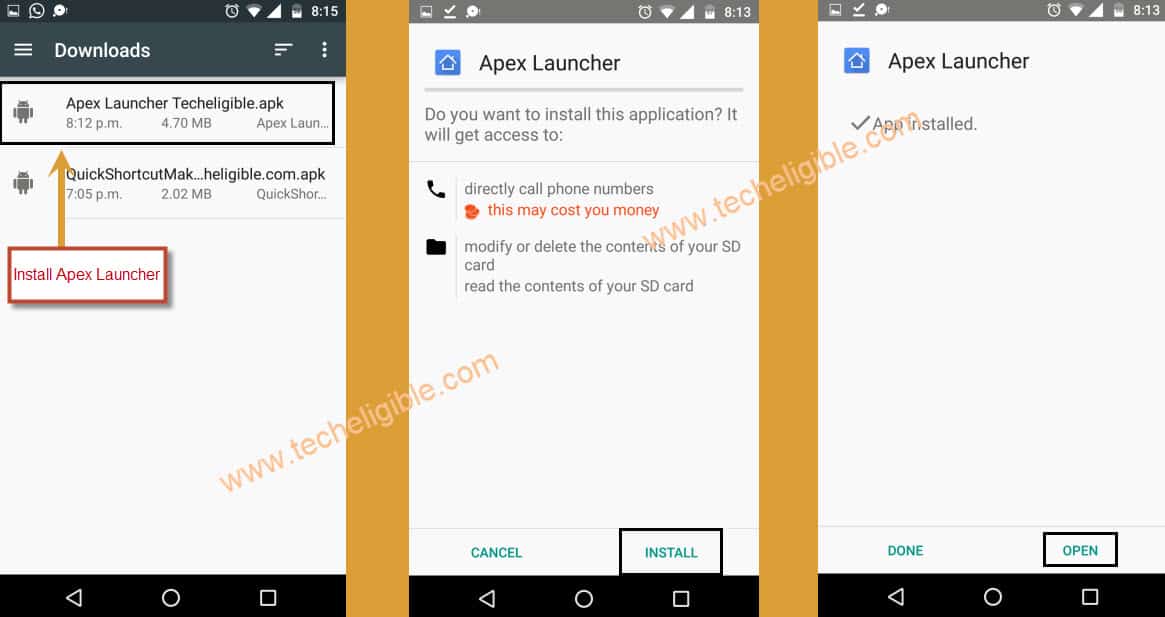
-We have to access the main home-screen of the phone. For this, just install also (Apex Launcher) app. Tap to > Apex Launcher > Next > Install > Open.
-We have to deactivate the security app from the phone main settings page. For this, firstly, open up the phone main menu.
Deactivate and Disable Apps from Settings
-Go to “Settings” option. Then, hit on > Biometrics and security > Other security settings >
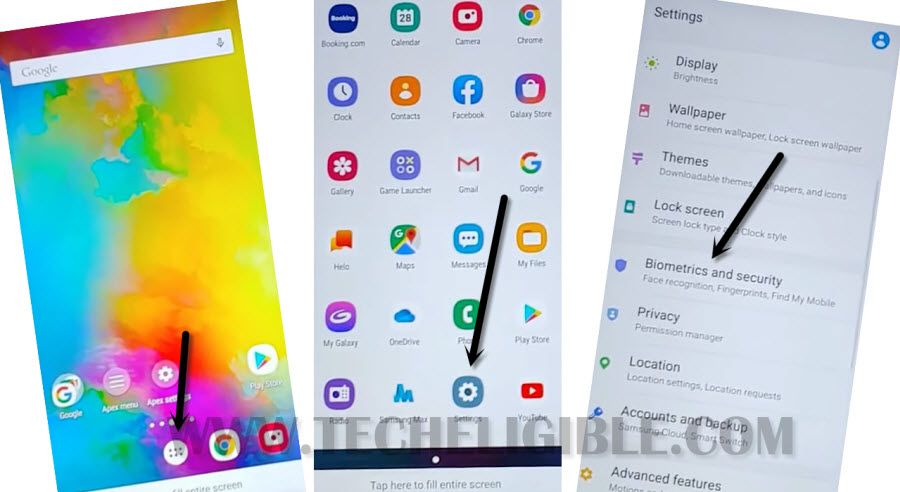
-Tap to “device admin app”.

-Finally, deactivate this application just by tapping over the “Find my device”. Then, simply, hit on “Deactivate” option. This will allow you to install other apps manually.

-Let’s get back on the main home-screen. From there, hit on the “Apps”.

-Find and tap over the “Google Play Services” app. Then, simply, disable this app by hitting on > Disable > Disable.

-We can setup another google account on this phone now. For that, go back on the primary main settings page of this phone.
Add an Account
-Then, hit on the “Clouds & Account” option.
-Afterwards, tap over the > Accounts > Add Accounts.

-To setup the google account, just tap over the > Google > Login there with your any valid Gmail account.

-We have to enable back the google play services app. For that, get back to main settings page. Just, tap over the “Apps”.
-Go to > Google Play Services > Enable.
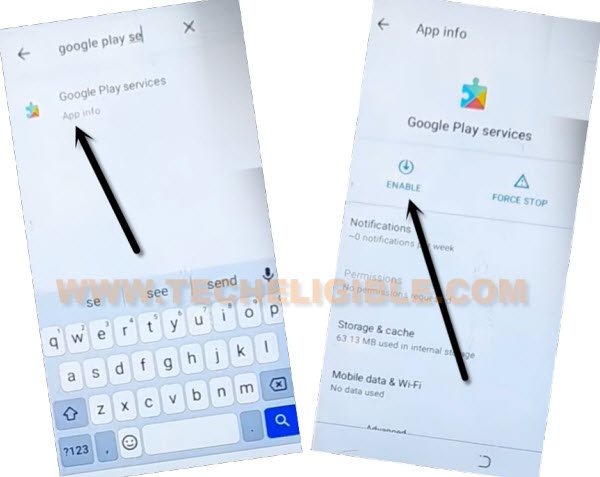
-After the logged in process is done, just restart your phone now.
Method 2: Bypass FRP Samsung J7 Pro (Android 8)
-Start the method by switching on the phone.
-Connect to WiFi network. After that, put your phone back on the first startup page. From there, long hold with 2 fingers together until you see the next page of (Talkback Tutorial).

-Lets swipe down to right with your finger and then, double hit on “Talkback Settings” option.

-Turn on the “Single Tap activation” option by double tap on it.

-After that, make (L) shape again by by swipe down to swipe right. From the popup window, double tap to “Text-to-Speech Settings”.
-Then, double tap to “Settings” icons.

Launch Samsung internet browser
-After that, double tap to “Version” number to lead to the legal information page.
-Then, tap 3 times quickly the “Home Button”, this will disable the talkback function.
-Let’s check mark the (i have read and agree…..) option, then, go to “Start”.

-You will access on the (Samsung TTS) page, from there, hit on the “Search” icon from the upper corner, type there “Samsung Internet browser”.
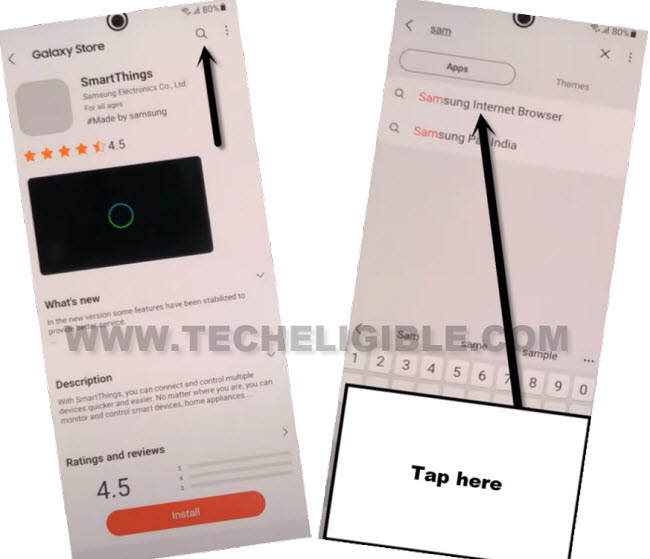
-Then, from the searched result, click to “Download” icon from the Samsung internet browser and then, hit on “Update” button.
-Once the updating process is finished, just tap over the > Open > Continue.
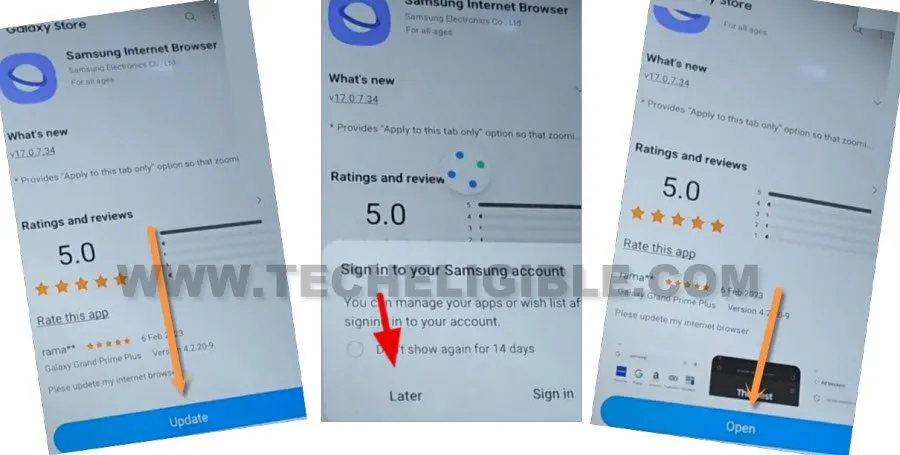
-Afterwards, you will be taken on the (Google) screen.
Download FRP Apps
-Search there with “Techeligible” and visit the first searched result of the techeligible official site.
-From there, you have to go to “Menu” icon from upper corner. Then, hit on the “Download FRP Tools”.
-We have reach on the primary settings page of this phone directly. For this, you only have tap once on the “Access device settings” option.
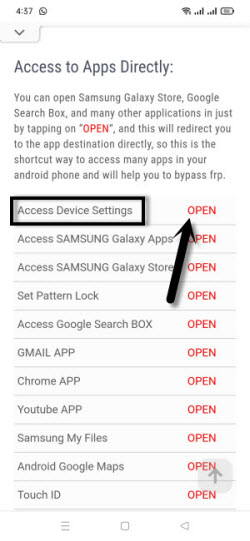
Access to Security Options from Settings
-Now, go to > Biometrics and security > Other security settings.

-Finally, hit over the “Device Admin apps” option.
-Go over the “Find my device” and hit on “Deactivate” option to disable this app.
-Let’s get back over the main settings page. From there,
-Then, hit on the “Apps”.
-Find and tap to > Google Play Services > Disable > Disable.
-By tapping on back arrow icon, just get back on the official frp tools page. From there, download the “Google Play Services” app.
-Then, tap on “MENU” icon from bottom right corner and hit on “Downloads”.
-There, you will be able to see your downloaded app. Let’s install app now by hitting on > Google Play Services > Install > Done.
-Tap one to two times on back arrow again to get back on (FRP Tools) screen. From there, simply, hit again on “Access device settings” option.
Login another Google Account
-Afterwards, go to > Clouds and accounts > Accounts > Add accounts.
-Choose the “Google” app. Then, you will be taken on the google sign in screen.
-Simply sign in with your Gmail account there.
-Once the account is added successfully, just, go back on primary settings page by tapping 1-2 times on back arrow option.
-Afterwards, tap on the “Apps” again.
-Find and go to “Google Play Services” app. Just enable this app by hitting on “Enable” button.
-We have to finish up the setup wizard steps. Just, go back on main (Start) page. From there, tap on > Next Arrow > Next.

-Let’s check mark “I have read and agree” option and then, go to “Next”.
-On next page, you will see the (Account is added). From there, simply, tap on the “Next” option.
-Complete all the remaining steps on your own.
Method 3: Unlock FRP Samsung J7 Pro (Android 7) By PC
If you have performed factory reset on your J7 Pro phone without knowing the logged in google account. In this condition, you wont be able to use your phone back whether you are legitimate device owner. To get out of this frustrated situation, you will need to flash J7 Pro android 7 with Firmware & Combination ROM using Odin PC tool. All steps are cleared defined here. Follow up to bypass frp now.
Download Tools List:
-Let’s download below list of tools on your PC by clicking here.
1. Samsung USB Driver.
2. ODIN Software.
3. STOCK ROM.
4.COMBINATION ROM.
-After downloading the all the above tools on PC. Let’s continue flashing process. Firstly, extract “Samsung USB Driver” and “Install” on your PC Windows.
-Switch off “Samsung J7 Pro” device.
-Put your device into download mode by, Press & Hold “Power Key + Home Key + Volume Down” until you see “Warning” screen in your device.
-Press “Volume Up” key to go into download mode.
Flash the Phone with Combination ROM:
| Note: Flashing process is required full attention, if you downloaded and flashed your phone with incorrect firmware, then, your Samsung J7 Pro phone can lead to bricked or stuck on logo. |
-Extract Downloaded “Samsung USB Driver” and “Install” in your computer.
-Extract Downloaded “Combination ROM & STOCK ROM” as well.
-Open “Odin Software”.
-Tap on “AP” from Odin, and give path of downloaded “COMBINATION ROM”.
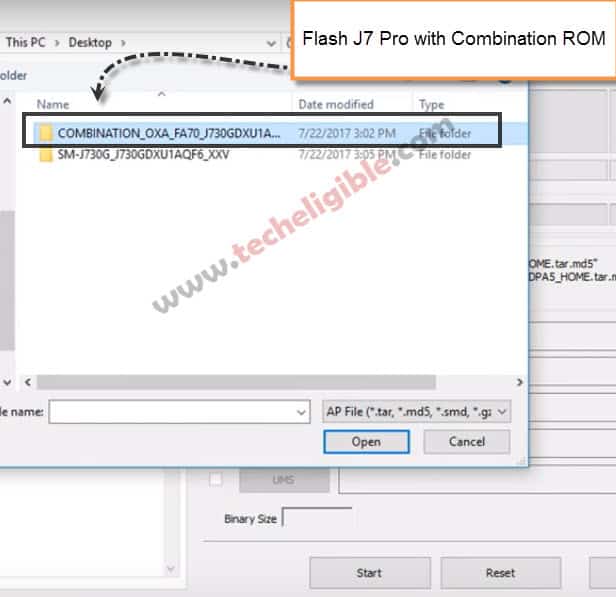
-Connect the phone to COMPUTER or LAPTOP via “Micro USB Cable”.
-After connecting to pc successfully you will see “ID:COM” is blue means your device connected to Odin.
-After giving file location of “Combination ROM” in “AP”, just click on “START” button to start flashing.
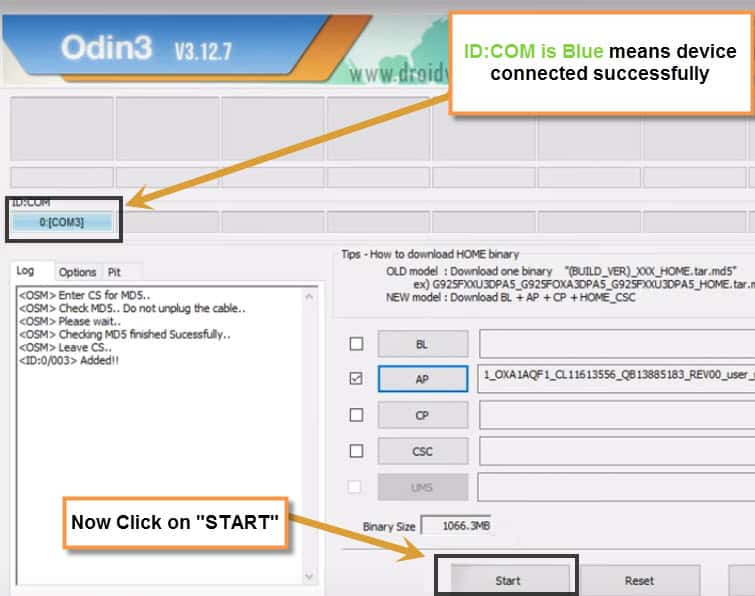
-After flashing done, you will get a green sign of “PASS!” in Odin.
-Now J7 Pro will auto restart to “Factory Binary” screen, now disconnect your device from computer.
-Tap on “MENU”, After that tap on “Settings”.
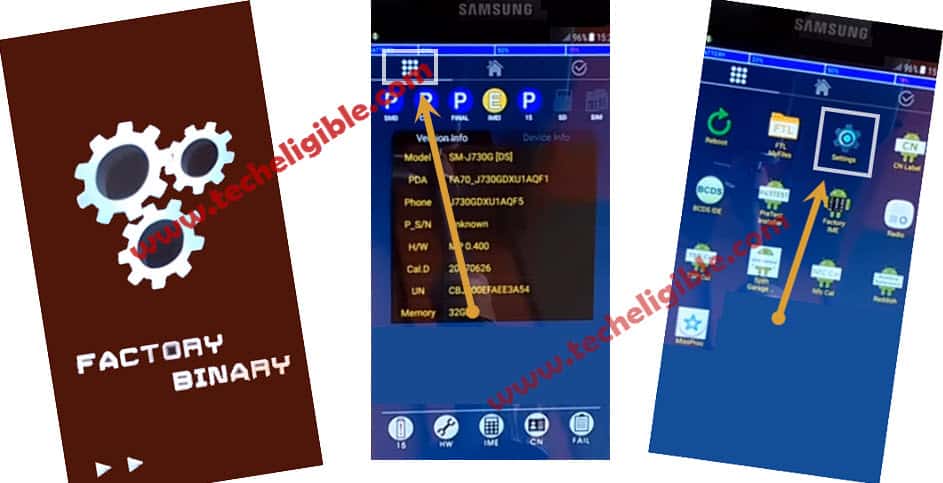
Enable USB Debugging:
-Go to “Developer Options” and then make sure “USB Debugging” is enabled there.
Note: If “Developer Options” is not listed, then tap on “About Phone”, after that tap on “Software Info” and then tap 5-6 times quickly on “Build Number” to enable “Developer Mode” in your device. After that go to “Developer Option” and make sure “USB Debugging” is enabled there.
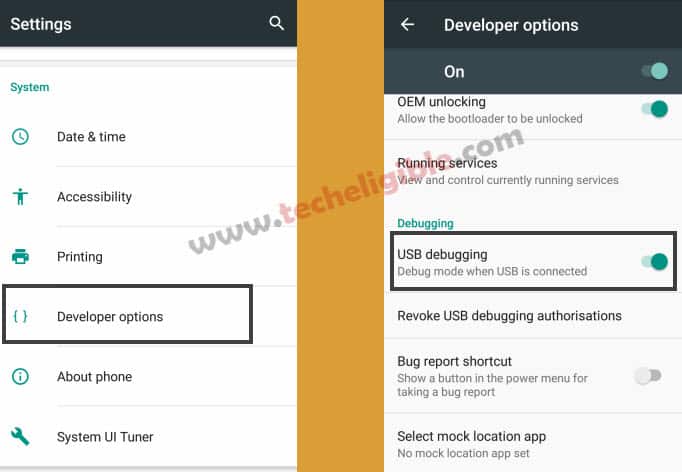
-Reboot device into download mode again.
-Switch off your device again.
-Press & Hold “Power Key + Home Key + Volume Down” until you see “Download” screen in your device.
-Press “Volume Up” key to go into download mode.
Flash the Phone with Stock Firmware:
-Open “Odin Software”, and then give path in odin “BL” of “BL” file from download “STOCK ROM” folder.
-Give path in Odin “AP” of “AP” file from download “STOCK ROM” folder.
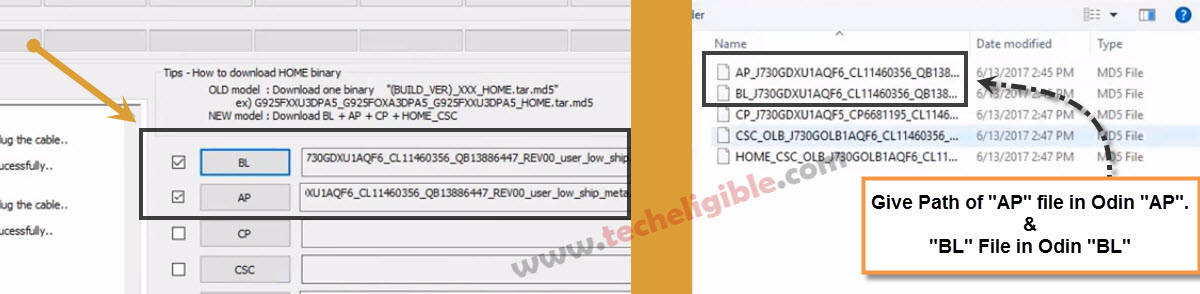
-Give path of in “Odin CSC” of “HOME CSC” file from stock rom folder as well.
| Remember: Give path of “HOME CSC” file in “CSC Odin“. and Leave blank “CP & UMS” in Odin. (See Below Images) |

-Make sure you have given right file location in “BL, AP, CSC”.
-Connect the phone again to computer/laptop.
-Click on “START” button from Odin software to start flashing and bypassing Samsung J7 Pro FRP lock protection.

-After successfully flashing j7 pro device, you will get sign of “PASS!” in Odin software.
-Disconnect the device from computer. Its all done now from frp bypass process, you can complete your setup wizard steps easily.
Disable FRP Lock Before Selling the Phone
Disabling FRP locking protection is quite easy on Samsung J7 Pro phone. You only have to remove your synchronized google account from settings. If your device is not locked out with FRP locked protection and you are inside the main home-screen of your phone. Then, simply, go to > Settings > Clouds & Accounts > Accounts > Google. Choose your account and remove it. Do make sure, there is no google account signed in. You will have to remove all signed in account in order to disabling frp lock protection.
Its your duty to logout your all account before selling or gifting the phone to someone. So that, other person can setup another gmail account and new frp lock protection.
Conclusion
In method 1: We dialed an emergency number and disconnected the call. After that, we accessed over the youtube webpage from there, we just launched techeligible site frp tools page, then, downloaded and installed frp apps. After that, we deactivated the (Device admin apps) and installed the google play services app manually. Then, we just logged in another google account.
In method 2: In guide, we enabled talkback through long holding with 2 fingers together on the main home (Start) page. Then, managed accessing on the frp tools screen and downloaded (Google Play Services) app. After that, we installed this app and setup google account.
In method 3: We followed up flashing steps on Samsung J7 Pro phone to bypass the frp lock after forgetting the linked google account. We just downloaded (Odin Tool + Stock ROM + Combination ROM). After that, connected our phone with PC and put our J7 pro phone into the downloading mode. After that, flashed with downloaded ROM using Odin tool.
FAQs
When i should disable FRP from my J7 Pro?
Before selling your Samsung j7 pro to someone, its your ethical act to remove your logged in google account, so that, other person may not face the FRP lock protection right after performing the factory reset.
How to remove google account on J7 pro?
You just go to > Settings > Clouds & Account > Account > Google. Remove the account easily from there.
Is this legal bypassing the FRP lock?
Yeah, if you are legit owner of your Phone or with permission of the device, you can perform frp unlock steps from here.