
Here, we will go over two ways to get around FRP on the Sony Xperia Pro-I (Android 13 and Android 12) without using any commercial services. You can resolve your device’s reaching problem by yourself.
However, one of the best features for protecting a user’s data from unwanted access is Factory Reset Protection (FRP). However, if you go for a hard reset your device, this becomes a nuisance when you lose your own Google account. Let us examine both approaches to Bypass FRP Sony Xperia Pro-I.
| ⇒ Method 1: Bypass FRP Sony Xperia Pro-I [Android 13] |
| ⇒ Method 2: Bypass FRP Sony Xperia Pro-I [Android 12] |
Method 1: Bypass FRP Sony Xperia Pro-I [Android 13]
-First, connect to WiFi and insert your SIM card into your device.
-Return to the first startup screen, sometimes known as the “Welcome” screen, after establishing a successful WiFi connection.
-From there, let us dial 112 or any other emergency number. If the (exclamation) error symbol appears up on the calling screen. Then, cut off the call.
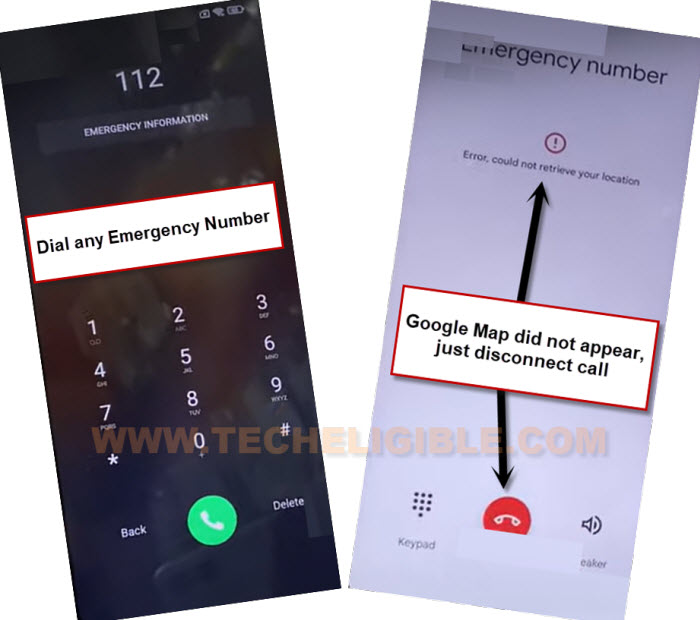
-We ended the call because there was no Google map visible up there. This dialing and disconnecting process must be repeated until we see the Google Map.
-Keep repeating 112 or any other emergency number until you see a Google Map. Tap over the (Google Map) fast after that.
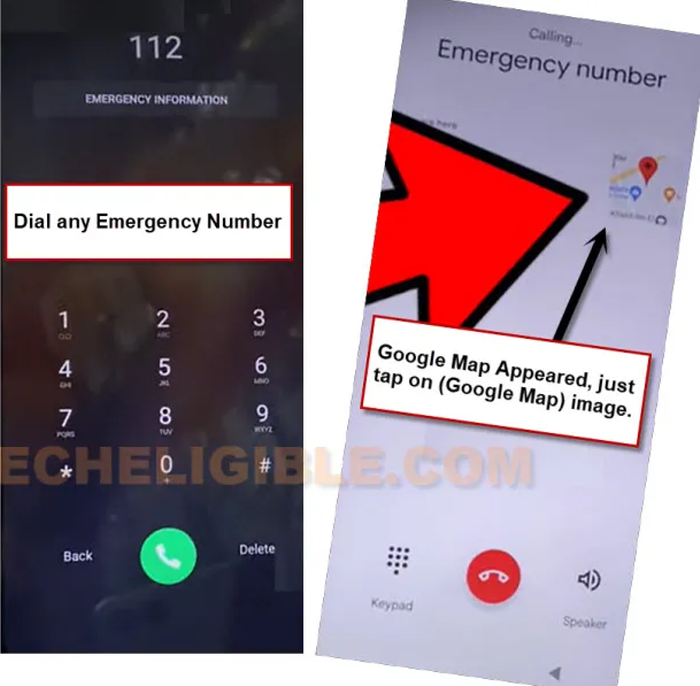
-Simply press “Skip” in the upper corner of the Google map page. Next, discontinue your call to the emergency number by taking out your SIM card from Sony Xperia device.

-Looking for the “Restaurant” from top search bar, select the “Call” option from the search result to access the calling screen.

-You have to put your SIM card back into your Sony device.

-Tapping to “3 dots” and selecting “Add wait” is the next step.
-To access the text message screen, touch “Send a message” at the end.

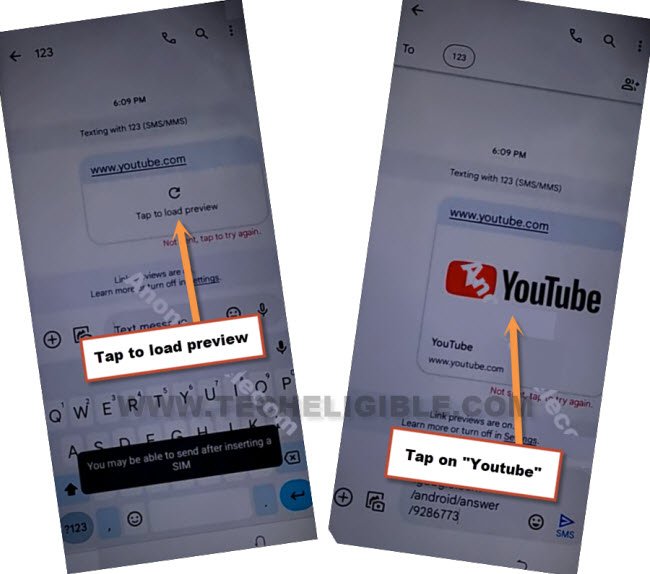
-We must SMS the URL of www.youtube.com to any random number. To view your url preview once the URL has been transformed to a hyperlink, simply select the “Tap to load preview” option from the URL.
-From there, select the “Youtube” image to bypass the FRP Sony Xperia Pro-I and access the official YouTube website.
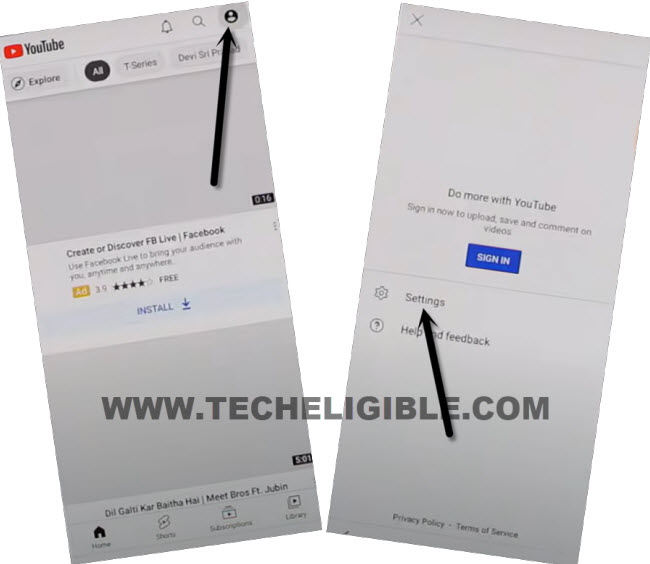
-You must go to a “Human” circle icon in the top corner. You then need to select the “Settings” option.
-Go to > History and Privacy > Youtube terms of service. After that, google chrome browser will be opened. Simply, go to > Accept & Continue > No Thanks.
Go to the Pattern Lock Configuration Page:
-Use Google Chrome to search for “Techeligible” text. access to the official Techeligible website after that.
-Let us select “Download FRP Tools” from the “Menu”.

-You are supposed to tap on a “Set Pattern Lock” option. This will take you to a screen where you may set up a security lock.

-Go to the “Pattern” option on this device to set up your new pattern.
-Draw any pattern you like, then select “Next”.
-Click “Confirm” after drawing the same pattern lock.
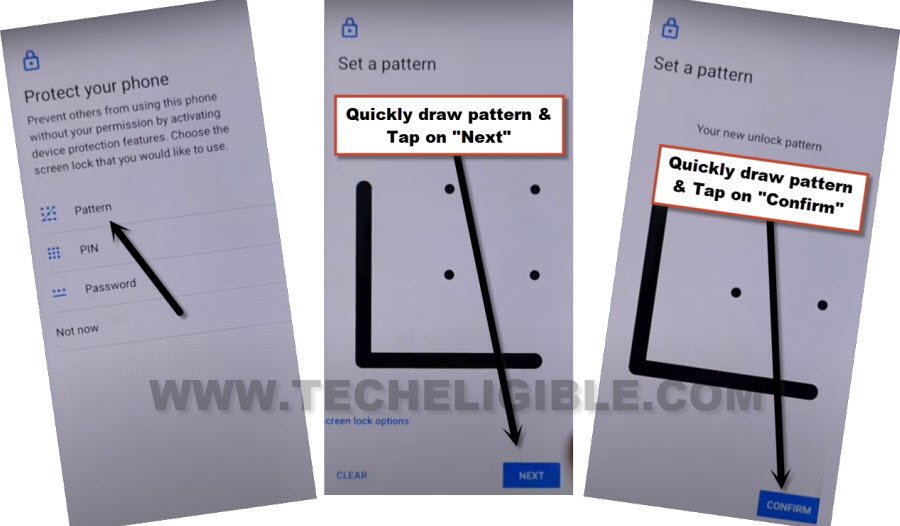
-Your pattern might not be accepted on the first try. You will either see a blank screen or be taken back to the FRP tools panel.
Repeat Quickly: Tap “Pattern” once more. Follow the image below to rapidly set up the pattern you want. Keep trying to seutp pattern lock very quickly until you see next screen (Keep your device unlocked while its on you).
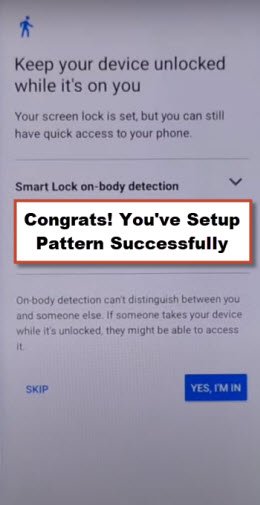
-When your Sony Xperia device accepts your pattern after 5-10 tries, you will see the screen that says “Keep your device unlocked while it is on you,” as seen in the image below. This indicates that the pattern has been successfully adopted.
-By tapping on back arrow several times, just reach back to first (Welcome) page. After that, tap to > Get Started > Accept from there.
-After 30 seconds wait, just remove your SIM card and restart your device to Bypass FRP Sony Xperia Pro-I.

-Once you have back your welcome page, just tap again on “Get Started” option. After that, hit on a “Accept”.
-Keep waiting over the loading screen until its done. After that, you will be taken to the (Connect to Mobile Network) page. Just go to > Skip > Accept > Don’t Copy.
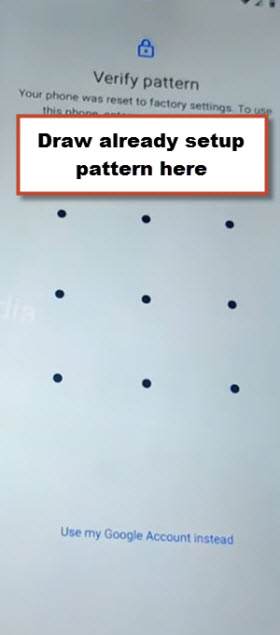
-Draw your recently configured pattern lock over there to complete your device verification process.
-From google verification page. Hit on a > Skip > Skip.
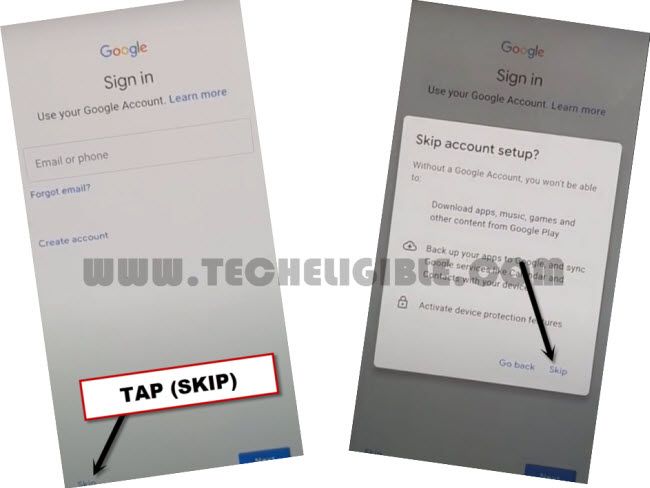
-You are done from Bypassing FRP Account on Sony Xperia Pro-I. Other all remaining steps can be done easily without any further guideline. If you have a Sony Xperia Android 12 version device, for that, follow up below method.
Method 2: Bypass Google Account Sony Xperia Pro-I [Android 12]
This process is for all those, who have forgotten their own previously signed in google account, they can easily Bypass FRP Sony Xperia Pro-I (Android 12) without using computer and any frp tools, just reach to our (FRP Tools) page using talkback function. After that, reach inside your device (Settings) directly to bypass frp completely, follow all steps from below.
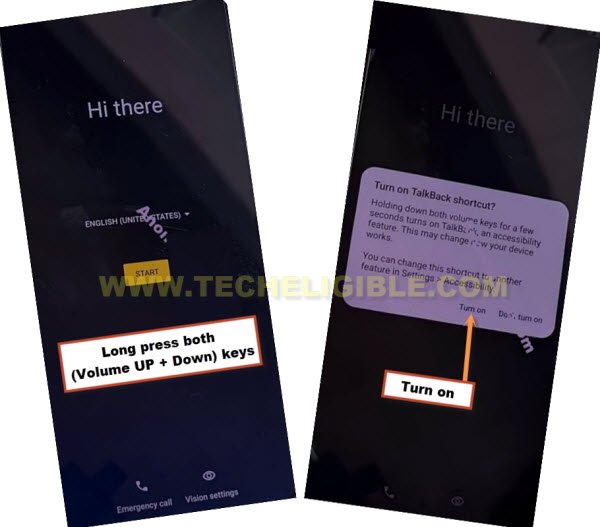
-Switch on device & Connect WiFi & Go back to (Hi there) homepage again, from there long hold both (Volume UP + Down) buttons at the same time, and hit on “Turn on” option.
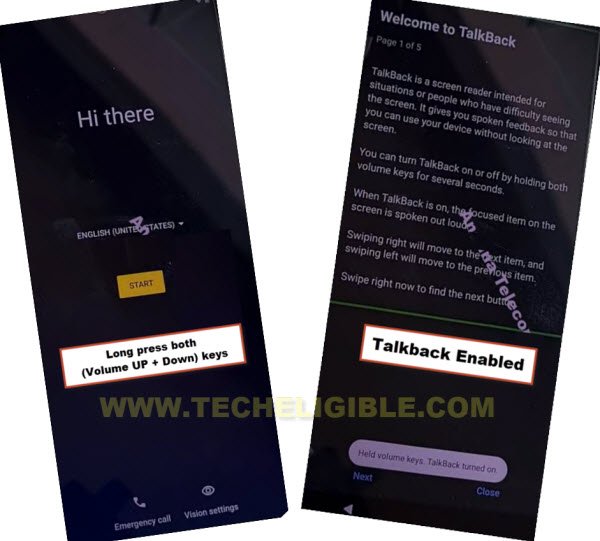
-Hold again both (Volume UP + Down) at same time, this will now redirect you to (Welcome to talkback) screen.
-On a talkback screen, just make a reverse “L” shape by swipe right and then swipe up, now double tap > While using the app > Use Voice Command.
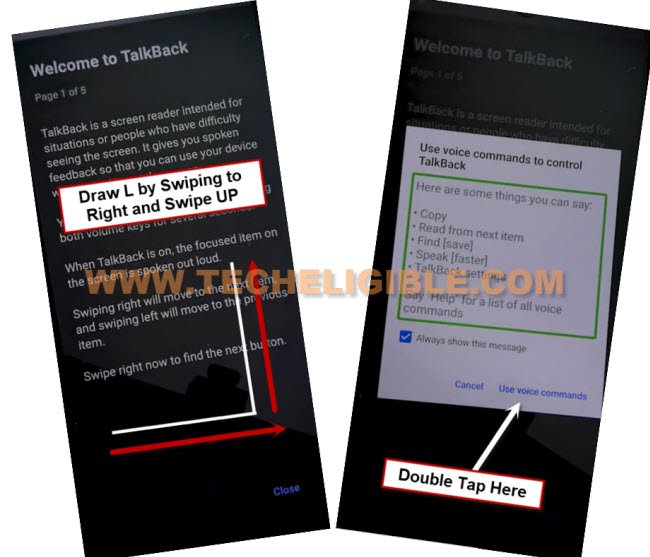
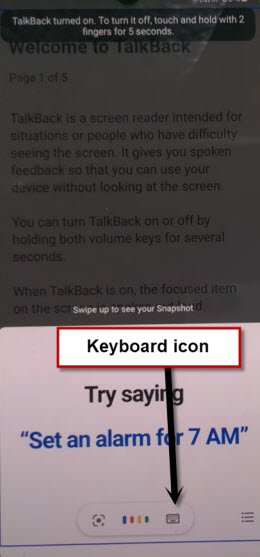
-You must see a green boarder around the screen corner, once you see this, speak loudly “Open Google Assistant”, this will show you new (Try Saying) popup window, from that window, double tap to “Keyboard” icon.
-Let’s just turn off talkback by press both (Volume UP + Down) keys at the same time, and search and open “Youtube” official website.
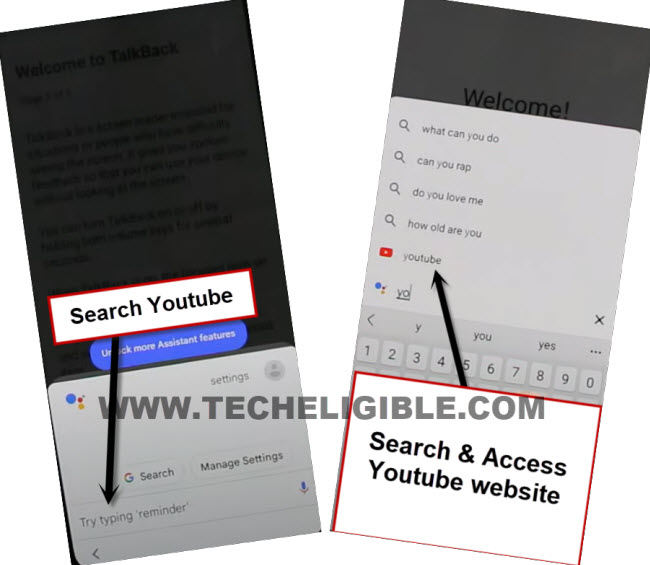
-After reaching inside Youtube official website, just tap “Profile icon” from top corner, and go to “Settings”.
-Go to > About > Youtube terms of service.
-After reaching chrome browser, tap to > Accept & Continue > Next > No Thanks.
Go to Device Settings Directly:
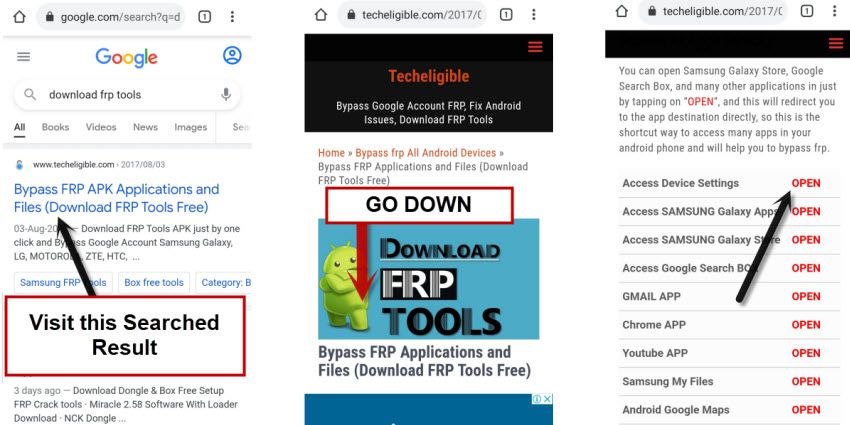
-You are supposed to search in browser “Techeligible“. After that, tap to 1st searched result from there to reach to techeligile site.
-After accessing to official site, from there, go to “Menu’ icon from top corner and then, tap to “Download FRP Tools” option. This will take you to the main frp tools page.
-From our website page, go down and tap on “Access Device Settings” option same as shown in below image.
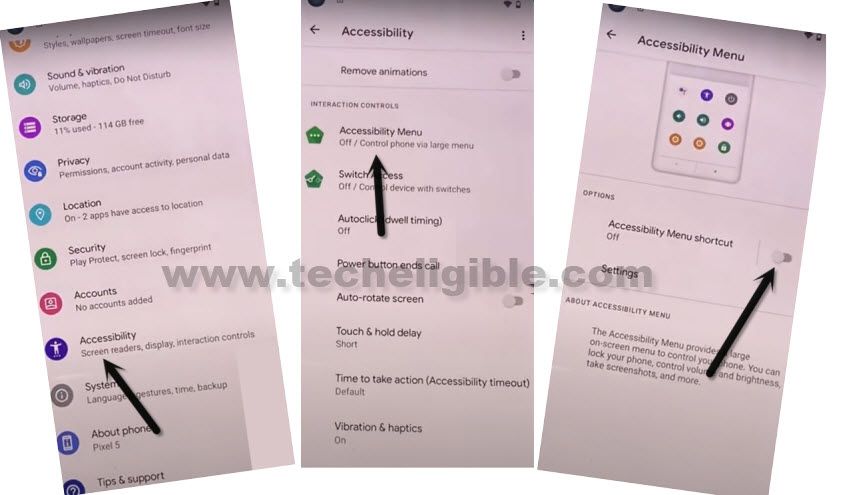
-Now we have to turn on shortcut menu just by going inside > Accessibility > Accessibility Menu > Turn on.
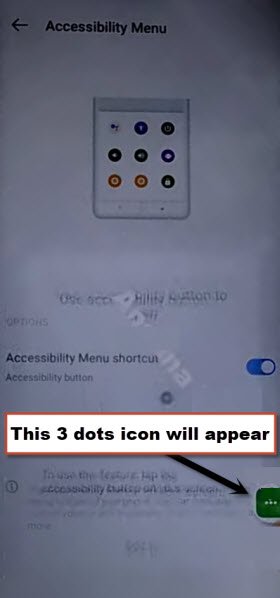
-Right after turning on (Accessibility Shortcut), the 3 dots icon will just start appearing at the bottom of your screen.
-We have to get back to “Settings”, from there tap on “Apps”, and then go to “All App”.
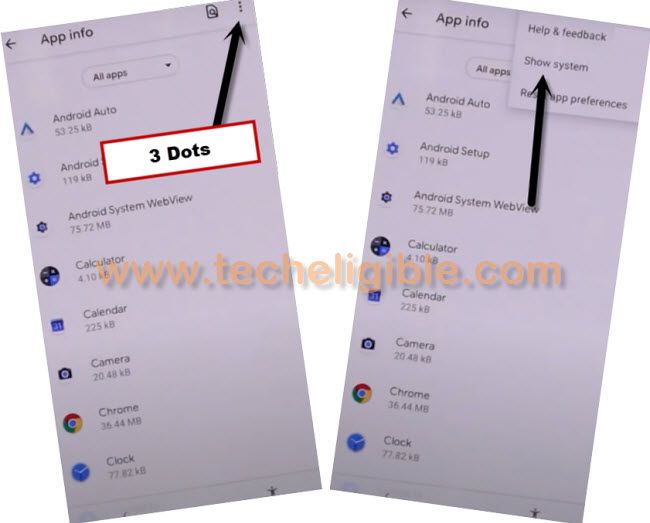
-Tap to “3 dots” from top corner and go to “Show system” same as displayed in below snap.
Force Stop & Disable Applications:
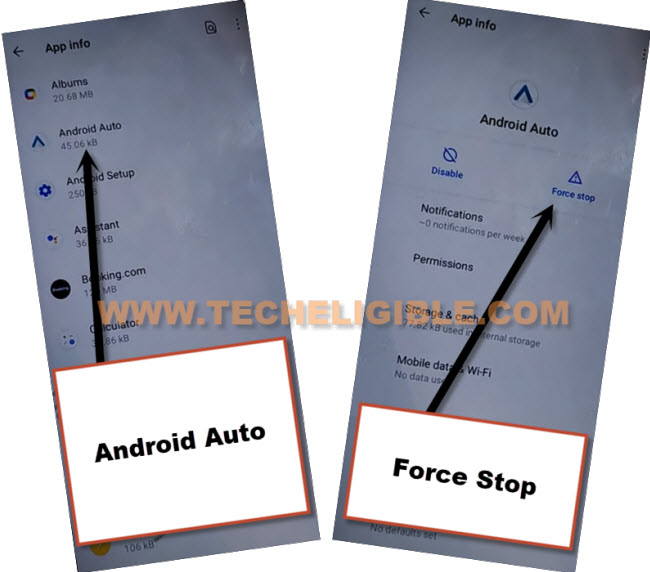
-From big app list, just find and hit on > Android Auto > Force Stop > OK.
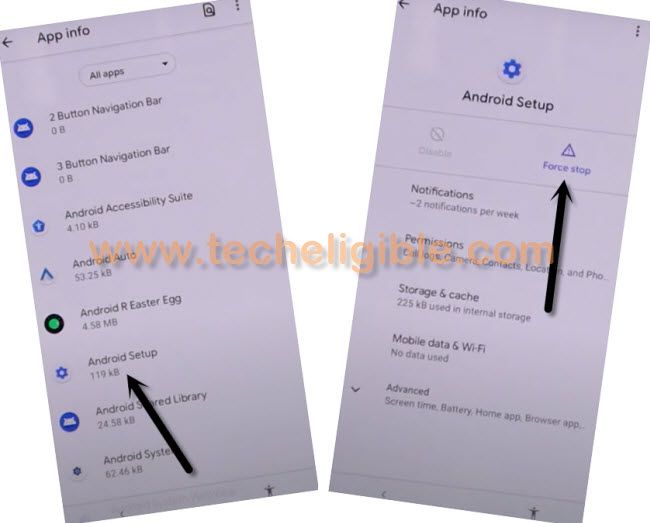
–Find and tap to “Android Setup” same as shown in below image, so just tap to > Force Stop > OK.
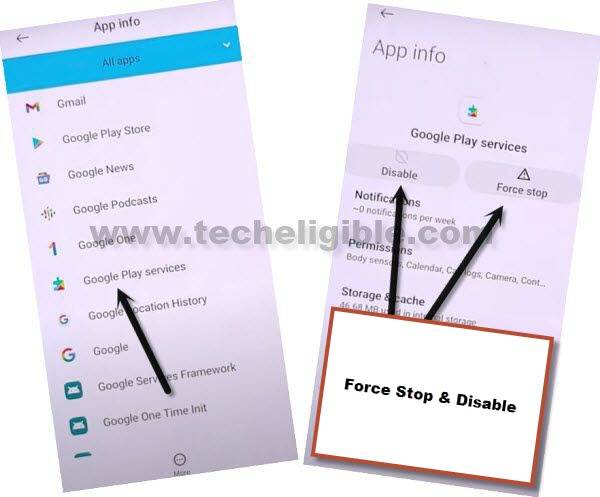
-We have to disable one main application, after that you will be able to easily finish setup wizard without signing with any google account, find and tap to > Google Play Services > Force Stop > OK, now hit on > Disable > Disable App.
-Go all the way back to first (Welcome) homescreen by tapping over back arrow from your device to Bypass FRP Sony Xperia Pro-I.
-Hit on > Get Started > Accept > WiFi only > Skip.
-Wait over the loading screen (Just a few moments), once this is done, hit on “Don’t Copy”.
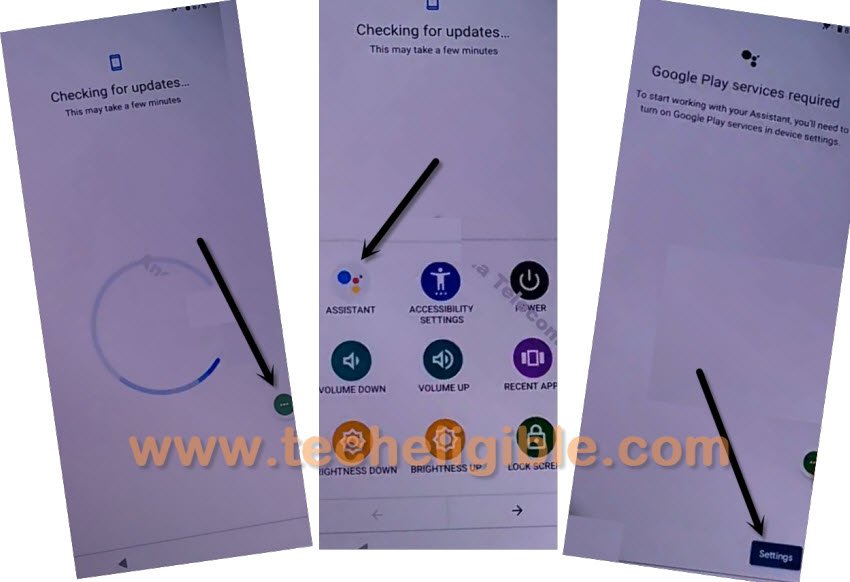
-After that, you will see there another loading screen (Checking for updates..), this will not finish until we turn on back the “Google Play Services”, to do this, we don’t need to go all the way back, we will use here a (Shortcut Menu Button), the 3 dots icon appearing at the bottom right corner of your screen.
Enable Google Play Services App:
-In regards to turning on that google app successfully, we will have to quickly and repeatedly trying below 3 steps very fast as much as possible, otherwise you won’t be able to reach (Google Play Services) app, you may have to try below steps for almost 10-15 times or may be more, the more you will repeat, the more perfection will come and the more fast you will be able to do this.
Note: What would happen actually here, sometimes, you will miss “Settings”, so you have to hit 3 dots icon again and repeat all 3 steps, sometimes, you will not see “Settings” option, but keep trying, if you hit on “Settings” option successfully, the next screen would be of turning on (Google Play Services) app.
3 Steps to Do Very Fast ⇒ : Tap to > 3 dots icon > Assistant > Settings.
-Once you see same below screen right after hitting on “Settings” option successfully, just tap to “Enable” button from google play services screen.
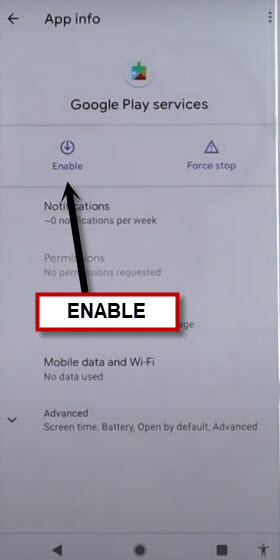
-After that, tap to “Back Arrow” 2 times, and finish all steps on your own easily without having any google verification screen, this is how, you can easily Bypass FRP Sony Xperia Pro-I (Android 12), thanks for visiting us.
Read More: