
ASUS Zenfone 3 Max Bypass Google Verification and FRP Android 7.1.1
ASUS Zenfone 3 Max Bypass Google Verification on Android 7.1.1 device, we will download only 2 software in our computer/laptop, and after that we will remove frp through that, no need to download any type of apk file in Asus Zenfone 3 max device.
Note: This method is successfully tested with Asus Zenfone 3 Max (ZC553KL | ZC520TL), Android 7.1.1, Android Security Patch level June 1 2017.
This Method would also work for: ASUS ZENFONE 4 MAX, Android 7.1.1
we have to download 2 files in computer or laptop for ASUS Zenfone 3 Max Bypass Google Verification.
Download FRP Tools in your Desktop/Laptop from Below:
Remove ASUS FRPIntel Driver Setup
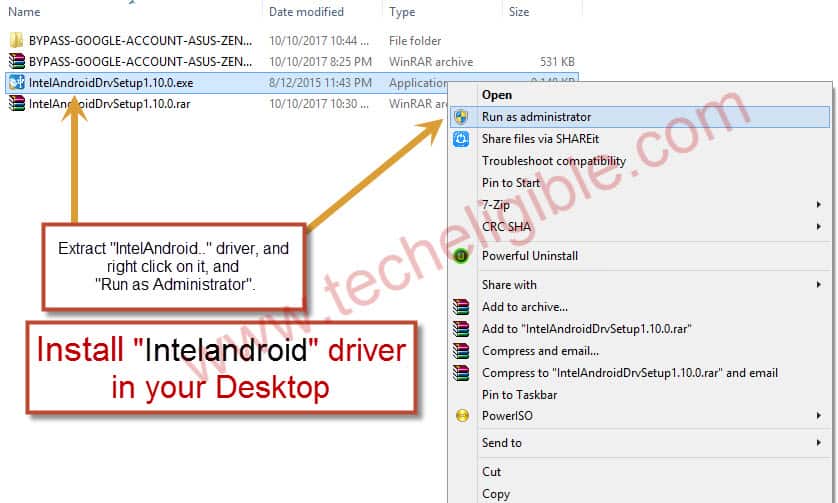
Extract Both Files & Install Intel Driver:
1. Once downloading finish, extract both files from winrar archive.
2. Install Intel Driver Setup in your Desktop, Right Click on “Intel Driver…exe” and Run as administrator, and then install it.
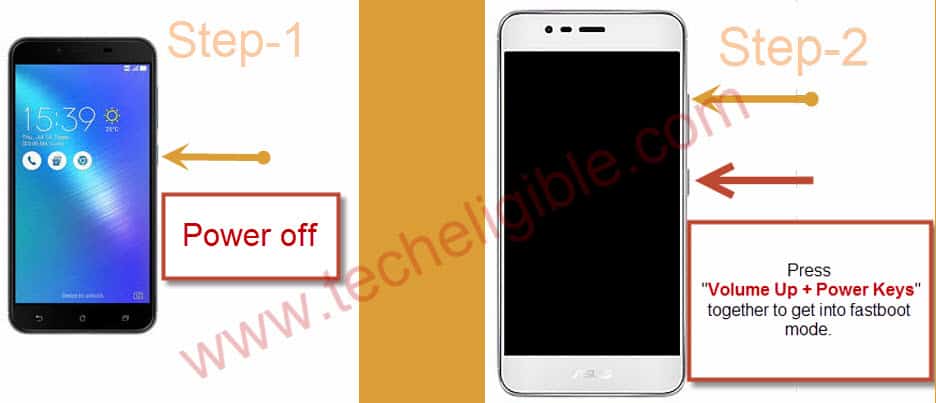
Reboot Asus Zenfone Max 3 to Fastboot Mode:
• Power Off by pressing “Power Key“, and then tap on “Power Off“.
• Now Power On device to fastboot mode by pressing “Volume Up + Power Key” together for 5-7 sec at least.
Connect ASUS Device to Computer Via Micro USB Cable:
• Take a “Micro USB Cable” and connect your ASUS device to computer.

See in below image, you will be able to see your connected device in “Portable Devices” or in “Ports COM/LPT“.

Let’s Start ASUS Zenfone 3 Max Bypass Google Verification:
Step-1: Make Sure ASUS Zenfone 3 Max Successfully connected to PC.
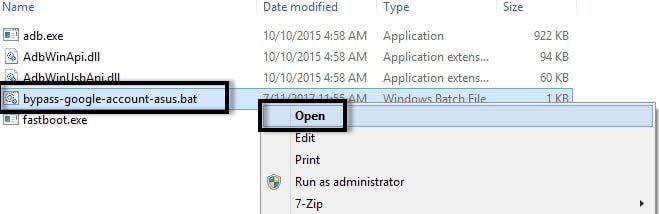
Step-2: Go to Extracted folder of “Bypass Google Account ASUS” which you have already downloaded and extracted.
Step 3: Now Right Click on “Bypass-Google-Account-ASUS.bat” and then click on “OPEN”.
Step4: Command Prompt window will appear, and then “Press Any Key” from your Keyboard to Bypass FRP.

Note: Make sure, your device is in “FASTBOOT MODE” and it’s connected to “Computer”.
• Now ASUS Zenfone 3 Max will auto restart.

Congrats you have successfully done ASUS Zenfone 3 Max Bypass Google Verification.
Complete Initial Setup for ASUS Zenfone 3 Max Bypass Google Verification:
– Now tap on > Next > Next > Next > Next > Swipe Up > Next > Agree > Setup as new > Skip > Skip > Next > Swipe Up > Next > No Thanks > Next > Skip Anyway > Next > Next > Swipe Up > Next > Next > Done > Continue > Next > Next > Next > Finish.
You have successfully finished initial setup on your ASUS ZENFONE 3 Max device.
Add Account to Finish ASUS Zenfone 3 Max Bypass Google Verification:
⇒ Go to “App”.
⇒ Then tap on “Settings”.
⇒ After that, tap on “Accounts”, and then tap on “Add Account”.
If this method of “ASUS Zenfone 3 Max Bypass Google Verification” really helped you, say thanks in comment box, or if you are facing any issue while following this method, share your problem with us in comment box.
NOTE: If this post really helped, and you have solved your issue successfully, so you can Buy Me A Coffee
[widgets_on_pages id=”Buy Me a Coffee”]