
2 Method to Bypass FRP All ASUS Zenfone Android 8, Android 6
We are gonna share with top best 2 methods to Bypass FRP All ASUS Zenfone Android 8, Android 6, these are all in one method, there is no model specific method, if you have ASUS device with Android 8 or Android 6, so you are welcome to apply these below method to bypass frp successfully.
Warning: Do not try this frp method on a stolen phone, this is a serious crime, if you are trying to bypass frp on a stolen phone, you may also be jailed, this process is for device owner and for educational purpose only.
| Method 1: Bypass Google FRP ASUS Android 6 |
| Method 2: Bypass Google FRP ASUS Android 8 |
Method 1: Bypass FRP All ASUS Zenfone Android 8
This is the best working method to Bypass FRP All ASUS Zenfone Android 8, there is a best trick, through that you can easily bypass google account, and can add new one, to complete this method, you are required another non frp locked android device, and a SD Card, because we will download 2 frp bypass apps in SD Card through other android device, and later on will insert SD Card in FRP locked ASUS device.
Note: This method is only for device owner and for educational purpose only.
Let’s Start to Bypass FRP:
-First of all turn on device & Connect WiFi.
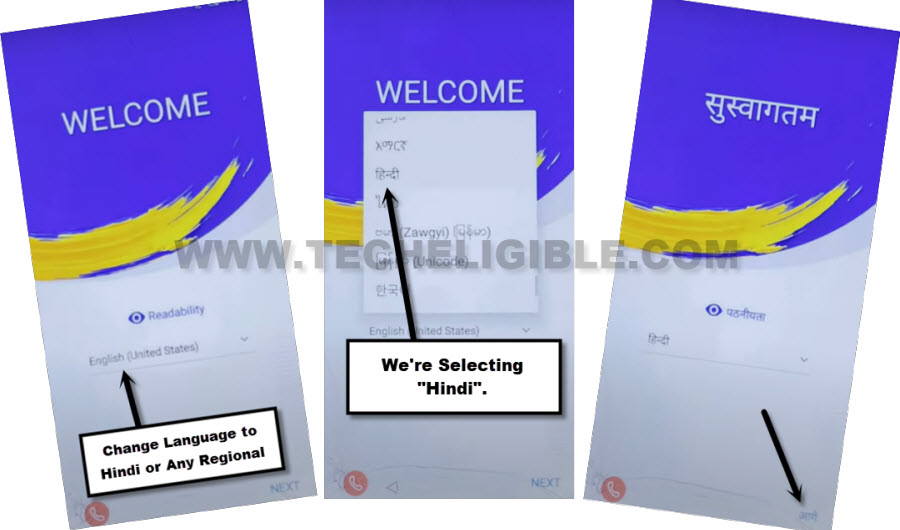
-Get back to first (Welcome) homepage, and change your language to “Hindi” same as shown in below image.
Note: You can choose your any other regional language as well except English.
-Tap to “Bottom Right” option.
-Tap to > Bottom Right Option > + Option.
-The keyboard will automatically appear, just long hold on “World icon”, and tap to last blue link from popup window.
![]()
-After that hit on “Center Green button”, and hit on any “Arrow indicated Language” from list.

-Tap > 3 dots > 2nd option.
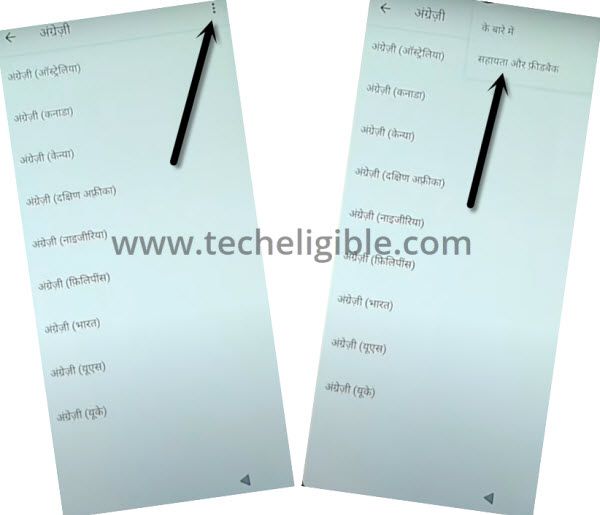
-Long tap on “World icon” again, and tap to “Qwerty” option from popup window.
-Type text “D” in search area, and go to searched result “Delete or Disable apps on android”.
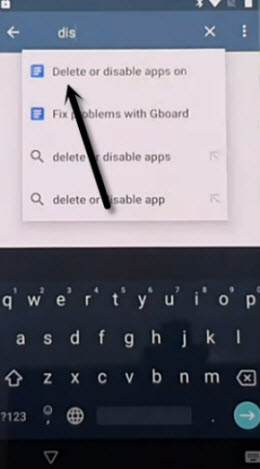
-Hit on “Hindi Text blue link” same as shown in below image.
-Tap to > Google Map icon > 1st option.
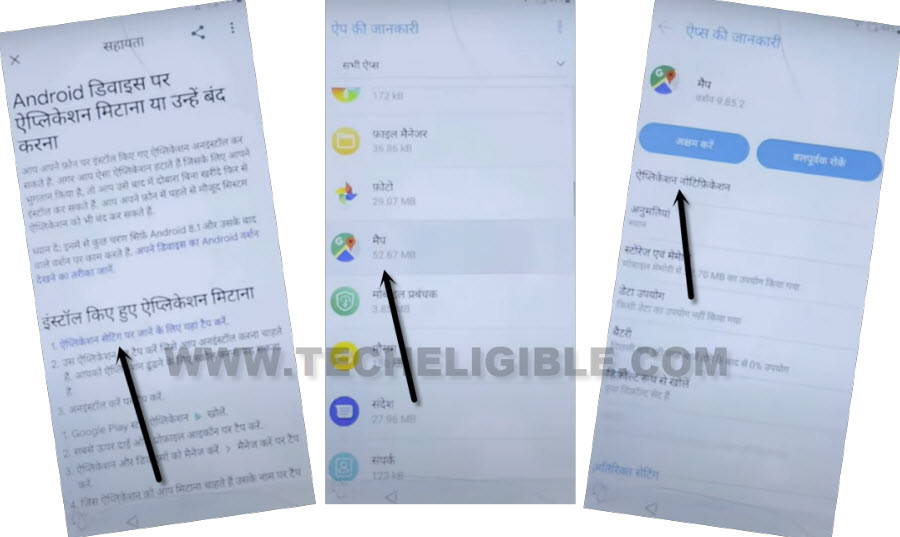
-Tap very last option.
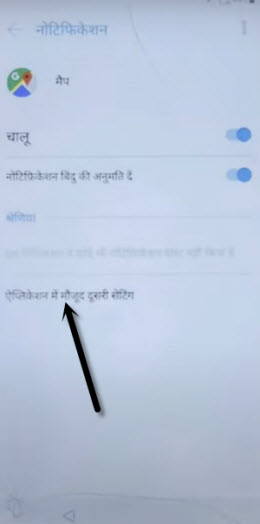
-Tap to > Top right corner option > Back Arrow from top left.
-After that hit on > Menu icon > Arrow icon > Bottom right option from popup window (See below image).
![]()
-Search in top search area “Nearest Hotel”, and select any nearest available hotel, after that hit on “Call icon” from there.
-Type code there *#*#4636#*#*.
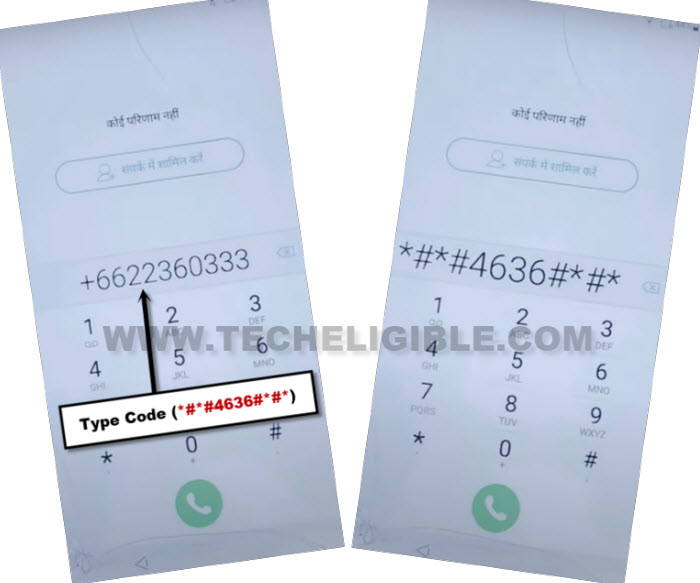
-Tap to > 2nd Option > Back Arrow from top corner.
![]()
Let’s Change Language to English:
-Scroll down, and tap to > 2nd last option > 1st option > 1st Option.
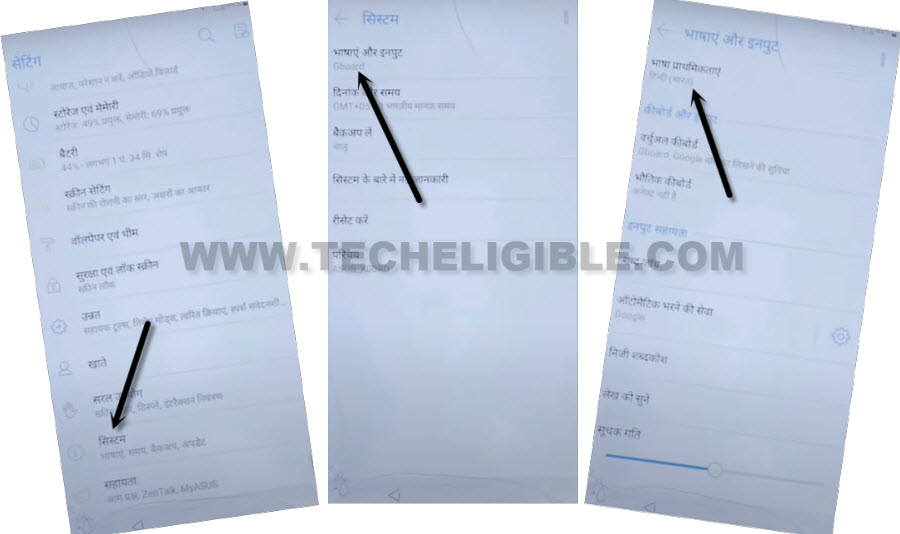
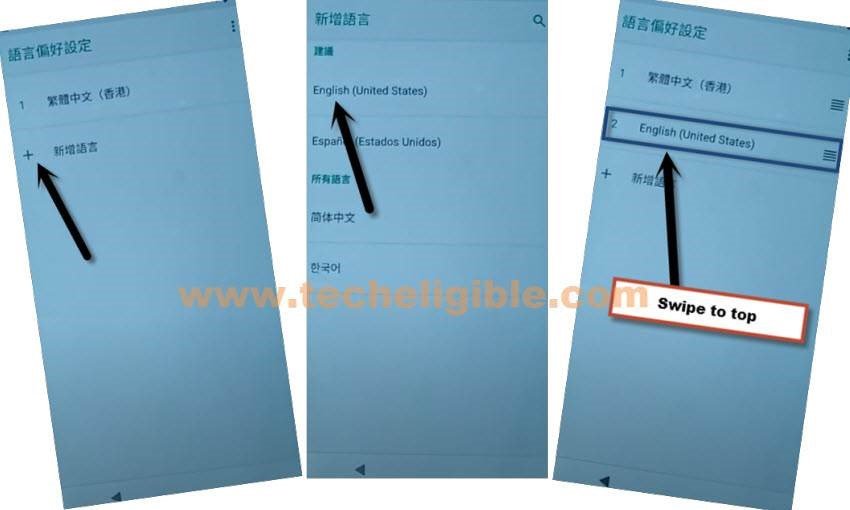
-Tap on “+” option, and select “English”, and then swipe the English language to top, after that the device language will be changed automatically to the (English).
Note: If you are not able to swipe up the language, so you can delete (Hindi) language by tapping “3 dots” from top corner, and select “First option”, then select language, and tap to “Delete icon” from top.
-Go back to “Settings” by tapping on back arrow few times.
Download FRP Tools in SD Card:
-Using any other android phone, we will first download FRP Tools in our SD Card.
-Open “Chrome browser” in other android phone which have SD Card installed in.
-Search there “Download FRP Tools“, and visit our website searched result.
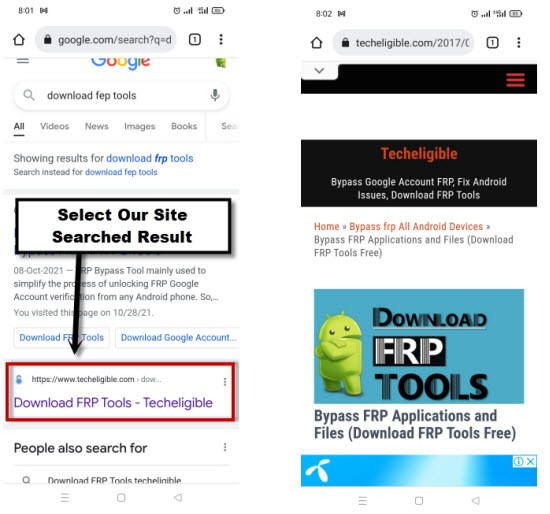
-Scroll down and download below 2 applications.
1st: Google Account Manager 9.
2nd: Account Login.
-Move both downloaded apps into “SD Card”.
Insert SD Card in ASUS Device:
-Insert SD Card in your frp locked device to Bypass FRP All ASUS Zenfone Android 8.
-From “Settings”, and tap to > Storage > USB Storage / SD CARD.
-There you will have both downloaded apps.
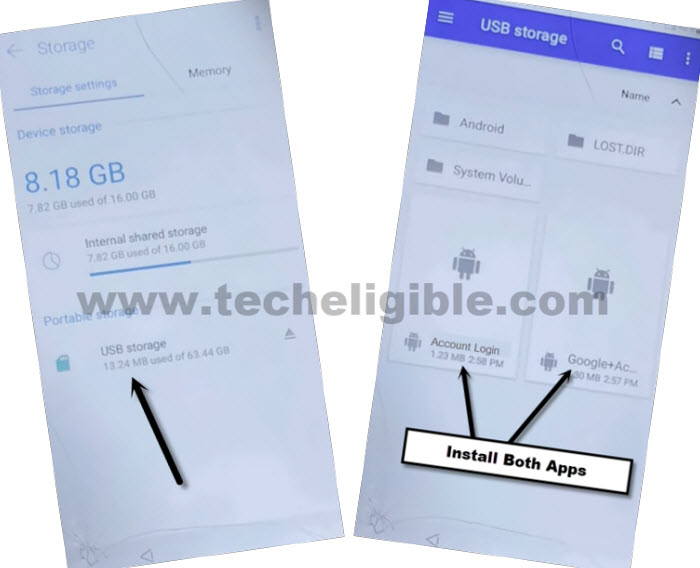
-First of all, install “Google Account Manager 9”.
Note: If you see (Installation blocked popup) window, just tap to “Settings”, and turn on “Allow Unknown Sources/ Unknown Sources”.
-Go back, and install “Google Manager 9”.
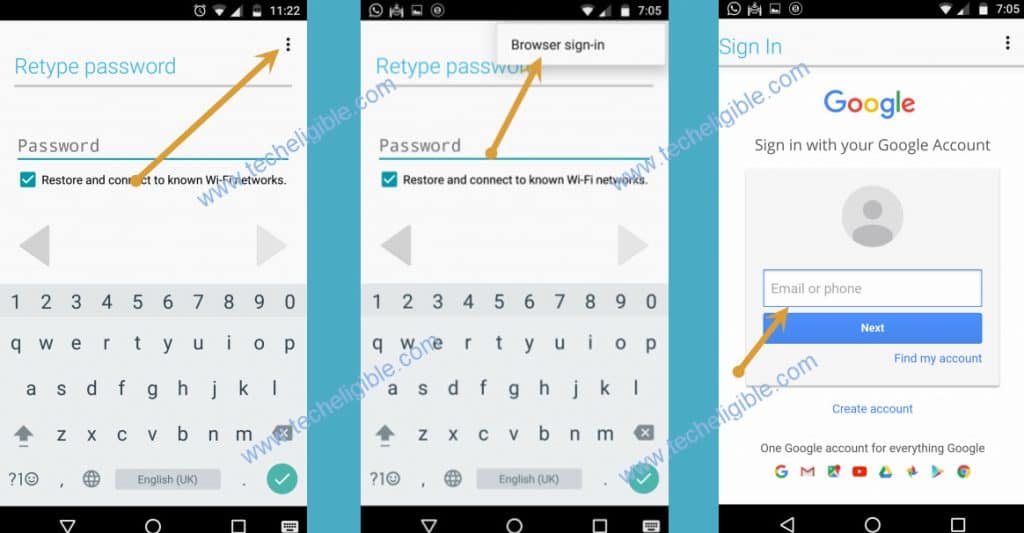
-Tap to > Account Login > Install > Open.
-Tap > 3 dots > Browser Sign-in > Sing in using new google account to Bypass FRP All ASUS Zenfone Android 8.
-The method has been completed, and your device is free of previously synched google account, just restart Asus Phone & Complete setup wizard, Thank You.
Method 2: Bypass FRP All ASUS Zenfone Android 6
-Turn on your mobile, and tap on next from “WELCOME SCREEN”
-Select language, and Connect WIFI.
-Tap on “NEXT”, and after that tap on “AGREE”, from “Terms and Conditions” popup.
-Now it will start checking connection, after few sec or minute, it will show you screen of “Verify Your Account”, from there
-Tap on “Email or Phone”, just tap over there.
-Now “Your mobile Keyboard” will open, tap on “SETTING” symbol from bottom left corner, if nothing happen so long press over there, till you see some options appear, like “EN” and “SETTING, so again tap on “SETTING” option from there.
-After that “QUICK SETTING” screen will be in front of you, tap on “SETTING” from there as shown in pictures.
-Then you will be on “ZenUI Keyboard Setting”, tap on top right side corner three dots “:”, few opetion will collapse there, choose “ABOUT”.
follow some steps as shown below.

-Choose “Privacy Policy > Accept & Continue > No Thanks > search there “Google.com”.
Once google website opened, there you have to search ” Unlock ASUS Zenfone techeligible.com”, from there download.
Download FRP Apps:
⇒ Google Account Manager 6.X.X [DOWNLOAD]
⇒ Account Login [DOWNLOAD]
-After downloading finish, tap on “<” button from your Asus Zenfone, keep going back till you see wifi connection, from there select any “NEW WIFI Connection”, and type there any “TEXT”, as password, after that “LONG PRESS” on those words, those you typed, till some options appear e,g “CUT, COPY, SHARE”, from them Choose “SHARE”.
-Long press with your finger on “GMAIL” logo, then you will be in “App Notification”, from there choose “NOTIFICATIONS”, and tap on “APP SETTING”, now tap on “TOP RIGHT SIDE CORNER 3 Dots” as shown like this “:”, then some options will be visible there, choose “Manage Accounts > Continue > Downloads.

-Once you opened “DOWNLOADS”, there you will be able to see your downloaded files “Account Manager 6.X.X and Account Login”.
Installation of Downloaded Files:
Follow below steps, you will see exacts options as i mentioned below, just keep following to successfully installing apps.
-Tap on “Account Manager 6.X.X > Settings > Enable Unknown Sources > Go Back
Once you enabled “UNKNOWN Sources”, now again tap on “Google Account Manager 6.X.X” to Bypass FRP All ASUS Zenfone Android 6.
-Tap on “Account Manager 6.X.X > Install > Accepts > Done
-Tap on “Account Login” > Install > Open.
-Hit on “3 dots” from top corner, and tap to “Browser Sign-in”, Enter any valid Gmail account there.
Once Signing in finish, to Bypass FRP All ASUS Zenfone Android 6, restart your ASUS Zenfone device, then have have successfully unlocked asus Zenfone, and now you can easily “factory reset” your device, simply by going into setting.
If you are unsuccessful to bypass google account all ASUS Zenfone android 6, Click Here to try NEXT method to bypass FRP on your ASUS Zenfone.