
2 Methods to Bypass FRP ZTE Majesty Pro Without PC
This method is specially for ZTE Majesty Pro devices, such as ZTE Z799VL and some other devices. Because in some ZTE devices, people are unable to get Talkback feature and that is the reason too many people are facing trouble in Bypass FRP ZTE Majesty Pro and they are still in search for a working method.
But now you don’t need to search any other zte frp method, because in this method we are going to use latest method to access chrome browser and then install frp bypass tools to bypass google account verification. We have 2 methods here in this post. You can follow up any one method. In case of (Method 1) is not working, you can go for (Method 2).
Warning: This method is only for Device Owner.
Method 1: Bypass FRP ZTE Majesty Pro Without Talkback
-You need 1 more android device to follow this method, so make sure you have 2 Android devices near by you, one is ZTE frp lock device, and 2nd is any other android device.
-Open “Chrome Browser” in your other android device.
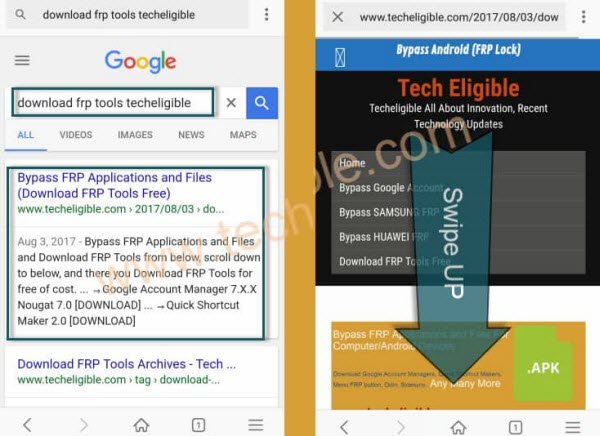
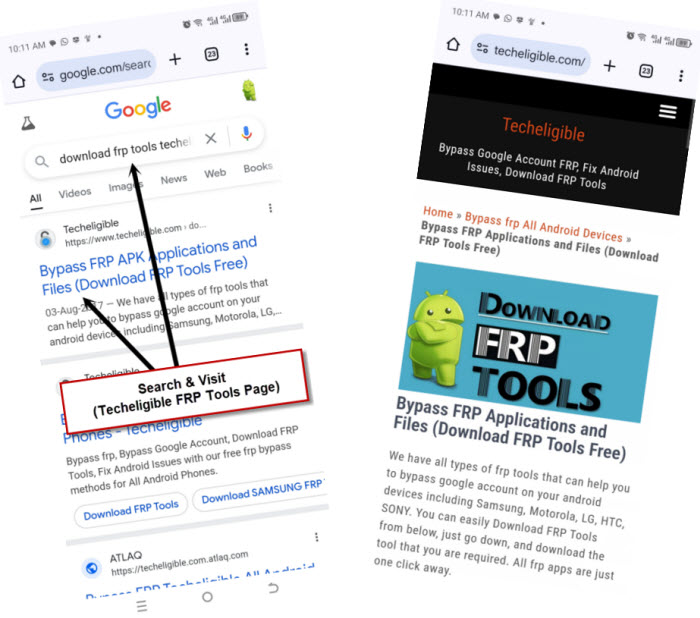
-Type in search bar “Download FRP Tools”, and then go to first search result from there.
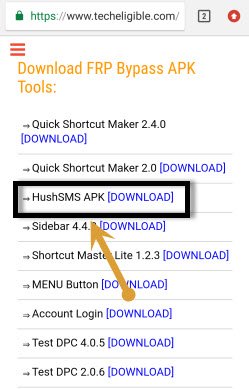
-Now download from there “HushSMS” application.
-After that install this application in your android device.
-Once the installation finish, simply open Hushsms app.
-Insert SIM Card in your ZTE frp lock device.
-Switch ON ZTE device.
Let’s Send POPUP Message to ZTE device from Other Android Device:
-HushSMS app will send “Youtube” link to your ZTE device from Other Android device, by doing that, we can directly reach to “Youtube” official website.
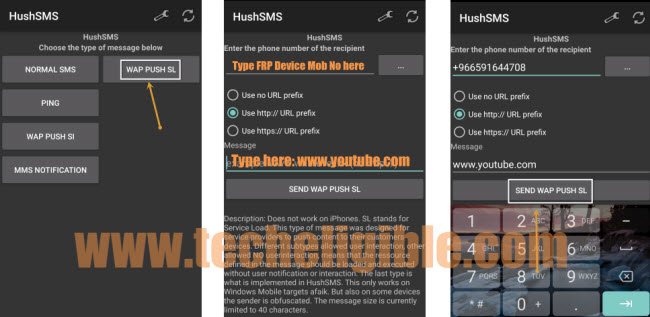
-Tap on “WP PUSH SL” button from Other Android device.
-Type the Cell no of ZTE frp lock device.
-After that type “www.youtube.com” url in Hushsms url field.
-Now tap on “SEND WAP PUSH SL” button to send popup message to your ZTE device to Bypass FRP ZTE Majesty Pro.
-Wait few minute, you will receive a popup message on your ZTE device, once you receive, just tap on “OK”, after that you will be redirected to the youtube official website.
Note: if you get update screen on your ZTE Majesty Pro, just tap on “Not Now”.
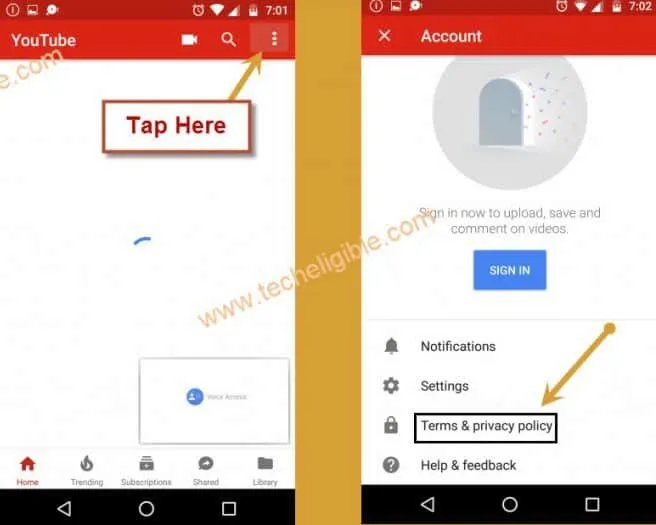
-Once you access to YouTube website, just tap on “3 dots” from top right corner & select “Terms & Privacy Policy”.
-After that you will be redirected to the chrome browser.
Download FRP Bypass Tool:
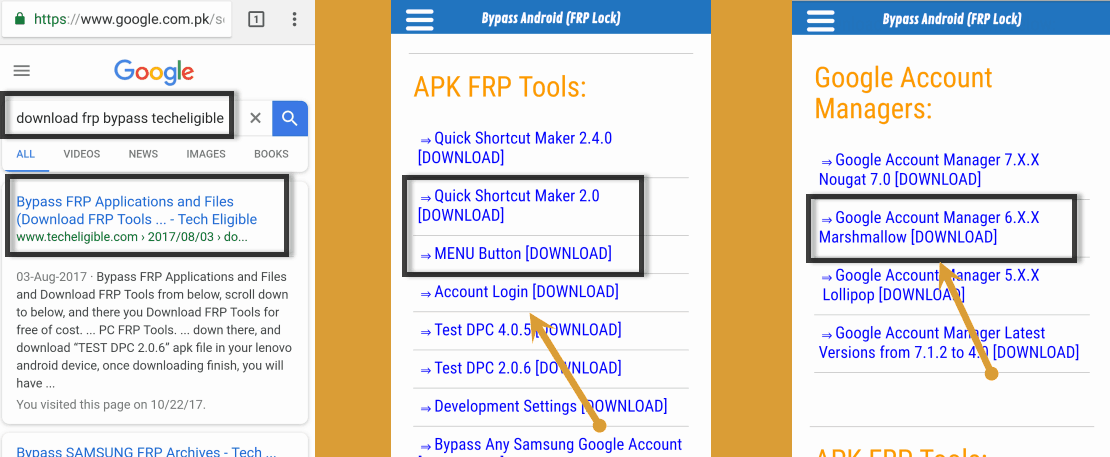
-Type in search bar “Download FRP Tools Techeligible“, and then go to first search result from there.
-Now go down & download from there “Google Account Manager 6.0“.
-Wait until downloading finish, and after that you will get popup bottom of your screen, just tap on “OPEN” from there.
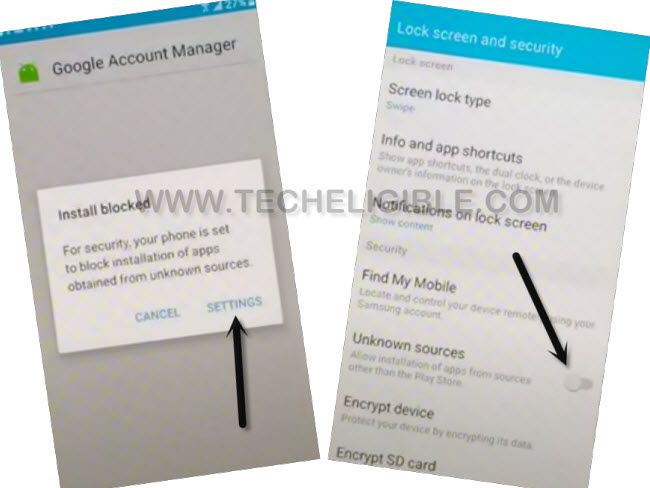
-After that you will get installation blocked popup message, just tap on “Settings” from there and then enable “Unknown Sources” option.
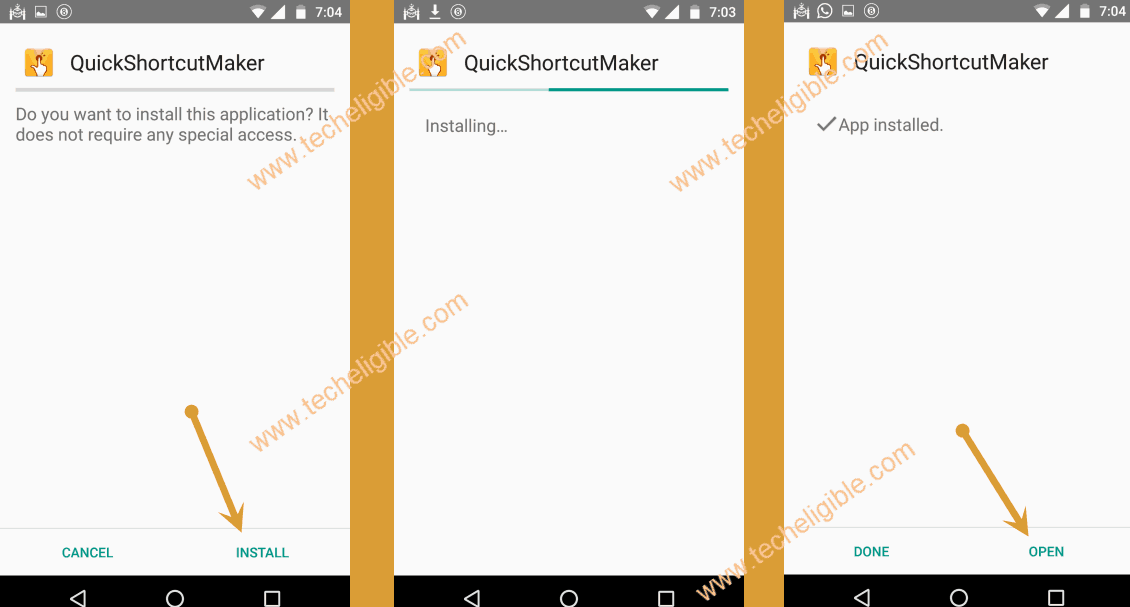
-Now tap on “Back Key”, and then tap on “Install”, once installation done, just tap on “Done”.
-Perfect, now we have successfully installed google account manager”.
-Tap on “Back Key” to go back to frp bypass page, where you downloaded google account manager.
-Download from there “Quick Shortcut Maker” app.
-Once downloading finish, you will get bottom popup, just tap on “OPEN”.
-Tap on “Install”, after that on “OPEN” to launch quick shortcut maker app to , after that you are done from Bypass FRP ZTE Majesty Pro.
-Now you have accessed to quick shortcut maker app.
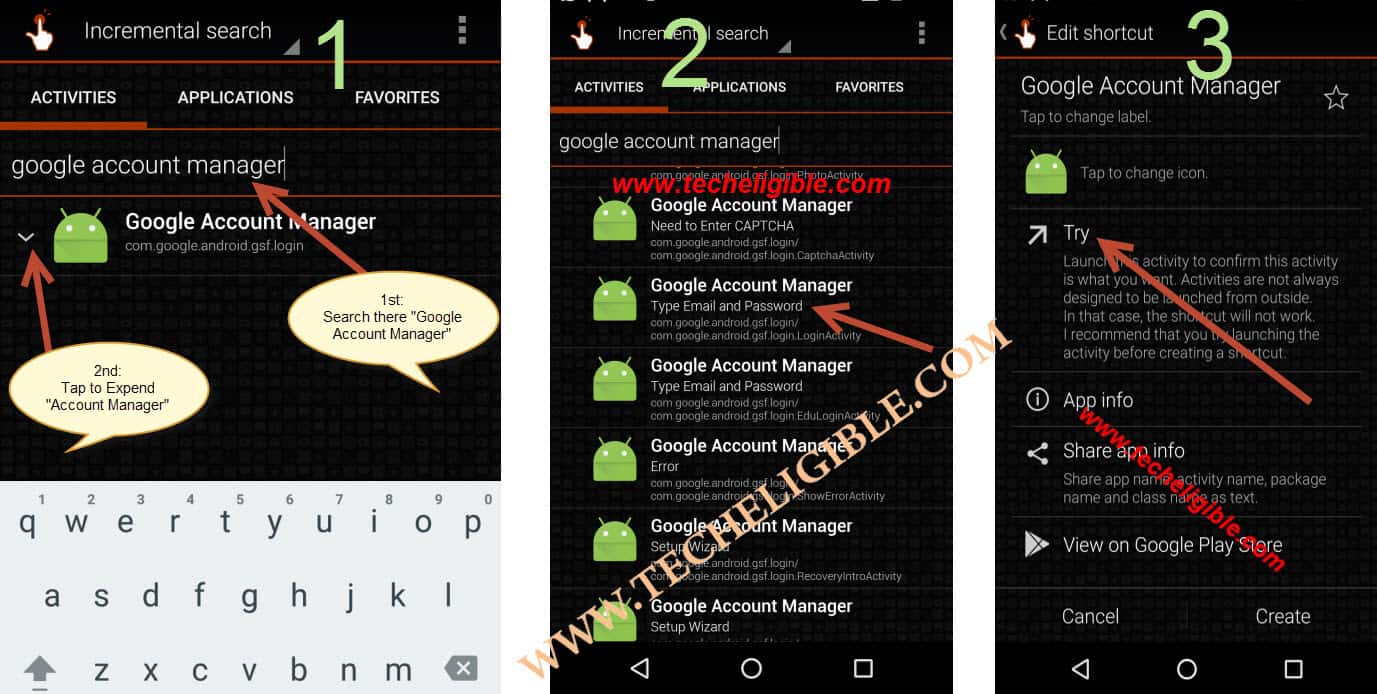
-Type in search bar “Google Account Manager”, and then tap on “Google Account Manager” from search result to expand it.
-Now you will see big list of google account mangers there
-Just select the one that appears with “Type email & password” same as shown in below image.
-Tap on “TRY”.

-You will be redirected to the “Retype Password” screen.
-Tap on “3 dots” from top right corner, and select “Browser Sign-in”.

-Now enter your any valid Gmail account there to sign in.
-Once you successfully signed in there, just restart your ZTE Majesty PRO device.
Method 2: Bypass FRP ZTE Majesty Pro Android 6 With Talkback
-Switch on ZTE Device.
-Long tap with two fingers on “Welcome Screen” for 10-15 sec until “Talkback Enable”.
-Once “Talkback Enabled”, means your 50% frp has done here.
-Double tap on “EXIT” from talkback screen.
-By double tapping, go to “Wi-Fi” screen, tap on “Add Network”, and then type there anything so that, keyboard appears.
-There is “MIC ICON” on your Android Keyboard, just tap on that.
-After that tap on “Network Settings”.
Now you have successfully accessed to the “Settings” of your ZTE Device.
Disable Talkback & Connect Wi-Fi:
-Using two fingers, go down to “Accessibility” from settings.
-Turn off talkback from there.

-Go back to “Settings”, and then tap on “Wi-Fi”, after that connect wi-fi.
-Once Wi-Fi connected, go back to “Settings”, now tap on “Google” from there.
-After that, tap on “Search & Now”, (If this option is not there, follow below one).
-Tap on “NOW CARDS”, after that tap on “SHOW CARDS” to enable it.
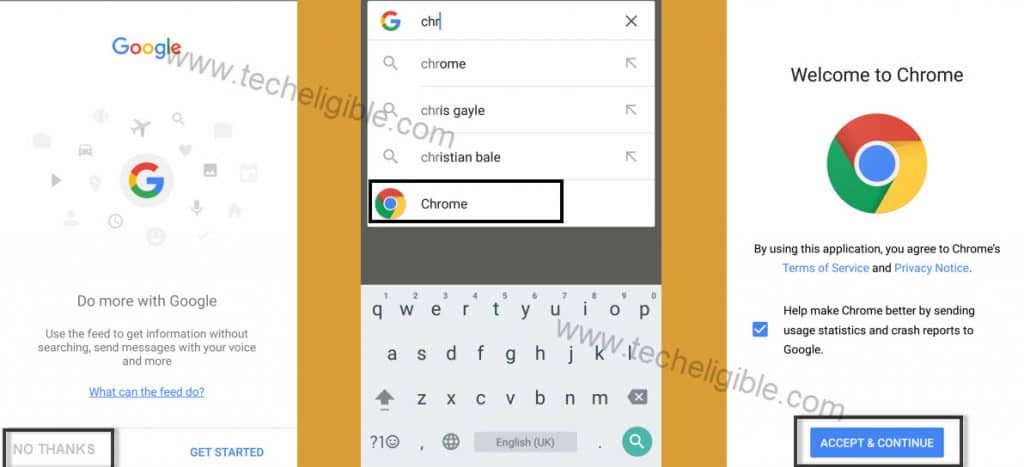
-Tap on “NO THANKS”, after that type in google search bar “CHROME”, and tap on “CHROME ICON” to open it.
-Now tap on “Accept & Continue”.
Download FRP Tools:
-Type in chrome search bar “Download FRP Tools Techeligible“.
-Open most relevant search result from there as shown in below image.
-Now download from there below frp apps:
1. Google Account Manager 6.0.
2. Quick Shortcut Maker 2.0
3. MENU BUTTON.
-Once downloading finished of all apps, you will get popup bottom of your screen, just tap on “OPEN”.
-Tap on “Google Account Manager”, to install it, if you get “Installation Blocked” popup, just tap on “Settings” from popup, and then enable “Unknown Sources” from there.
-Now tap on “Install” to install google account manager, after that tap on “DONE”.
Install & Open MENU BUTTON App:
-Tap on “Menu Button”, after that “Install”, and then tap on “OPEN”.
-You’ll have “App Update” popup, tap 4 times on “CLOSE” to close it.
-Tap on > Display > Display the Settings Screen > ALLOW > Display the Settings Screen > enable “MENU BUTTON IME” > Tap on “Back Key”

-Tap on “Display the Setting Screen”, tap to enable “Permit Drawing over other apps”, tap on “Back Key”.
-Tap on > Display the Setting Screen > Menu Button > turn it “ON” > Tap on “Back Key” to go back to Menu button app.

-Tap on “DISPLAY”, now you will have “MENU BUTTONS” on right side to Display 3 dots Missing issue.
-Tap on “BACK KEY” to go back to “DOWNLOAD” folder.

Now you have successfully enabled “MENU BUTTON” on your ZTE device, go back to “Download” folder, so that we could install “Quick Shortcut Maker 2.0” as well.
-Tap on “Quick Shortcut Maker”, and then tap on “Install”, after that “OPEN”.
-Type “Google Account Manager” in search bar, after that tap on “Google Acc Manager” to expand it.
-Now select one “Google Account Manager” that appears with “Type email and password”.
-After that, tap on “TRY”.
Add Latest Gmail Account:
-Tap on “3 Dots” from MENU BUTTON.
-After that tap on “Browser Sign-in”.
-Add your new Gmail account there to Bypass Google Account ZTE.

-Once accounted added successfully, just restart ZTE device by pressing power key.
-Now complete initial setup simple to access your device main home-screen.
Thanks for visiting us, you can ask any question regarding this method in comment box, do mention complete detail of your device.
Read More: