You might have locked out with FRP on your own Samsung Galaxy Fold 5G device after factory reset. That is why, you are here to regain access on your device again and update the phone with new FRP lock protection. You can apply these all steps from frp bypass steps here. We will use free (Easy Samsung FRP Tools) to open youtube directly, and afterwards, access to galaxy store to install S9 Launcher theme, and then we will be redirected inside the device home menu easily, follow steps from below.
Disclaimer: We highly recommend you to apply this method only on your own device, if you are not owner of this device, or you found this from some where, you must return to its real owner. This process is just for educational purpose to assist device owner, how to approach on their own FRP locked Samsung Galaxy Fold 5G.
Let’s Start to Bypass FRP Samsung Galaxy Fold 5G:
The Tools You Need:
We do required below tools before starting this method, and these all can easily be arranged, not a big deal.
1/ WiFi Connection
2/ Samsung Account (Gmail Account)
3/ Any Other Android Device.
4/ Easy Samsung FRP Tools (You can also try latest version of this tool)
5/ PC or Laptop
1. Start method with Downloading & Opening the tool Easy Samsung FRP Tools in PC. Download & Install also Samsung USB Driver on PC.
⇒ Easy Samsung FRP Tools [Link]
⇒ Samsung USB Driver [Link]
2. Connect WiFi in Galaxy Fold 5G device, and then connect the device to PC or Laptop. (Make sure the Device is turned on).
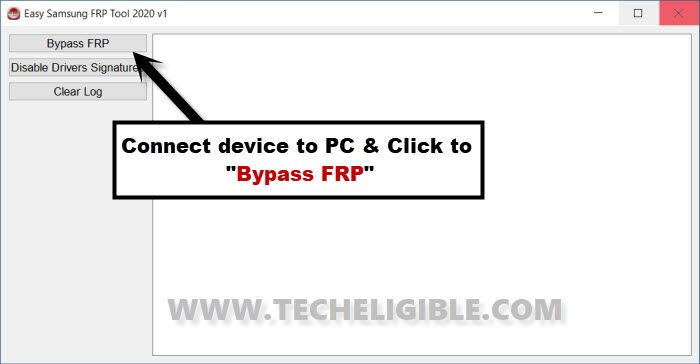
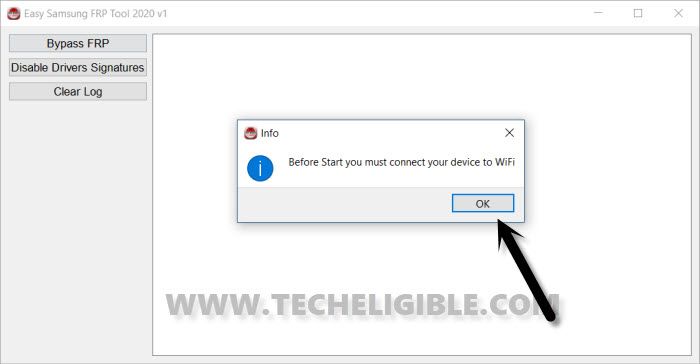
3. After the galaxy phone is detected, just hit on “Bypass FRP” button from the software, and from the popup window, hit also on “OK”.
Note: If your device is not being detected, then install Samsung USB Drivers.
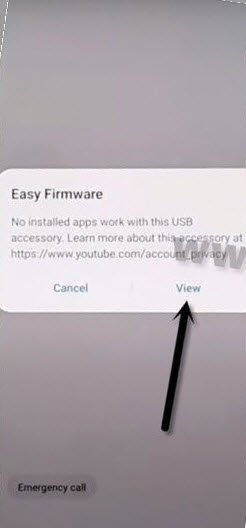
4. You will receive a popup box of (Easy Firmware), tap to “View”.
Note: If you don’t see (view) popup message, then click to “Disable Driver Signature” from the software, and then disconnect and connect the device again, and again hit on “Bypass FRP” button from the software, after trying this few times, you will be able to have (VIEW) popup message.
5. From the Chrome screen, tap to > Accept & Continue > Next > No Thanks.
Open Galaxy Store app:
6. You have to make search in browser with “Techeligible“. After that, visit 1st searched result from there same as instructed in below image.
-Hit on “Menu” option from top corner of the site & Go to “Download FRP Tools”.

7. Go down and tap on “Open Samsung Galaxy Store“.
8. Hit on “Cross icon” to close the popup message, and then hit on “Centered Option”.
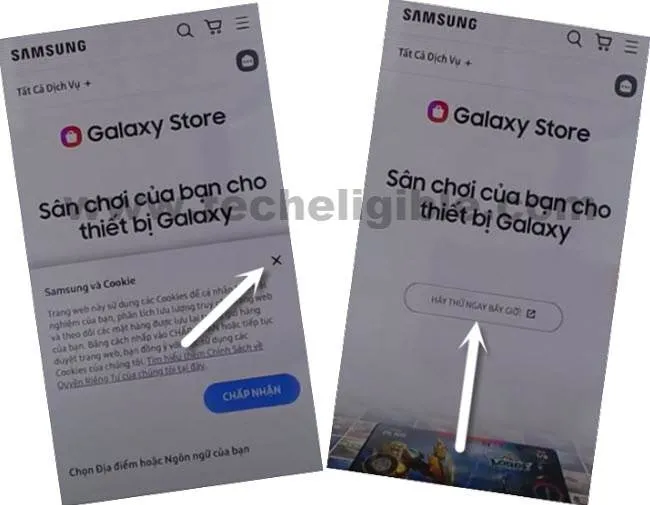
9. Check mark the option “Get new and special offer…”, and then hit on “Agree”.
10. Check mark the option “Automatically update the Galaxy Store”, and then tap to “Update”.
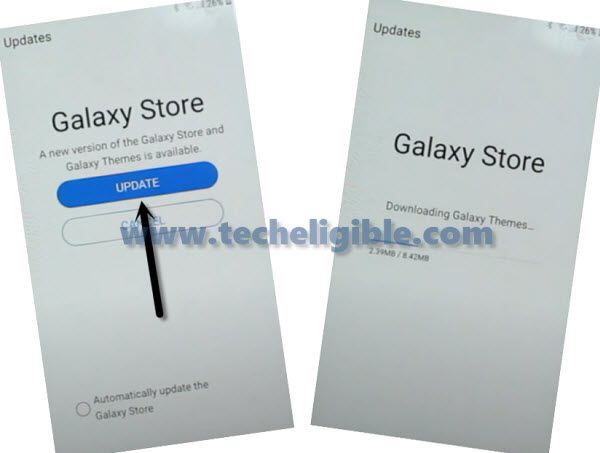
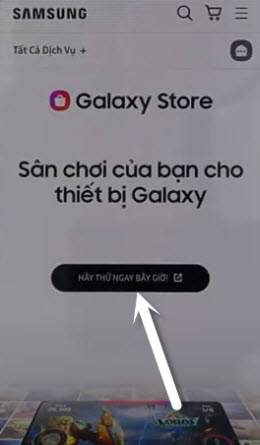
11. Tap on “Centered Option” again by following below image to open Galaxy Store app.
12. Tap to “Search icon” from top corner, and search there “S9 Launcher”.
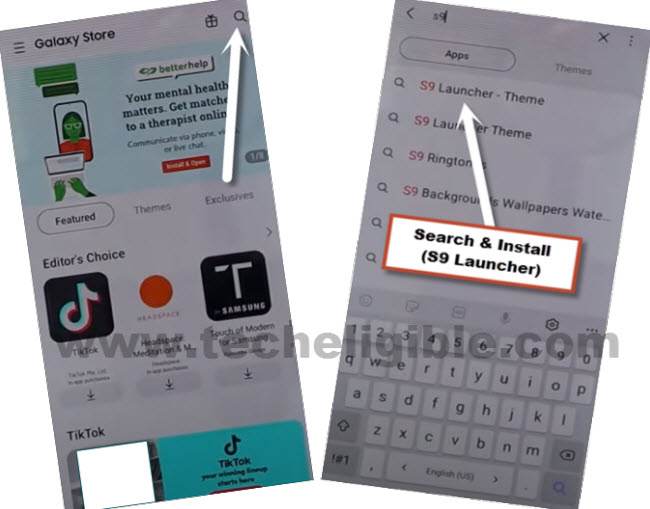
13. Install & Open “S9 Launcher – Theme” app.
Note: Before the installation starts, you will have to sign in with your gmail account, and this gmail account should also be signed-in in other android device.
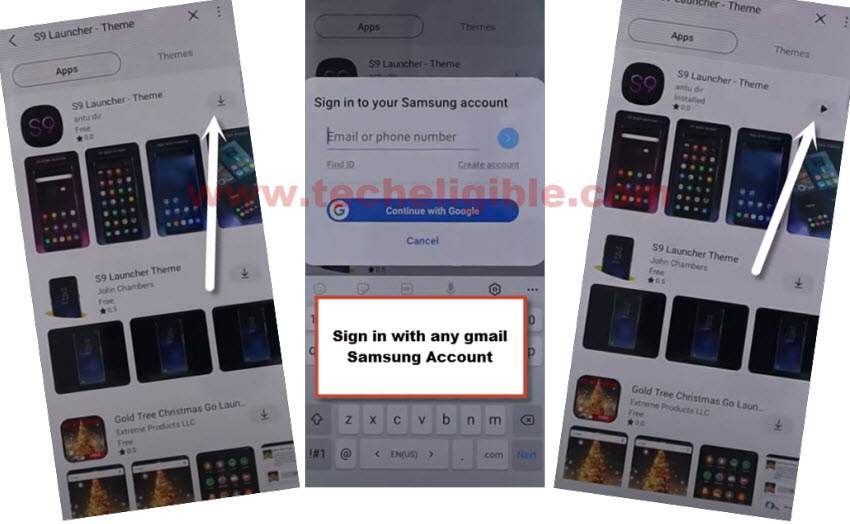
14. Congrats, you have reached to your device home screen, but still plenty of steps remaining to bypass frp completely.
Follow Steps in Other Android Device:
15. Go to > Settings > Accounts & Backup > Accounts.
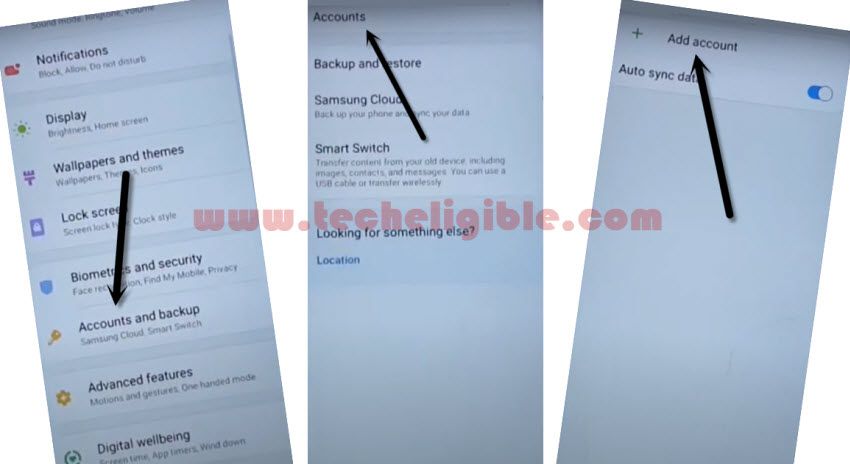
16. Add your Same (Google & Samsung Account) which you have already added in Samsung Galaxy Fold 5G device.
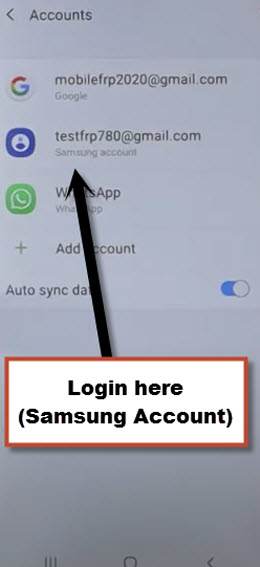
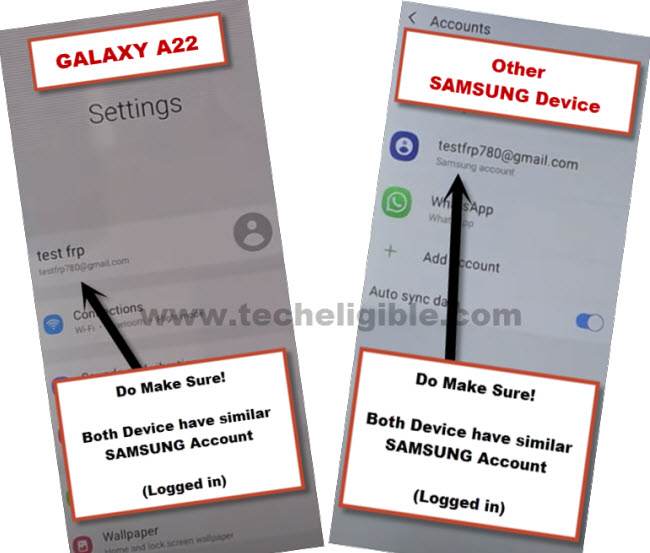
Note: Make sure, your both android devices are on same WiFi network and on Same Samsung/Google Account.
14. Open “Play Store” in other android device, and install “Alliance Shield X” app.
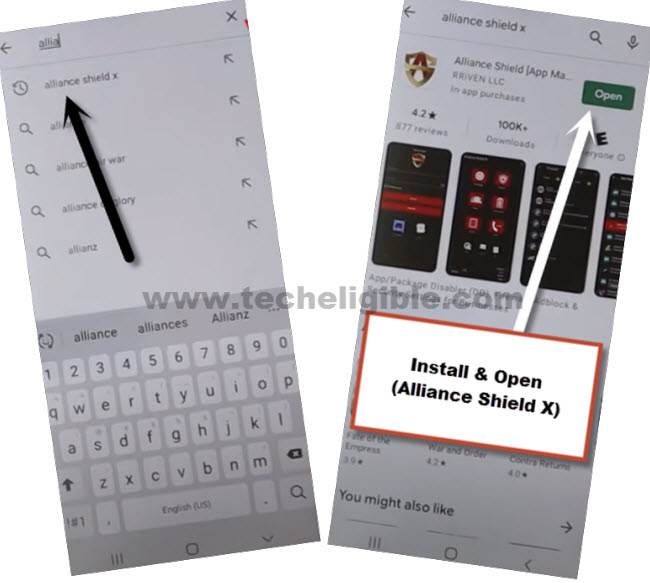
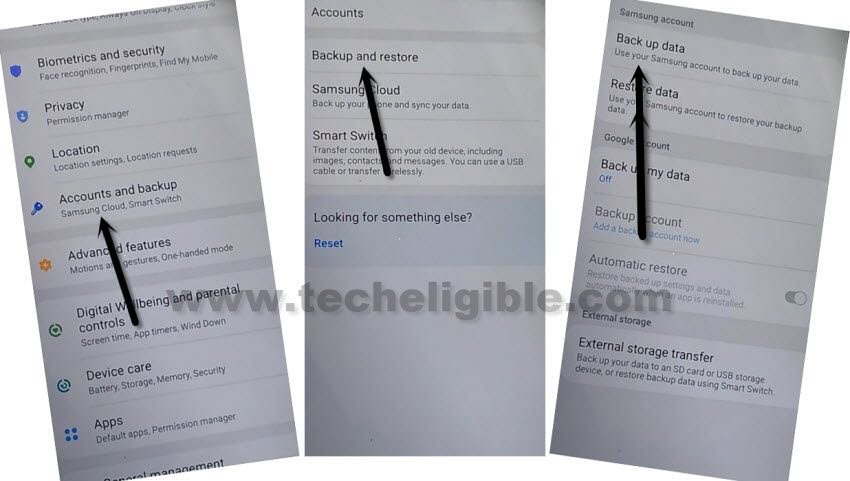
18. Go to > Settings > Accounts and Backup > Backup And Restore > Back up data.
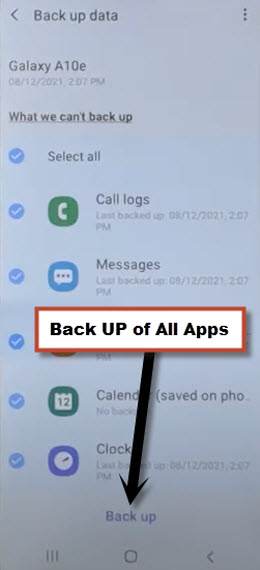
19. Tap to “BACKUP UP” button from below to backup all your apps in Samsung Account, which is already signed-in in your (Galaxy Fold 5G) phone.
Follow Steps on Galaxy Fold 5G Device:
20. First of all make sure, your both devices are on same Samsung/Gmail account.
21. From (Settings), just go to > Accounts & Backup > Restore Data > Update.
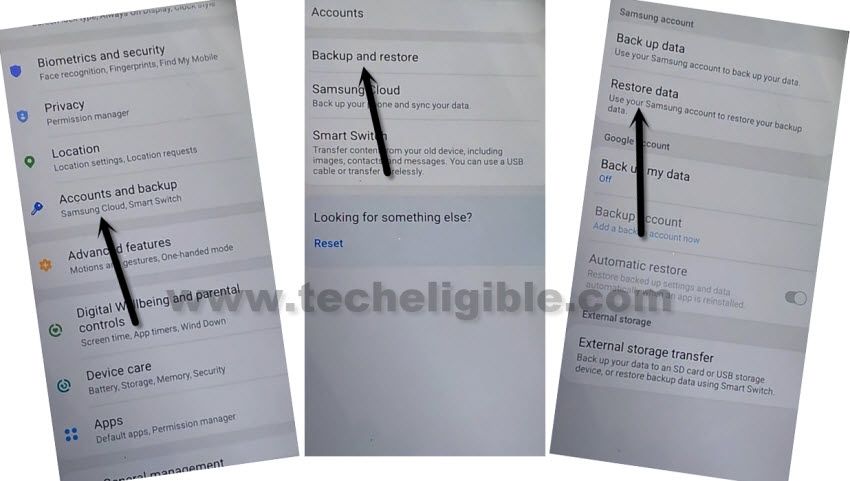
22. Wait for few minutes, this will take time in updating all apps, Again hit on > Restore Data > Select all apps > Restore > Install, now wait until restoring data process completes.
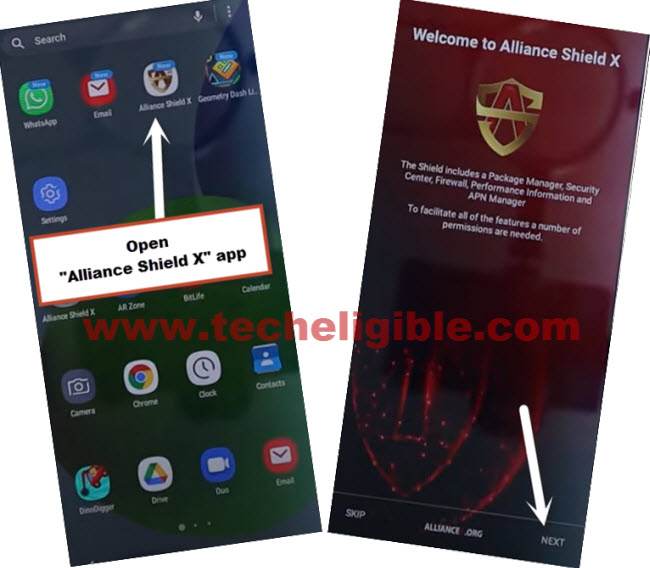
23. Once the restoration process completes, just open (MENU), and you will have there “Alliance Shield X” app, this app has been restored from your other android device because your both devices are on same gmail account.
24. From the (Alliance Shield X) app, tap to > Next > Next > Next > Got it.
25. Register your new account in (Alliance Shield X) .
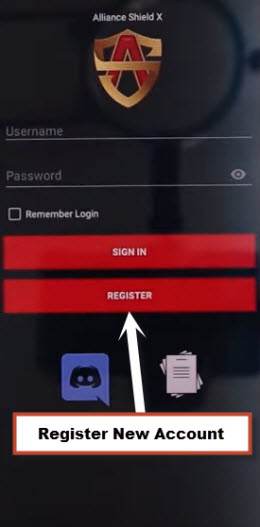
26. Sign-in with your registered account in (Alliance Shield X) app.
27. Type any “Device Name”, and then tap to “Next”.
28. Turn on “Device Admin”, and hit on > Activate > Next.
29. Turn on “Knox”, and select option (i have read and agree…), and tap to > Confirm > Next > Finish.
30. Go to “App Manager”, and tap to “Close” from popup box.
31. Hit on “Search icon” from top corner, and search there “Mode”, and tap to “Service Mode”.
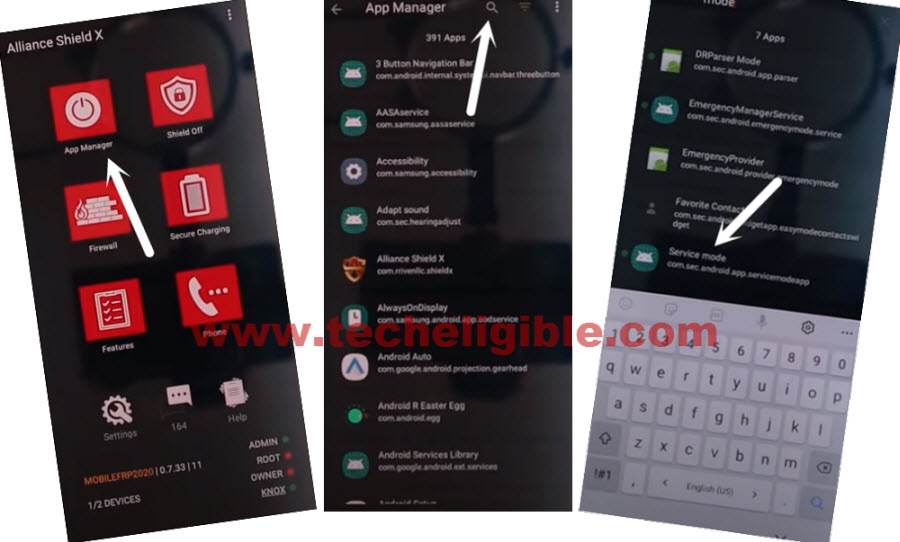
32. Tap to “Activities”
33. Go all the way down, and tap on option (com.sec.android.app.modemui.activities.usb.settings).
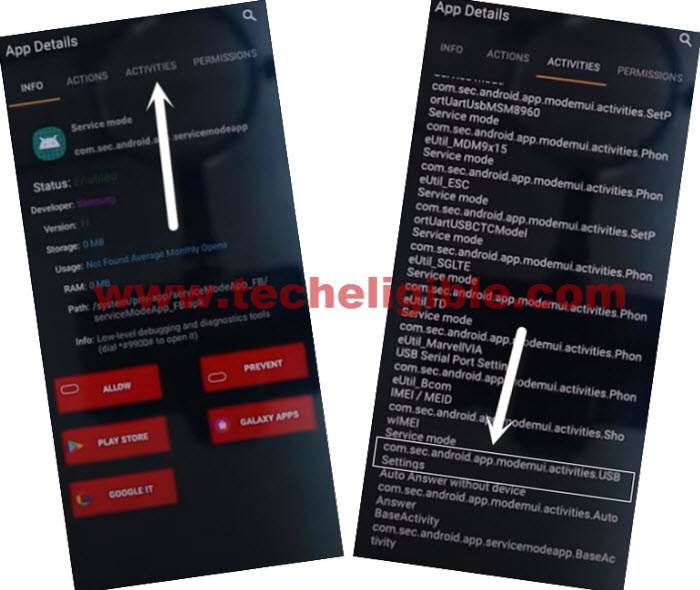
34. Tap again on (com.sec.android.app.modemui.activities.usb.settings), and again hit on “OPEN”, and then select (DM+MODEM+ADB).
Bypass FRP Now with ADB Tool:
35. Download & Open below adb tool in your PC.
⇒ FRP-BYPASS-ADB Tool [DOWNLOAD]
36. Connect the device (Z Fold 5G) with PC, Extract & Open “FRP Bypass ADB Tool” in PC.
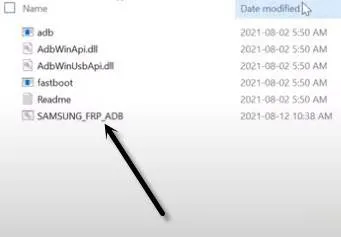
This tool will start automatically, and will Bypass FRP Account on Galaxy Fold 5G in few seconds, wait until this process finishes.
Note: In your Samsung Device, you will have a popup widow, just tap to > Allow > Allow, afterwards, the ADB Tool will detect your device and will start bypassing frp lock.
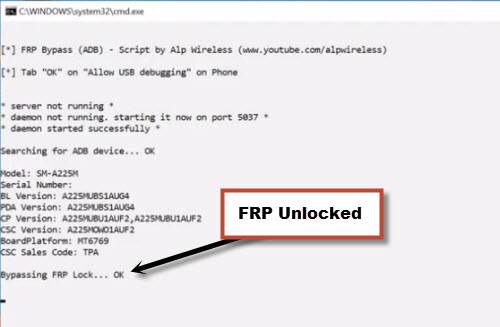
37. After the device starts, Select the (Setup Wizard) icon, and boom, you are in your device HOME SCREEN.
We have to do a factory reset to this phone in order to remove previously added google account completely.
Final Step: Factory Reset Galaxy Fold 5G
38. Go to > Settings > General Management > Reset > Factory Data Reset > Reset > Delete All.
39. Give your Samsung account there, this will continue factory reset operation, once the process done, the device will auto reboot, and you will have first homscreen there, just finish initial setup wizard, and access to device normally without having previously added google account, and add your own new google account in order to use the benefits of a (FRP Protection).
FAQs About Galaxy Fold (5G)
Will i face FRP lock again after factory reset Galaxy Fold 5G?
Nope; this time, you will not face FRP locking issue again till and until you remember your logged in google account.
What is Factory Reset and why we do this on Samsung Galaxy Fold 5G?
Factory reset is the task, that should be done when its required. This function is to used to wipe all data including and saved settings from Samsung Z fold 5G phone within a minute only.
How to Setup new FRP Lock Protection on Samsung Fold 5G?
You only have to login your new google account on Samsung Fold 5G phone, after that, the FRP lock protection will be activated automatically.
Conclusion on How We Bypassed FRP
We just downloaded (Easy Samsung FRP) tool on PC. After that, installed this tool and connected Samsung Galaxy Fold (5G) phone to PC. Installed proper Samsung usb driver, so that, we may not face any connectivity issue. After that, we launched the chrome browser using the (Samfirm) tool and accessed to galaxy store. From there, we installed and opened S9 Launcher. After that, we simply enabled ADB mode using the alliance shield x application and bypassed frp with one click from (Samfirm tool).
Read More: