
2 Methods to Remove Google FRP Oneplus 9, 9R,9 Pro [Android 12, 11]
Remove Google FRP Oneplus 9, 9R,9 Pro Android 12, Android 11 without using any computer, you can choose any one method from below according to your device android version, both are best and working method to bypass frp easily from your device, if you cant reach your device and in search of a best working method, so try steps from here, we hope you will be able to reach your device homescreen easily and will add your new google account easily.
Remember: Do not try this frp method on a stolen phone, this is a serious crime, if you are trying to bypass frp on a stolen phone, you may also be jailed, this process is for device owner and for educational purpose only.
| Method 1: FRP Remove ONEPLUS 9|9R|9 Pro [ANDROID 12] |
| Method 2: FRP Remove ONEPLUS 9|9R|9 Pro [ANDROID 11] |
Method 1: Remove Google FRP ONEPLUS 9|9R|9 Pro [ANDROID 12]
-First of go to (Verify Your Account) screen.
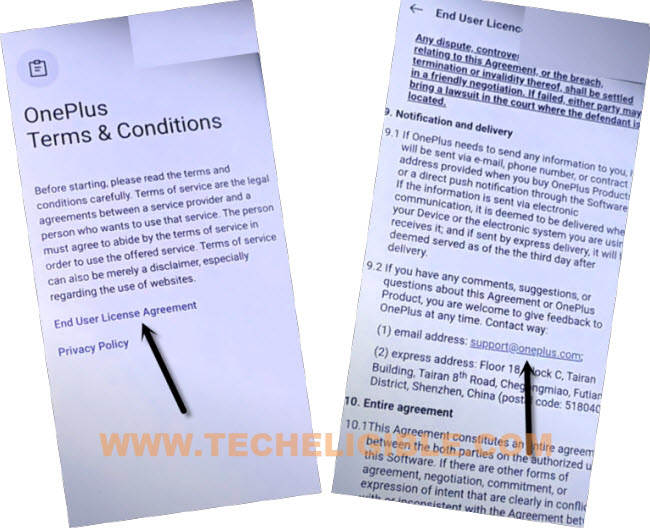
-By tapping on back arrow few times, just get back to (OnePlus Terms & Conditions) screen, from there hit on a link “End User License Agreement).
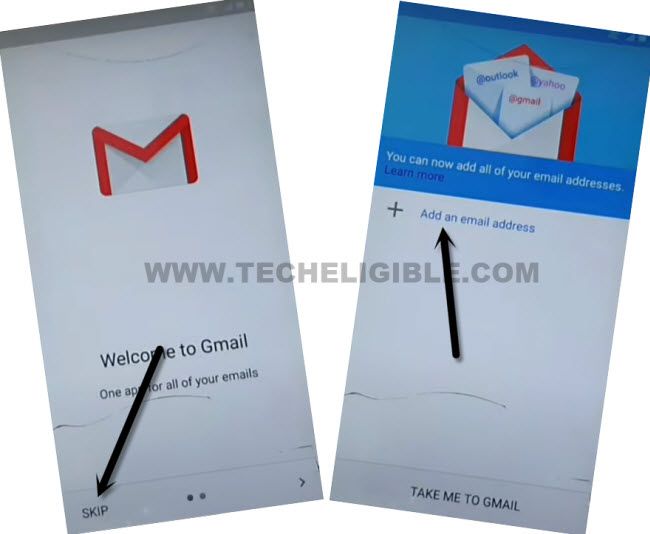
-Go down and hit on “[email protected]”, and you will be redirected to the (Welcome to Gmail) screen.
-Tap on > Skip > Add an email address to Remove Google FRP ONEPLUS 9.
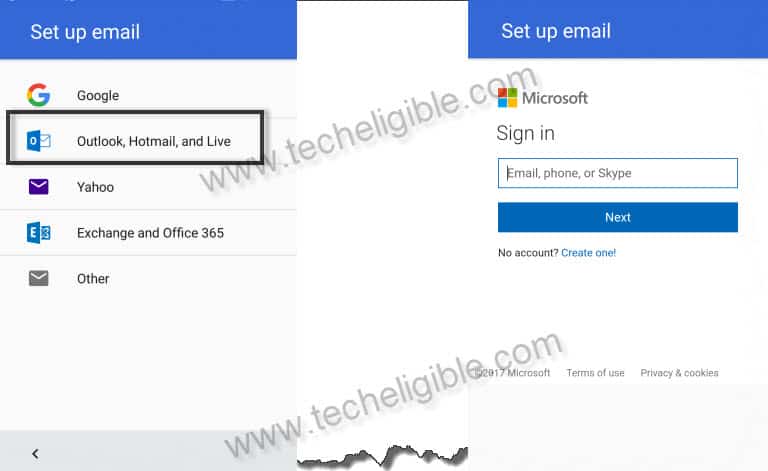
-Hit on “Outlook, Hotmail, and Live”, Login with any your Hotmail ID there, you can also create your Hotmail ID in free and then login there.
-So, after entering Gmail ID and Password, just tap on “Sign in” button, and select the respective way to receive your Gmail verification code, and then hit on “Send Code”, and after that “Verify” the code to successfully sign in.
-Tap on > Get it Now > Next > Done.
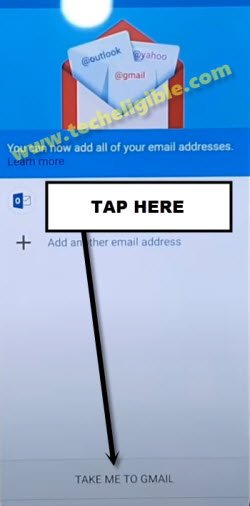
-After signing in with Hotmail id, just tap on > Next > Next > Take ME to Gmail.
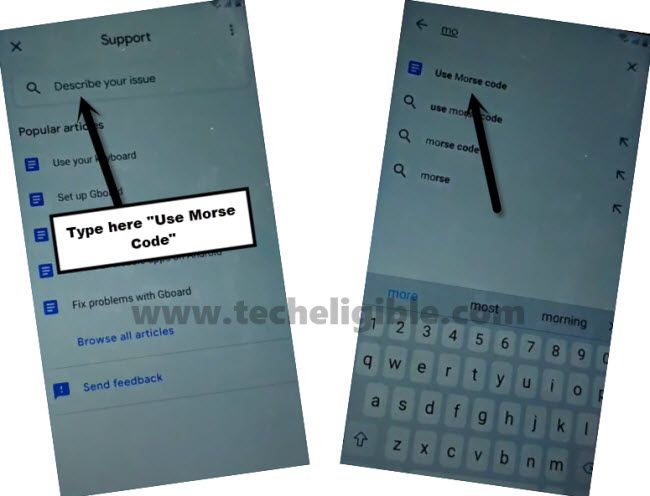
-Now you have to type there “Use Morse code”, and then tap on “Use Morse Code” from the searched result.
-You will have YouTube video on your screen, just tap on that video play icon, and wait until you get youtube video title.
-Tap on video “Title”, by doing this, you will be redirected to the youtube official website to Bypass frp Galaxy M01 Core.

-Drag down Youtube Video, and tap on “Profile icon” from top right corner, and then tap on “Settings”.
-Now tap to > History and Privacy Policy > Youtube Terms of Service.
-Tap to > Accept & Continue > No Thanks.
Access to Device Settings Directly:
-We can now easily access inside device settings to Remove Google FRP ONEPLUS 9.
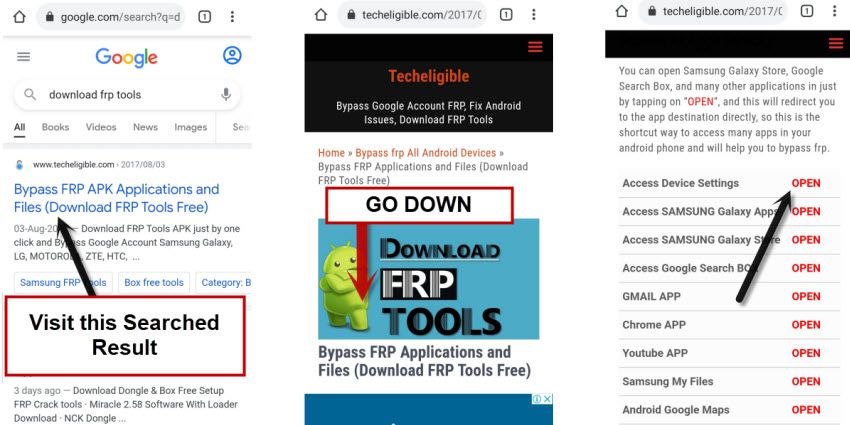
-Search in chrome browser “Download FRP Tools“, and then visit our website searched result.
-Scroll down, and hit on “Access Device Settings” link, you will be redirected into the device settings shortly.
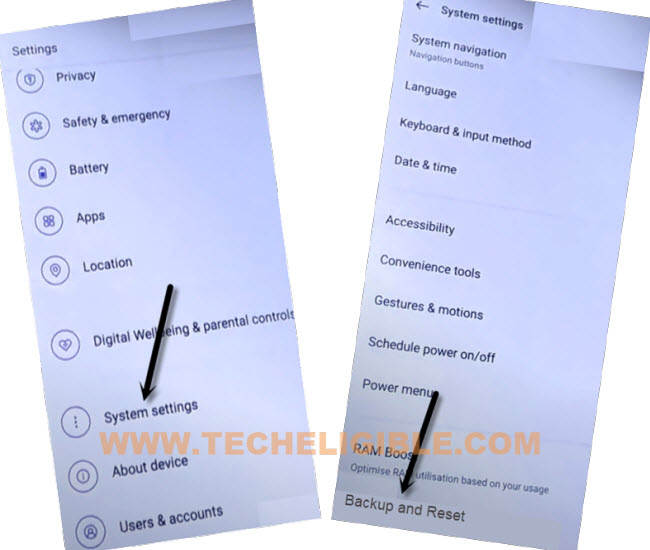
-Scroll down from your device settings, and tap to > System > Backup & Reset.
-Now hit on > Rest Phone > Reset System Settings only.
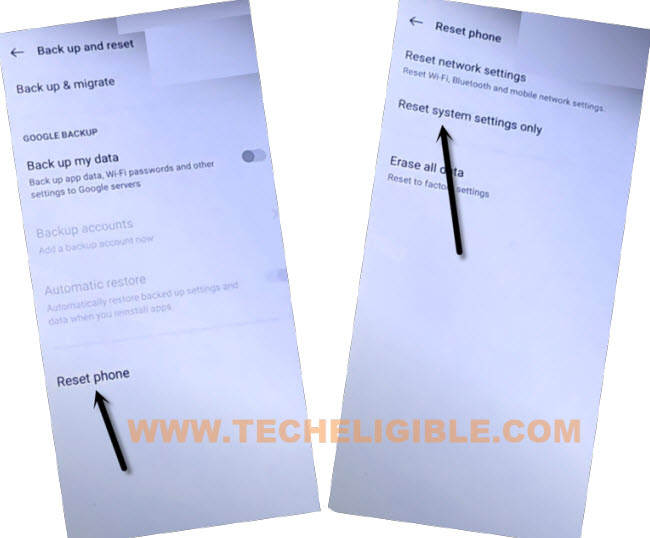
-Afterwards, hit on > Erase All Data > Erase Data > Erase Data.
-The device will be restart, and wait for few minutes, after that you can easily complete setup wizard to reach device normally without facing google verification screen.
Method 2: Remove Google FRP OnePlus 9|9R|9 Pro [ANDROID 11]
You can easily Remove Google FRP Oneplus 9, 9R,9 Pro without any computer through this latest frp method, we will disable some apps from this device, and then we can easily access to our device homescreeen to add new Google Account and remove old already added google account, lets start to follow steps from below.
Note: This method is only for device owner and for educational purpose only, and this post will not harm your device by software or by hardware.
-Start with Connecting WiFi first & go back to “Hello” screen.
-Emergency Call > Double tap “Emergency Rescue” > Add Contact.
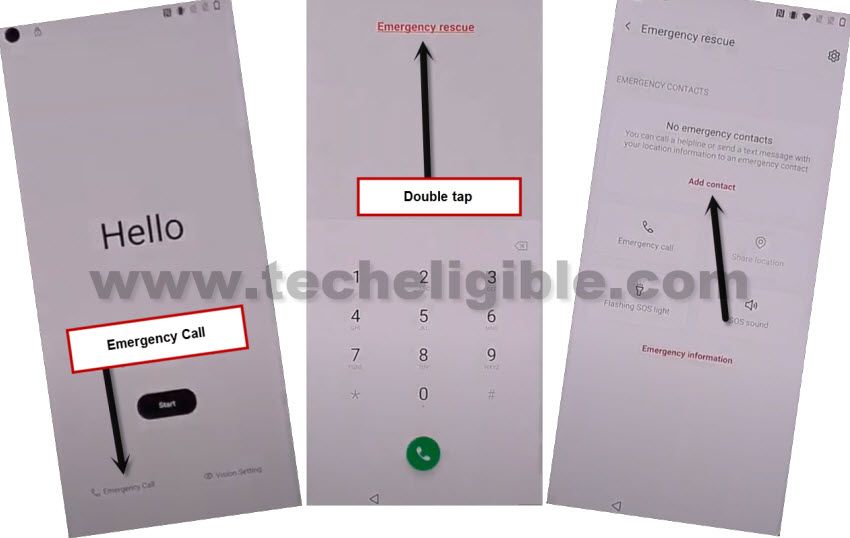
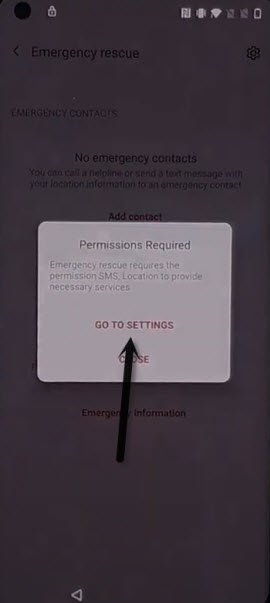
-Tap to > Deny > Deny, and tap to “Go to Settings”.
-Permissions > Search icon.
Note: If you don’t see an (Emergency Rescue) scree, then go back, and tap again on > Add Contact > Go to Settings.
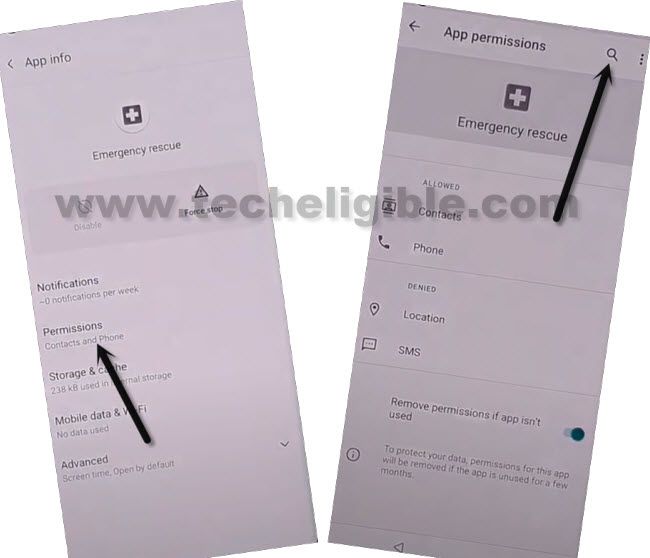
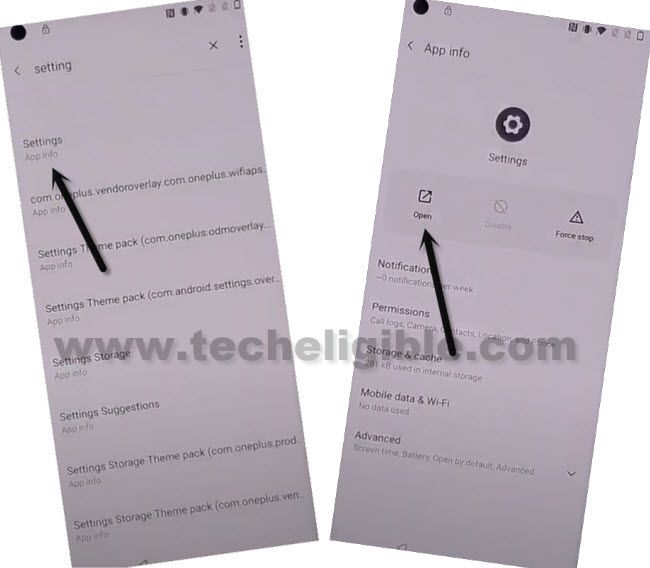
-Type in search box “Settings”, and Go to > Settings App info > Open.
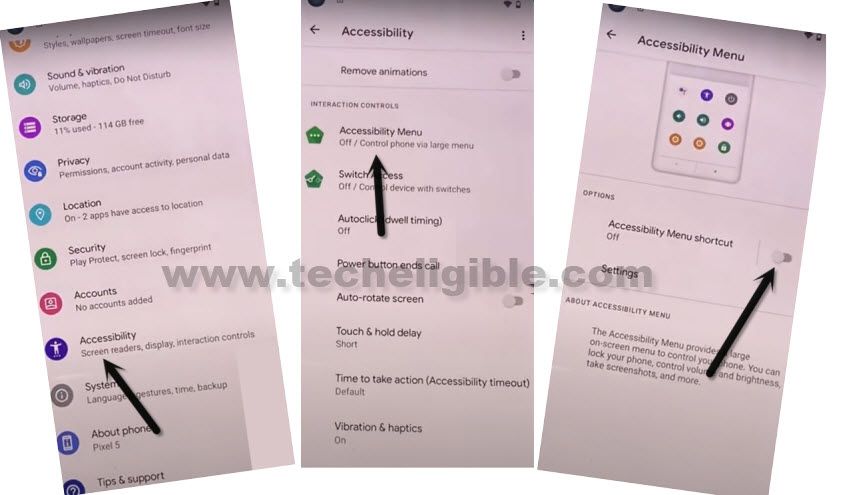
-Enable shortcuts first by going to > System > Accessibility > Accessibility MENU > Turn on (Accessibility Menu Shortcut) > Allow > Got it.
-Go back to settings by tapping at back arrow from bottom right corner.
-Apps & Notifications > App info, and access to app list, now we will disable some apps some specific apps to Remove Google FRP Oneplus 9.
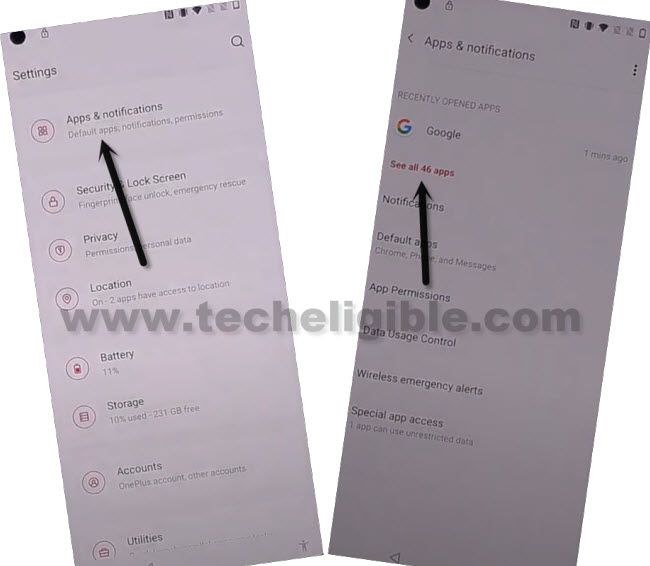
-Tap to 3 dots from top right corner, and hit on “Show System”.
![]()
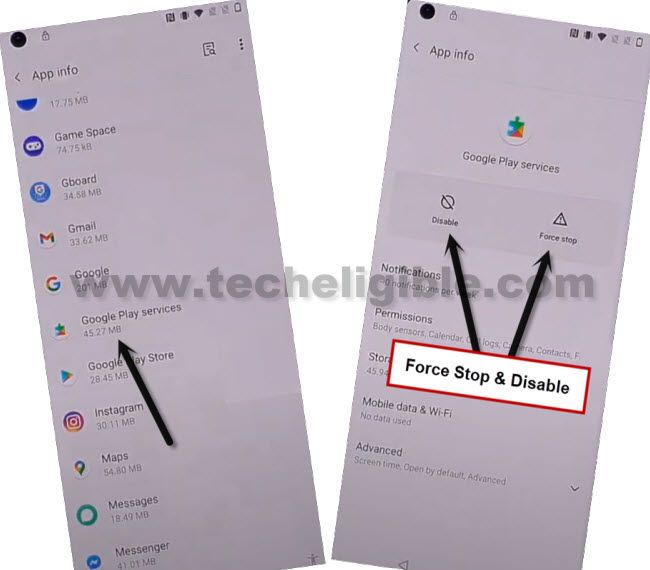
-Find and tap on > Google Play Services > Force Stop > OK.
-Now hit on > Disable > Disable App.
-Hit on (Bake arrow) to go back to app list, and go to > Android Setup > Force Stop > OK.
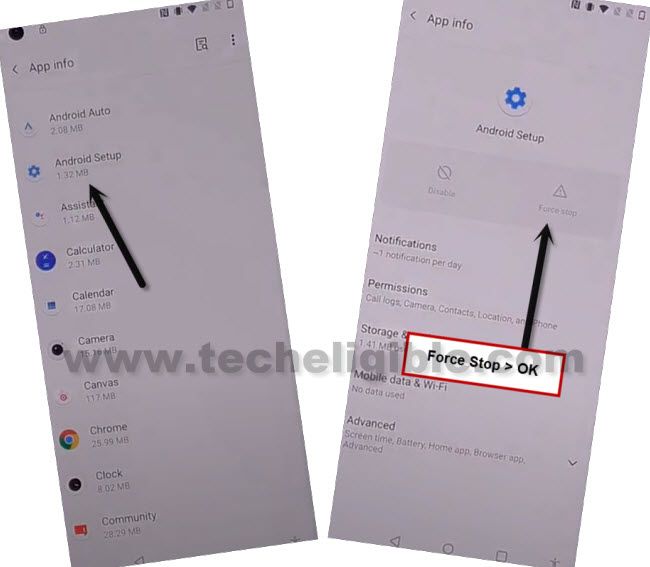
-There are 2 android setup, so you have to force top 2nd android setup as well, for that Tap on 2nd Android Setup > Force Stop > Ok.
-Go back to (HELLO) homescreen by tapping at back arrow for several times.
-Complete initial setup by tapping to > Start > Agree > Agree > Skip > Don’t Copy > OK > Agree.
-There you will have (Set Screen Lock), just tap to “SKIP” from bottom left corner, and again tap to “SKIP”, and complete rest steps by tapping to next, afterwards, you will easily reach to your device homescreen.
Thanks for visiting us, if you have question regarding this method, feel free to ask us in below comment session of this post.
Read More: