
Bypass Google Account ZTE Majesty Pro, Sonata, All ZTE Android 6.0.1
Bypass Google Account ZTE All devices, those have android version 6.0.1, this method would work perfectly on “ZTE MAJESTY PRO” and “ZTE SONATA 3” smartphones, all you need is to enable “Talkback” and then open chrome browser, that’s it.
Note: This Method is successfully tested with “ZTE Majesty Pro z798bl & ZTE SONATA 3 z832 Android 6.0.1“
Let’s Start to Bypass Google Account ZTE:
-Switch on ZTE Device.
-Long tap with two fingers on “Welcome Screen” for 10-15 sec until “Talkback Enable”.
-Once “Talkback Enabled”, means your 50% frp has done here.
| Note: If you are unable to get “Talkback”, you can try this method to Bypass Google Account ZTE Majesty Pro |
-Double tap on “EXIT” from talkback screen.
-By double tapping, go to “Wi-Fi” screen, tap on “Add Network”, and then type there anything so that, keyboard appears.
-There is “MIC ICON” on your Android Keyboard, just tap on that.
-After that tap on “Network Settings”.
Now you have successfully accessed to the “Settings” of your ZTE Device.
Disable Talkback & Connect Wi-Fi:
-Using two fingers, go down to “Accessibility” from settings.
-Turn off talkback from there.

-Go back to “Settings”, and then tap on “Wi-Fi”, after that connect wi-fi to successfully Bypass Google Account ZTE.
-Once Wi-Fi connected, go back to “Settings”, now tap on “Google” from there.
-After that, tap on “Search & Now”, (If this option is not there, follow below one).
-Tap on “NOW CARDS”, after that tap on “SHOW CARDS” to enable it.
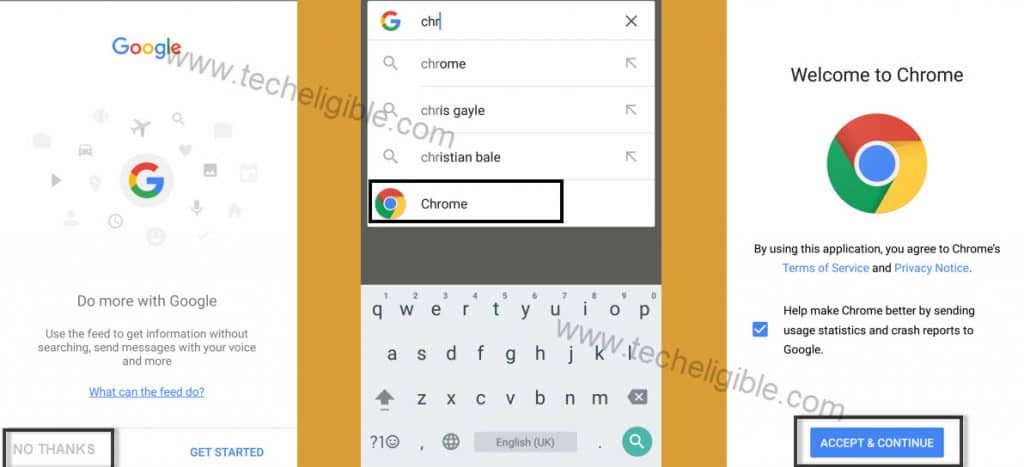
-Tap on “NO THANKS”, after that type in google search bar “CHROME”, and tap on “CHROME ICON” to open it.
-Now tap on “Accept & Continue”.
Download FRP Tools to Bypass Google Account ZTE:
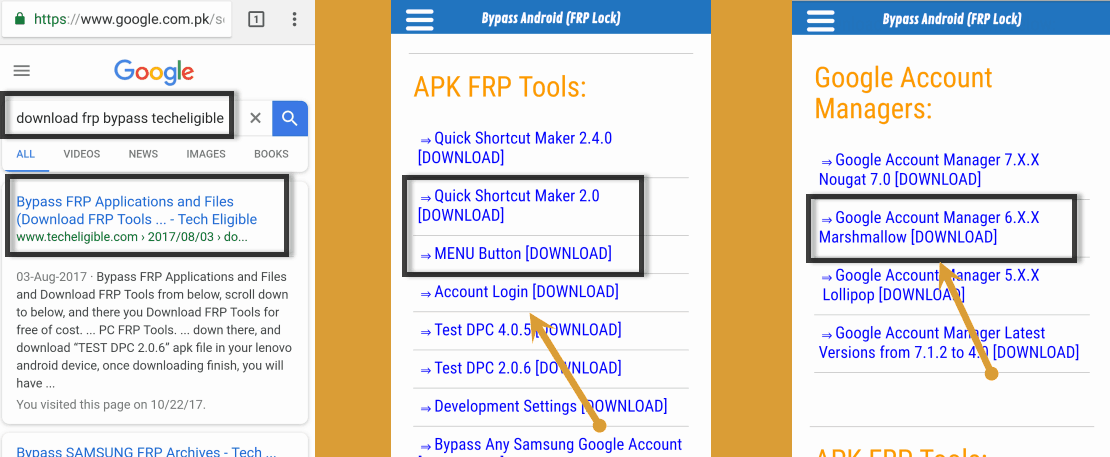
-Type in chrome search bar “Download FRP Tools Techeligible“.
-Open most relevant search result from there as shown in below image.
-Now download from there below frp apps:
1. Google Account Manager 6.0.
2. Quick Shortcut Maker 2.0
3. MENU BUTTON.
-Once downloading finished of all apps, you will get popup bottom of your screen, just tap on “OPEN”.
Install Downloaded Apps:
-Tap on “Google Account Manager”, to install it, if you get “Installation Blocked” popup, just tap on “Settings” from popup, and then enable “Unknown Sources” from there.
-Now tap on “Install” to install google account manager, after that tap on “DONE”.
Install & Open MENU BUTTON App:
-Tap on “Menu Button”, after that “Install”, and then tap on “OPEN”.
-You’ll have “App Update” popup, tap 4 times on “CLOSE” to close it.
-Tap on > Display > Display the Settings Screen > ALLOW > Display the Settings Screen > enable “MENU BUTTON IME” > Tap on “Back Key”

-Tap on “Display the Setting Screen”, tap to enable “Permit Drawing over other apps”, tap on “Back Key”.
-Tap on > Display the Setting Screen > Menu Button > turn it “ON” > Tap on “Back Key” to go back to Menu button app.

-Tap on “DISPLAY”, now you will have “MENU BUTTONS” on right side to Display 3 dots Missing issue.
-Tap on “BACK KEY” to go back to “DOWNLOAD” folder.

Now you have successfully enabled “MENU BUTTON” on your ZTE device, go back to “Download” folder, so that we could install “Quick Shortcut Maker 2.0” as well.
-Tap on “Quick Shortcut Maker”, and then tap on “Install”, after that “OPEN”.
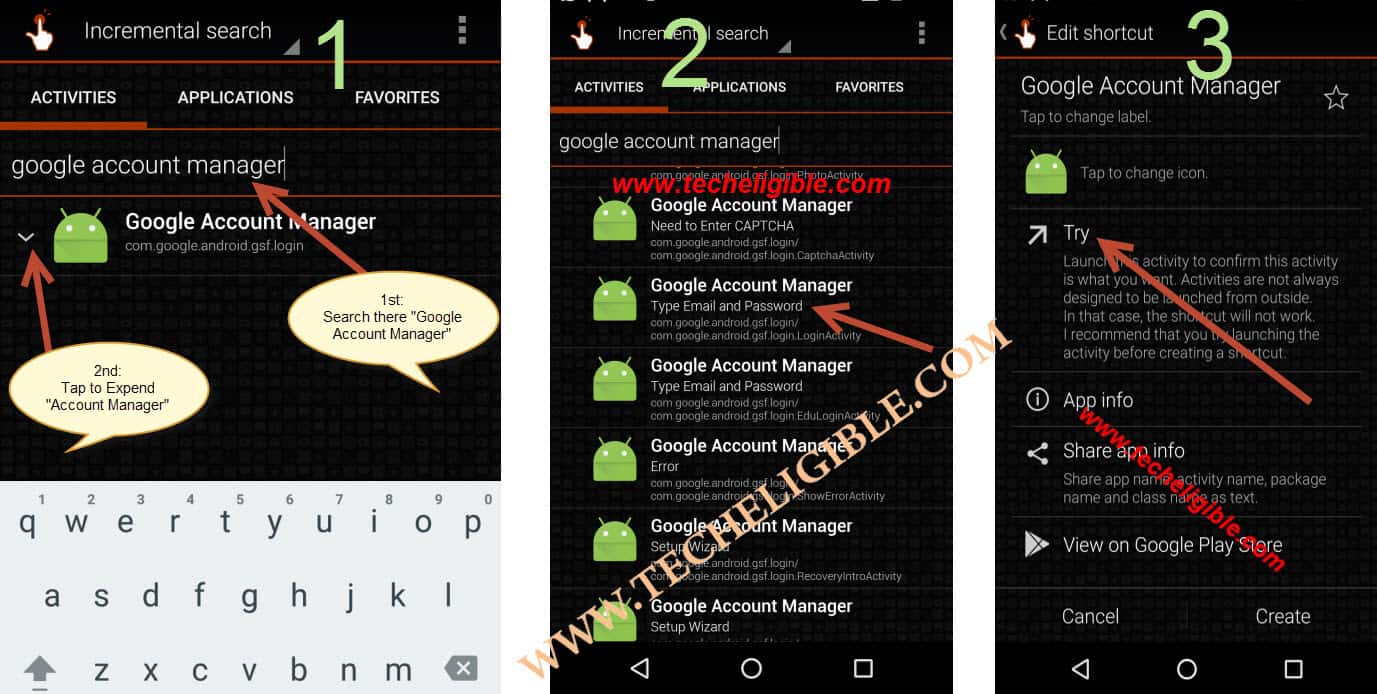
-Type “Google Account Manager” in search bar, after that tap on “Google Acc Manager” to expand it.
-Now select one “Google Account Manager” that appears with “Type email and password”.
-After that, tap on “TRY”.
Add Latest Gmail Account to Remove ZTE FRP:
-Tap on “3 Dots” from MENU BUTTON.
-After that tap on “Browser Sign-in”.
-Now add your new gmail account there to Bypass Google Account ZTE.

-Once accounted added successfully, just restart ZTE device by pressing power key.
-Now complete initial setup simple to access your ZTE Smartphone.
Thanks for visiting us, you can ask any question regarding this method in comment box, do mention complete detail of your device.
Read More:
How to remove frp all ZTE Devices