Our article provides four reliable methods to help you out, how to Bypass FRP LG K51 Android 9, 10, Android 11 version devices. You can follow up any method according to your device android version. If you don’t remember previously signed in google account on your device after hard reset it. So, don’t worry about this. We will show, how to get back your device with new google account.
Disclaimer: Do not try this frp method on a stolen phone, this is a serious crime, if you are trying to bypass frp on a stolen phone, you may also be jailed, this process is for device owner and for educational purpose only.
| Method 1: Remove FRP LG K51 [Android 11] |
| Method 2: Remove FRP LG K51 [Android 10] |
| Method 3: Remove FRP LG K51 [Android 10] |
| Method 4: Remove FRP LG K51 [Android 9/10/11] |
Method 1: Bypass FRP LG K51 By Bluetooth HeadSet [Android 11]
Required Tool:
1/ PIN Locked SIM Card.
2/ Bluetooth Headset / Airpads.
3/ WiFi Connection.
-We are gonna start this method by turning on phone & Connect to a WiFi network.
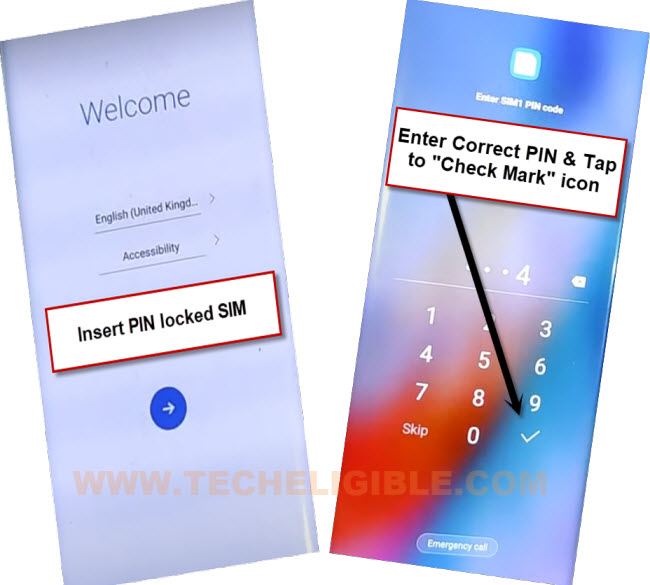
-Insert any PIN locked SIM card on your LG K51 device.
Note: If you are not aware of how to setup PIN code on SIM card. Click here to setup 4 digits PIN code now on your SIM card using any other android device.
-You will be asked to enter SIM PIN, give your correct 4 digits PIN code and tap to “Check mark” icon to go to next.
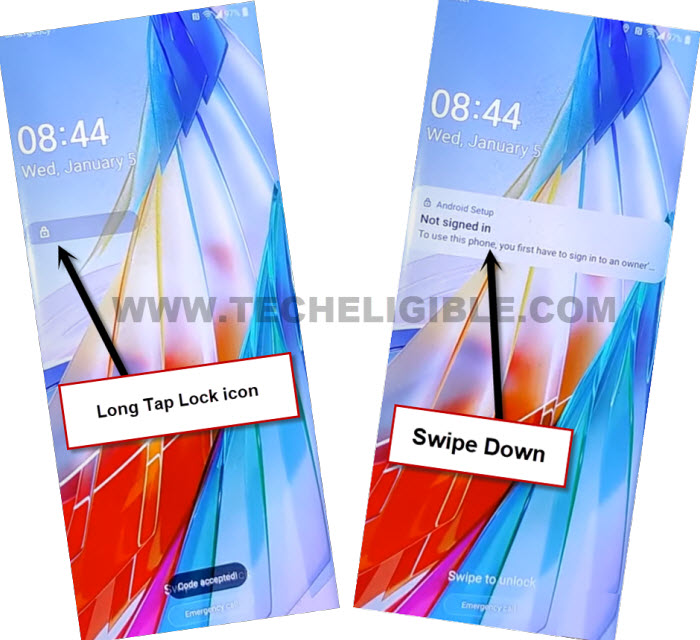
-From next screen, tap twice on a “Lock” icon, after that, hole and swipe down the (Not Signed in) popup message.
-You will get a (Top Notification) bar at the top, from there, long tap on “Bluetooth” icon. After that, turn on “Bluetooth” feature from there.
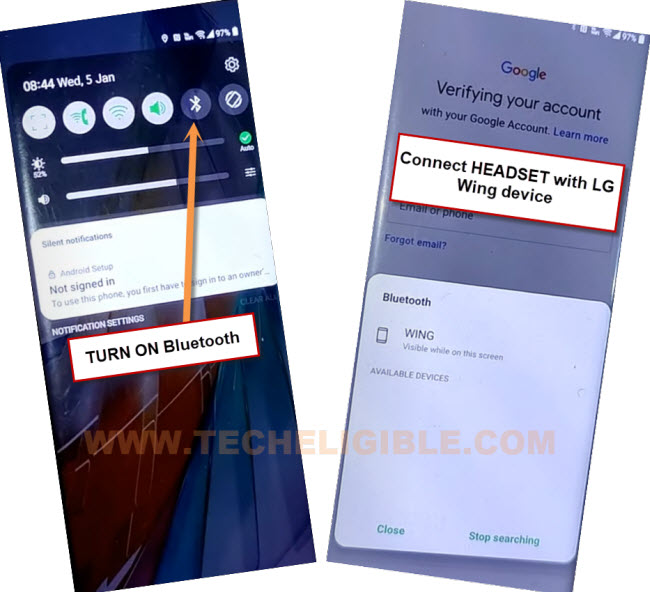
-Make pair with your any wireless bluetooth HeadSet or Airpads.
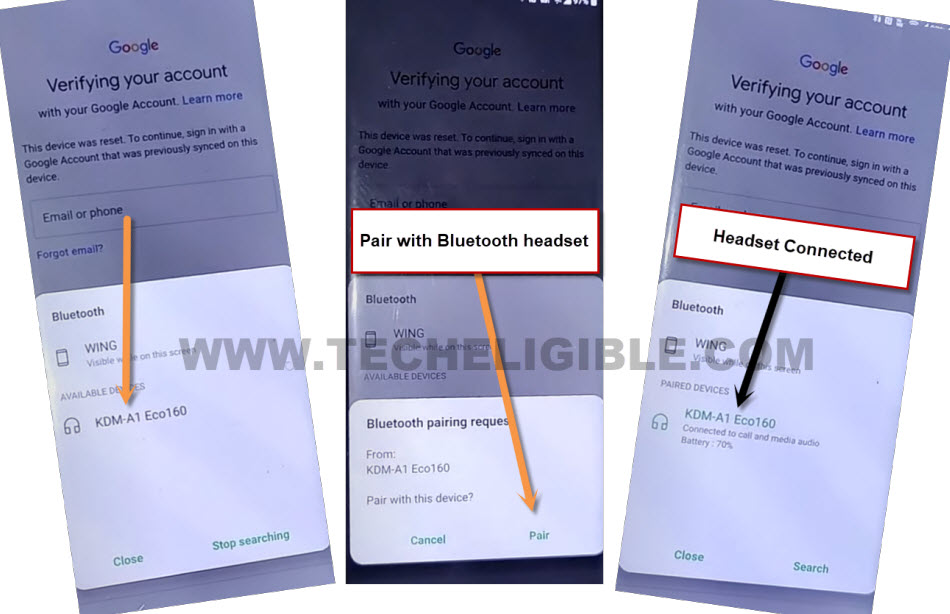
-Once your headset is connected to the LG K51 device, just go all the way back to (Welcome) by hitting back arrow several times.
-Let’s get a (Try Saying) popup window just by long hold and press “Calling” button from Bluetooth headset to Bypass FRP LG K51.
-From there, tap on “Keyboard” icon. After that, type message “open settings”. Tap to “Send” icon button.
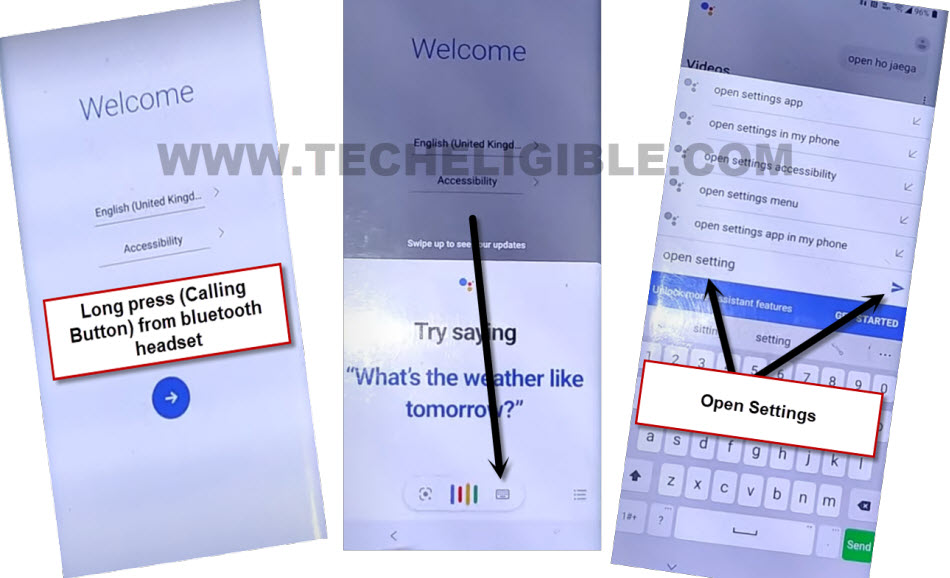
-Congrats, we’ve successfully reached to our LG K51 settings page. From there, tap to > Apps > App info.
-We’re now inside app list page, here, we have to disable google play services applications.
Disable Few Apps from App List:
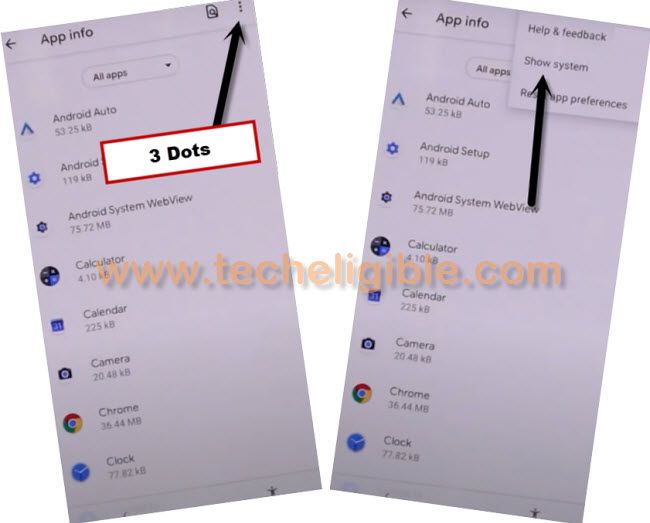
-Firstly, tap to “3 dots” from top corner and hit on “Show system” application.
-Now, find and tap to > Android Setup > Force Stop > Ok.
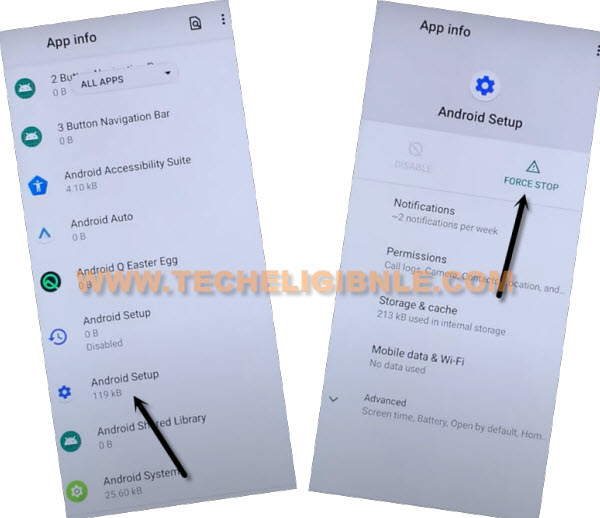
-Now, find an tap to > Google Play Services > Force Stop > Ok. After that, tap over > Disable > Disable app.
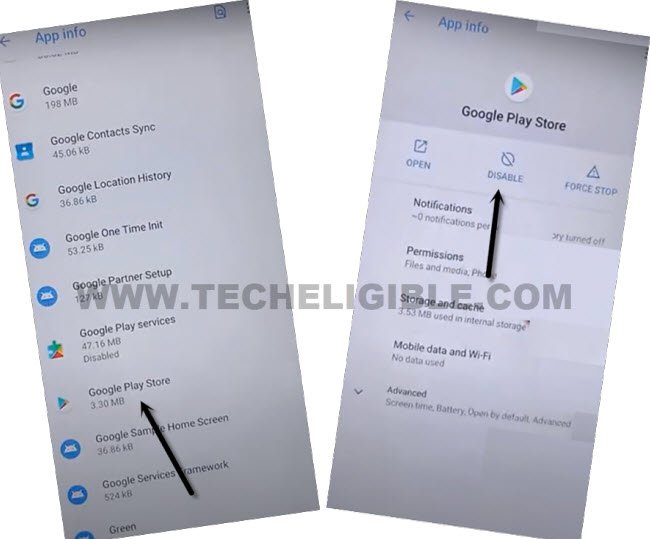
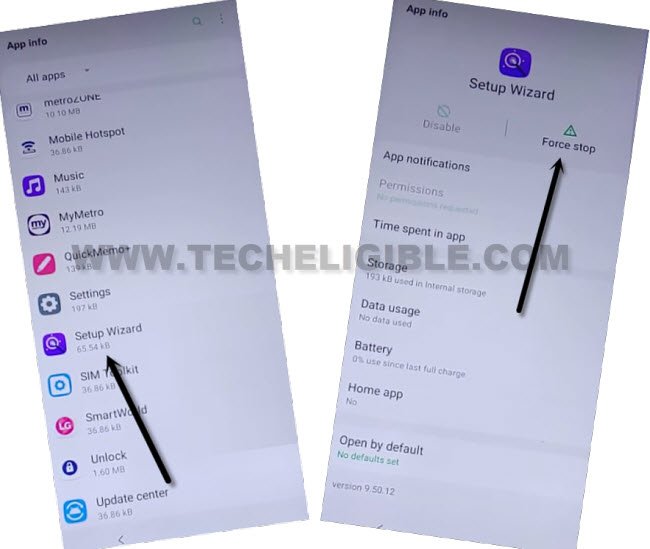
-We also have to disable setup wizard, just find and tap to > Setup Wizard > Force Stop > Ok.
-Restart LG K51 phone, after that, enter correct PIN lock code. Swipe up the lock screen to get into (Welcome) homepage.
-Tap to “Next” icon from welcome screen, after that, tap to “Back Arrow” from bottom on loading page.

-You will get back on (Connect to WiFi) page. From there, tap to > Setup offline > Continue.
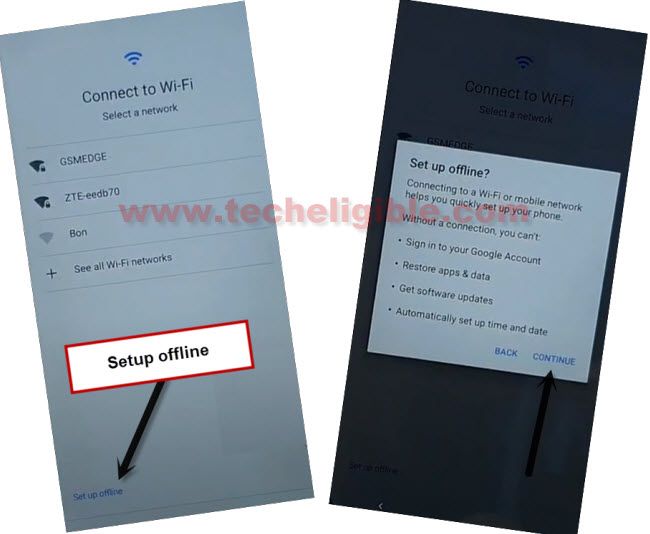
-Wait on (Just a sec…) screen for 30 seconds. After that, go back to (Welcome) screen by hitting back arrow from bottom.
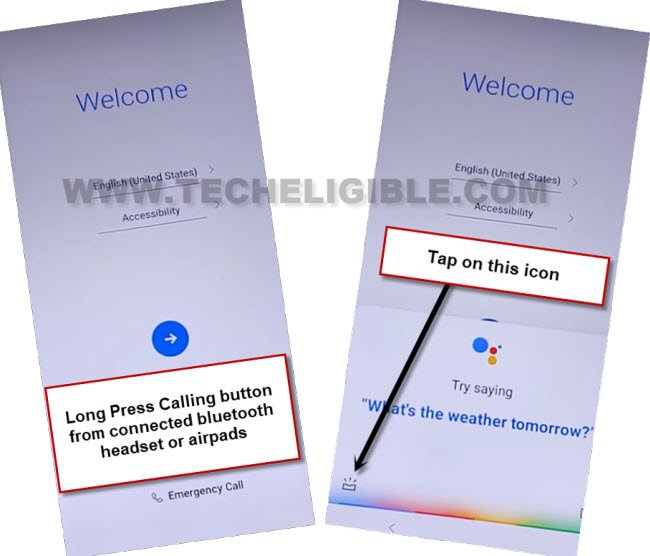
-Long press “Calling” button from your Bluetooth headset or Airpads. You will be displayed a google assistant window.
-Tap to “Bottom Left icon” from there (See below image).
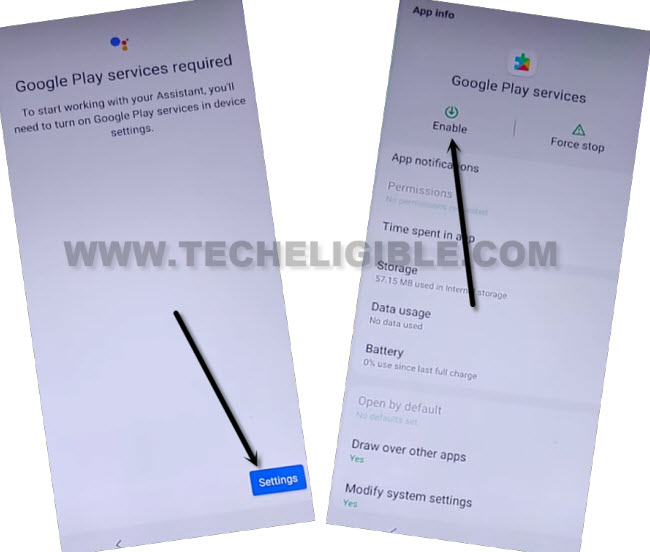
-Hit on “Settings”. Tap to “Enable” option to enable google play service app to Bypass FRP LG K51.
-Go back (Welcome) screen again. Now, you can easily complete setup wizard on your own, you are all done from bypassing frp. Thanks for visiting us.
Method 2: Bypass FRP LG K51 By Pattern Lock [Android 10]
We are going to share with you 2 latest methods on how to Bypass FRP LG K51 Android 10 ?, in this method, you can apply both methods one by one, you don’t require any PC or paid tool, just follow easy steps from here to get back your device with new google and pattern lock.
-Turn on LG device & Connect WiFi, after that go to (Verify your Google Account) screen, there you are asked to enter Gmail account.
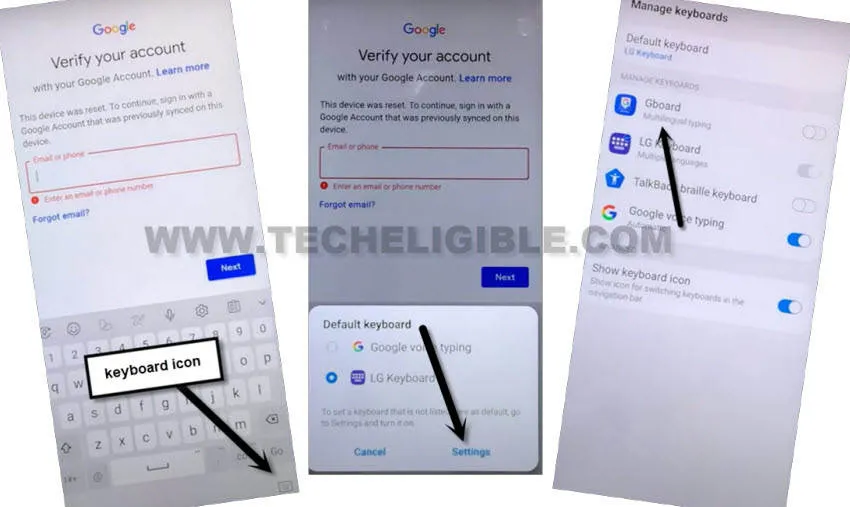
-Tap to “Email or Phone” field tab to bring keyboard, from there, tap to “Keyboard” icon from bottom right corner of the screen same as shown in below image.
-Hit on “Settings” from popup, after that, tap to “Gboard”.
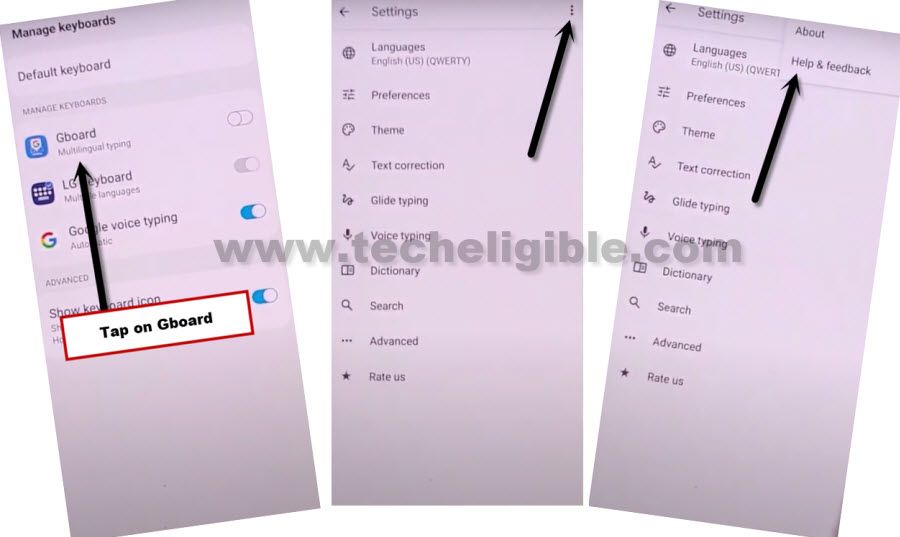
-Tap to > 3 dots > Help & Feedback.
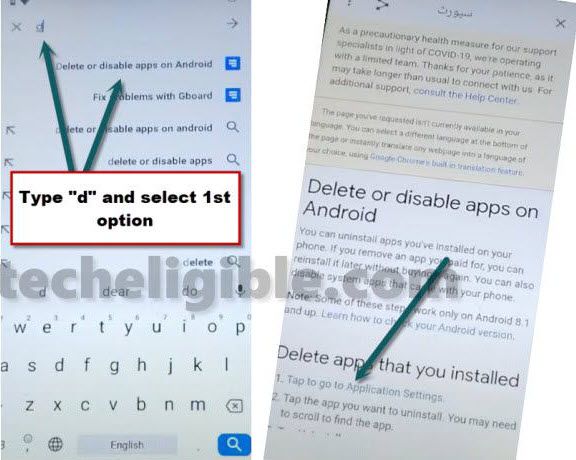
-Type in search area “delete or disable”, after that, hit on “Delete or Disable Apps on Android” form searched result, now tap on blue link “Tap to Go to Applications Settings”
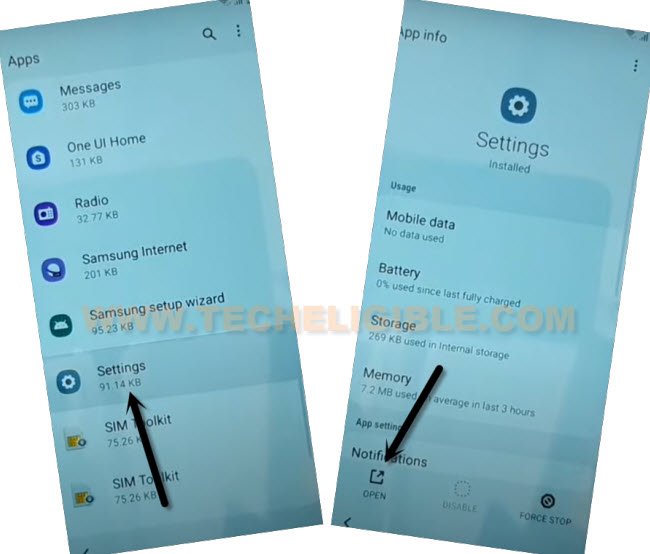
-Search and open “Settings” in your LG K51 device.
Setup Pattern from Fingerprint Option:
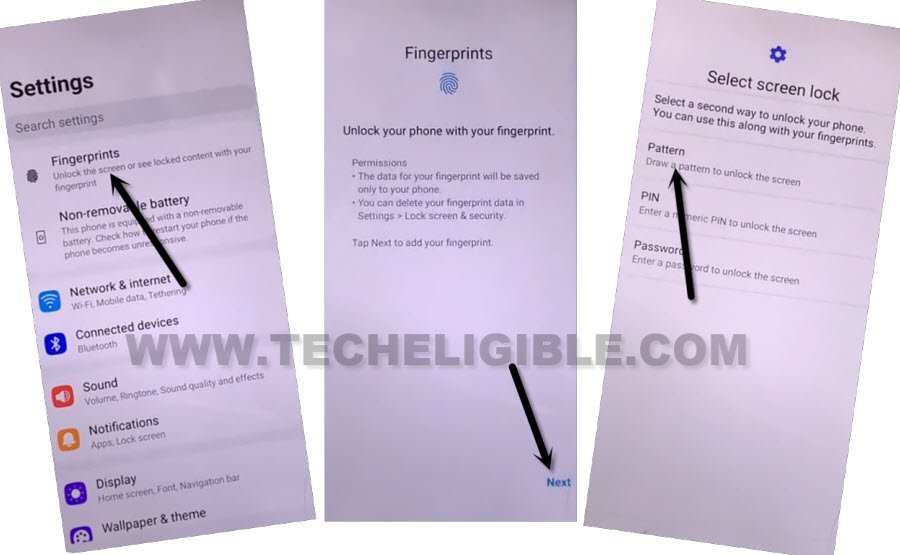
-We’re gonna setup new pattern lock to bypass frp LG K51 without PC, just go to > Fingerprint > Next > Pattern.
-Draw your any new pattern lock there, and tap on “Next”.
-Draw again same pattern, and tap on “Confirm” button.
-From fingerprint screen, just tap over “Back” arrow from bottom left corner.
-Restart your LG K51 device.
Finish Setup Wizard in LG:
-As soon as the device screen is black, just long hold both (Volume Down + Power) buttons at the same time, release “Power button” only, when the LG logo is displayed, then immediately hold (Power button) again.
-You will get enter into factory data reset screen.
-Select “Yes” option there using volume and power buttons.
-Select again “Yes”.
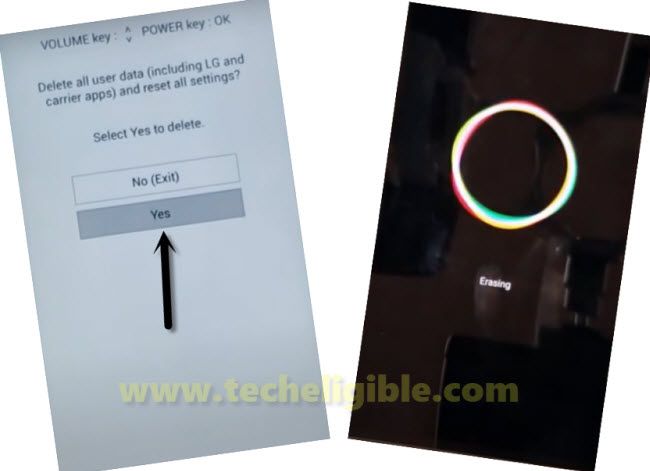
-Allow several minutes for the hard reset process to complete.
-From welcome screen, tap to > Next icon > Next > Skip.
-Let’s Connect to a WiFi Network again.
-Wait on (Checking for update….) screen, this may take time to complete, after that, hit on “Don’t Copy”.
-You will be asked to draw pattern there, just draw same pattern lock, that is created recently.
-Tap to > Skip > Skip from google sign in screen.
-Finish few more remaining step on your own to access your device main home-screen.
Method 3: Bypass FRP LG K51 by SIM Card [Android 10]
-Turn on LG K51, and Remove SIM tray.
-Connect WiFi, and go to the screen “Verify your Account”.
-Now insert PIN Locked SIM card.
Note: The 4 digits PIN lock can be setup in your SIM card easily using any other phone.
-After that inserting the SIM card, you will surely have a screen of “Enter PIN Code”.
-Now just remove SIM tray, and after that “Press Power key” to wake up the screen.
-Now you will have a popup window of “Not Signed in”.
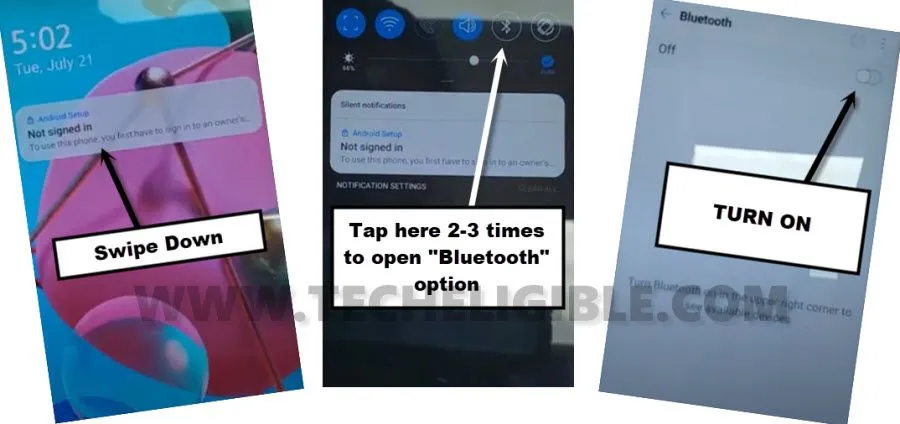
-Swipe down the Popup window (Not Signed in), and this will bring top bar menu options.
-Tap 2-3 times on “Bluetooth icon” from top bar MENU.
-This will open Bluetooth Screen, Turn on “Bluetooth” from there.
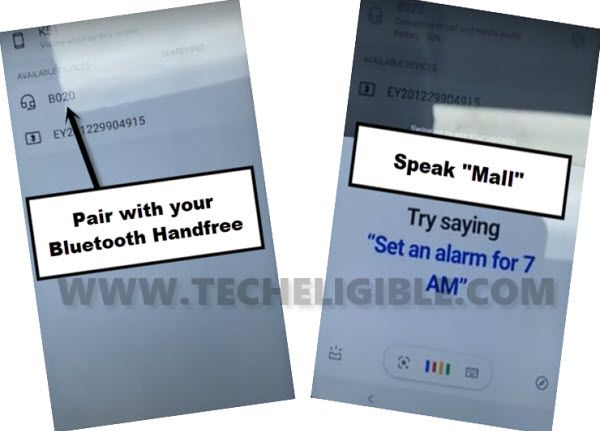
-Make pair with your any Bluetooth handfree.
-After making pair successfully, you just have to long press or 3 time press “Power button / Calling Button” from your handfree, this will open “Google Speak” feature.
-Speak loudly “Mall“, and you will get a list of Mall nearby you.
-Tap to any listed “Mall” there, and then tap on “Direction”.
-Tap to “SKIP” from sign in screen, and then tap on “OK” from the popup window.
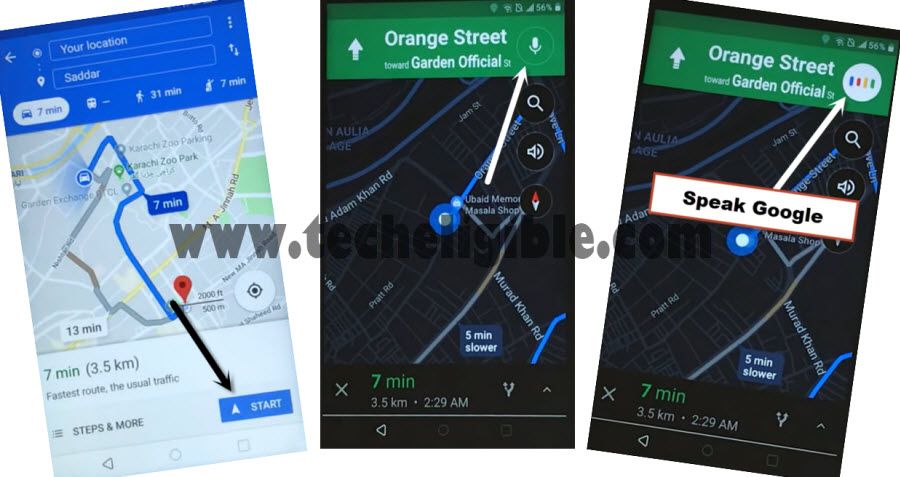
-After that, you will get your “START” button there, just tap on “START”.
-Tap on “Got it”.
-Now Tap on “Mic icon” from top right corner of the screen.
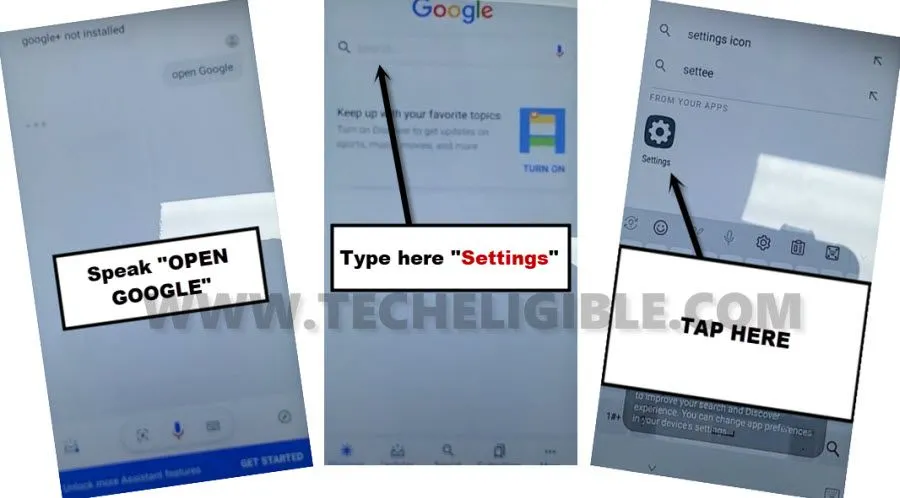
-You have to Speak loudly “Open Google”.
-Once the Google App opened, just type there “Settings”.
-Tap on “Settings” gear icon from searched result.
Setup PIN & Complete Initial Setup Wizard:
-Now tap on > Fingerprints > Next > PIN.
-Setup your any desire 4 digits PIN code there 2 times and then tap on “Next”.
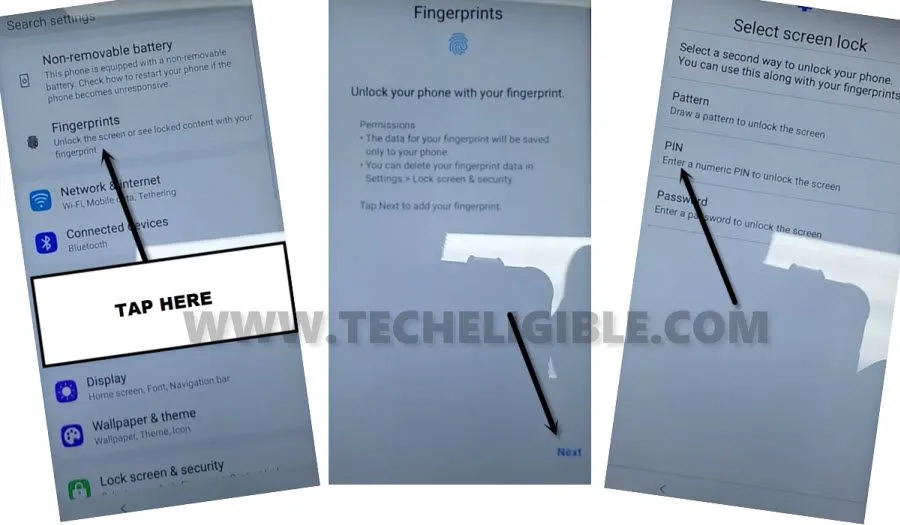
-Now Enroll your fingerprint there.
-Once you enrolled fingerprint successfully , just tap on “OK”.
-Restart LG K51 Phone, before starting phone, it will ask you to enter PIN code, just give the same PIN code that you have already setup in your phone.
-Complete your setup wizard by tapping on > Next Arrow > NEXT > Skip > Don’t Copy > Enter your PIN Code & tap on “OK”.
-Now tap to “SKIP” from the google sign in screen, and then again tap on “SKIP” from popup window.
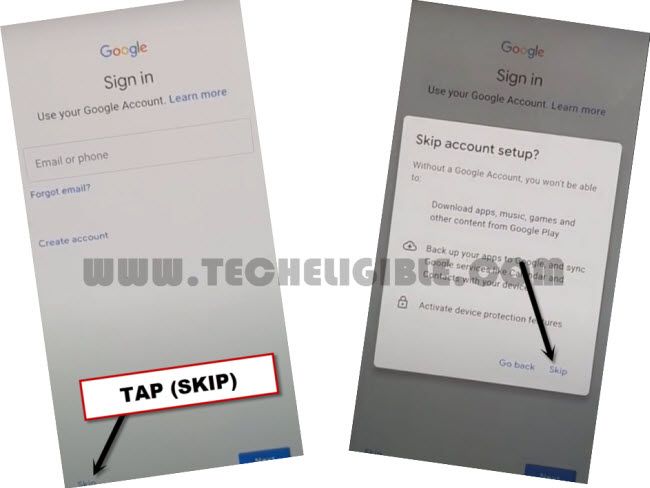
-Tap to > More > More > Accept > OK.
-Select both “I agree” option, and then tap to “DONE”.
-Congratulation, you are done to from FRP Bypass on LG K51 Android 10 easily without any APP and PC, we hope this method has worked perfectly with your Phone as well, don’t forget to make comment below of this post.
Method 4: Bypass FRP LG K51 Without PC [Update New]
-Begin the procedure by powering on the LG device and first connecting it to WiFi.
-Return to the (Welcome) screen. To activate the talkback feature, press and hold both the (Volume UP + Down) buttons at the same time. Maintain pressure on the buttons until the (Talkback Shortcut) popup window appears. Then, select the “Turn on” option.

-Hold down both (Volume UP + Down) keys once more; this will bring you to the (Welcome to Talkback) page.

-You need to make gesture on screen by Swipe right and then swipe up on the display. A popup window will show, and from there, double tap on > While using the app > Use Voice Command.
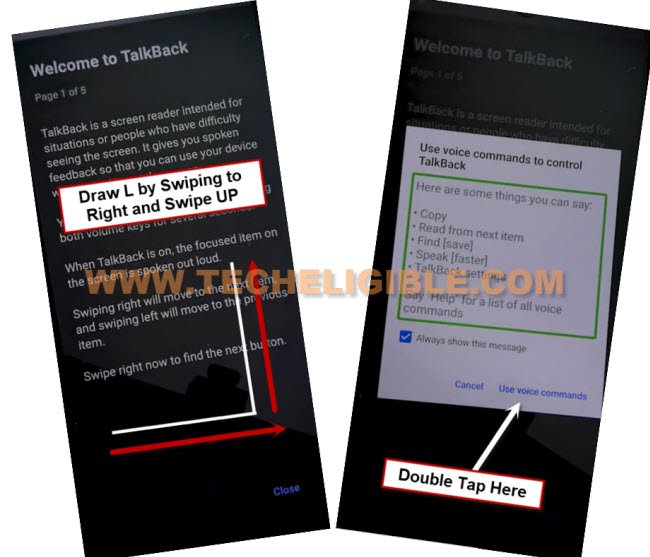
-Next, green lines will appear on your display; loudly say “Open Google Assistant.”
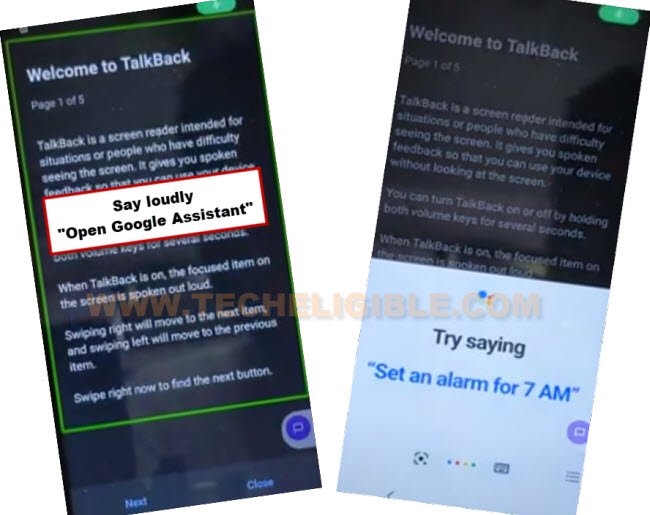
-Afterward, the (Try Saying) popup screen will show up, just perform a double tap on the “Keyboard” icon.
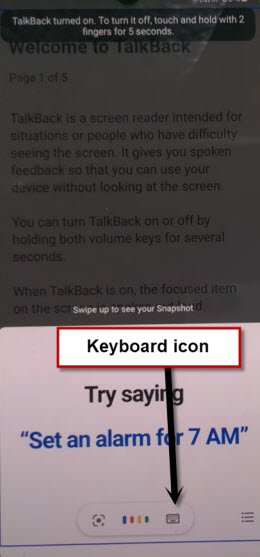
-Now, we will disable the talkback function by pressing and holding both buttons (Volume UP + Down).
Go in Primary Settings Page
-When talkback is completely turned off, type “Open youtube” into the field and select the “Send” option. This action will direct you to the youtube website immediately.

-Select the “Profile” icon in the upper corner and click on the “Settings” option.
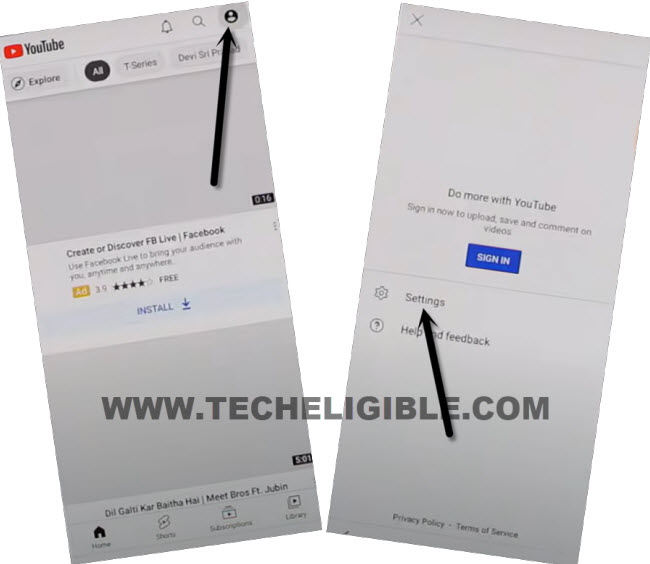
-Then, choose these options from youtube webpage > About > Youtube terms of services.
-After this step, select > Accept & Continue > No Thanks. Finally, the google chrome browser will be launched successfully.

-We need to reach the primary settings page of the LG K51 phone. To do so, search google with “Techeligible” text.
-Click on the first result from the official techeligible site and open the menu list by tapping the menu icon in the upper corner. Finally, select “Download FRP Tools.”

-You will now be on the FRP tools page; from there, tap to open “Access device settings”.
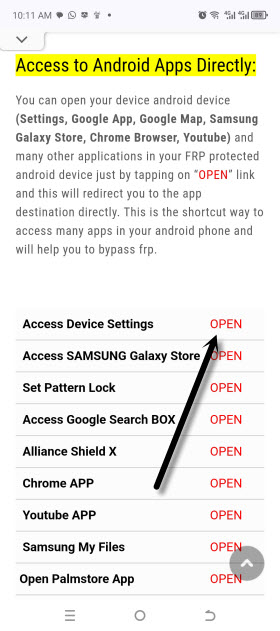
Disable 4 Main Apps:
-Navigate to > Apps > App info.
-Then, click on the > 3 dots > Show system. This action will reveal all hidden apps as well.
-Locate the “Android Auto” app on the app list page and simply disable and force stop this application.
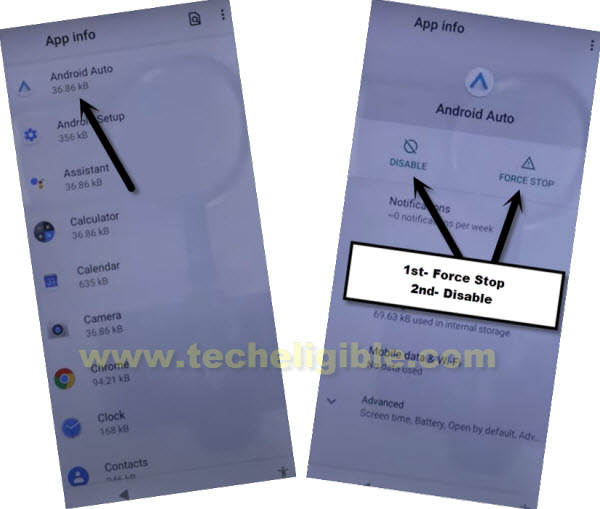
-Press the “Back Arrow” icon to return to the app list page.
-Locate and select the “Android Setup” application. You also need to (Force Stop & Disable) this app as well.
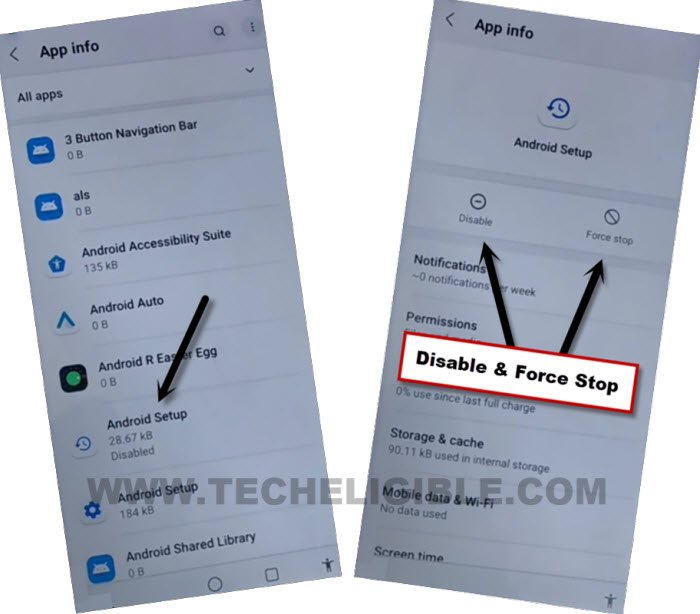
-Return to the app list page again. After this, find and choose the “Google Play Services” apps. Disable and force stop this application.
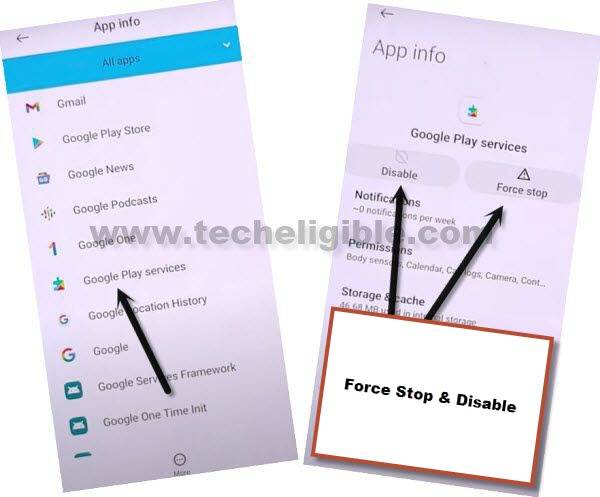
-Return once more. Now, proceed to disable and force stop the “Google Play Store” application.
-We have effectively disabled four key applications from the FRP locked LG K51 phone.
Complete Setup Wizard Steps
-It is time to restart the device now.
-After the restart is complete, from the initial (Welcome) page, navigate to > Next > Skip.
-Click the “Next” icon from the welcome screen, then tap the “Back Arrow” at the bottom of the loading page.

-You will arrive at the (Set internet connection) screen. From here, we need to perform a simultaneous action.
-Use your two fingers together to disable WiFi and simultaneously select the “Next” button. If performed correctly, you will see the (Just a sec…) display. But, this display will not complete, go back to (WiFi) page by hitting on back arrow option.
-Once you get the (Just a sec..) loading page, just hit over the back arrow icon to go back on the WiFi settings page and turn on again the WiFi connection.

Turn on Back the (Google Play Services)
-Activate the talkback feature by pressing and holding the (Volume UP + Down) buttons. Following this, you will once more encounter the (Welcome to Talkback) screen.
-From this point, double-click on the > Close > Close options.

-We have to get the voice command popup window just through swipe right and swipe up on screen. From the popup screen, double-hit over the “Use Voice Command”
-Afterwards, promptly say “Open Google Assistant” in a loud voice.

-Next, you will be prompted to activate the Google Play Services application.
-Deactivate the talkback feature now by pressing and holding the (Volume UP + Down) buttons again.
-Click on “Settings.” Then, enable the application by selecting the “Enable” option.
–
Tap once on the “Back Arrow” to return to the (Set Internet Connection) screen.
-Now, let’s “Turn off WiFi” while pressing the “Next” option at the same time with your two fingers together.
-You will briefly see the (Just a sec…) loading page once again for just a few seconds. After that, you will be on a (Google Services) page.

-From there, touch > More > More > Accept.
-Its finish now, you can setup your LG device by on your own without facing the google verification screen again. After accessing to the main home-scree, don’t forget to setup new screen lock protection and google account.