
2 Ways to Remove FRP Tecno Spark Go Plus, and Tecno Spark Go
We’re gonna show you 2 best methods to Remove FRP Tecno Spark Go Plus and Tecno Spark Go (Android 12) without using any PC and paid frp tool. You can apply both methods one by one without any risk. The method-1 is the most latest method. If you have (Android 12) version device, so, follow up guideline from (Method 1).
Note: We highly recommend you to apply this method only on your own device, if you are not owner of this Tecno device, or you found this from somewhere. You must return this device to its real owner.
| Method 1: Remove Google FRP Tecno Spark Go Plus, Tecno Spark Go [Android 13] New |
| Method 2: Remove Google FRP Tecno Spark Go Plus, Tecno Spark Go [Old] |
Method 1: Remove FRP Tecno Spark Go Plus and Tecno Spark Go
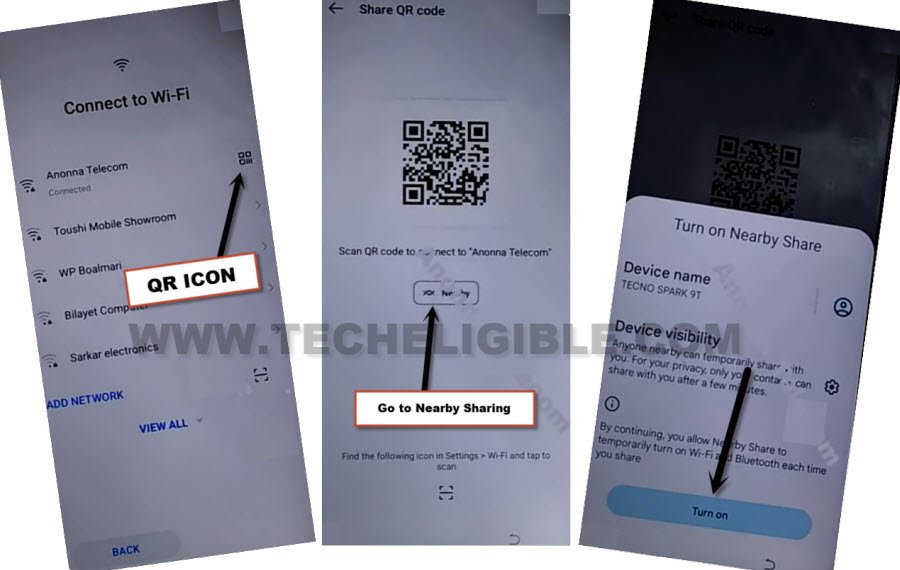
-Let’s begin steps by turning on Tecno phone.
-Connect WiFi. From same (Connect to WiFi) page, just go to “QR Code” icon. Afterwards, go to > Nearyby > Turn on.
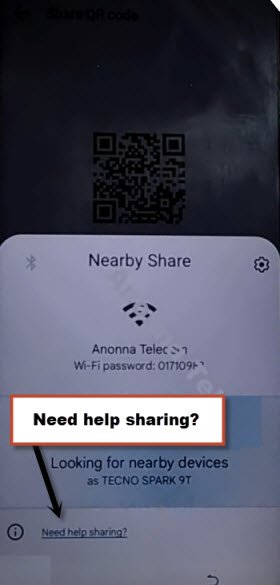
-Go to link “Need Help Sharing?”.
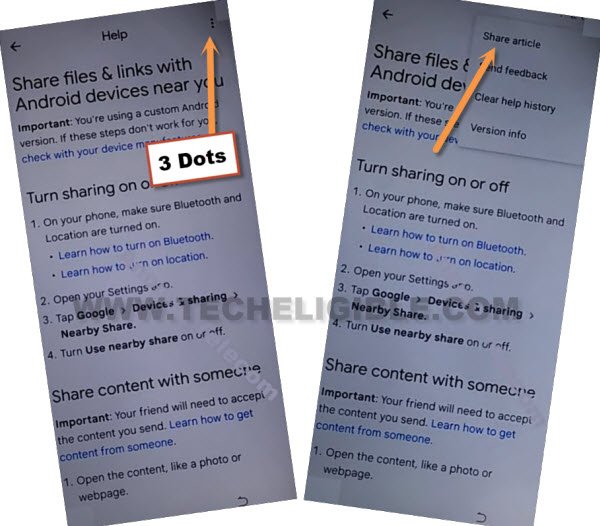
-You will be on (Help) page, just hit on > 3 dots > Share Article.
-You will have some share options, choose only > Phoenix > Phoenix > Agree & Start > Skip (From top right corner).
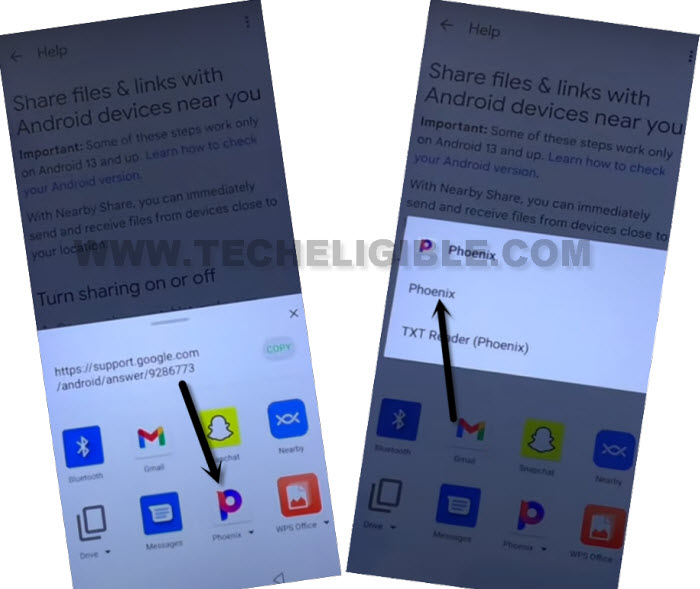
-After that, you will be inside (Phoenix browser).
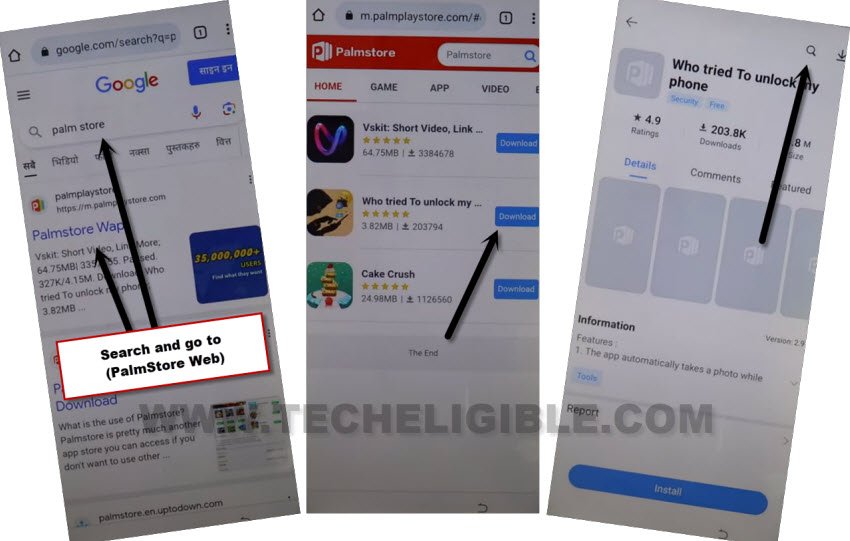
Search and Go to PalmStore Wab:
-Search there “Palm Store”, and go to “Palm Store Wap” from searched result. (See below image)
-Hit on “Download” button from any app, after that, tap to “Open” from popup.
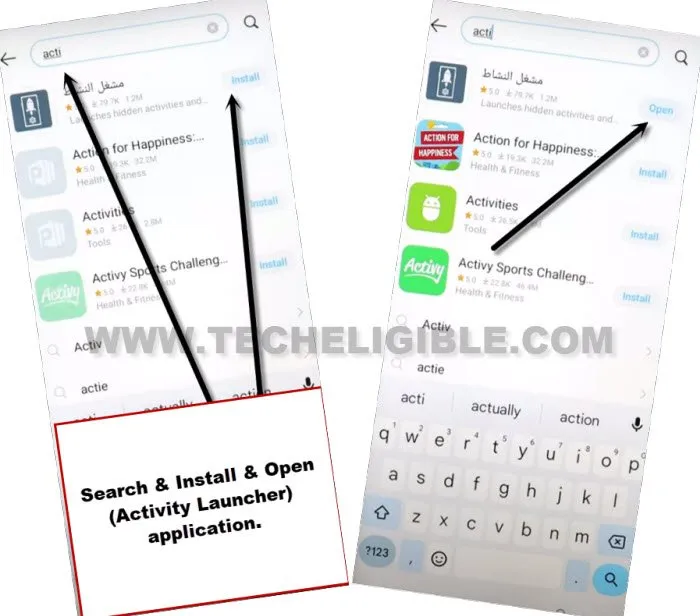
-Tap over “Search icon” from top corner.
-Search “Activity Launcher” from there.
-Install & Open (Activity Launcher) application.
-Tap to “Ok”, after that, wait on loading screen to be done.
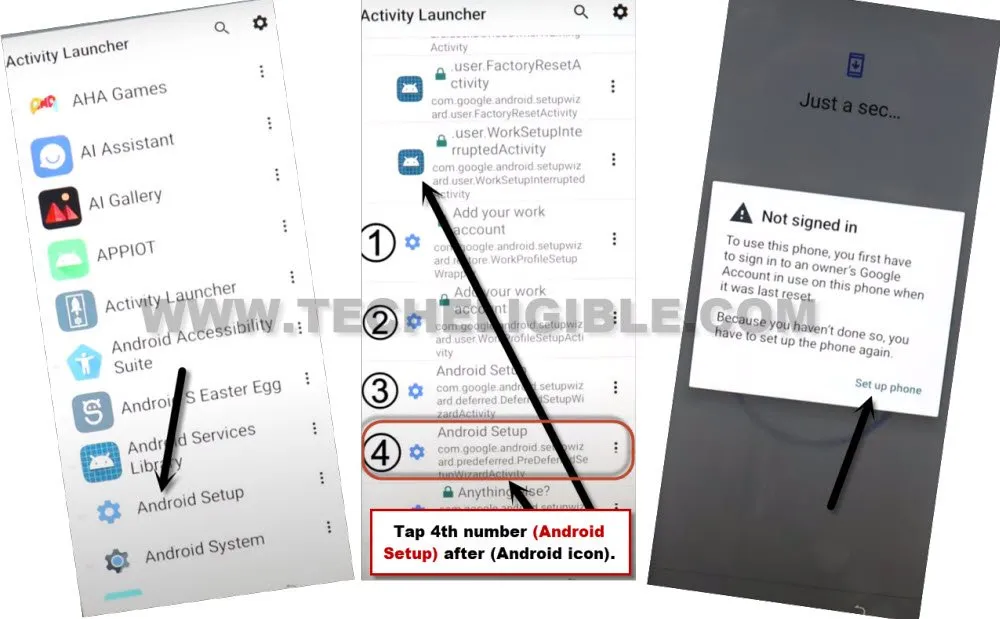
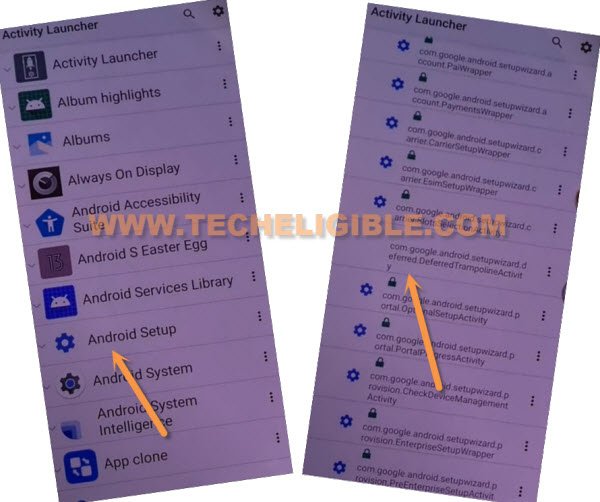
-Once you reach inside the app, just tap on “Android Setup”.
-There, you will have a huge app list inside (Android Setup), go down, and find out (Android icon) same as mentioned below.
-Hit on 4th number (Android Setup) after that android icon same as shown in below image. Go to “Set up Phone”.
-You will get back on (Select Language) screen.
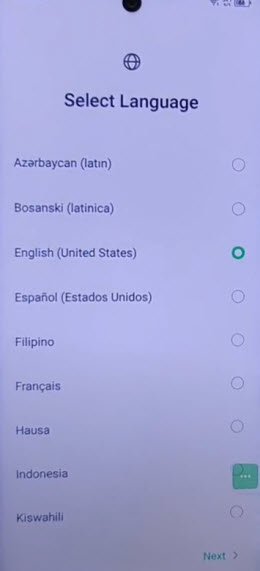
-Go to > Next > Next > Skip.
-You will reach on (Connect to WiFi) screen. We have to repeat all septs again to launch (Activity Launcher) application.
Let’s Repat Steps to Access Activity Launcher App:
-Tap over “QR Code” icon. Afterwards, go to > Nearby > Turn on.
-Go to link “Need Help Sharing?”.
-Hit on “3 dots” from top upright corner of the screen, and tap on “Share Article”.
-From share box, just hit over > Phoenix > Phoenix > Agree & Start > Skip (From top right corner).
-The Phoenix browser will be launched, we have to search and go to (Palm Store Web) to Remove FRP Tecno Spark Go Plus and Tecno Spark Go.
Launch PalmStore to install Activity Launcher:
-Search there “Palm Store”, and go to “Palm Store Wap” from searched result. (See below image).
-Tap to “Download”, and “Open” at any application from there.
-Tap over “Search icon” from top corner.
-Search “Activity Launcher” from there.
-Install & Open (Activity Launcher) application.
-Hit on “Android Setup”, you will see there a big list of too many android setup, just scroll down, and tap to “com.google.android.setupwizard.deferredTramplineactivity” same as shown in below image.
-Tap to > Start > Skip > Next > Next > No Cable > Copy Without Cable.
-Hit on “Next”. Tap to “Next Keyboard” from popup window.
-Hit over “Use my google account instead”.
-Just tap to > Next > Next, you will be displayed (Verify your device) screen.
Note: The below image is from (V20) screen shot, in your case, you will see your device model number on (Verify your device) screen.

Use Other Android Phone to Connect With:
-We’ve to use any other android phone, and, you must know other android phone Gmail account. Because, with that same Gmail account, we will sign-in in Tecno Spark Go phone too. In simple word, we will login in Tecno Spark Go phone with the same google account, that is already logged in in other android phone.
-In other android phone, just go to > Settings > Google > Setup & Restore.
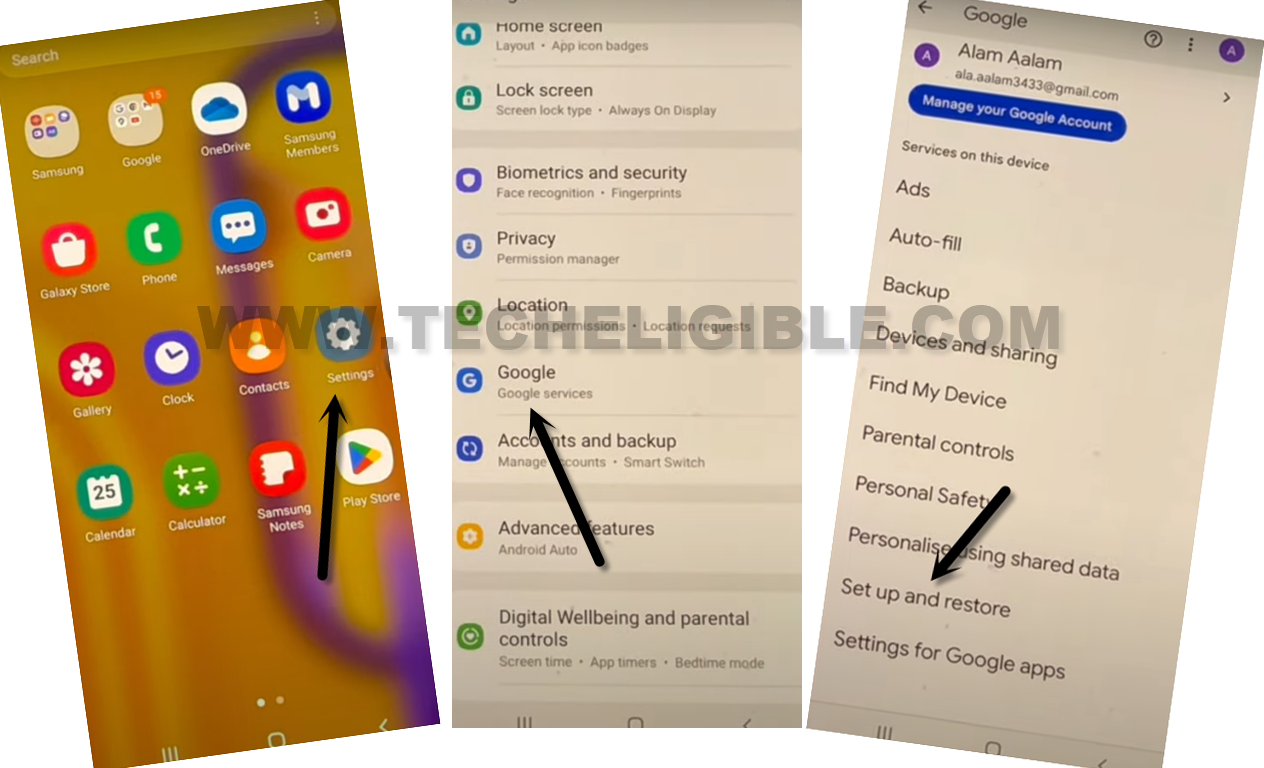
-After that, hit on > Set up Newby device > Next.
-Wait on searching for device, afterwards, you will be displayed (Verify the shape) screen on both devices.
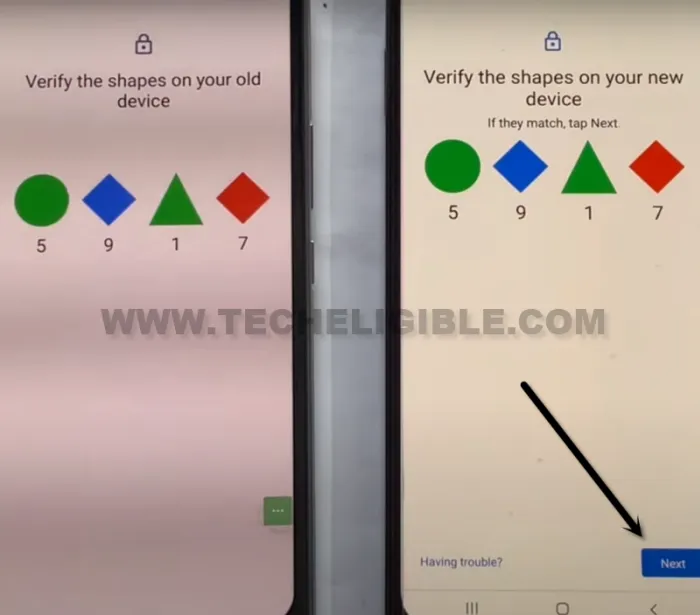
-Tap to > Next > Copy from other android phone to Remove FRP Tecno Spark Go Plus and Tecno Spark Go.
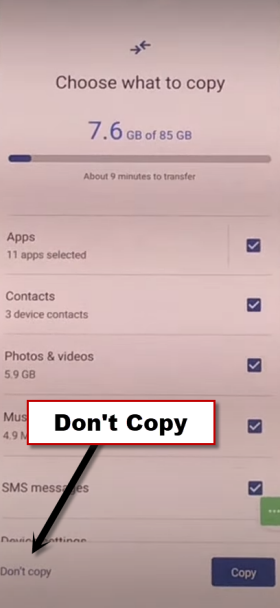
-Wait on (Getting ready to copy…) screen. Once its done, you will have another screen of (Choose what to copy) on Tecno Spark Go, Spark Go Plus.
-Tap to > Don’t Copy > Don’t Copy > Next.
-From google services screen, hit on “Accept”, and complete all setup wizard steps to access device directly.
Method 2: Remove FRP Tecno Spark Go, Spark Go Plus
This is a method 2, if you are failed from 1st method, go for this other method to bypass frp on Tecno Spark device. We are going to install and open apex launcher to access our tecno device settings, and then we will setup new pattern lock there, but you must be thinking how is this possible to access device settings on frp locked phone, the procedure is very simple.
1. You have to connect WiFi first, and then from go to the screen (Connect to WiFi).
2. Tap to “Add Network” to bring keyboard, and hit on > MENU icon > Settings.
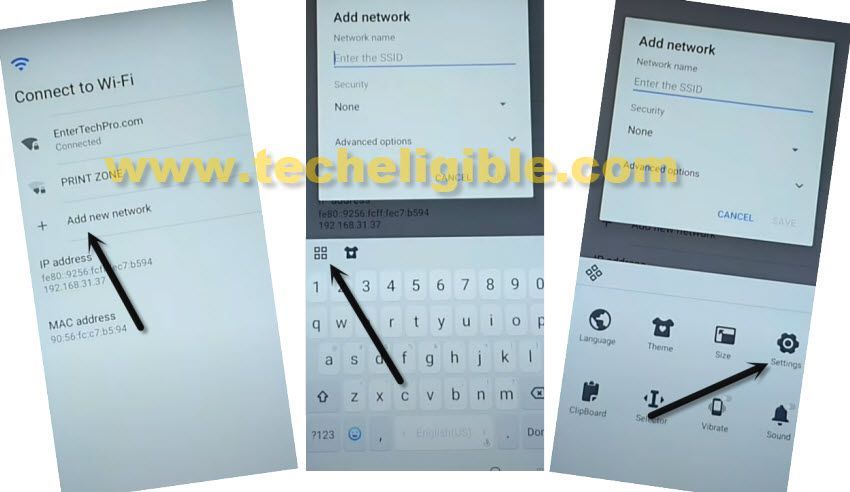
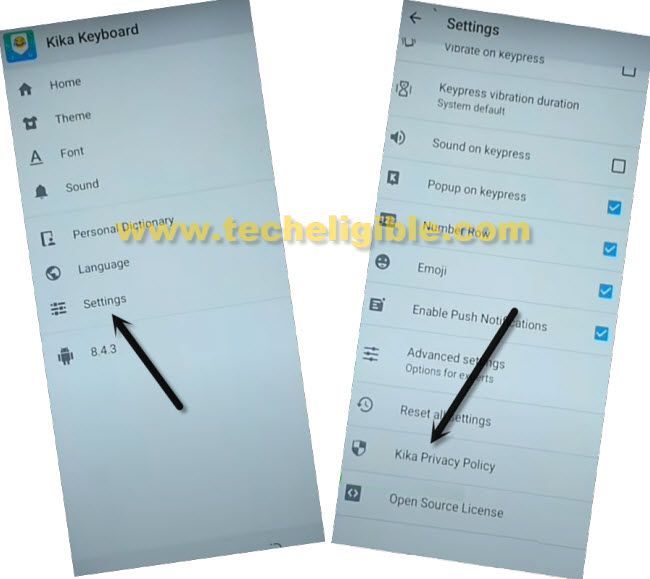
3. Tap to > Settings > Kika Privacy Policy.
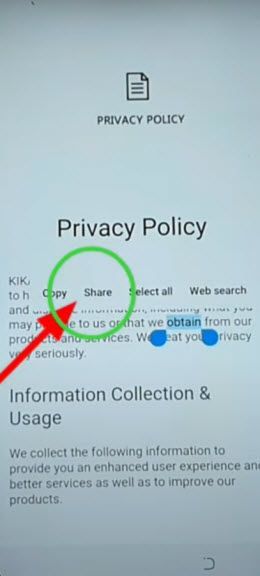
4. Long tap at text and tap to “Share”.
5. Long tap at “Gmail icon”, and then tap to “App info”.
![]()
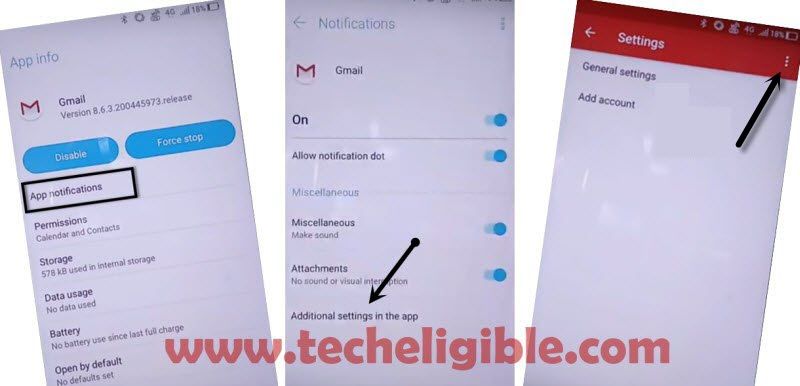
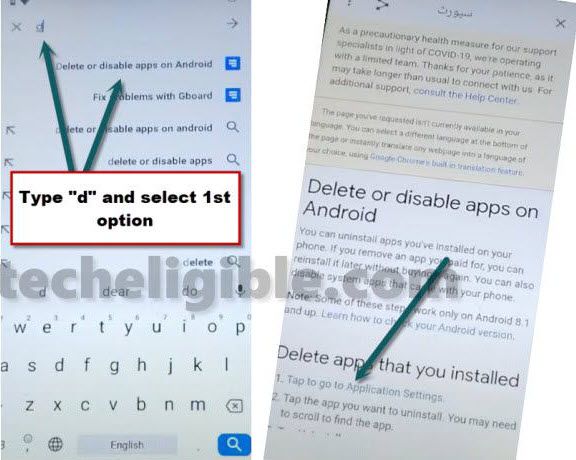
6. Afterwards, you have to go to > Notification > Additional Settings in the app > 3 dots > Help & Feedback.
7. Type letter “d”, and then tap to “Delete or disable app on android”, and then tap on hyper link “Tap to go to application settings”.
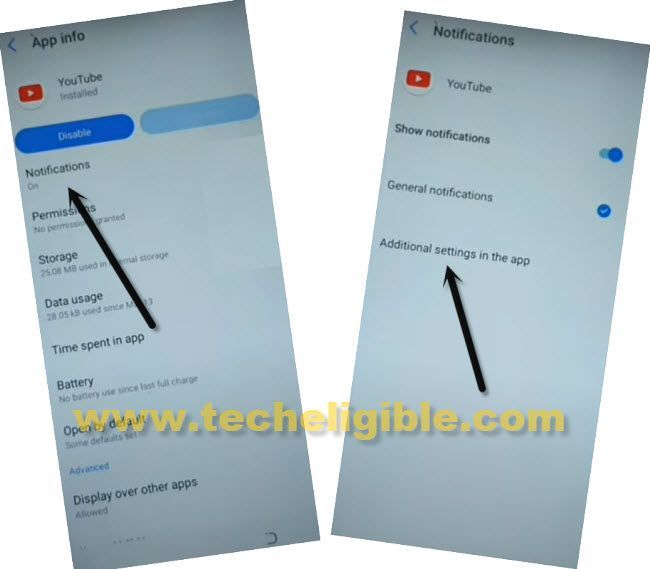
8. From the list of app, just go all the way down and tap to “Youtube”.
9. Go to > Notifications > Additional Settings in the App.
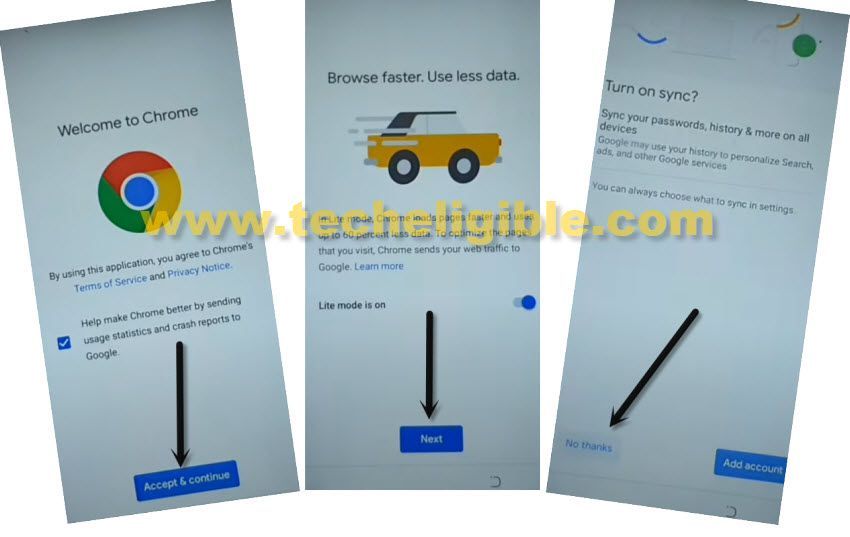
10. Go to > About > YouTube Terms of service.
11. From the chrome screen, go to > Accept & Continue > Next > No Thanks.
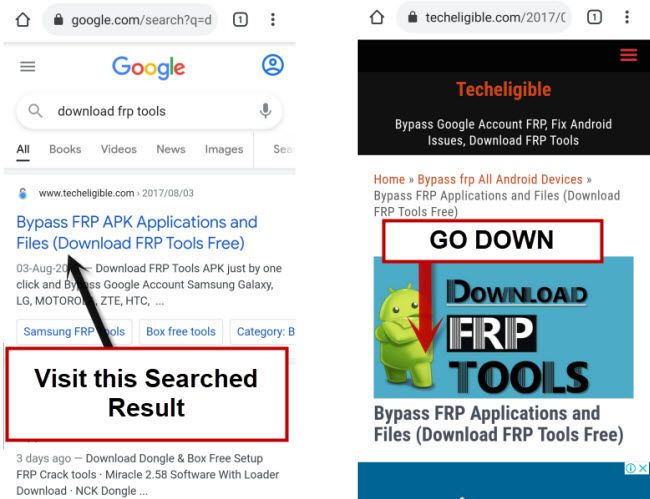
Download Apex Tool:
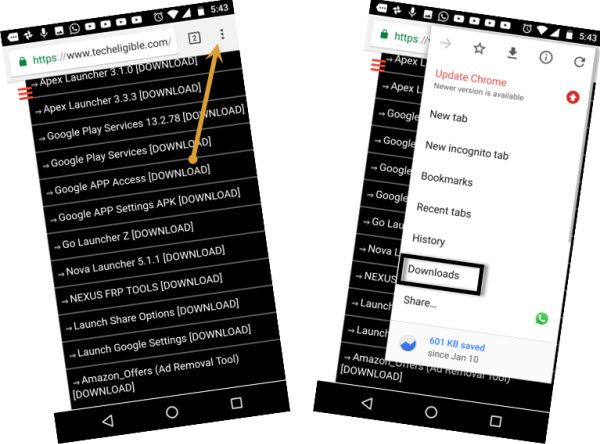
12. Search in chrome “Download frp tools“, and visit our website searched result to Remove FRP Tecno Spark Go Plus, Tecno Spark Go
13. Go down & download from there “Apex Launcher” app, wait until this process finish.
14. Tap to “3 dots” from top right corner and hit on “Download” to access this downloaded app.
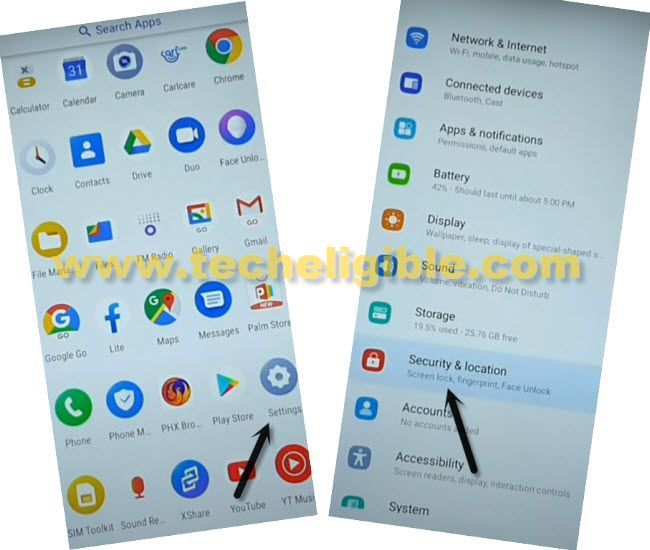
15. Tap on > Apex Launcher > Settings > Enable option (Allow from this source).
16. Go back, and tap to > Install > Open.
17. Open > Settings > Security & Location.
18. Go to > Screen Lock > Pattern > Yes

19. Draw any your desire pattern on screen.
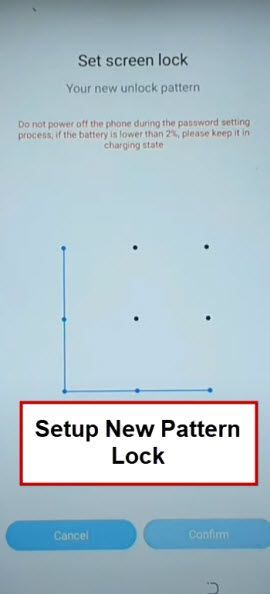
20. Restart device, and then finish initial setup wizard, use your already setup pattern lock on a (verify pattern) screen.
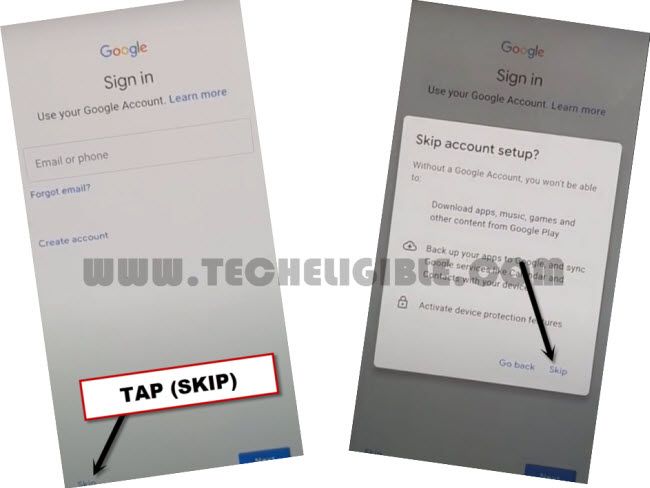
21. You must have “SKIP” option on google Sign in screen, just tap to > SKIP > SKIP to Remove FRP Tecno Spark Go Plus, Tecno Spark Go.
Thanks for visiting this post, don’t forget to mention in comment area, if you liked this post.