
2 Methods to Bypass Google Account LG Stylo 2 Plus (Enable Unknown Sources Easily)
Enable “Unknown Sources” easily, fix grayed out issue and Bypass Google Account LG Stylo 2 Plus Android 6.x.x with latest 2 methods, if you’ve forgotten your previous synced gmail account, and you’ve got frp lock, so you can easily fix that issue from here.
Many users facing problem while unlock frp lock, because they can not install any app like “Quick Shortcut Maker” etc, because unknown sources grayed out, so this post would help you to Bypass Google Account LG Stylo 2 Plus.
⇒ Method 1: Bypass frp LG Stylo 2 Plus (Enable Unknown Sources)
⇒ Method 2: Bypass frp LG Stylo 2 Plus by Latest 2019 Method *
Method 1: Bypass Google Account LG Stylo 2 Plus
-Connect “Wi-Fi” to your device first.
-Go back to very first “Welcome Screen”.
-Tap on “Accessibility > Yes > Vision > Talkback > Text-to-speech Output“. (See Below Image).
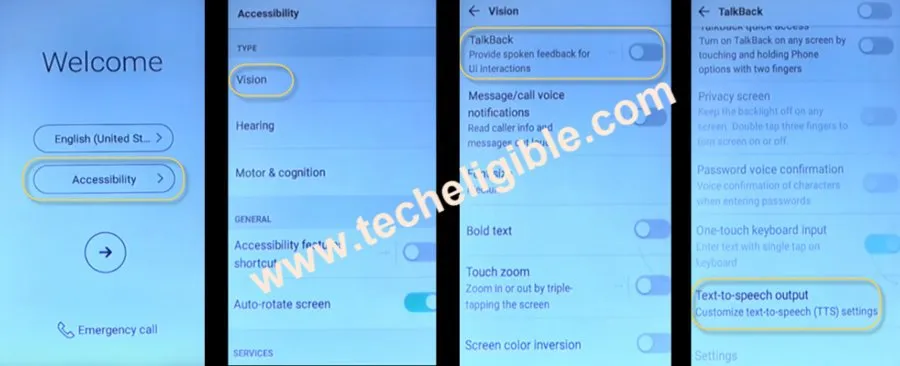
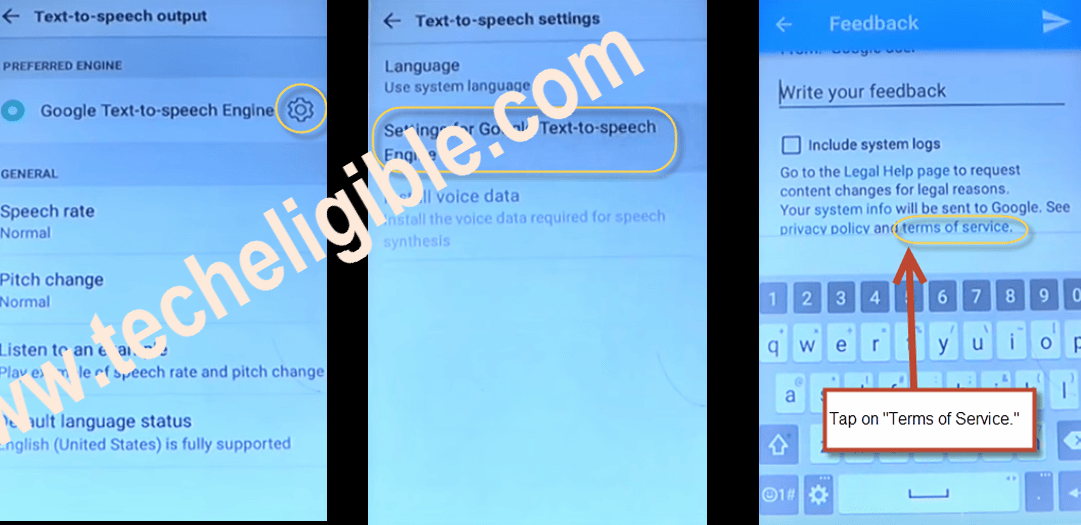
-Tap on “Gear icon”.
-Now Tap on “Setting for Google Text-to-speech Engine”, and then tap on “Feedback”.
-After that, tap on “terms of service”. (Chrome browser will be launched).
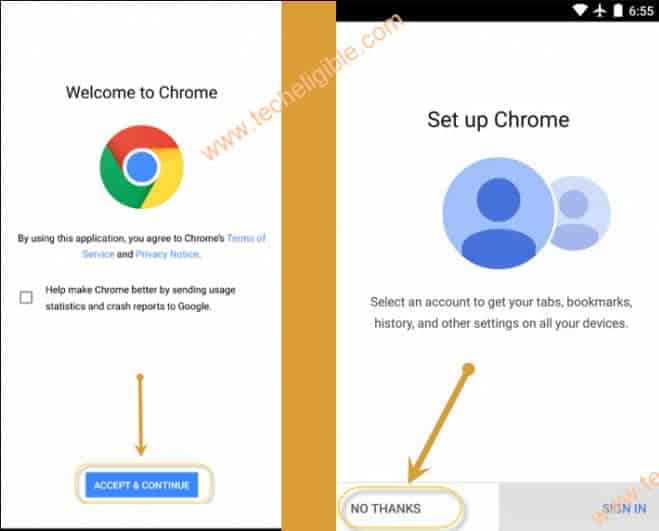
-Tap on “Accept & Continue”, and then tap on “No Thanks”.
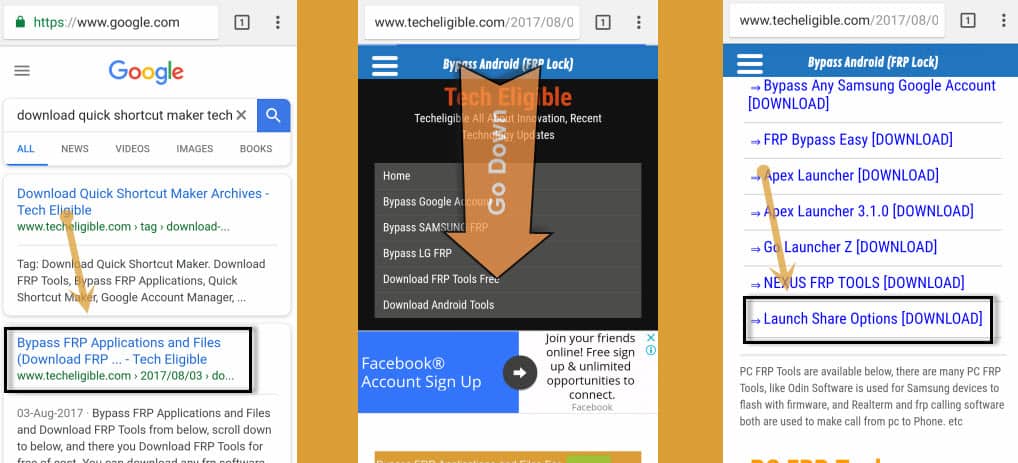
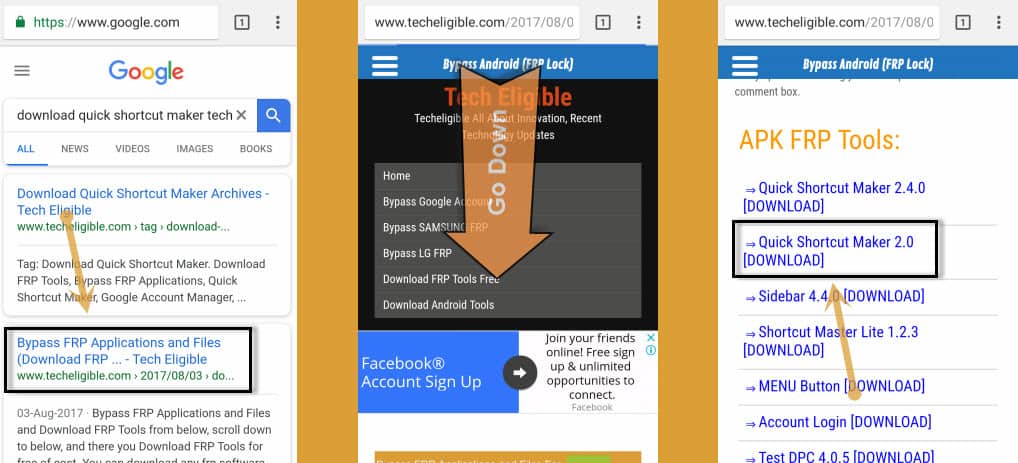
-Type in search bar “Download Quick Shortcut Maker Techeligible“.
-From search result, open “Bypass FRP Applications & Files…” (as shown in below image).
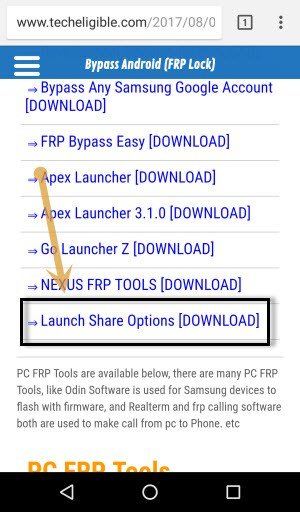
-Swipe up, and tap on “Launch Share Options”. (as shown in below image).
-This will open “Popup” bottom of your screen.
-Un-check the box “Use as Default App”.
-Long tap on “Gmail icon”.
-After that tap on > Notifications > App Settings.
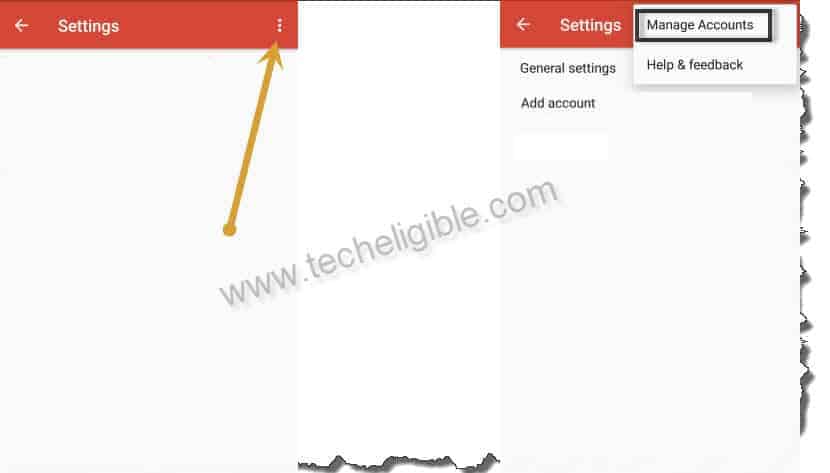
-Tap on “3 Dots” from top right corner, and then select “Manage Accounts”, after that “Continue”.
Fix Unknown Sources is Grayed Out:
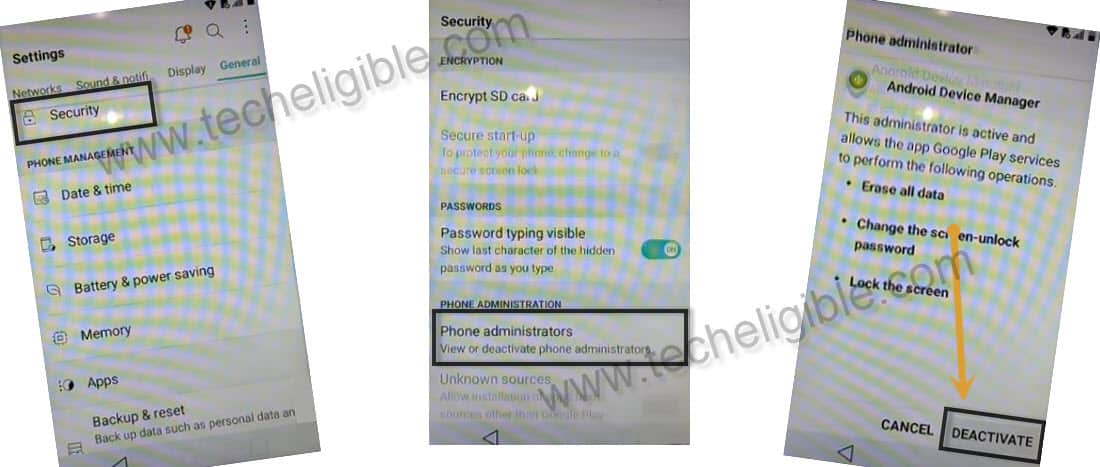
-Scroll down, and then tap on “Fingerprints & Security”.
Note: Now you will see there “Unknown Sources” is grayed out. we can fix this issue by disabling some applications.
-Turn off “Verify Apps” from there.
-Go to > Phone Administrators > Android Device Manager > Deactivate to bypass google account.
-Now again tap on “3 Dots” from top right corner, and then select “Manage Accounts”.
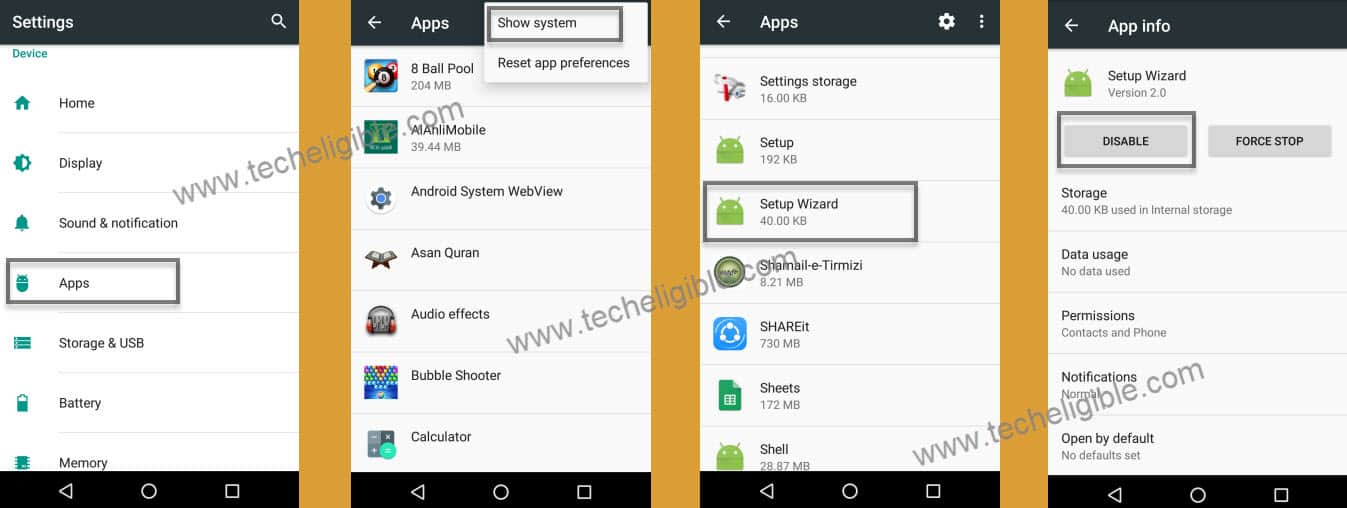
-Tap on “Apps”, and then tap on “3 Dots” from there, after that select “Show Systems”.
Disable Some Applications to Fix Unknown Sources:
-Scroll all the way down until you see “Setup Wizards”.
-You will see “2 Setup Wizards” there, one is in “Blue” color and second is in”Green” color.
-Tap on blue color “Setup Wizard > Force Stop > OK > Storage > Clear Data.
-Go back to “Apps”.
-Tap on green color “Setup Wizard > Force Stop > OK > Storage > Clear Cache.
-Go back to “Apps”.
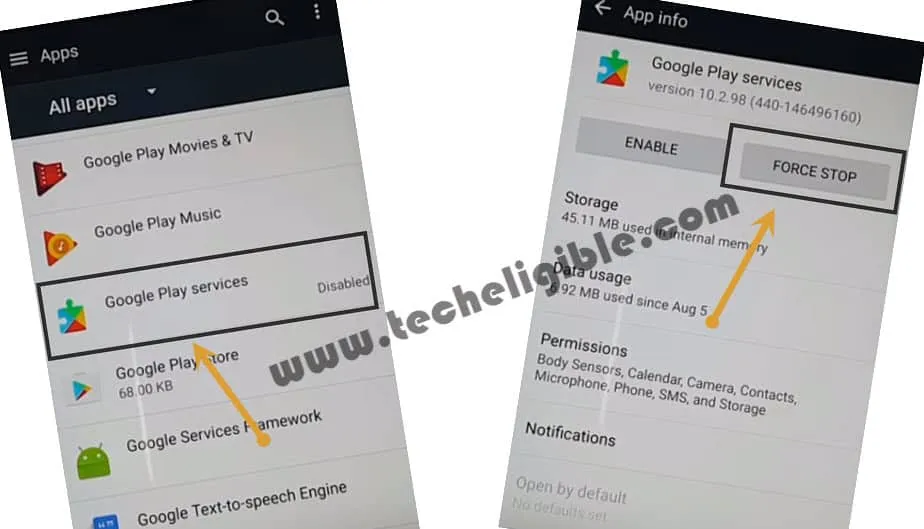
-Scroll all the way up until you see “Google Play Services”.
-Go to > Google Play Services > Force Stop > OK > Disable > Yes.
Go Back to Welcome Screen:
-Lets get back to very first “Welcome Screen” by tapping on “Back Key” multiple times.
-Tap on “Next Arrow”, and then “Skip”.
-Go down, and tap on “Add Wi-Fi Network”.
-Type “Techeligible” in SSID Field.
-Long tap on your typed text so that (Cut, Copy, Share) options appear.
-Tap on “Share” to bring share options.
Let’s Enable Unknown Sources:
-Now from share options, Long tap on “Gmail icon”.
-After that tap on > Notifications > App Settings.
-Tap on “3 Dots” from top right corner, and then select “Manage Accounts”, after that “Continue”.
-After that, Scroll down, and then tap on “Fingerprints & Security”.
-Enable “Unknown Sources” from there, i hope this time you wont see unknown sources is grayed out.
-Now go back to “Settings”, and then tap on “Apps”.
-Enable “Google Play Services” from there.
-Keep tapping on back key until you get back to “Welcome Screen”.
-Now you have to follow above steps again to open “Chrome Browser”.
Open Chrome Browser:
-Tap on “Accessibility > Yes > Vision > Talkback > Text-to-speech Output“.
-Tap on “Gear icon > Setting for Google Text-to-speech Engine > Feedback > terms of service”
-Now you’ve successfully launched “Chrome Browser”.
| Note: If you get “JavaScript Error”, so that means you have to enable JAVASCRIPT from your Chrome browser Settings, tap on “3 dots” form top right corner of chrome browser, and select “Settings or Advance Settings”, and then go to “Site Settings”, from there enable “Javascript”. |
Download Quick Shortcut Maker:
-Type in search bar “Download Quick Shortcut Maker Techeligible“.
-Open result “Bypass frp applications and files..” (as shown in below image).
-Go down, and download “Quick Shortcut Maker 2.0“.
-Wait until downloading finish.
Open Download Folder & Install Quick Shortcut Maker:
-From same techeligible page, tap on “Launch Share Options”.
-After that, you’ll have share options.
-Long tap on “Gmail icon”.
-After that tap on > Notifications > App Settings.
-Now Tap on “3 Dots” from top right corner, and then select “Manage Accounts”, after that “Continue”.
-Now you’ve accessed to “Settings”.
-Tap on “Google Services > Now Cards > Show Cards. (This will launch Google).

-Tap on “No Thanks”.
-Type in search bar “Download”, and then tap on “Download icon” to go to download folder.
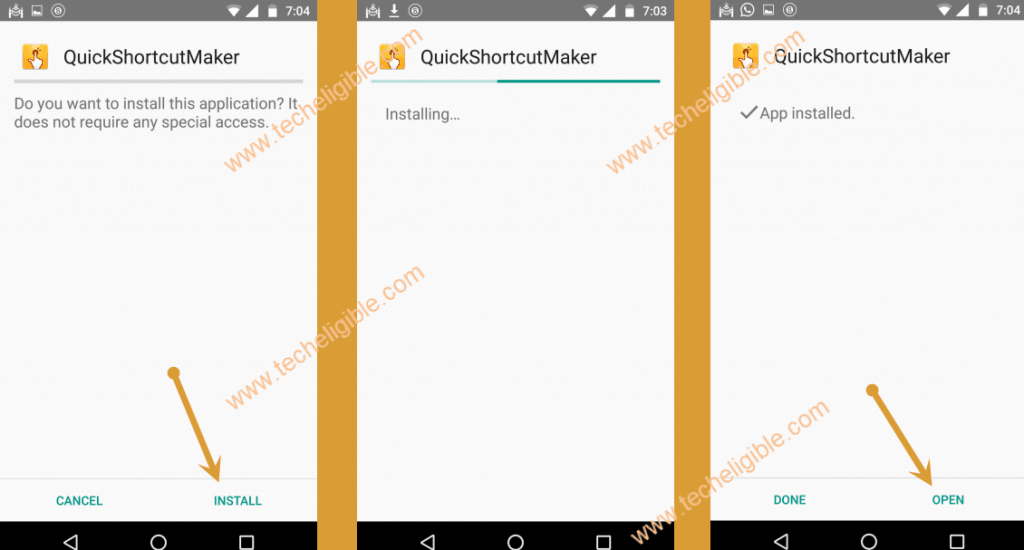
-Now tap on downloaded app “Quick Shortcut Maker > Install > Open”.
Note: Uncheck “Use as default app”, and open with “Package Installer”.
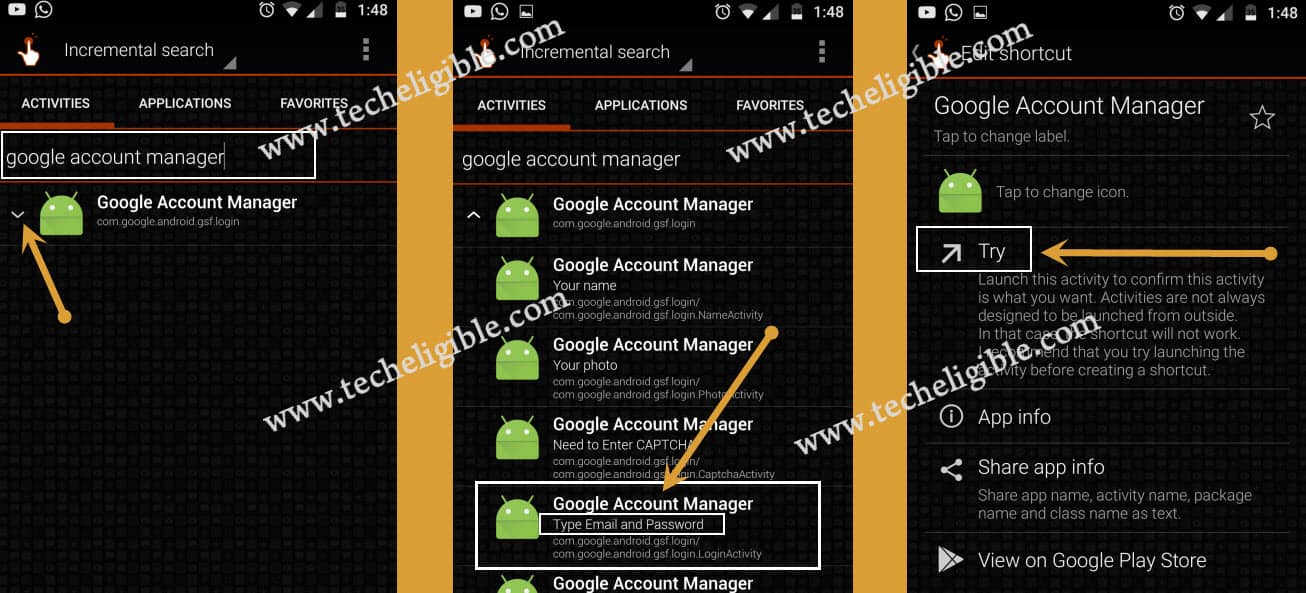
-Type in search bar “Google Account Manager“, after that you will have list of google acc managers there.
-Select the one which appears with “Type email & password”.
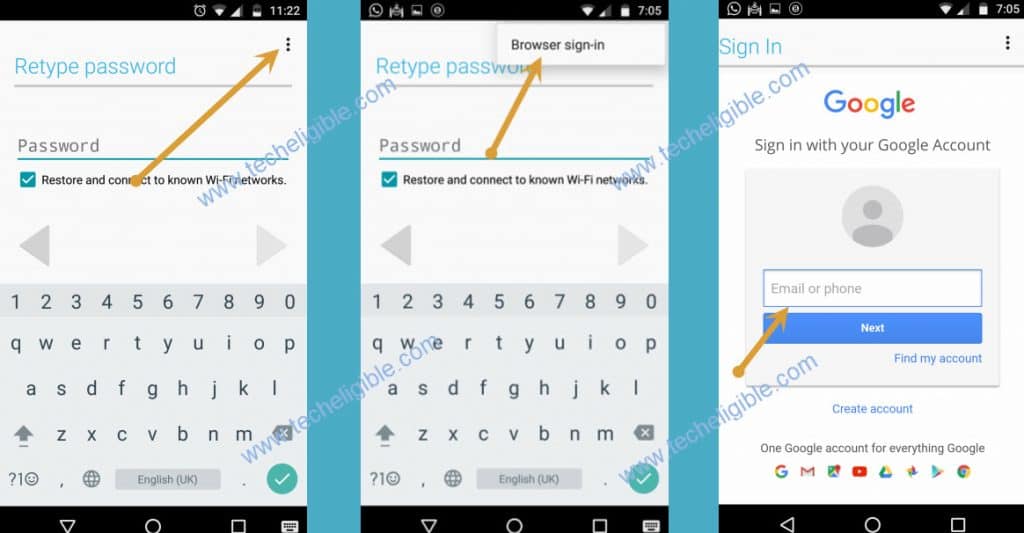
-Now tap on “Try”. (See Below Image)
-Tap on “3 Dots” from top right corner, and then select “Browser Sign-in”.
-Now add your valid gmail account there to Bypass Google Account LG Stylo 2 Plus.
Thanks for visiting us, and to Bypass Google Account LG Stylo 2 Plus with our method, if you have any question regarding this post, you can comment below box, don’t forget to mention complete detail of your device.
Method 2: Bypass Bypass Google Account LG Stylo 2 Plus Without PC & Apps
If you failed in following 1st method, you don’t need to be worried, your device might have updated version, that could be the reason of 1st method failed, so lets give a try to this method, we hope this will work for you to bypass google account LG Stylo 2 plus.
-Turn on phone, and start with connecting Wifi in your LG Stylo 2 plus.
-Now we have to enable TOUCH ASSISTANT option, for that just get back to 1st “Welcome” screen.
-Go to > Accessibility > Motor & Cognition > turn on “Touch Assistant”.
-After turning on this option, you will have a “Human icon”, just tap on that.
-Long tap “HOME”, and this will open for you “Chrome Browser”.
-Type “Settings” in the search bar, and tap on “Setting gear icon”.
Disable Apps in LG Stylo 2 Plus:
-From settings, we are going to > Security > Phone Administrator > Android device manager > Deactivate.
-After deactivating android device manager successfully, lets get back to “Settings” by tapping on back arrow.
-Now go to top, and turn off “WiFi” in your phone.
-Go down, and tap on “Apps”.
-from app list, go down, and tap on > Google Play Services > Storage > Clear Cache.
-After that tap on > Manage Space > Clear Data > OK.
-Tap on “Back Arrow” only once.
-Now tap > Force Stop > OK > Disable > Yes.
Let’s Complete Setup Wizard Without Connecting WiFi:
-Restart your phone.
-From the first welcome screen, just tap on “Next Arrow”, and then tap on “Next”.
-Do not Connect WiFi.
-It will show you “Please wait” popup window, after that hit on “Skip Anyway”, now tap on “Next”.
-Just un-check option of “Protect this device”, and then tap on > Skip > Skip Anyway.
-Select all “I agree…” option, and then tap “Next”.
-Congratulation, you have successfully reached in your LG Stylo 2 plus phone.
Enable OEM Unlocking & Soft Reset Phone:
-To completely Bypass Google Account LG Stylo 2 Plus, we have to soft reset our phone, before doing that, just enable OEM Unlocking, so let’s do that.
-Go to > Settings > General > Software info.
-Tap 7 times on “Build Number”, once you see popup message of “You are now a developer”, just go back to “Settings”.
-Tap on “General” from top right corner, Go down, and tap on “Developer Options”.
-Turn on option “Enable OEM Unlocking”.
-Now again go back to “Settings”, and tap on “General” from top right of the screen.
-Go down, and tap on “Backup & Reset”.
-Tap > Factory Data Reset > Reset Phone > Delete All > Reset.
-This may take several minutes in complete its process, so just wait until it finish.