
Are you stuck on google verification screen due to forgetting your logged in Gmail account? Don’t worry; we are here to help you in getting back your lost access phone after factory reset. You need only a WiFi connection for starting up this free FRP Bypass tutorial.
We are gonna bypass Frp Samsung A41 through another pattern lock setup, which will help us to easily skip the (Verify Google Account) screen. After that, add our new Gmail Account for setup new FRP Lock protection on Samsung A41 device without using any frp bypass application.
Disclaimer: This process is only for Device Owner to educate the people, how to reach back to their FRP locked device after performing hard reset the device and forgetting the logged in google account.
Why Owner is Locked out with FRP?
Signing in with a google account on a newly purchased android device is too easy. But, we don’t forget to save our signed in google account credential. Problem occurs, when we go for the hard reset the phone, and without removing the logged in google account, we just perform hard reset on the phone. After that, FRP lock is activated and ask you to login first before completing the setup wizard steps. There, we need frp bypass method. If you are facing the same situation on Samsung A41 device, luckily, frp bypass method is available on this phone.
What steps to take if the owner is locked out due to FRP lock on their Samsung A41 phone?: This is an aggravating scenario for the owner encountering FRP lock security. This situation arises solely when the user forgets their previously signed-in Google account after executing a factory reset on their Samsung device. Proceed with the following instructions for bypassing the FRP in this instance.
How to Bypass frp Samsung A41 Android 10
-First of all, Connect WiFi to start the process.
-Get back to the first “Let’s Go” screen.
-Afterwards, Hit “Next Arrow” button.
-Select “i have read and agree all of the above“, and tap to “Next” from there.
-You will have a screen of “Choose a WiFi Network” same as shown in below image.
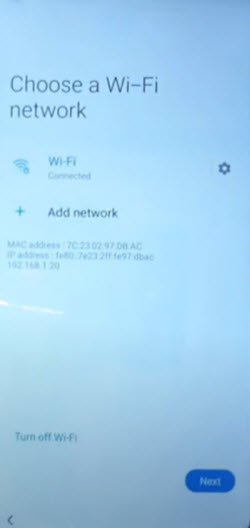
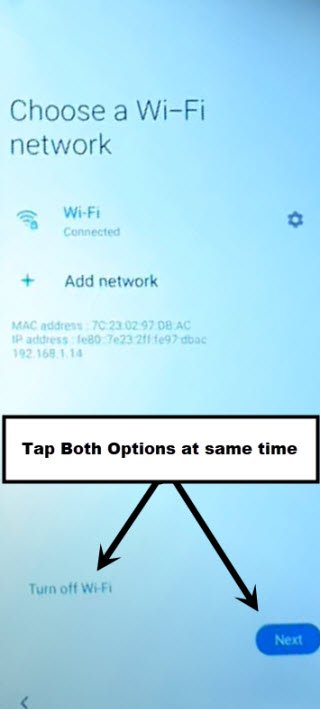
-This is the tricky part to finish, we have to tap 2 options at the same time using our 2 fingers.
-Tap both options at the same time “Turn off WiFi” & “Next“.
-If you got the popup window of “Samsung setup wizard keeps stopping”, that means you hit both options at same time perfectly, you have succeeded, and you leave below 3 steps, and continue by tapping on “APP info” from the popup window.
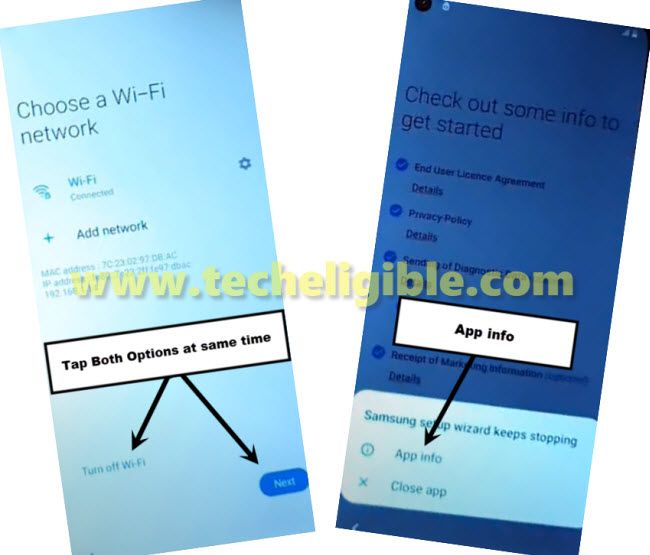
Note: If you did not receive that popup window, so don’t worry about that, you may have to try that 4-5 times, then you will be able to get that popup window easily.
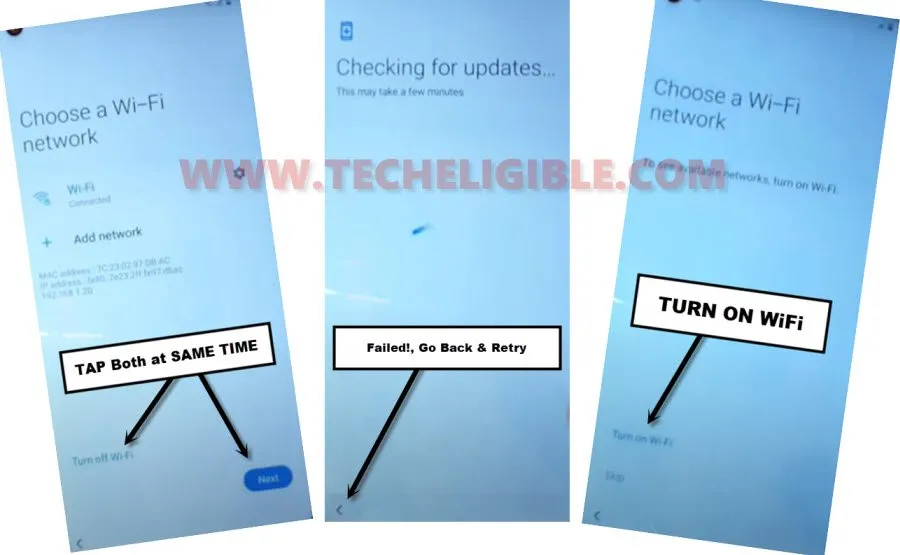
Failed!, Repeat Steps to Get Popup Window:
-in some cased, you may be redirected back to 1st “Let’s Go” screen, or Sometimes you will see “Checking for Updates…”.
-If you see “Checking for updates…”, just tap to back arrow to go back to the same screen.
-Turn on WiFi first, and then retry to tap both option at same times to get the popup window. (Do it 4-5 times or may be more) but that popup window will appear somehow.
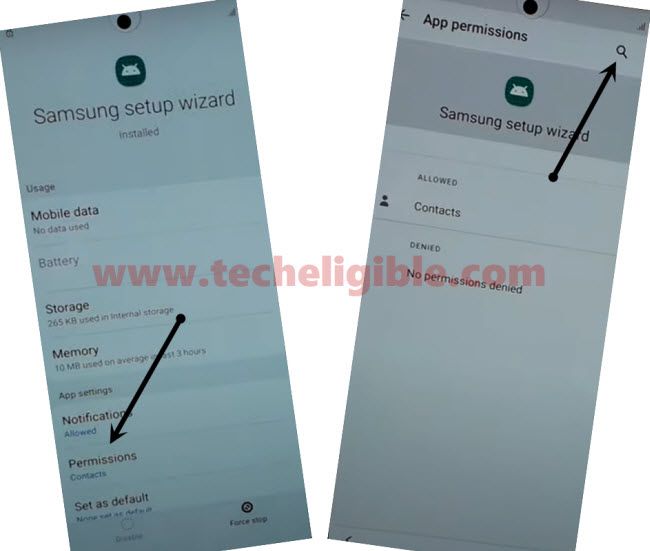
-Hit “APP Info” from the popup window.
-Tap on “Permission“, and then tap “search icon” from top right corner.
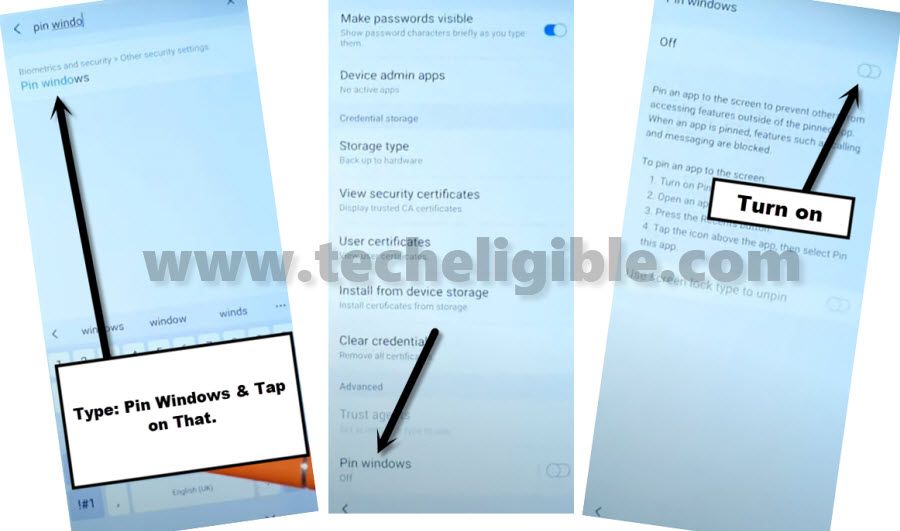
-In search box, type there “PIN Windows”.
-Tap on “PIN Windows” from searched result to setup new pattern lock protection on the FRP Locked Samsung A41.
-Tap on “PIN Windows”.
-Turn on “Pin Windows” option from top right corner.
Add Pattern Lock in Galaxy A41:
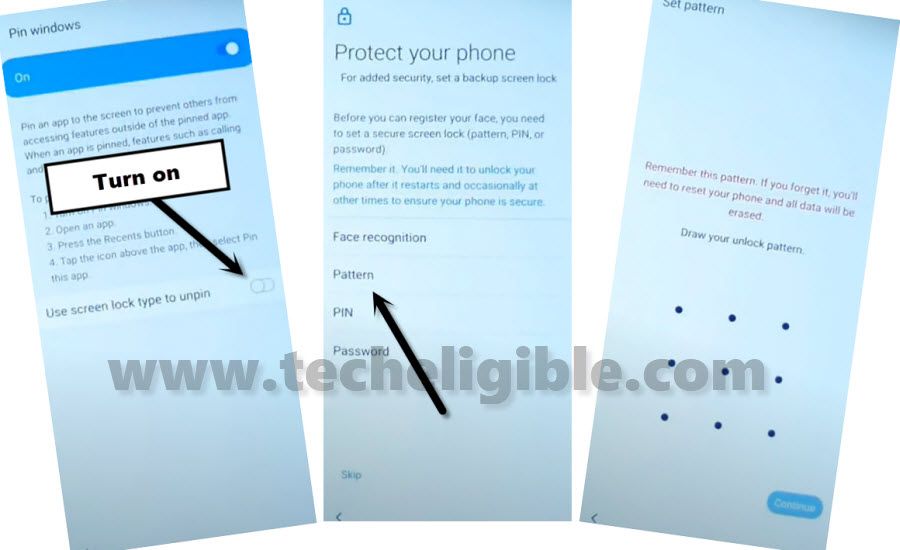
-To Bypass frp Samsung A41, we are going to setup new Pattern Lock.
-Enable “Use Screen Lock Type to unpin” from bottom right corner.
-Hit on “Pattern”.
-Give there any easy Pattern Lock twice time.
-Now you have successfully added new Pattern lock in your Samsung Galaxy A41.
-After that, just restart Samsung A41 phone.
-Complete setup wizard steps, once you access to google sign in screen, simply, tap to > Skip > Skip.
Note: If you are asked for Pattern Lock, just type your already Setup New Pattern lock, that will work.
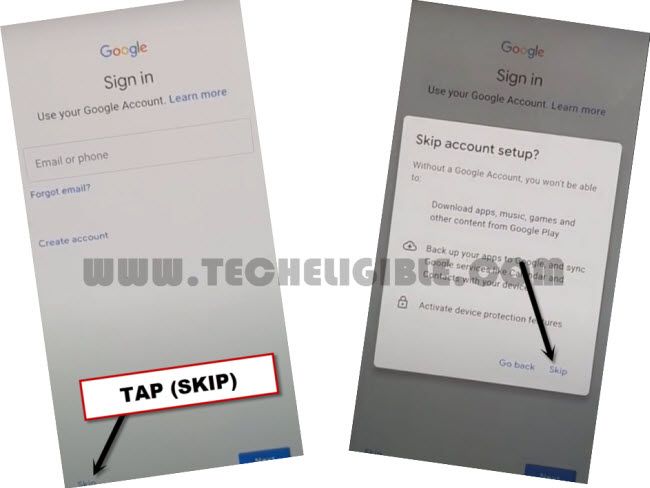
This is how, we have bypassed the frp lock protection on the Samsung A41 device without using any paid tool and frp bypass application.
FAQs About Samsung A41 Phone
How to Add FRP Lock on Samsung Galaxy A41?
This can easily be done by going into your device settings, if you bought brand new device, then you will have to add your own gmail account, and that account will be used for frp protection, no one can access your device Galaxy A41 phone until login back with already signed in google account. -To add Gmail account, just go to > Settings > Accounts & Backup > Add Account > Google. -Sign in there with your Gmail Account.
Why Should i Remove FRP Protection from Galaxy A41 Before Selling Phone?
If you wanna sale your device to someone, in this case, you should remove your Gmail account, otherwise later on your device will be frp locked, and new owner of that device Galaxy A41 won't be able to have access in that phone, so put someone in trouble, better to remove Gmail account. For removing Gmail account, just go to > Settings > Accounts & Backup > Account > Select your Gmail Account > Remove Account.
Conclusion
We brought up the (Samsung setup wizard) application by turning off the Wi-Fi and tapping at (Next) option simultaneously. This is the only tricky part of this method. After accessing to Samsung setup wizards screen, from there, search and go to (PIN Windows) screen. Turn on the PIN windows and enable new pattern lock on the FRP locked phone. With the help of this pattern lock option, you will be able to skip google verification screen while completing the startup steps on Samsung Galaxy A41.
Read Also: Bypass frp Galaxy A40 (Android 9)