
Reset Google Account Moto G20 Without FRP Application
Reset Google Account Moto G20 Android 11 without using any frp app or paid service, if you are still stuck with frp lock phone, and don’t know your previously added google account, then follow all steps here to setup your new google account for future frp protection. This method is just for device owner and try only on your own MOTO G20 device.
Everything has been mentioned below of this post with screen shot, so you can follow up all steps from below easily and if you find any difficulty in understanding any step, you can comment us as well.
Let’s Start to Reset Google Account Moto G20:
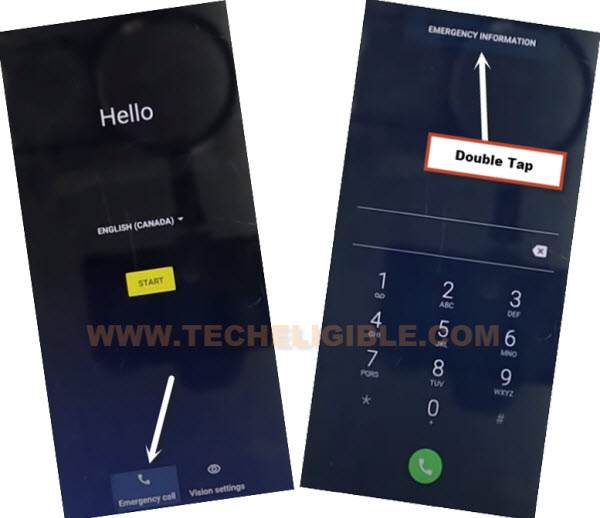
1st: Connect WiFi, and from “Hello” startup screen, tap to “Emergency Call”, and double tap to “Emergency Information”.
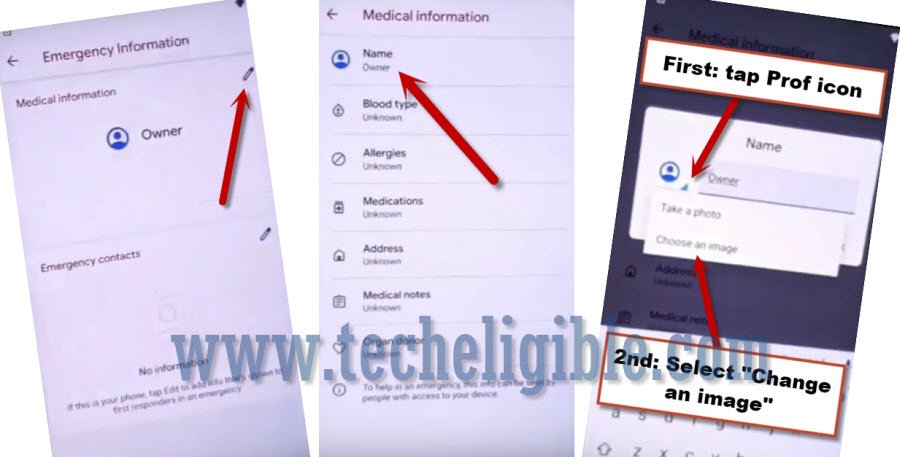
2nd: Tap > Pencil icon > Name > Profile icon corner > Choose an image.
3rd: Tap to > Menu icon > Photos > Permissions.
![]()
4th: Contacts > See All apps with this permissions.

5th: Hit on “Search icon”, and search there “Settings”, afterwards, tap to “Settings App info“, now hit on “Open”.

Enable Shortcut Menu in Moto G20:
6th: Go to > Accessibility > Accessibility Menu > Turn on.
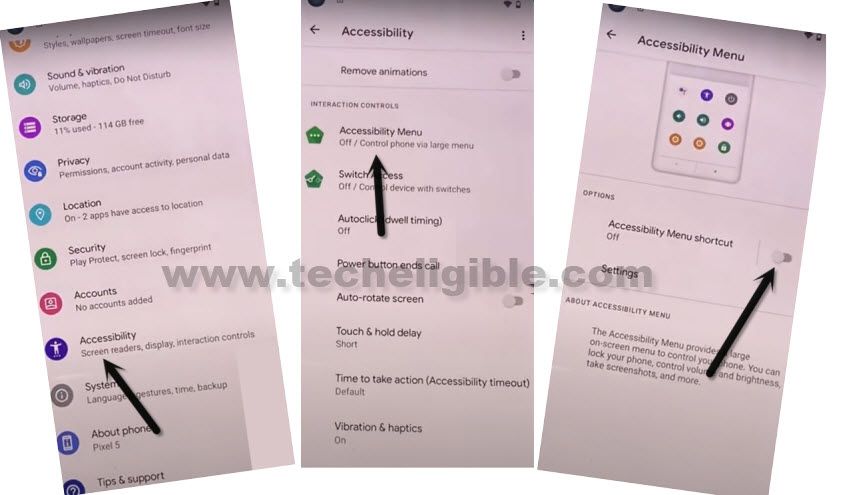
Note: Just for verification, swipe from bottom to top using two fingers, and the MENU Shortcut will appear, that means you have successfully turned on this option. this will assist us to Reset Google Account Moto G20.
7th: Go back to (Settings), from there tap to > Apps & Notification > App info.
8th: Tap on > 3 dots > Show system Apps.
![]()
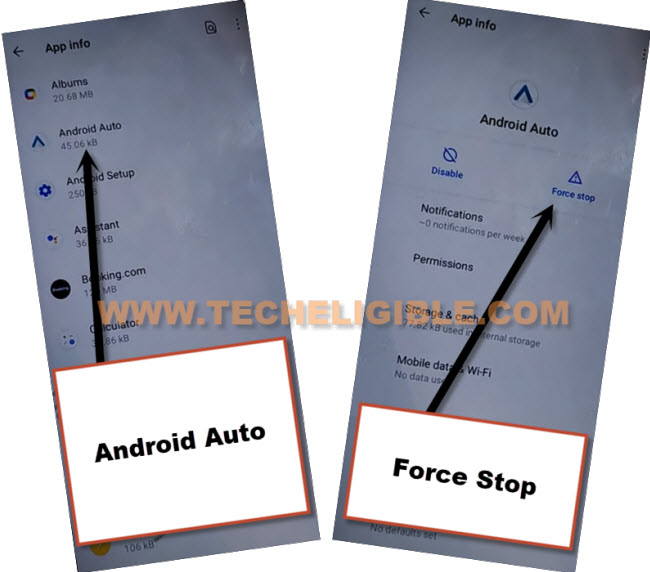
Disable Few Applications to Delete FRP:
9th: Find and hit on > Android Auto > Force Stop > OK.
10th: Find blue color settings icon “Android Setup” same as shown in below image, so just tap to > Force Stop > OK.
![]()
11th: Find and tap to > Google Play Services > Force Stop > OK, now hit on > Disable > Disable App.
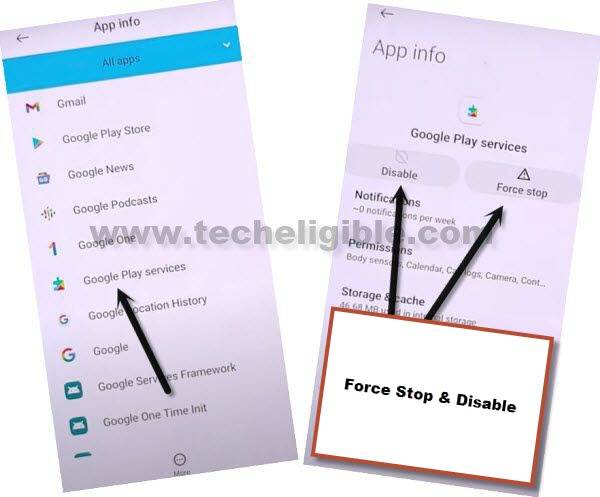
Now we have successfully disabled and force stop above 3 apps, lets get back to first homescreen to finish setup wizard without entering the previously added google account.
Enable Google Play Services to Finish Setup Wizard:
12: Go back to “Hi There” screen by tapping on “Back Arrow” several times, from there tap to > Start > Skip to Reset Google Account Moto G20.
13: There you will see a loading screen (Just a sec…), this won’t disappear until we enable (Google Play Services).
14: Go back to (Connect to WiFi) screen by tapping on back arrow.
15: Bring (Shortcut Menu) through Swiping up from the bottom of the screen using two fingers.
![]()
Follow Below Steps Fastly:
16: Quickly tap to > Assistant > Settings > Enable (Google Play Services).
Note: You may have to repeat below steps for many times, because after hitting on “Assistant” option, this wont show you (Settings) at first time, so you will have to try this for almost 10-20 times to reach (Google Play Services) screen.
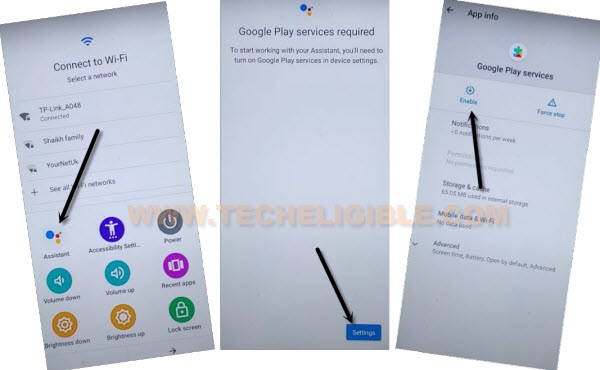
17: After successfully enabling (Google Play Services), just tap “Back Arrow” from bottom, and wait few seconds on “Checking for update” screen, this will show you next screen.
18: From there, tap to > More > More > Accept.
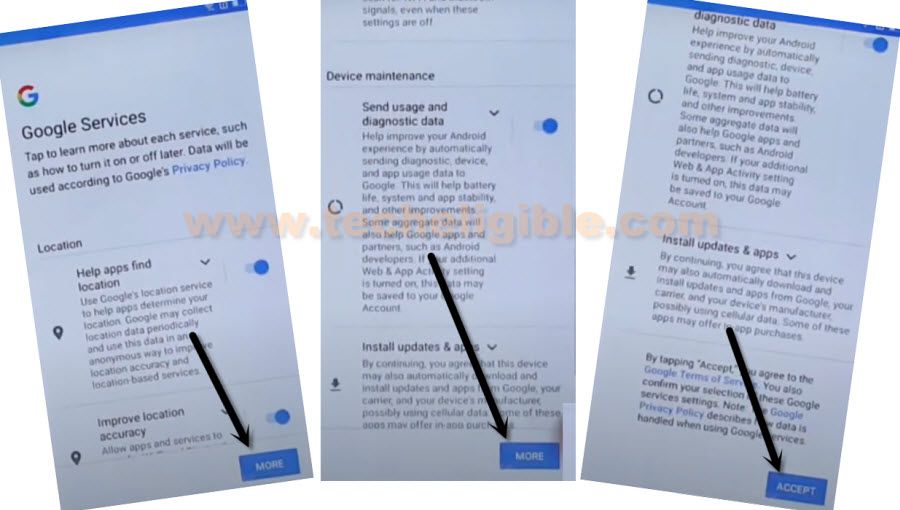
19: From (Set Screen Lock) screen, tap to > SKIP > SKIP > OK > Accept & Continue, finish remaining steps to reach homescreen.
![]()
Final Step: Go to > Settings > System > Advanced > Reset Option, now hit on “Erase (All Data) option 3 times.
You have successfully Reset Google Account Moto G20, now after finishing setup wizard or start-up screen, you can easily add your own new google account from the device “Settings”.
Read More: