
Bypass FRP Hisense e50 Android 11 Without PC Tutorial
The steps are very easy, if you wanna bypass frp Hisense e50 (Android 11) device without paying a single penny, you can do this on your own just by applying some easy steps from below to get back your FRP protected device, we will go to settings through (Emergency Call) option, once you got inside settings, just disable some apps, after that, the (Google Verification) screen will go away.
Warning: This method is only for Device Owner, and for a educational purpose only to educate, how you can remove frp, if you forget your own signed in google account.
Let’s Start to Bypass FRP Hisense E50:
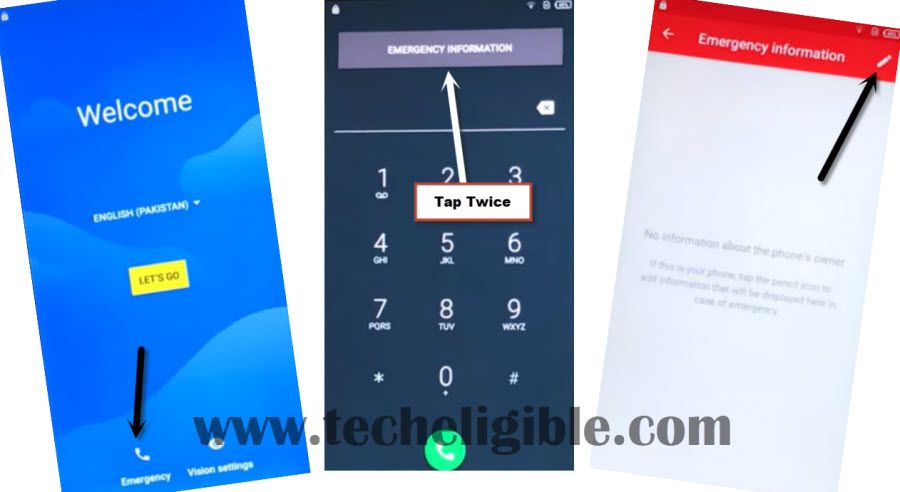
-We’ve to start this method by connect WiFi first, after that, go back to first (Hi there) homescreen, from there tap to > Emergency > Emergency Information.
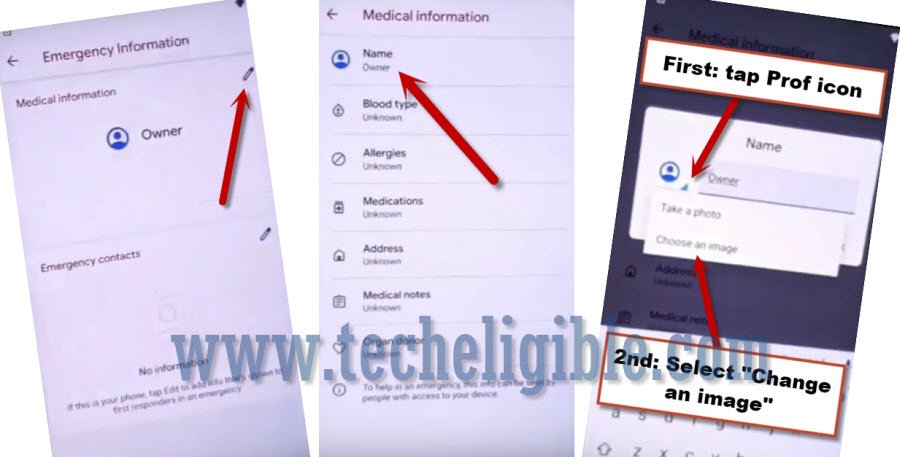
-Tap on “Pencil icon” from top right corner.
-Hit on a “NAME”, and hit on a “Small Down Arrow” which is right bottom of the profile icon (See below image).
-Tap on “Choose an image”.
-You would see there a (Menu) icon at the top right corner, just tap to that > Menu icon > Photos > Permissions.
![]()
-Tap on “Search icon” from top corner, and search there “Settings”.
-Scroll down, and tap to > Settings > Open.

-From inside settings, tap to > Apps & Notification > See all apps.
-Tap on > 3 dots > Show system Apps.
![]()
Disable Android Setup & Google Play Services:
-Tap to “Android Setup” which is with clock icon same as shown in below image, just tap to that > Android Setup > Force Stop > OK.
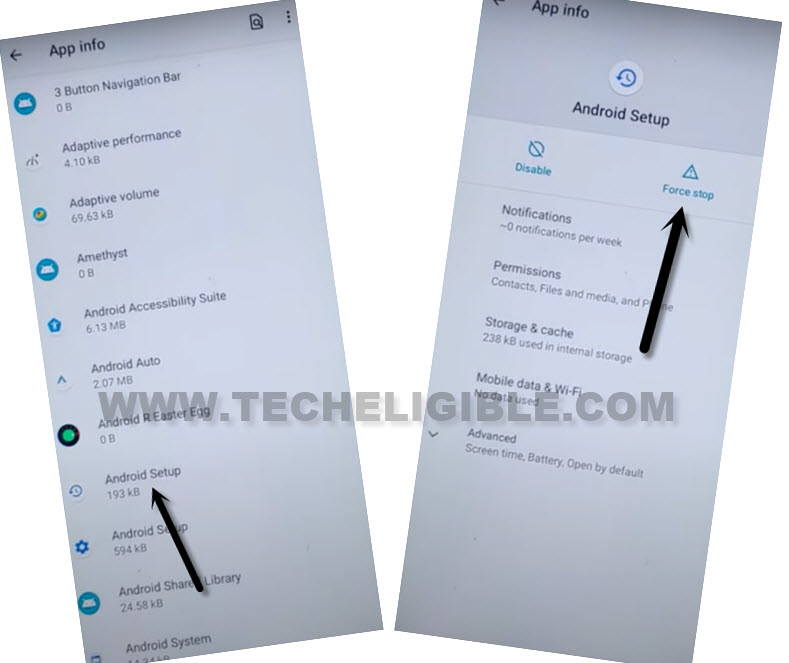
-Find blue color settings icon “Android Setup” same as shown in below image, so just tap to > Force Stop > OK.
![]()
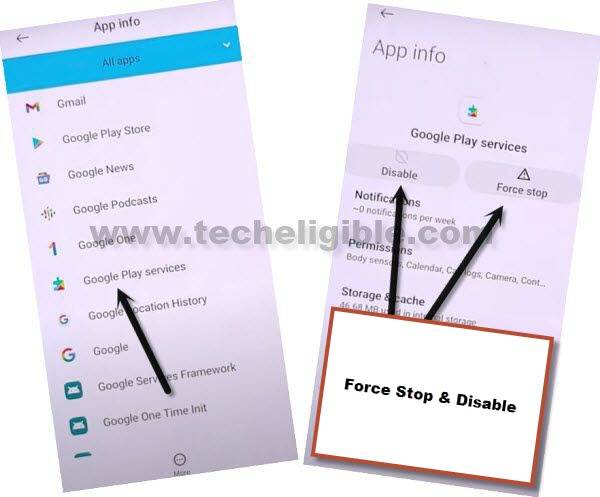
-Find and tap to > Google Play Services > Disable > Disable.
-Now tap to > Force Stop > OK.
-Once you disabled google play services app, just go back on first (hi there) homescreen by hitting over back arrow for several times, once you got back to that screen, just tap to > Start > Skip.
-Now you will have a loading screen of (Getting your phone ready), just tap over “Back Arrow” from there.
-After that, you will be taken to the (Connect to WiFi) screen, from there tap to > Setup Offline > Continue.

-Now, hit on “Next” from (Date & Time) screen.
-You will see there a (Just a sec…) screen, this won’t complete, you don’t back to your device settings, and turn on (Google Play Services) app again.
-Go all the way back to first (Hi there) screen, finish rest steps from there carefully to bypass frp Hisense e50.
Repeat all Previous Steps to get back to Settings:
-Tap to > Emergency Call > Emergency Information.
-Go to > Pencil icon > Name > Down Arrow > Choose an image.
-You would see there a (Menu) icon at the top right corner, just tap to that > Menu icon > Photos > Permissions.
![]()
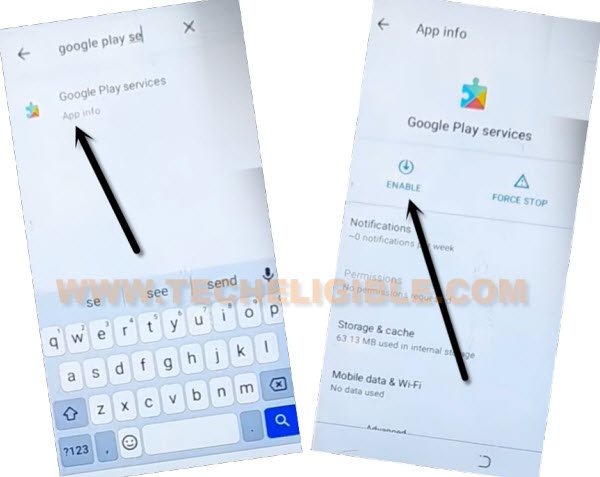
-Search and access to “Settings”.
-Go to > Apps & Notification > See all apps.
-Tap on > 3 dots > Show system Apps.
![]()
-Find and tap to > Google Play Services > Enable.
-Once you enabled your google play services app, now you can easily complete setup wizard without facing any google verification screen, because you are all done from Bypass FRP Hisense e50.
Let’s Finish Setup Wizard:
-Go back to “Hi there” screen again, from there, tap to > Start > skip > Back Arrow.
-After that, you will be taken to the (Connect to WiFi) screen, from there tap to > Setup Offline > Continue.
-Tap to > Next > More > More > Accept > Skip > Skip > Next.
-You will be taken inside your device homescreen, congrats, the FRP has been deleted completely, now new google account can be setup easily.