
2 Ways to Remove FRP Samsung S9, S9 Plus Android 9, 8
Remove FRP SAMSUNG S9, S9+ Android 9 without PC/Talkback/Hushsms, we will use only our any SIM card that has 4 digits pin lock code, and if you did not setup the pin code, so you can do that easily by using any other phone, this will not harm your sim card anymore, but through this process you can get back your Samsung Galaxy S9 device.
If you have galaxy S9/S9+ (Android 8) device, then you are surely required PC for that method, and from below link you can follow your method to bypass google account.
| Method 1: Bypass Google Acc Samsung S9, S9 Plus [Android 9] |
| Method 2: Bypass Google Acc Samsung S9, S9 Plus [Android 8] |
Method 1: Remove FRP SAMSUNG S9+, S9 Android 9
-Arrange any sim card and setup 4 digits pin locked code with other phone.
-Start process by connecting WiFi to the phone first.
-Go back to “Let’s Go” screen & insert pin locked SIM.
-You will see “Enter SIM Puck Code” screen.
–Remove SIM tray & Quickly Press “Power Button” to turn off screen only.
Note: You have to do both actions at the same time, right after Popup sim tray, just press Power Button once, if you did that at very same time you will surely succeed in this method, and after that you will be able to follow next all steps.
-Press power button from your phone again to wake-up screen, and there you will be able to see “Lock icon”.
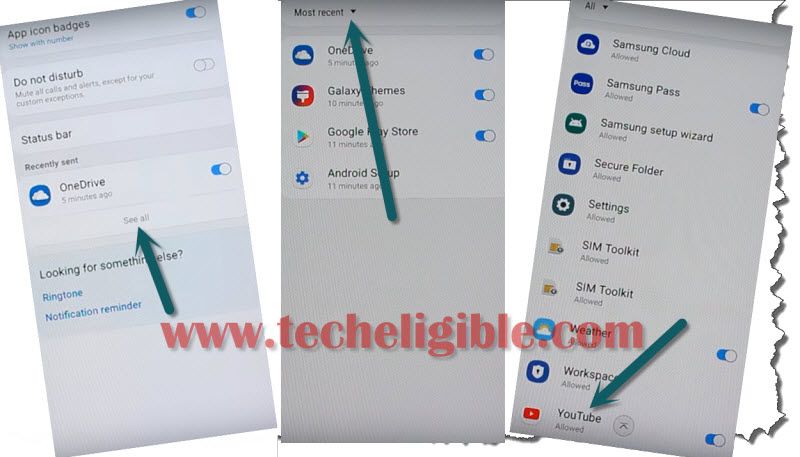
-Tap on “Lock icon”, and after that you will get top notification bar, just tap “Notification Settings” from the top bar.
![]()
-Tap “See All” option from there, and then tap on “Most Recent” from top right corner and select “All”.
-Now you will have list of all the apps there, just go all the way done and tap “Youtube” icon.
-Follow below all steps respectively.
-Tap > in-app-notification settings > About > Google Privacy Policy > Accept & Continue > Next> No Thanks.
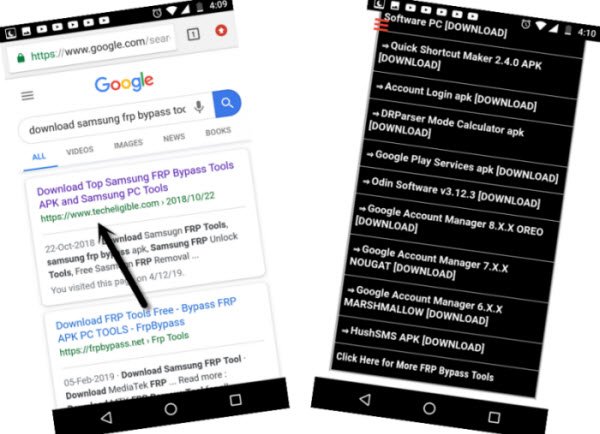
-Now we have got into chrome browser, and also got search bar on top, now we will find frp tools.
Find and Download Frp Tools:
-Search “Download Top Samsung frp tools“.
-Go to our site searched result same as shown in below image.
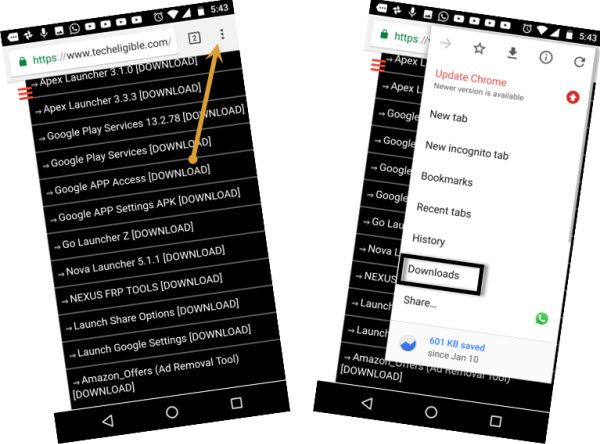
-Download from there below 2 applications.
1-Google Account Manager 8.
2-Account Login.
-Go top of the site, and tap 3 dots from top right corner of the browser and then tap to “Downloads”.
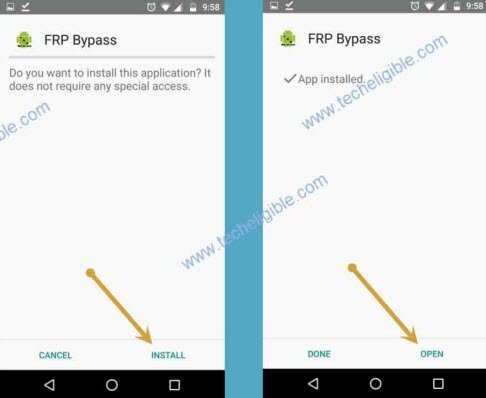
-Tap “Google Account Manager 8“, and then from chrome popup window, just tap “Settings”, and enable option (Allow from this source).
-Tap on “Back Arrow” from your phone, and then tap to “install”, and then tap “Done”.
-Install also 2nd app “Account Login”, by tapping on > Account Login > install > Open.
-After hitting on open button, you will have a window of (Re-type Password), only tap “3 dots” from top corner and tap “Browser Sign-in”.
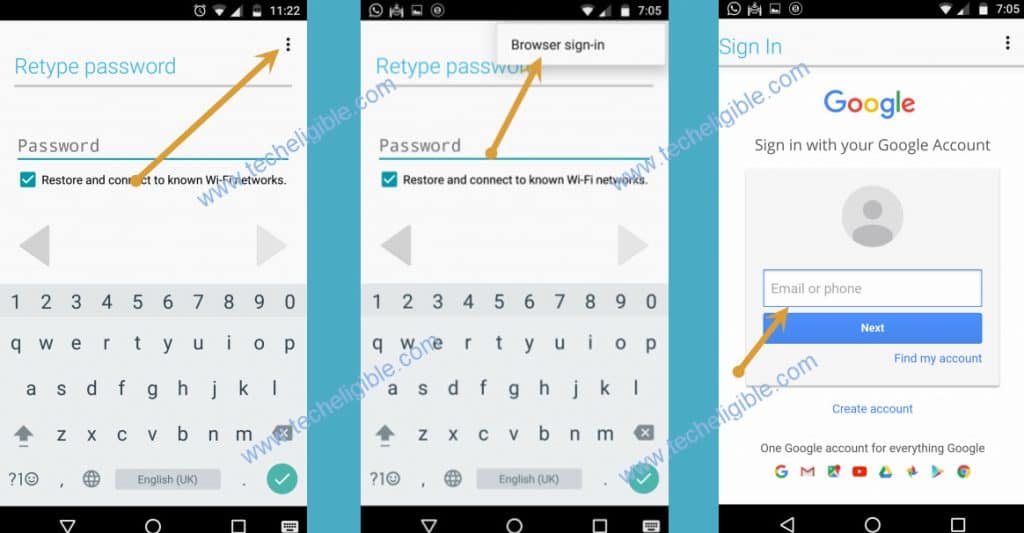
-Add your new remembered Gmail account for signing in, and from the next time you will use your this new Gmail account.
-After that, remove sim tray completely.
-Restart your phone and then complete initial setup, and this time you won’t be asked about previously synced Gmail account.
Method 2: Bypass Google FRP S9+, S9 Android 8
Are you unable to access your device after you hard reset it ?, if your device is asking to enter previously synced Gmail id, then surely you are facing FRP Lock, then, we need to flash our device with some flashing files, the method is very straightforward, all you need is to follow all steps very carefully. This method is only for Device Owner.
Note: This method has successfully been applied on Samsung Galaxy S9+, (SM-G965F), Bootloader 1, Android 8.0.
Check your Device Firmware Code:
-First of all we have to write down our device firmware code.
-Switch off your device.
-Put your device into “Android Recovery Mode” by press and holding keys (Volume UP + Bixby Key + Power key) together.
-Release keys once you enter into “Android Recovery

-There you will be able to see your device firmware code.
-In my case, mine device firmware code is “G965FXXU1ARC3″, this is bootloader 1 code, because the red color 1 is indicating that, this is bootloader 1 firmware, so i have to download bootloader 1 combination firmware, and also i need to match code as well.
Remember: You have to write down your firmware code, and download “Combination ROM” for your device by matching with your device firmware code.
Download Combination ROM:
-If your device firmware code is different from my firmware code, so you will have to find your device combination ROM by clicking below link. Otherwise the combination ROM of (G965FXXU1ARC3) can be downloaded from below.
⇒ Click Here to Find Galaxy S9+ / S9 Combination ROM.
Download FRP Bypass Files:
⇒ COMBINATION_OXM_FA80_G965FXXU1ARC3.zip
-Once downloading finish, put all downloaded file on your desktop.
-Extract all downloaded files.
Let’s Start FRP Bypass Procedure:
-Switch off Galaxy S9+.
-Put device into Download Mode by pressing (Volume Down + Bixby Key + Power Key).
-Once you see blue warning! screen, just press (Volume UP) key to continue.
-Perfect, now we are going to flash our device with (Combination ROM).
Note: Make sure the downloaded combination rom is matching to your device.
-Install “Samsung USB Driver” in your computer.
-Open Odin Tool.
-Tap on “AP”, and then give file path there from (Combination ROM) folder.
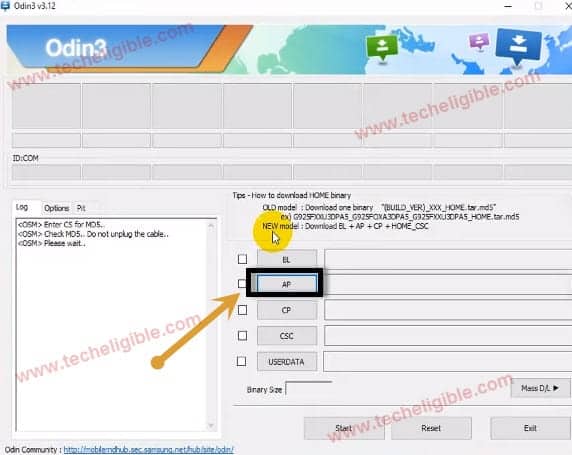
-Wait few minute until you see your file in “AP”.
-Connect Galaxy S9+ to computer.
-You will see “ID:COM” will turn to blue after you connect device to computer, this is for sure, that your device has successfully been detected by Odin.
-Click on “START” button to flash device by combination ROM.

-Wait until you see “Pass!“.
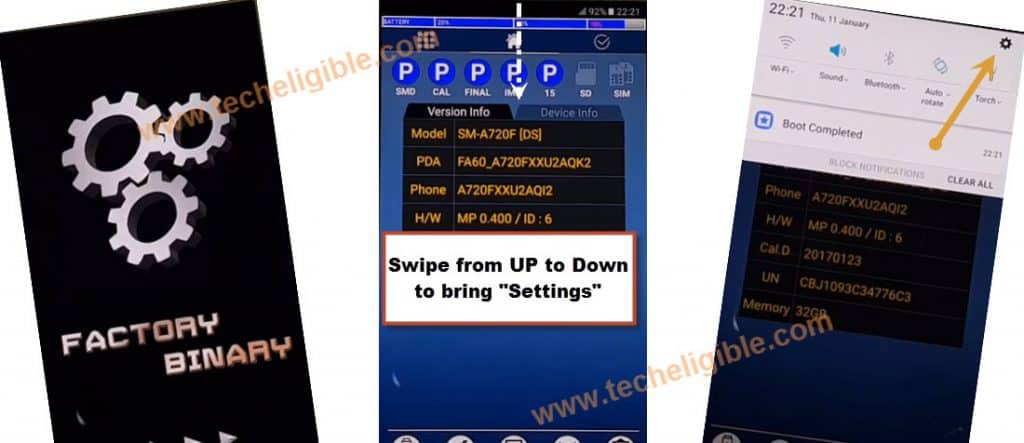
-After flashing process finish, disconnect device, and your device will auto enter into “Factory Binary Mode”.
Factory Reset Galaxy S9+:
-Bring top bar options by swiping form up to down.
-Tap on “Setting gear icon” from top right corner (See Below image).
-Go to “About Phone”.
-After that, go to “Systems”, and then go to “About Emulated Device”.
-Tap 7 time rapidly on “Build Number”, until you see a message of “You are now a developer”.
-Tap on “Back Key’, and there you will be able to see “Developer Options”.
-Go to “Developer Options”, and then enable “OEM Unlock” and also “USB Debugging” from there.
-Now tap on “Back Key” to go back to “Systems”.
-There you will be able to see “Reset” option, just tap on that.
-Now tap on > Factory Data Reset > Reset Phone > Erase everything.
-Congrats, now you have successfully done.
-Now we have to flash our device with official stock firmware to bring our device back to normal mode.
Download Official Stock Firmware in your PC:
-Open browser & type “Download Samsung Galaxy Firmware Sammobile“.
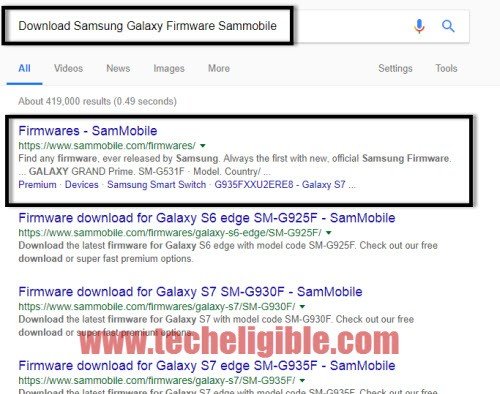
-Visit the very first search result.
-Go to “Firmware” tab, and then type your device model number.

-Select your country, and download from there your device firmware just by matching the firmware code from your device firmware code.
Note: The device firmware code can be checked in “Android Recovery Mode”, this step we have already described above of this post.
-Once you download firmware successfully, now extract the firmware files, and you will have there 5 files.
-Now you need to flash device to completely Remove FRP SAMSUNG S9+, Galaxy S9 Android 8
Let’s Flash Galaxy S9+ with Stock Firmware:
-Open “Odin tool”.
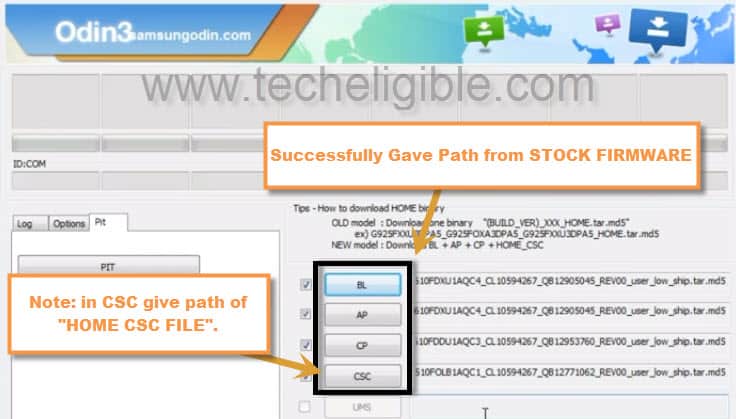
-Click on “BL”, and give file path there from Stock ROM folder of “BL” file.
-By following above steps, give all file path there, in “AP”, give AP file, and in “CP” give “CP File Path”, and in “CSC” give “HOME CSC” file path.
Warning: Make sure you are giving “HOME CSC” file in “CSC” odin option (See Below Image).
-Now put your Galaxy S9+ device into DOWNLOAD MODE again.
-Connect device to computer.
-Now click on “START” button to flash your device.
-Once flashing process finish, congrats, now you can use your Galaxy S9+ device normally.
Read More: