Bypass FRP All Motorola Devices Android 11 | 10 | 8 | 7 | 6 [Latest-2022]
Bypass FRP All Motorola Devices Any Android Version, whether it is Moto Z2, or Moto X Play, or Moto G series devices, this is universal method for all Motorola smartphones, only you need to download “Moto Device Manager”, and moto frp tools, after that connect device to computer to easily bypass google verification.
We have mentioned all 4 methods below, you can follow up any one of them, that fulfill your device requirement, if you fail with 1 method, you can try other method as well.
| Method 1: Bypass FRP Any Moto Android 11 |
| Method 2: Bypass FRP Any Moto Android 10 |
| Method 3: Bypass FRP Any Moto Android 7, 6, 5 (With PC). |
| Method 4: Bypass FRP Any Moto Android 7, 8 (Without PC). |
Method 1: Bypass FRP All Motorola Android 11
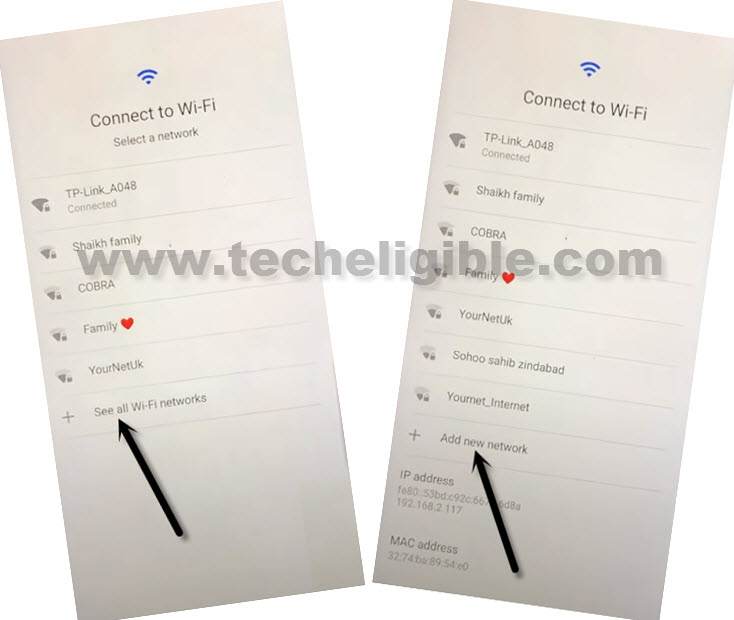
–Connect WiFi, and then go back to (WiFi Setup) screen.
–Tap to > See All WiFi Network > Add New Network.
–Tap to > Mic icon > Deny.
![]()
–Tap to > Mic icon > Deny & Don’t Ask Again.
![]()
–Tap to > Mic icon > Allow.
![]()
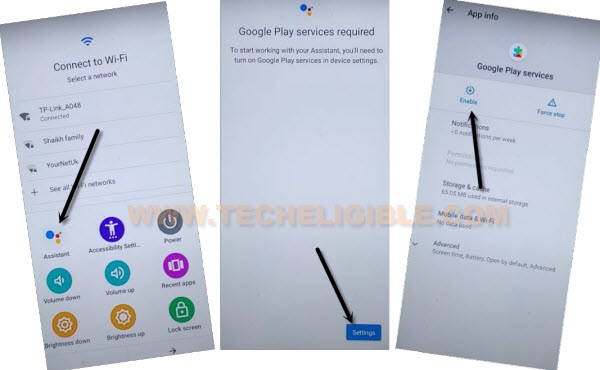
–Go to “Permission”, and hit over “Search icon” from top corner.
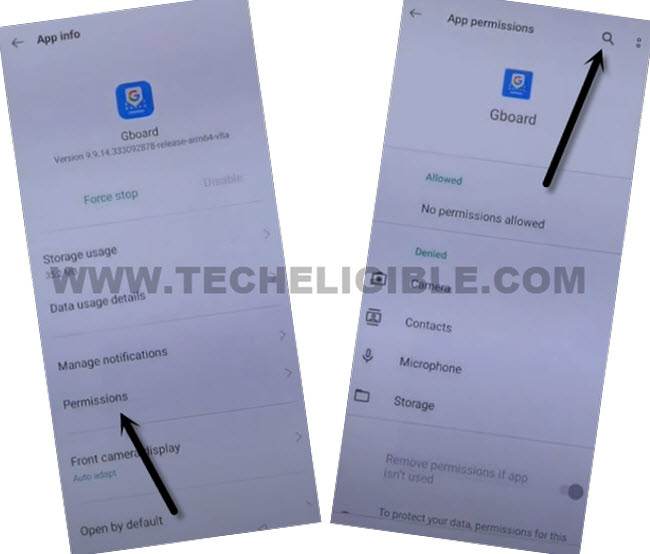
–Type in search area “Settings”, and then go to down, and hit on > Settings > Open to Bypass FRP All Motorola Android 11.
Enable Shortcut Menu in Moto Android 11:
–Congrats, we have reached inside (Settings), now just go to > Accessibility > Accessibility Menu > Turn on.
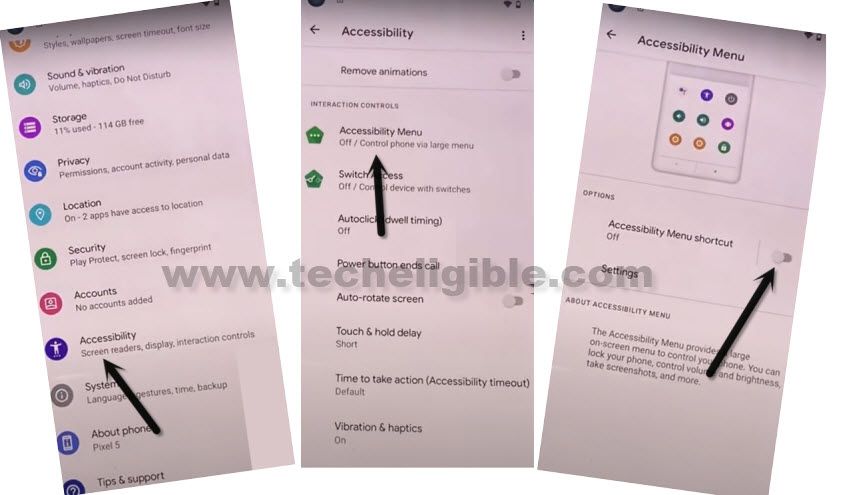
Note: Just for verification, swipe from bottom to top using two fingers, and the MENU Shortcut will appear, that means you have successfully turned on this option. this will assist us to Bypass FRP All Motorola Android 11.
–Go back to (Settings), from there tap to > Apps & Notification > App info.
–Now we are inside a (App List), from here we are gonna disable few applications that will help us to Bypass FRP All Motorola Android 11 2021, so tap on > 3 dots > Show system Apps.
![]()
Disable Few Applications to Delete FRP:
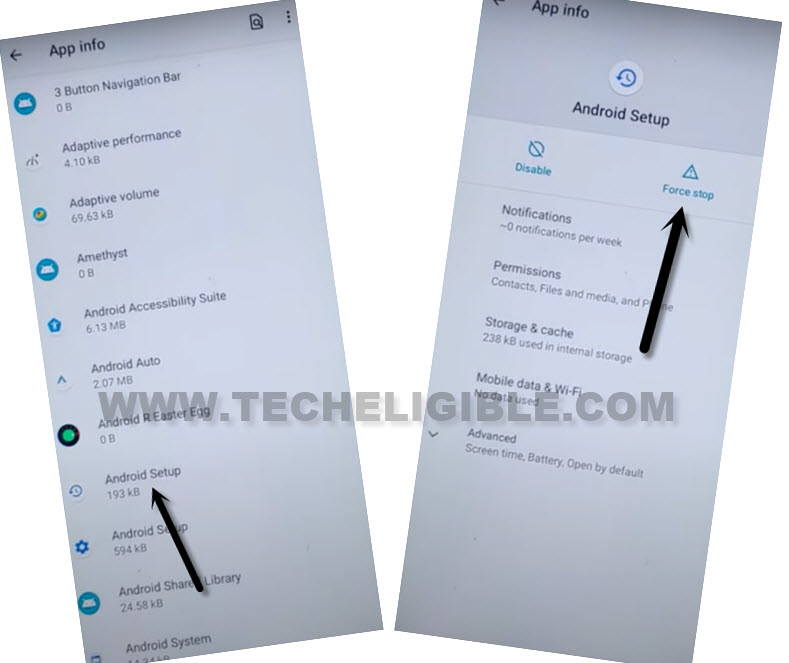
–Find and hit on > Android Setup (Clock icon) > Force Stop > OK.
–Clear both (Storage & Cache) by going to “Storage & Cache” option.
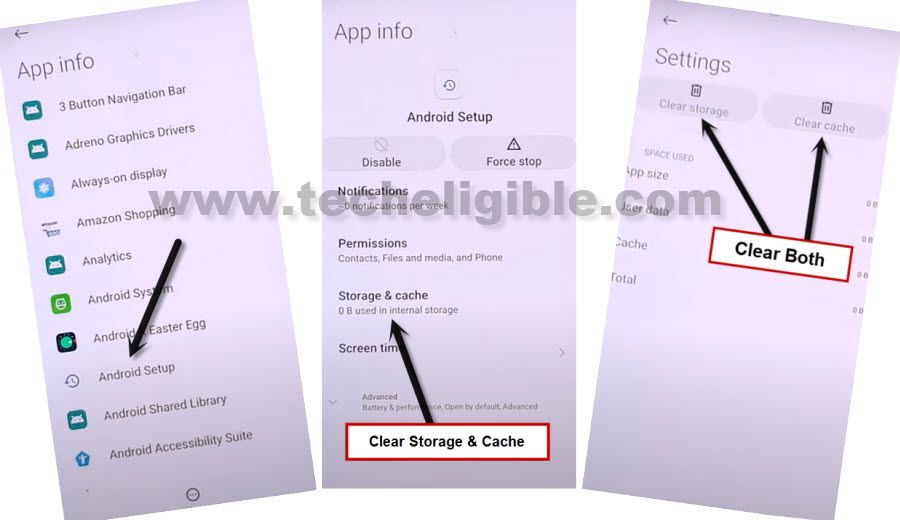
–Finally, tap to “Disable > Disable App”.
–Find blue color settings icon “Android Setup” same as shown in below image, so just tap to > Force Stop > OK.
![]()
–Tap to “Storage & Cache”, and clear also both storage and cache from of (Android Setup).
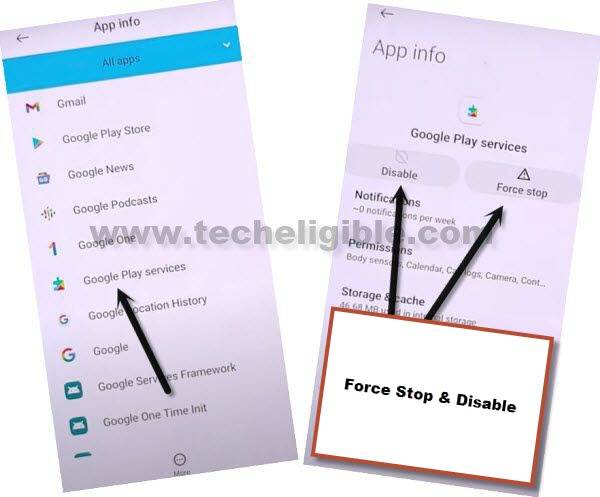
–Find and tap to > Google Play Services > Disable > Disable App.
Note: Do not hit on “Force Stop” from this app.
After disabling and force stop above apps according to given instructions, let’s move on to next step to bypass frp account.
Enable Google Play Services to Bypass FRP:
–Tap to “Back Arrow” several times to get back to first “Hello” startup homepage, from there tap to “Start” button, and you will see continuously a loading screen there.
–As soon as you see “Checking for update…”, just go back to (Connect to WiFi) screen.
–Bring (Shortcut Menu) through Swiping up from the bottom of the screen using two fingers.
![]()
–Quickly tap to > Assistant > Settings > Enable (Google Play Services).
–Go back, and tap to > Skip > Continue.
–From there, tap to > More > Accept.
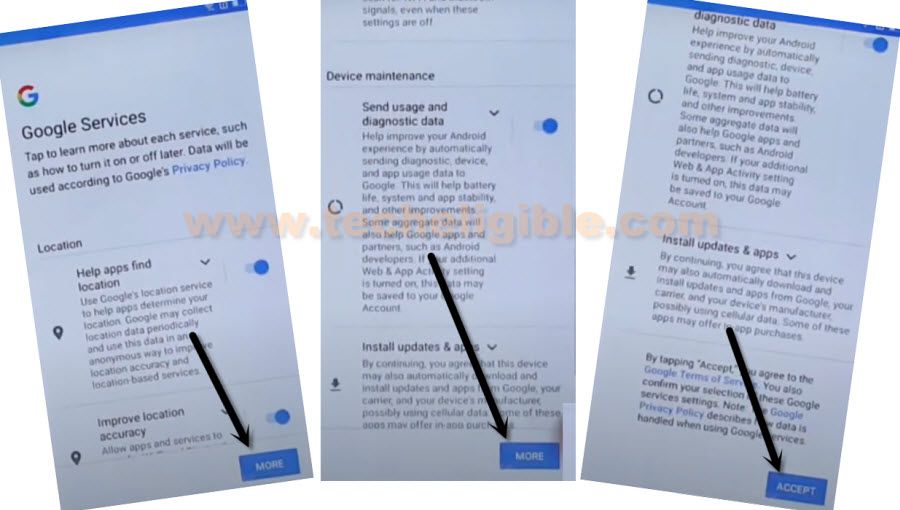
–From (Set Screen Lock) screen, tap to > SKIP > SKIP > OK > Accept & Continue, finish remaining steps to reach homescreen.
![]()
Final Step: Go to > Settings > System > Advanced > Reset Option, now hit on “Erase (All Data) option 3 times.
You have successfully Bypass FRP All Motorola Android 11, now after finishing setup wizard or start-up screen, you can easily add your own new google account from the device “Settings”.
Method 2: How to Bypass FRP Any Moto Android 10 [Latest Method]
We will change our moto phone language to Bypass FRP Any Moto Android 10, after changing language, we will add some keyboards, and through this way, we will be able to access chrome browser to download frp apps, so lets do that, how we can go step by step.
Note: This method is only for Device owner and for education purpose only, so you can apply this method only on your own device, if you are a device owner.
Let’s Start to Bypass FRP:
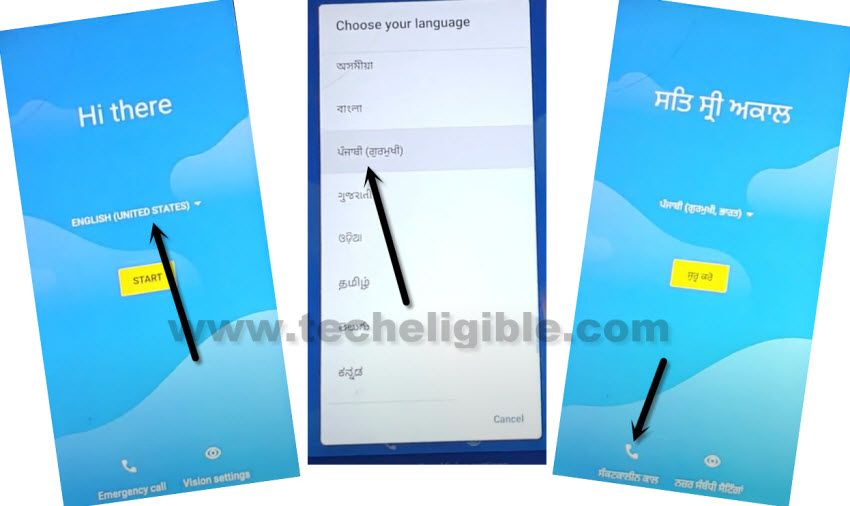
-Connect WiFi first, and go back to first “Hi there” screen.
-Change language to any Russian or Chinese language or follow same language as shown in below image.
-Tap on “Call icon” option from bottom.
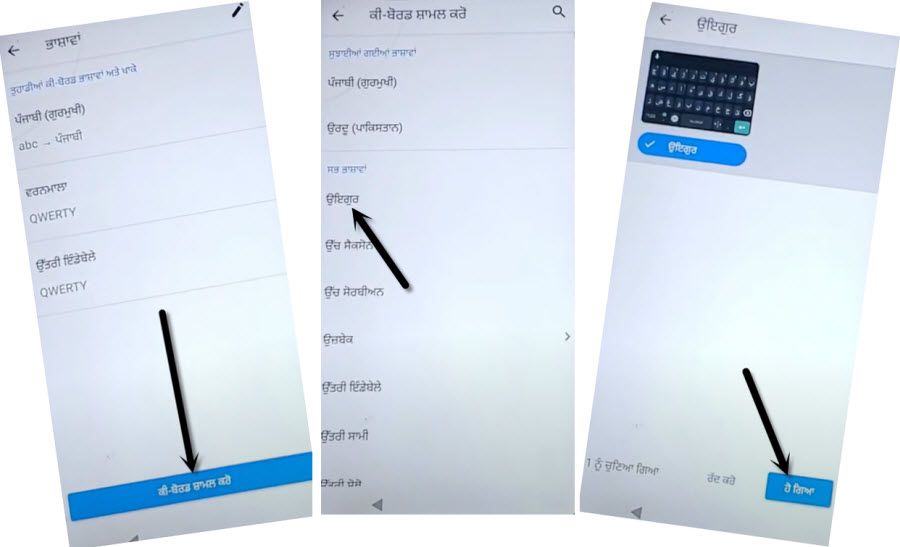
-Double tap on “Top gray button”, and then hit on “Pencil icon” from top right corner, after that hit on 2nd “+” option by following below image.
![]()
-Search icon, and long tap on “Language icon”, from popup window, hit on “3rd blue color” option.
![]()
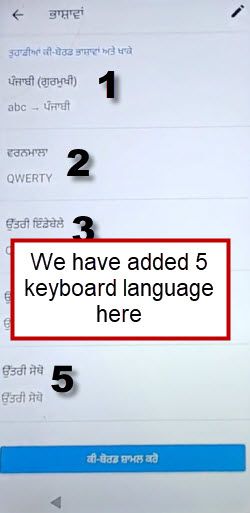
Add Some Keyboards by Following image:
-Add Keyboard by following below image carefully.
-Add another keyboard through the help of below image.
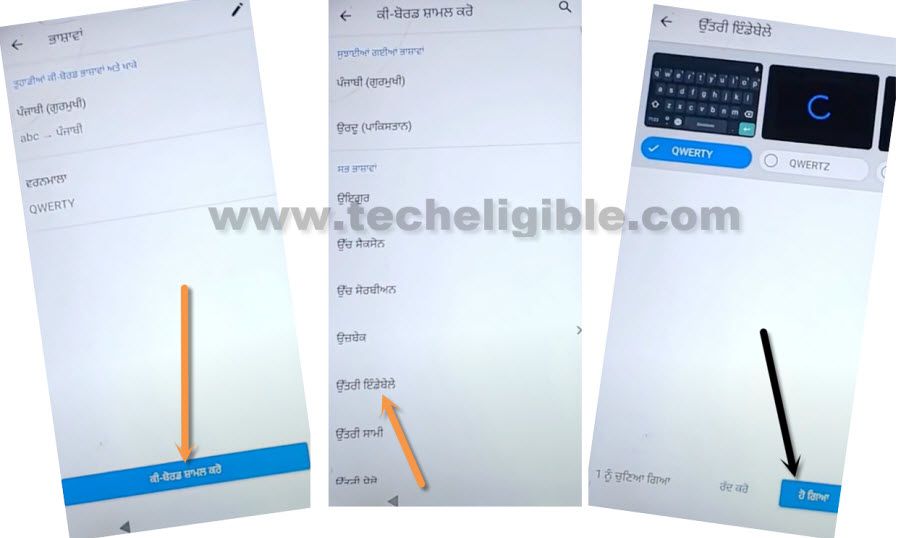
-Add final keyboard, and then we will get back to changing language option.
Note: Sorry below image is not in sequence, but you must have understood, how to add keyboards, by following image, so after adding some keyboards, we can easily access to chrome browser.
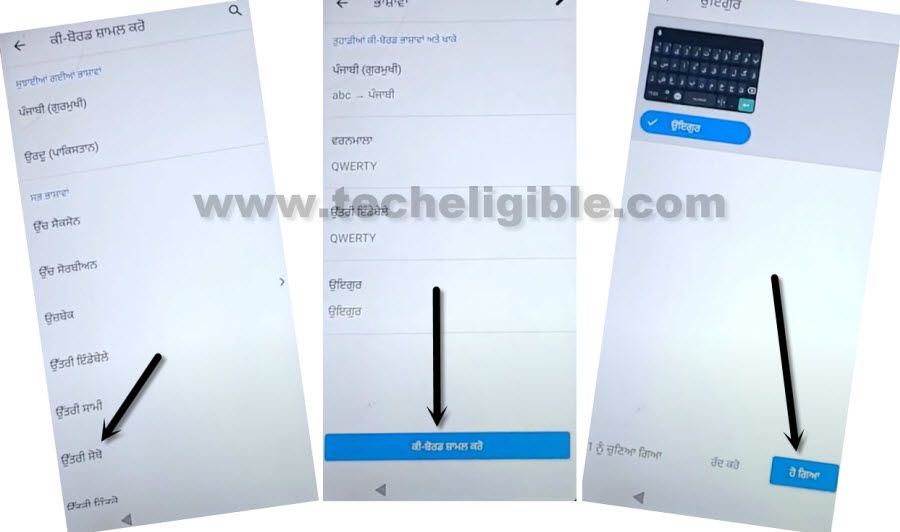
-As you can see, we have added some new keyboards in our device to bypass frp any moto android 10.
Change Language & Open Chrome Browser:
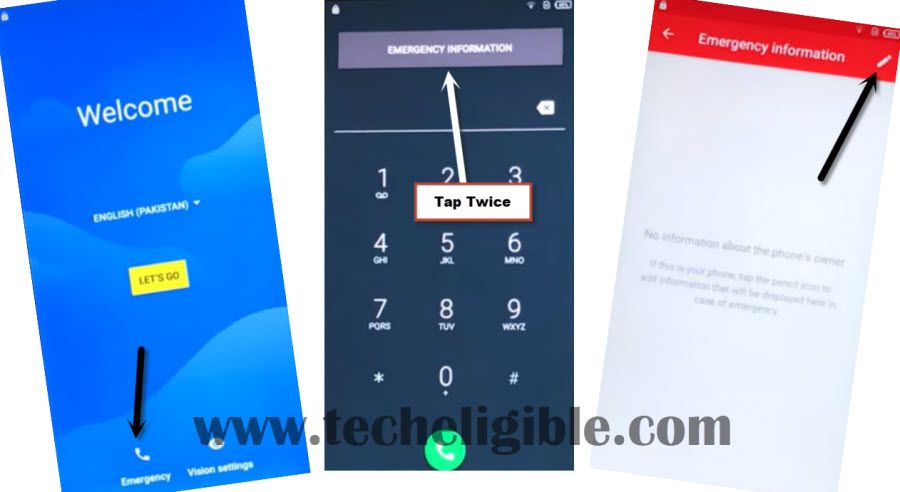
-Go back to first “Hi There” screen by tapping on back arrow several times.
-Change language to “English”.
-Tap on “Emergency Call”, and then double tap on “Emergency information”, and then hit on “Pencil icon” from top right corner.
-Tap on > Add Contact > Search icon.
-Press & Hold “Language icon”, and then go to “Language Settings”.
-Tap on “Add Keyboard”.
-Go down, and hit on “Arabic”, or tap any language that contains (Right-Arrow Symbol).
-Tap to “3 dots” from top right corner, and then tap on “Help & Feedback”.
![]()
-Type & go to “Use Morse Code”.
-Tap to “Share Arrow” from top right corner.
Note: If the language is changed, you can change language to English, by long press “Language icon” and then select “Alphabets”.
![]()
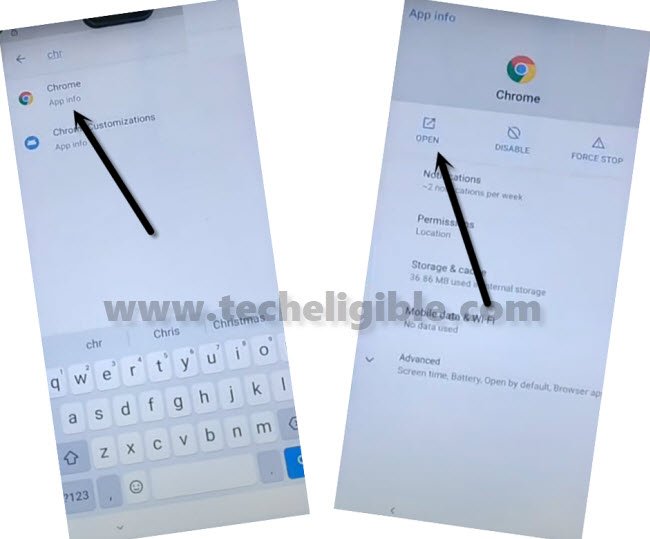
-Press & Hold “Message icon”, and then go to “App info”.
![]()
-Hit on > Permission > Search icon.
-Type “Chr”, and then hit on “Chrome App info“, now hit on “OPEN”.
Download Free Apps:
-We’re gonna download and install frp apps to bypass frp any moto android 10.
-Type in chrome search box “Download frp tools“, and go to our website searched result.
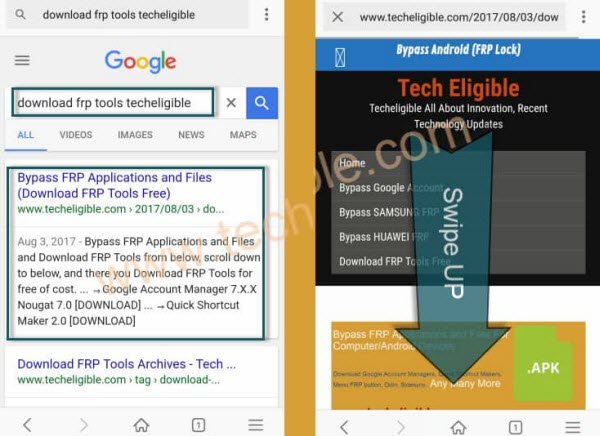
-Download below apps from there.
App One: Apex Launcher.
App Two: Google Account Manager 6.
App Three: Account Login.
-Once downloading process done of all above app, just tap go to top of the page, and tap “3 dots” from top right corner, afterwards, hit on “Download” option.
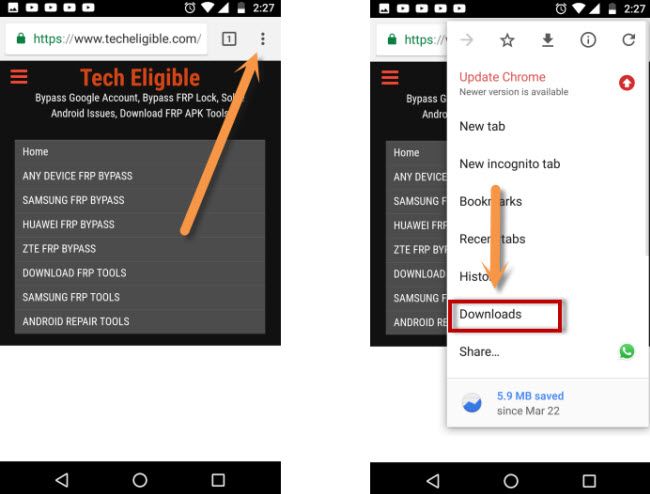
-There you will have list of all 3 downloaded apps, so lets install them one by one to bypass frp any Moto Android 10.
Install Apps:
-Tap on “Apex Launcher”, and then from popup window, tap on “Settings”, enable “Allow from this source” option.
-Go back, hit on > Install > Open.
-Congrats, you have got accessed inside your phone, but still we are behind some steps to completely bypass google account from from our Motorola Phone.
-Open “Chrome” browser, you will see same our website download frp tools page, again hit on “3 dots” from top right corner, and then go to “Downloads”.
-Install “Google Account Manager 6” in your Moto phone.
-After that, install final app by tapping on > Account Login > Install > Open.
Sign in With New Account:
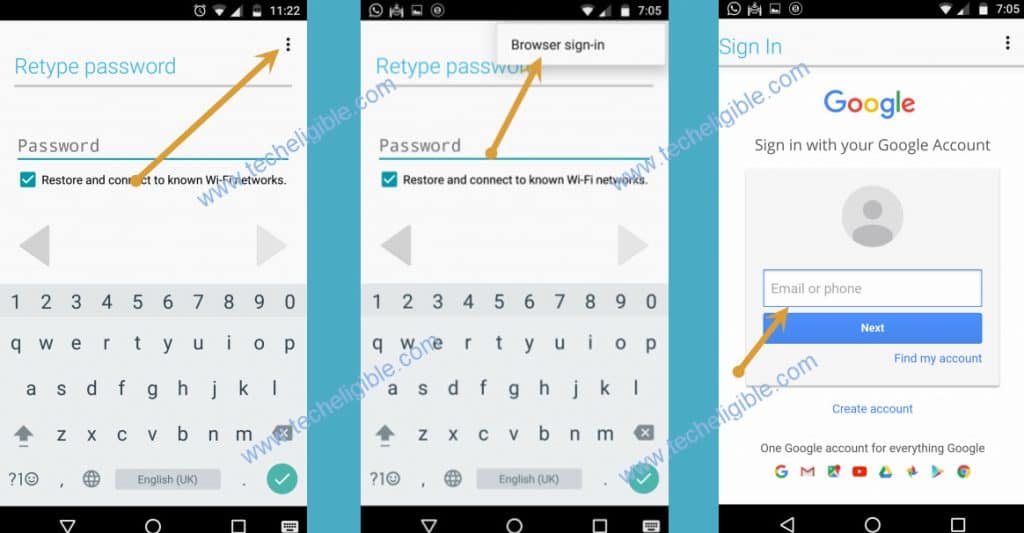
-Tap “3 dots” from top right corner.
-Tap “Browser Sign in”.
-Enter your valid Gmail account to sign in with.
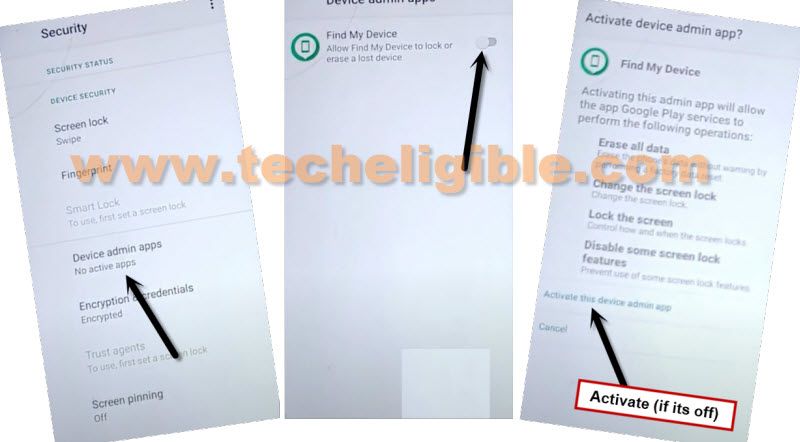
Activate Find My Device:
-Close chrome browser, and go back to your device homescreen by tapping on back arrow.
-You have to activate (Find My DEVICE) if its off, so how can we access to this option ?, follow below step.
-Go to > Settings > Security > Device Admin App > Activate this device admin app.
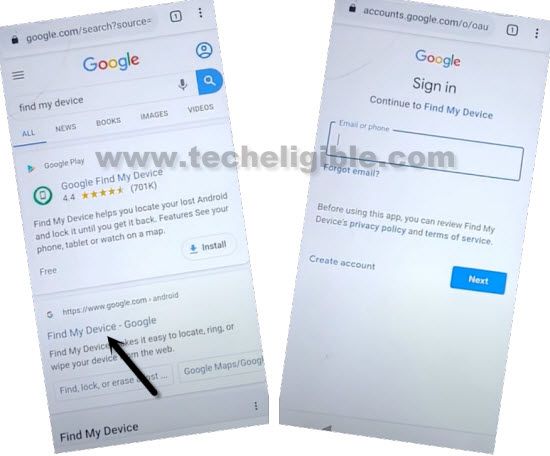
Secure Device by Find My Device App:
-Now we are going to setup another password through a google find my device app, this is very simple, just follow carefully.
-Open “Chrome browser”, and search “Google” there.
-Type in google search box “Find My Device Google”.
-Open from there “Find My DEVICE -Google”.
-This will show you sign in screen, just sing in there with your Gmail account, which you have already used in previous sing in step.
-After entering Gmail ID and Pass, just hit on “Next”.
-Hit on “Secure Device”.
-Now type there any 4 digits password, after that typing password, just tap to “Next”.
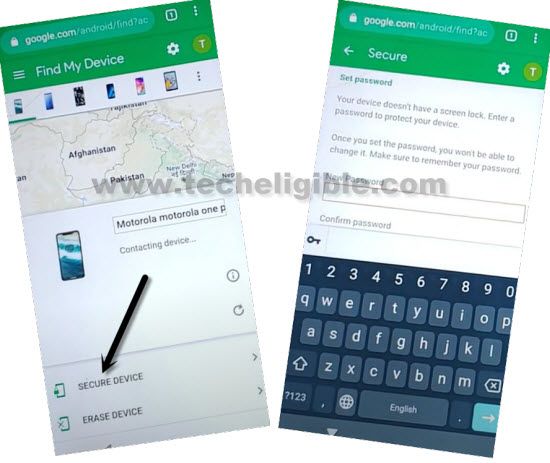
-Type any recovery message there & hit on “Secure Device” button.
-After that, this will lock your screen, and you need to swipe up the screen, and enter “Password” there which you have setup already.
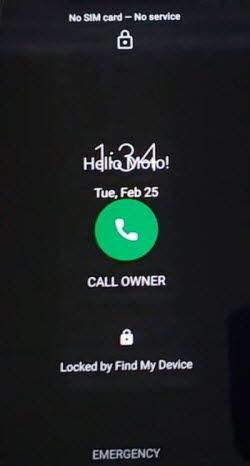
-You will be redirected back to the “Find My Device” screen.
Erase Device:
-This is our final option to erase device through find my device app, if we did that successfully, our device will be like brand new phone without any frp and security lock.
-Tap on “Erase Device”.
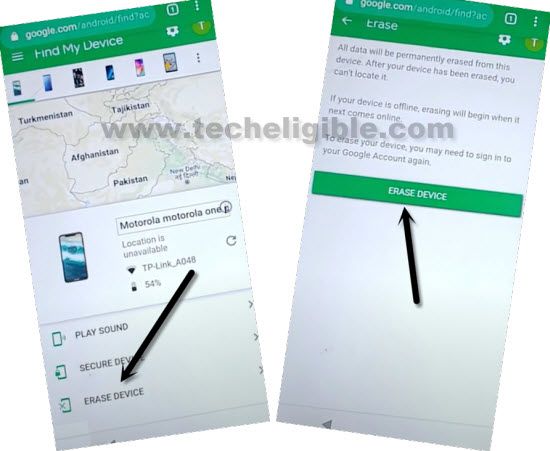
-Give there already setup Gmail Account.
-Tap on “Erase” option from popup message, and this will start performing factory reset, so wait there until this process finish, and you get back to “Hi there” screen.
Method 3: How to Bypass FRP Moto Android 7, 6, 5 (With PC) ?:
To accomplish this method, you do make sure, you have PC nearby, and download below tools in your PC.
Download Moto Tools in PC:
⇒ Motorola Device Manager [DOWNLOAD]
⇒ Moto FRP Tool [DOWNLOAD]
⇒ ADB [DOWNLOAD]
-After downloading finish.
-Turn off any “Active Antivirus Software” to avoid interruption while removing frp.
-Install “Motorola Device Manager” in your computer/laptop.
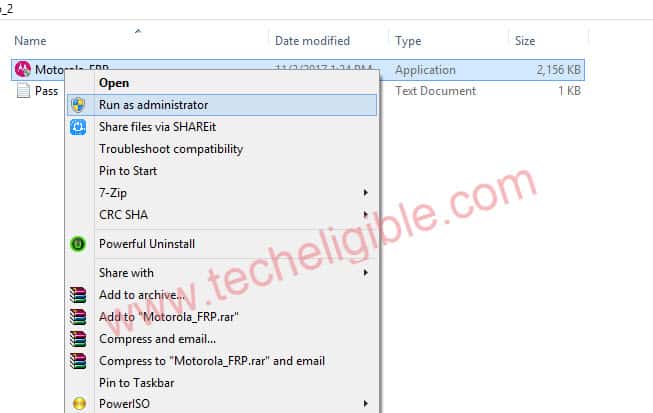
-Extract “Moto FRP Tool” from winrar archive.
-Now run “Moto_FRP” as administrator.
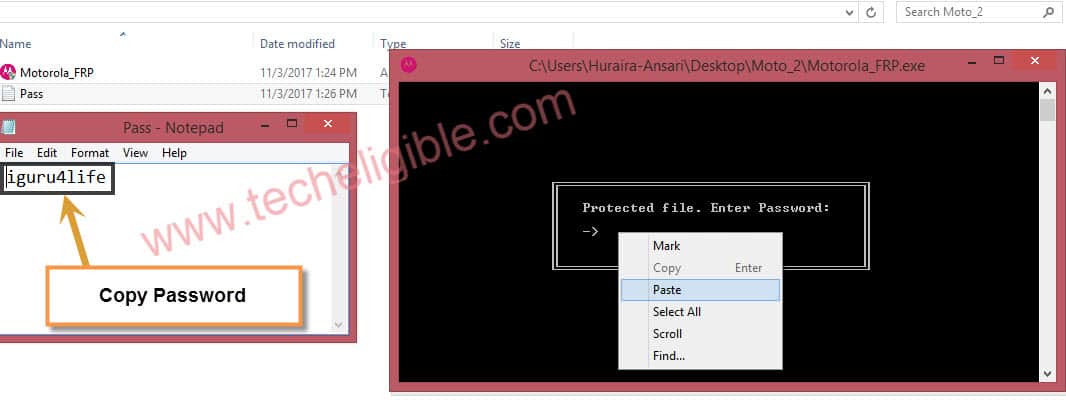
-Copy password from “PASS.TXT” file, that file is including with “Moto_FRP” folder.
-Past password in “Command Prompt” window as shown in below image.
Let’s Start to Bypass FRP All Motorola Devices:
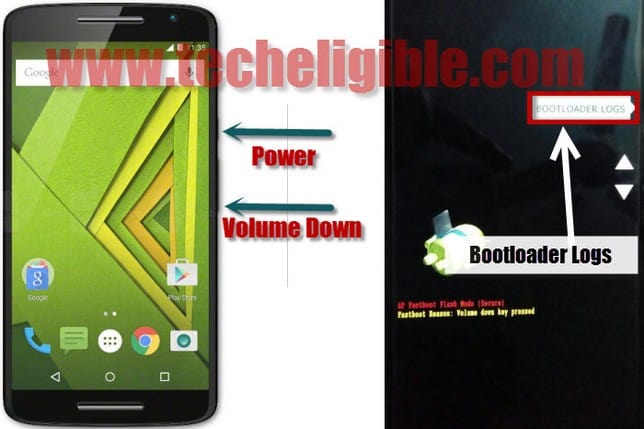
-Switch off Motorola Device.
-Press & hold (Volume Down + Power) key together until you enter in fastboot mode.
-By pressing volume down key, put your device on “Bootloader Logs” option (See below image).
-Connect device to computer using good quality “Micro USB Cable”.
-Now wait until you get message of “Daemon not Running” in cmd window. (See Below Image).
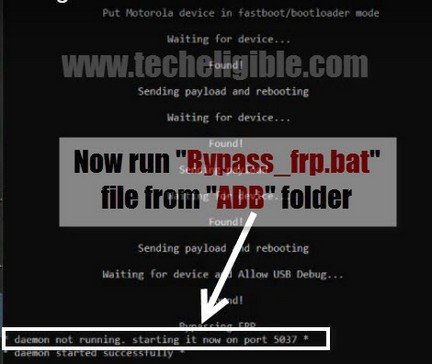
-Extract the downloaded winrar archive file “ADB”.
-Go to “ADB” folder, and run “Bypass_FRP.bat” file.
-After few seconds, you will get “Allow USB Debugging” popup in your Moto device.

-Tap on “OK” to allow usb debugging.
-Now wait until your Moto device reboot, and access to “Home Screen”.
-Once your “Moto Device” access to “Home Screen”, close “CMD Windows”, and disconnect device from computer.
User Tip:
Add Gmail Account:
-Go to Settings.
-Tap on “Accounts”, and then tap on “Google”.
-Now add your any valid Gmail id there to Bypass FRP All Motorola Devices.

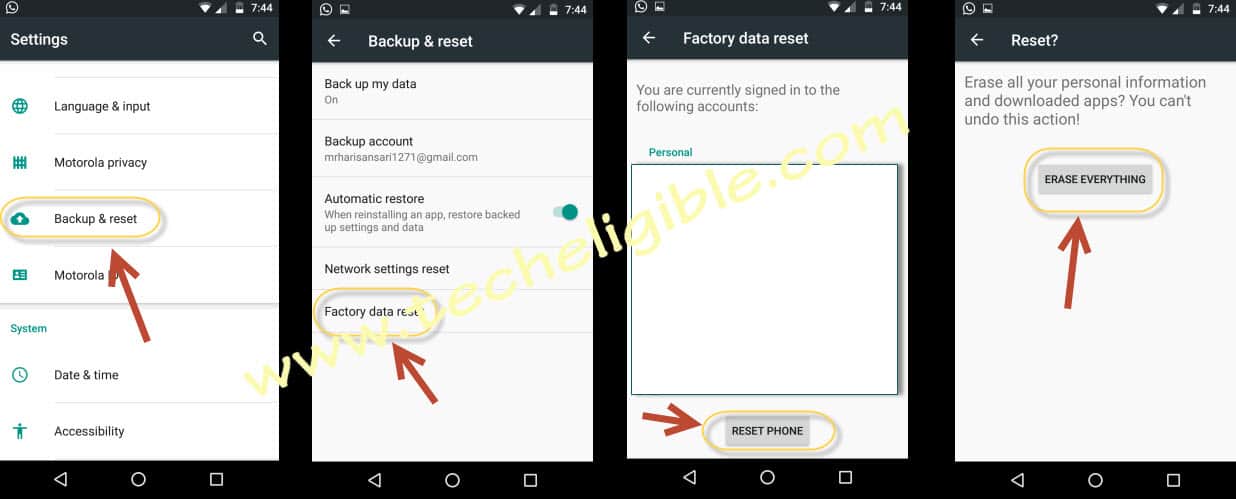
Soft Reset Moto Device:
-To Bypass FRP All Motorola Devices, you need to soft reset moto device.
-Go to “Settings”.
-Tap on “Security”.
-Tap on “Backup & Reset”.
-Select “Factory Data Reset”, and then “Reset Phone”.
-At last, select “Erase Everything”.
Warning: This would delete all your data, and when it ask you to login with Gmail account, you can use same Gmail id that you previously added.
Read More:
⇒ Bypass FRP Moto Android 7, Android 8 Without PC
⇒ Bypass FRP Moto G4 Plus All Security Patch
⇒ Bypass FRP Moto G3, All Moto X Series
⇒ Bypass FRP Moto G4 PLus, Moto G3