
Bypass Google Account Xiaomi Redmi Note 11 Android 12, 11
This is the easiest way to Bypass Google Account Xiaomi Redmi Note 11 (Android 12, Android 11), we can easily reach to this device setting even if you have FFRP protection on screen, once we reach inside the device settings, from there we can easily bypass frp Xiaomi just by disabling few applications, and these apps can be enabled later on after our purpose done.
We also have updated new method for Redmi Note 11 MIUI 13 (Android 12), both methods are different, so if you’ve latest android version android 12, that means you should follow our updated new (METHOD 1) first.
Warning: Do not try this frp method on a stolen phone, this is a serious crime, if you are trying to bypass frp on a stolen phone, you may also be jailed, this process is for device owner and for educational purpose only.
| Method 1: Remove FRP Redmi Note 11 MIUI 13[Android 12] |
| Method 2: Remove FRP Redmi Note 11 [Android 11] |
Method 1: Bypass Google Account Xiaomi Redmi Note 11 MIUI 13 [Android 12]
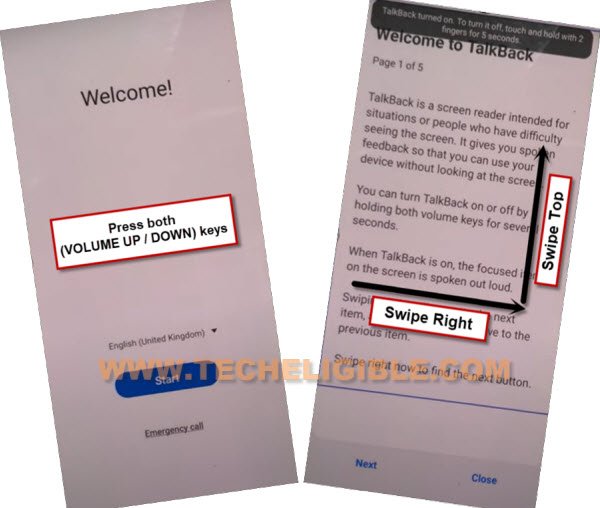
-Let’s begin process by turning on device and connect WiFi.
-Long hit both (Volume UP + Down) keys together, and you will have (Turn on talkback) popup, just tap on “Turn on”.

-We have to long press again (Volume UP + Down) keys , and you will see there (talkback turned on).
-Lets just draw a reverse “L” by swiping from right to left and then swipe up.
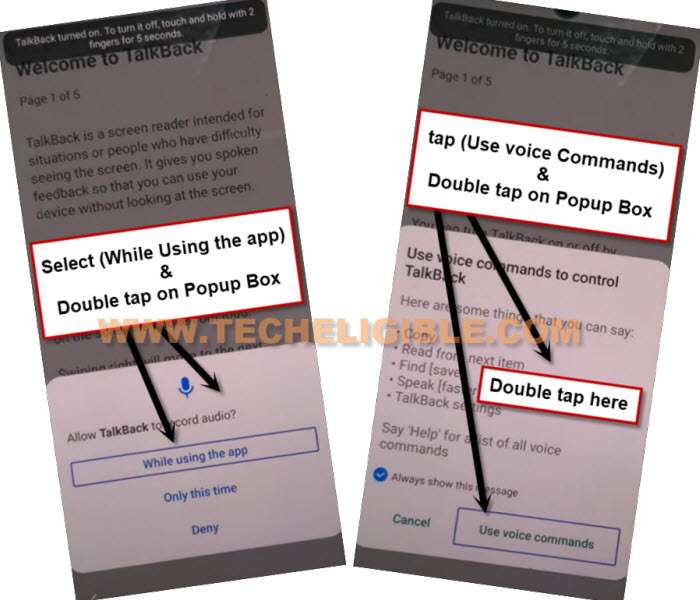
-You will’ve a popup window, just double hit on “while using the app”.
-Select “Use Command Voice” option, and double tap again on same option.
–Lets open google assistant by Speaking loudly (Google Assistant).
–After having a popup window of google assistant, just long press both (Volume UP +Downs) to turn off talkback.
-From popup window, hit on “Keyboard” icon same as shown in below image, and then type there “Sett”, you will see (Settings) in searched result, just go to that.
![]()
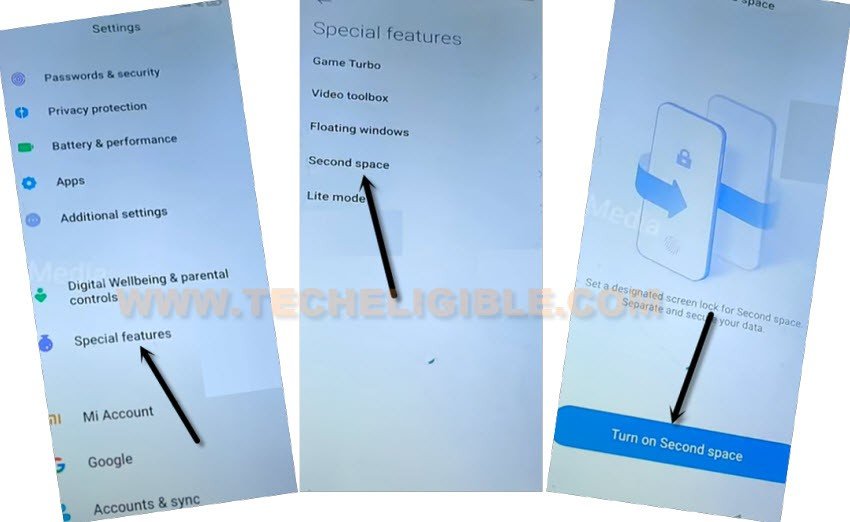
-Once you reach inside settings, just scroll down little but, and then go to > Special Features > Second Space > Turn on Second Space.
-Just over there, this will start creating a second space to bypass google account xiaomi redmi note 11 Pro Android 12.
-Tap to “Continue”, and then select “Using a Shortcut”, and tap on > Continue > Skip.
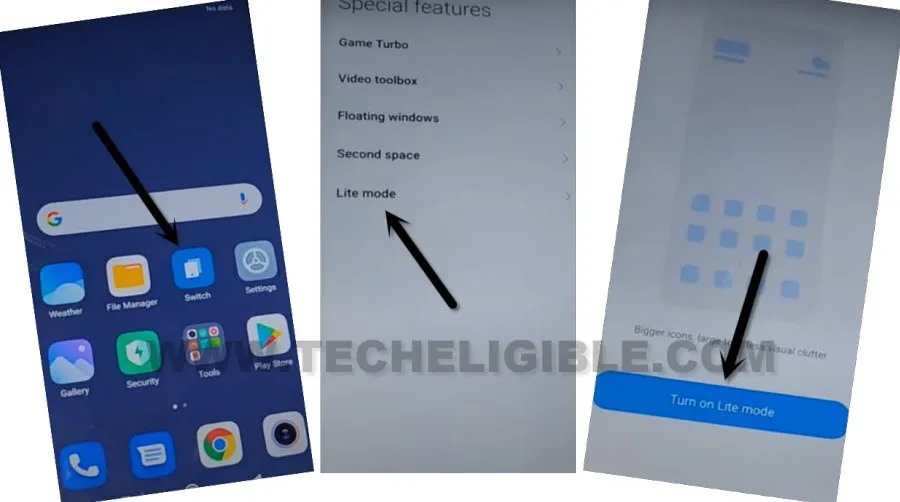
-Tap again on > Switch > Second Space > Go to Second Space.
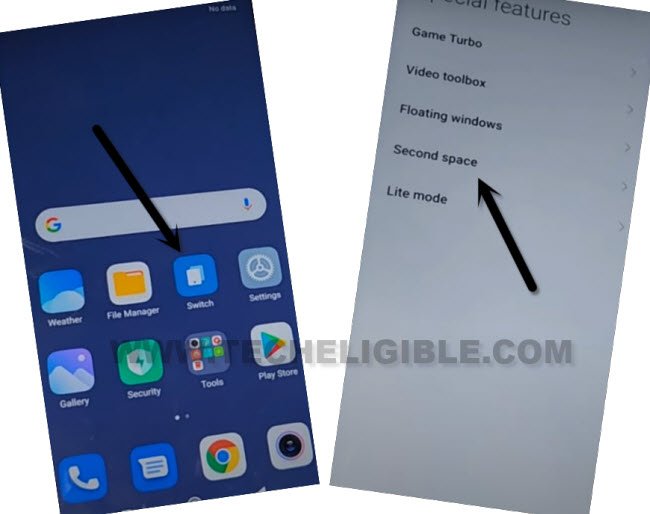
-Now you will get back to homescreen again, tap again on “Switch”, and this time, select last option > Lite Mode > Turn on Lite Mode.
Enable OEM Unlocking Option:
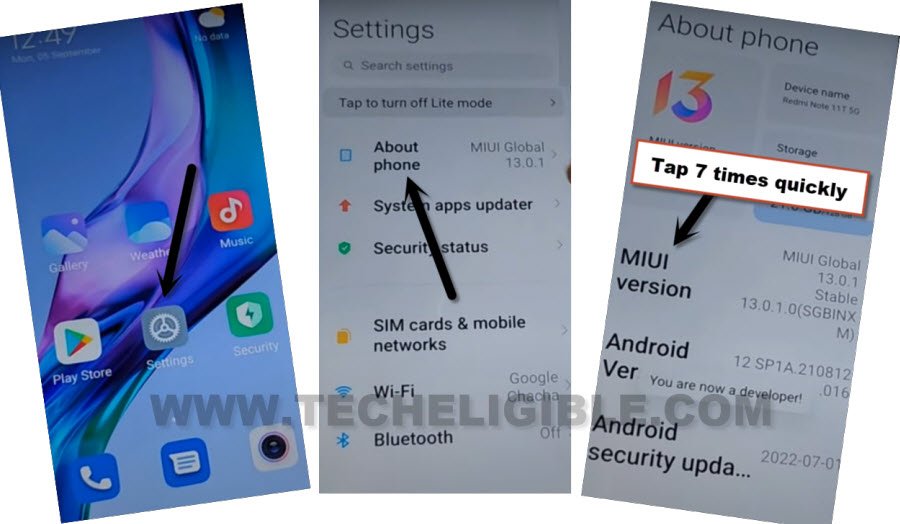
-Open settings again by tapping on “Settings” icon, and go to “About Phone” by following below image.
-From here, we have to turn on developer option, just tap 7 times quickly on “MIUI Version”, you will get a flash message of (You are now a developer).
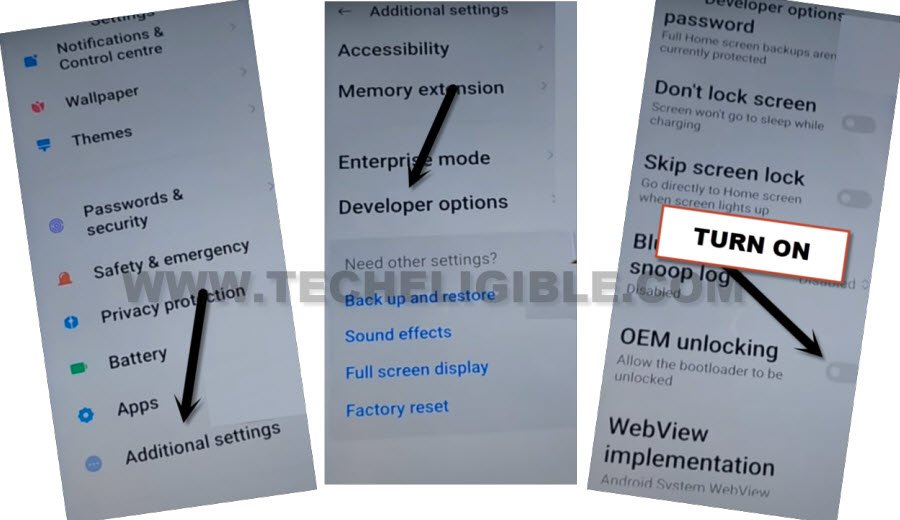
-Go back to > Settings > Additional Settings > Developer Options.
-Turn on “OEM Unlocking” option from there, and now go outside of developer option, and get into developer option again just to make sure that the (OEM unlocking) has successfully been turned on.
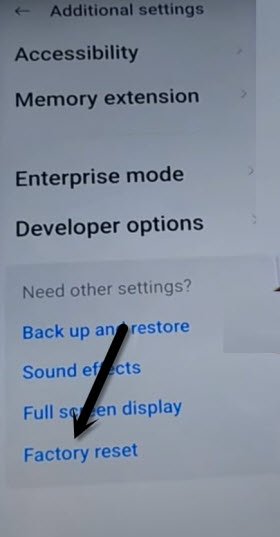
-Now tap to “Back Arrow” from top left corner to get back to “Additional Settings”, from there hit on > Factory Reset > Erase All Data > Factory Reset.
-You will see a popup box, just wait till countdown finish, and tap on “OK” button.
-Now the device will be restart, and it will start reset your device completely including old google signed in account, after that, you can easily finish setup wizard, thanks for visiting us.
Method 2: Bypass Google Account Xiaomi Redmi Note 11 [Android 11]
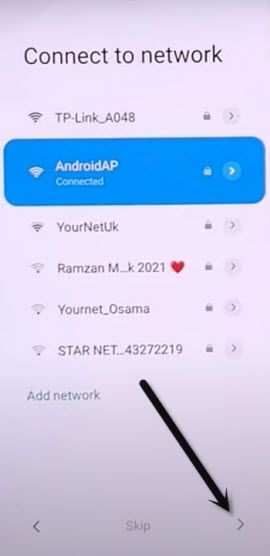
-Connect WIFI, and then go to > Connect to Network > Add Network.
-There you will have a (SSID text area), so type there any text”, and then long tap on your typed text.
-You will get some options, just hit on “Download” icon from there same as shown in below image.
-Now long hit on “Gmail” icon.
![]()
-> Notification > Additional Settings in the app.
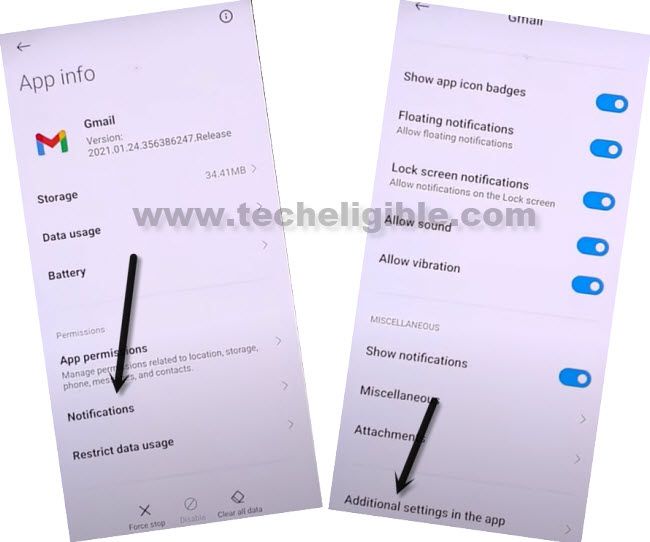
-> 3 Dots > Help & Feedback.
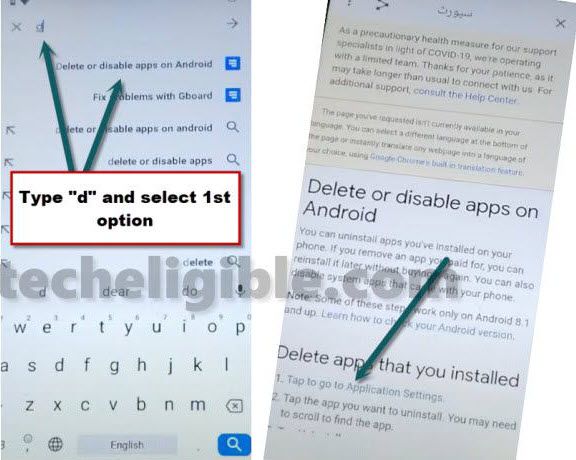
-Type in search box “D”, and then hit on “Delete or disable apps on Android” from searched result, now hit on blue link from text “Tap to go to Application Settings”.
-Scroll down, find and tap on > Settings > Open > Additional Settings.
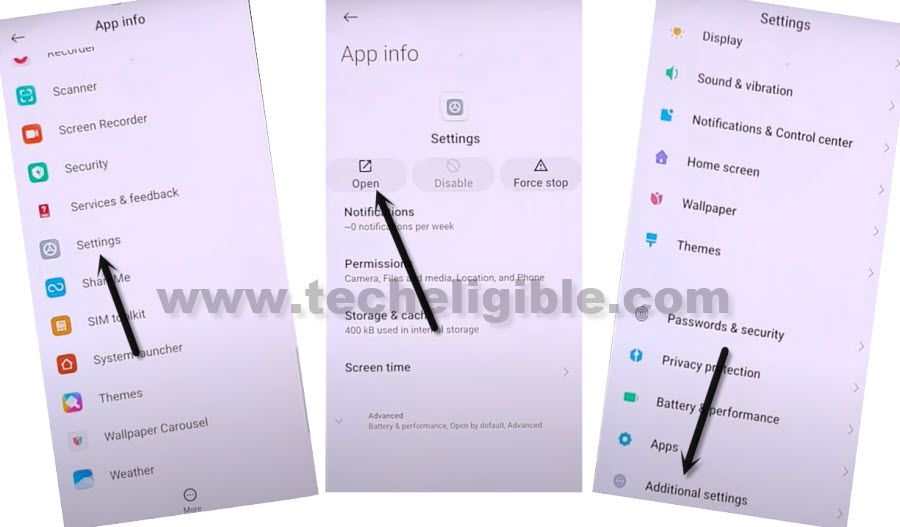
-We are going to enable the Shortcut menu, for that, go to > Accessibility > Accessibility MENU > Turn on (Accessibility Menu Shortcut) > Allow > Got it.
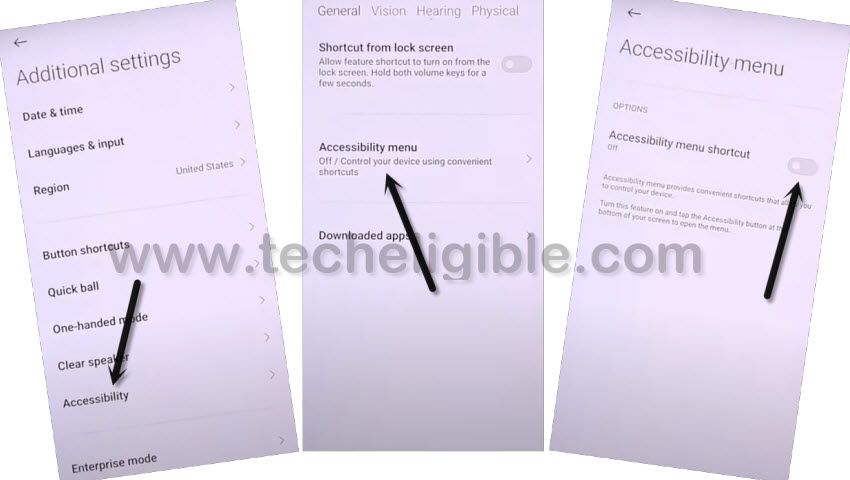
-Once you enabled the shortcut menu, you will see a (HUMAN ICON) at the bottom right corner.
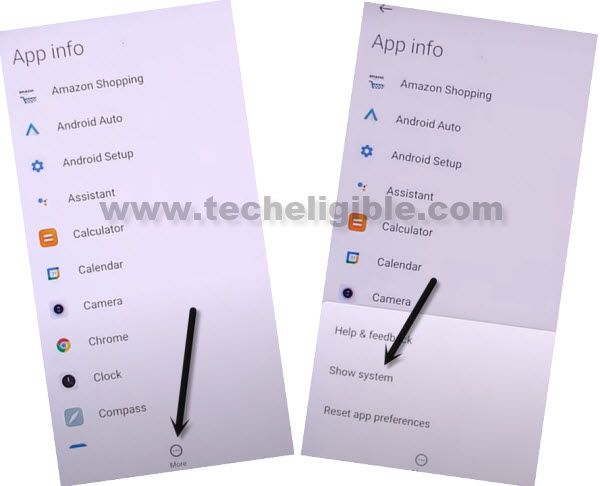
-By tapping on back arrow carefully, just get back to (App info) homepage.
-From there tap on > More > Show System.
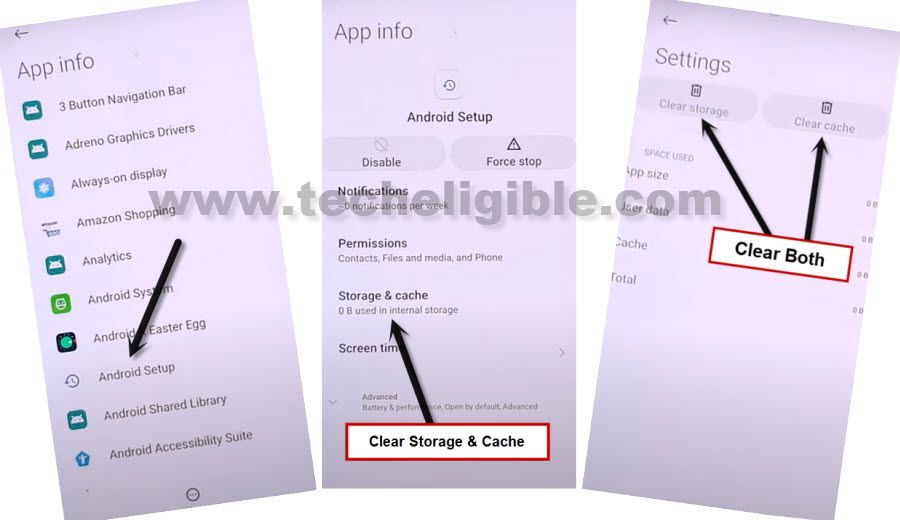
Clear Cache & Disable 4 Apps:
-Tap on Android Setup (Clock icon) > Storage & Cache > Clear (Both Storage & Cache).
-Go back, and tap on > Force Stop > OK, and then tap on “Disable > Disable APP”, again tap on “Force Stop > OK”, we have completely disabled (Android Setup).
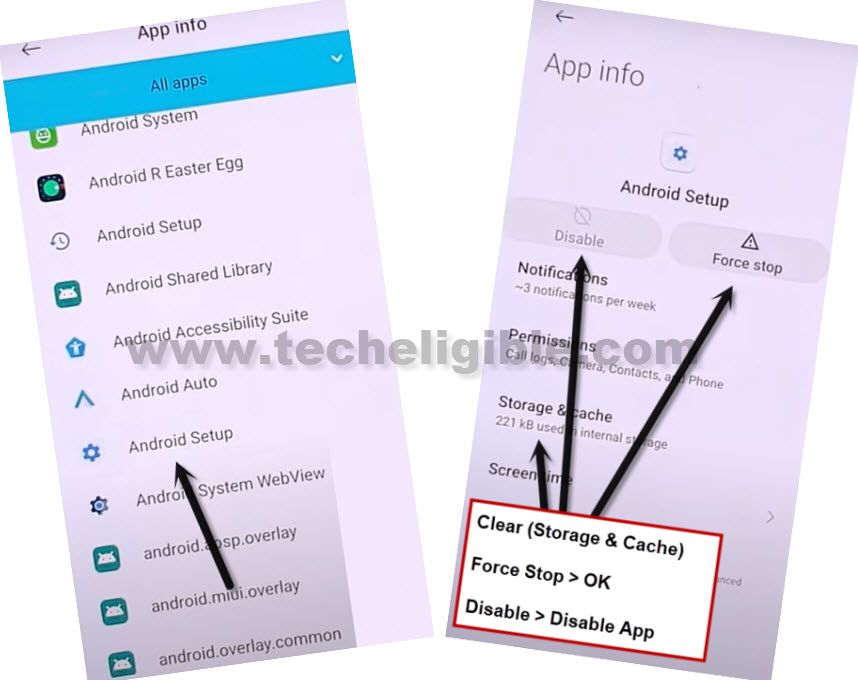
-Go back to (App info) homepage again, and then tap on another “Android Setup”.
-Clear Storage & Cache, and also Force Stop & Disable this app, same as we did with 1st app.
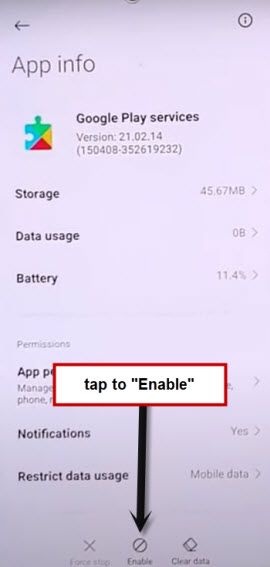
-Now go back again to “App info” homepage, after that tap to > Google Play Services > Disable > Disable App.
-Now hit on > Force Stop > OK.
-Go to > Storage & Cache, if possible, clear both (Cache & Storage).
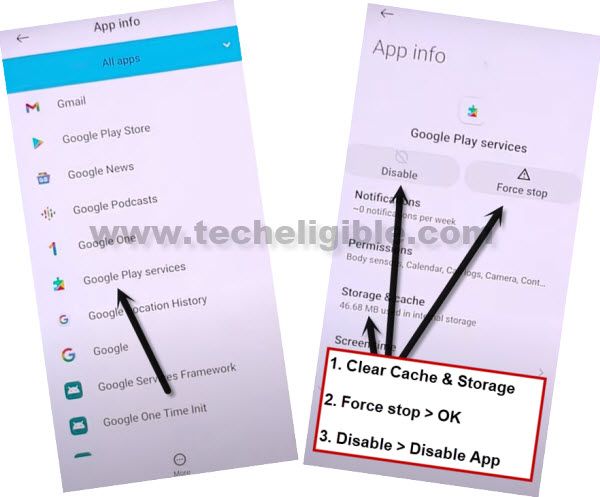
-After clearing Cache and disabling these 4 apps, it will be easy for us to Bypass Google Account Xiaomi Redmi Note 11.
-Go back to (Connect to Network) screen, and from there hit on “Next Arrow” icon.
Do this Fast: Once you have (Checking for update…) screen, quickly tap on > Human icon > Google Assistant > Settings > Enable.
Note: We have to enable Google Play Services to bypass checking for update scree, if you did that very fast and quickly, you will be able to enable google play services, and you may have to try this for several times to bring perfection and to know where you have to tap on quickly right after the next screen appears.
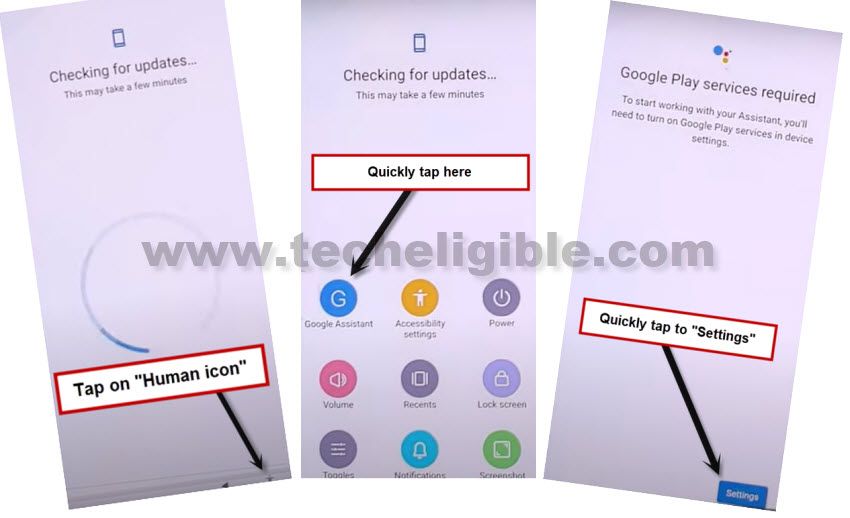
–Quickly tap on “Enable” to enable google play services.
-After enabling google play services successfully, just tap “Back Arrow” and wait on (Checking for update…) screen.
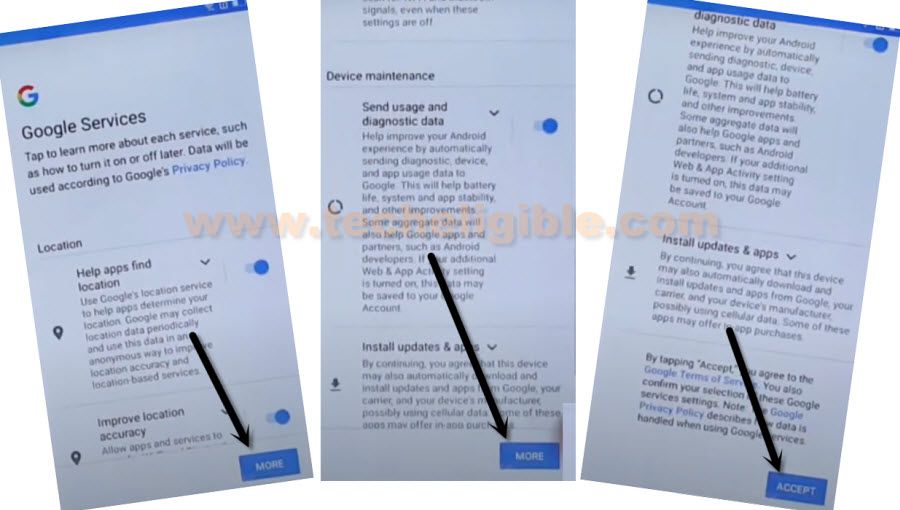
-After that, you will have (Google Services) screen, tap to > More > More> Accept.
-Hit on > Skip > Next Arrow.
-Select (App Drawer) option, and then tap on “Next Arrow”.
-Now hit again on “Next Arrow” from setup complete screen.
Read More: