
Remove FRP Account VIVO Y35 Android 13 Without PC
If you have got a FRP protection on your own VIVO device, so you can Remove FRP Account VIVO Y35 (Android 13) without using computer, apply steps from below, but, you would require another android device to accomplish this method, because, we will use other android device Gmail account to our VIVO Y35 device through a (Easy Share) app, means, you will copy Gmail account in that device, follow steps from below.
Warning: Do not try this frp method on a stolen phone, this is a serious crime, if you are trying to bypass frp on a stolen phone, you may also be jailed, this process is for device owner and for educational purpose only.
Let’s Start to Remove FRP Account VIVO Y35:
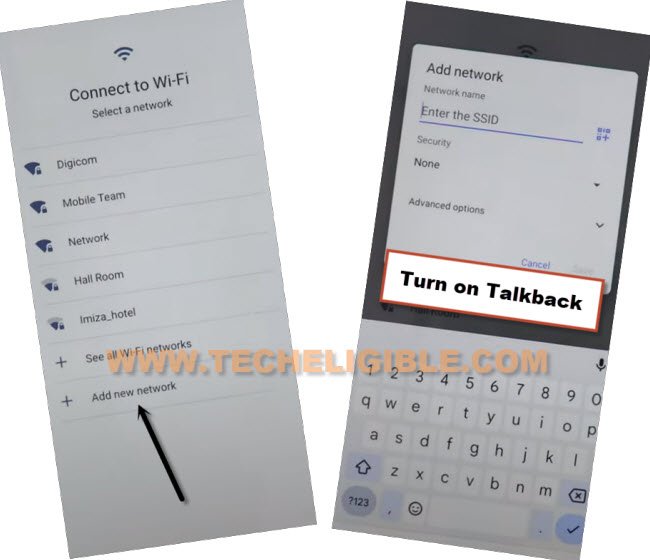
-Go on a screen of “Connect to WiFi”, and connect WiFi in your VIVO device to start bypassing frp process.
-From the same (Connect to WiFi) screen, hit on “Add new network”, this will show you a device keyboard.
-Enable talkback Long press again both (Volume UP + Down) buttons at the same time.
-A popup window will appear saying (Enable Talkback Shortcut?), just hit on “Turn on”.
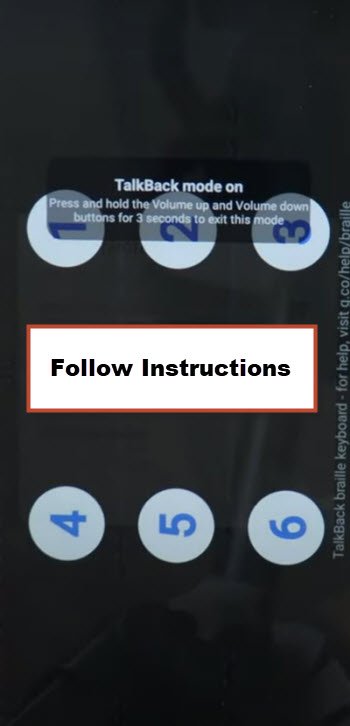
-Long press again both (Volume UP + Down) buttons at the same time, and this time you will have a (Welcome to Talkback) screen.
-Double hit on “Close” from bottom, because drawing (L) letter here is no more working, we have to use another different way to reach our device settings to bypass frp.
-Double hit on “Enter the SSID” field tab to get keyboard, from there, double tap over “World icon”.
-Now double tap on “Next”, after that, double anywhere on black screen.
![]()
-Now you will have a numbers (1,2,34,5,6) on screen, you have to hit number the one that is highlighted.
-First tap on letter (1).
-After that, (1,2) will star blinking, just tap both number at the same time.
-After that, (1,4) will star blinking, just tap both number at the same time.
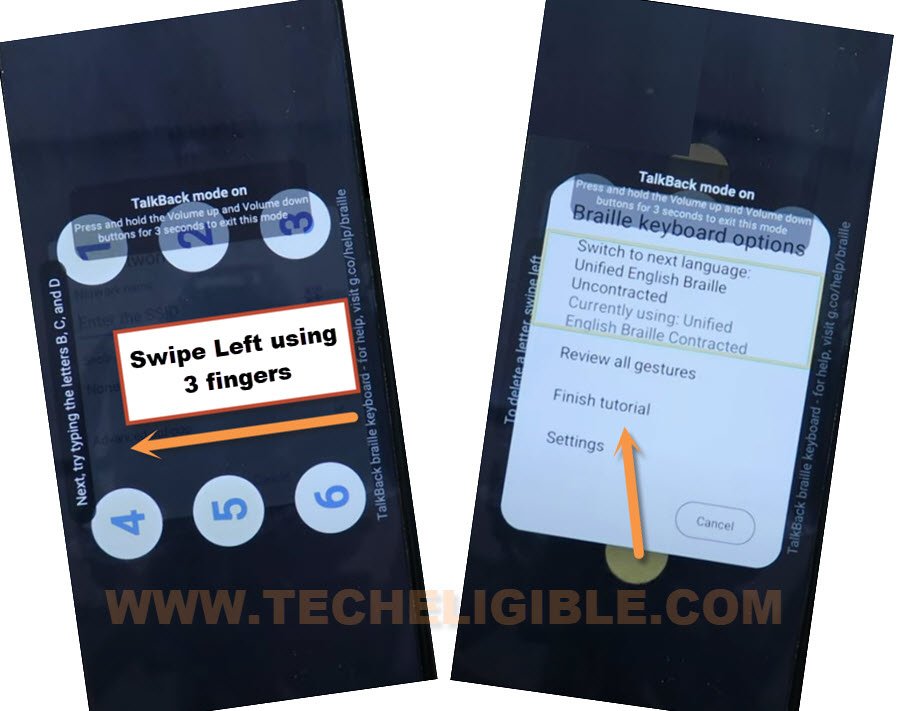
-After that, (1,4,5) will star blinking, just tap thrice number at the same time using your 3 fingers.
-Swipe with 3 fingers from Right to Left to bring (brail keyboard options)
-Now double tap over “Finish tutorial” option.
-Swipe again with 3 fingers from Right to Left to bring (brail keyboard options), now double hit on “Settings”.
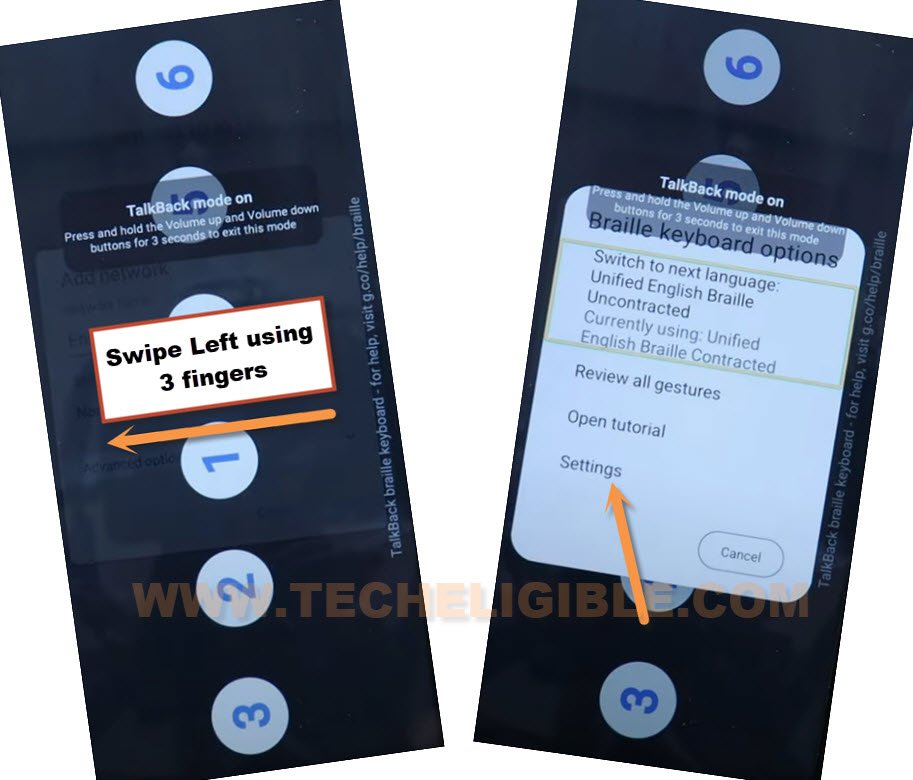
-Disable talkback by long press both (Volume UP + Down) buttons.
-After that, hit on “Back Arrow” from bottom, after that, tap to “Close” from popup window.
-Now, hit on “Cancel” from (Add network) popup window.

-You will reach back on “Connect to Network” screen, from there, tap on “Add new network”.
-You will have a popup window, just tap on option “Turn on in accessibility Settings”.

-Go to “Accessibility MENU”, now turn on “Accessibility Menu Shortcut”.
-Hit on “Allow”, and then tap “Got it”.
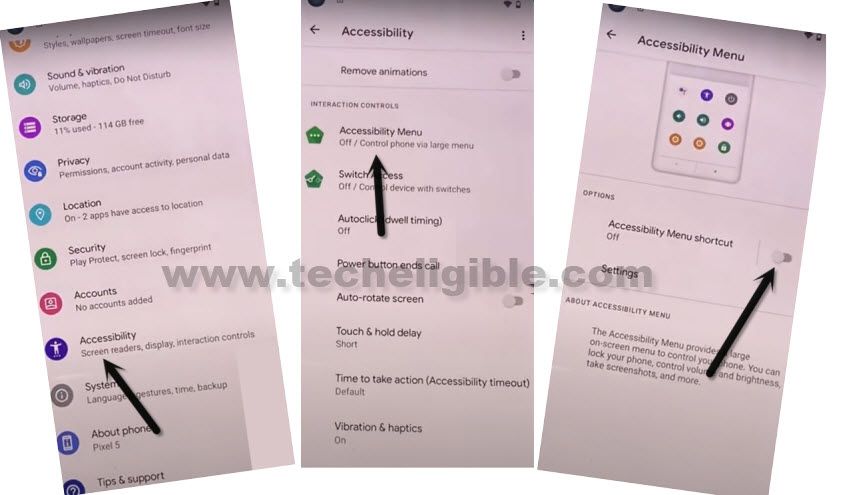
-You will start having a “3 dots” icon at the bottom right corner.
-Hit on “3 dots”, and then go to “Assistant”, after that hit on a “Keyboard” icon.
![]()
-Wait over popup window, this will auto disappear.
-After that, Type “Settings”, and tap to “Settings” from searched result.
-After that, tap on “Settings” gear icon to reach inside your device settings.
-After that, go to “System”.
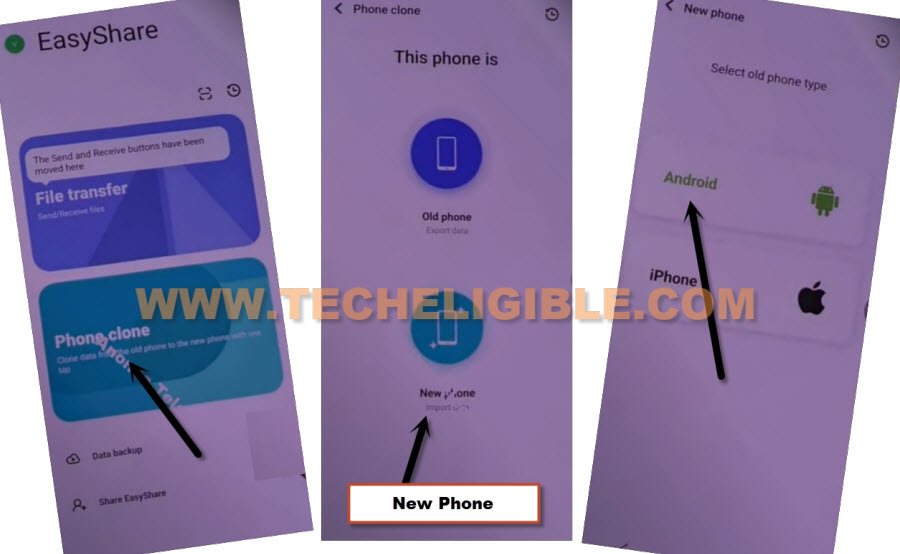
-Go to > Phone Clone > New Phone > Android > Got it.
-Tap few times on “While using the app” from shortcut popup, and tap to “Allow”.
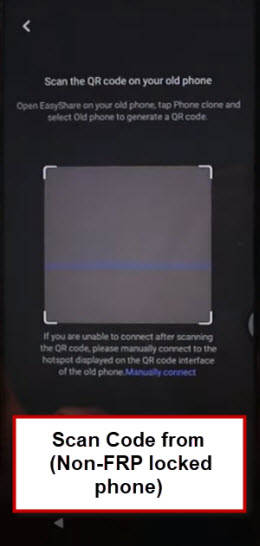
-You will having a QR Code reader screen.
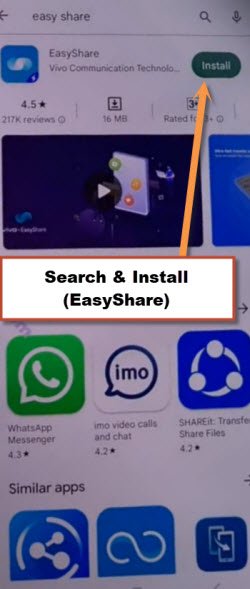
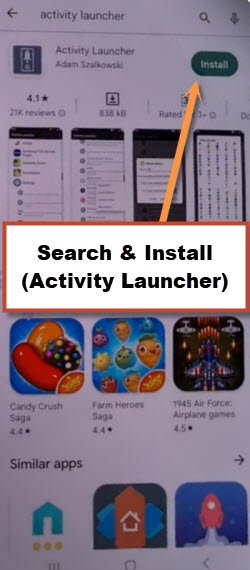
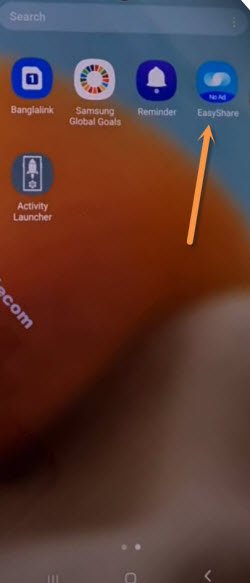
-Take any other non FRP lock android device, install “Easy Share” app in that android device from google play store.
-Install another app “Activity Launcher” in other android device.
-Open “Easy Share” app in other android device.
-Go to > Phone Clone > Old Phone > Set Now.
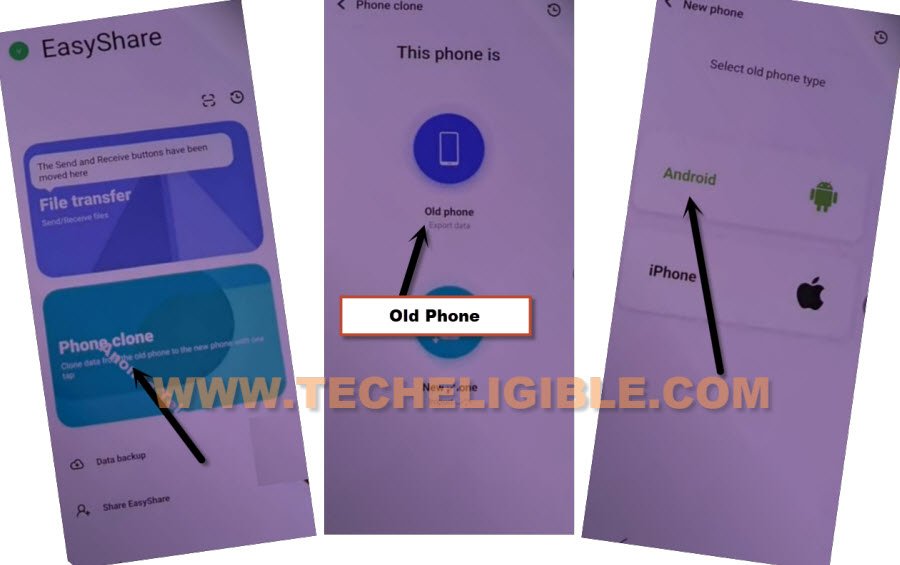
-Turn on from there “Easy Share” app, after that, hit on “Back Arrow”.
-Hit on > Old Phone > Got it > While using the app > Allow.
-You will have QR Code in your other android device, lets scan that code with your VIVO device.
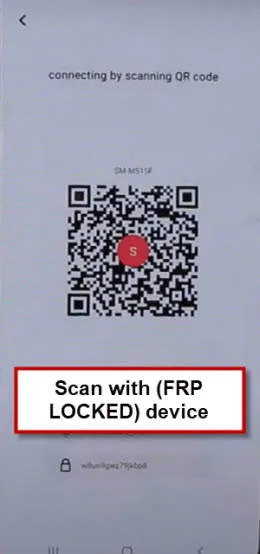
-After scanning QR Code, you will receive a popup in other android device, tap to “Set Now”.
-Now your both device will be connected each other, and we can now easily transfer (Activity Launcher + Google Account) from other android device to a VIVO frp locked phone, this is how, you will be able to Remove FRP Account VIVO Y35.
-Turn on “Easy Share” app, now hit on “Got it”.
-Tap on “Allow” option for 4 times,
-De-select “All Options”, after that go to “Apps”.
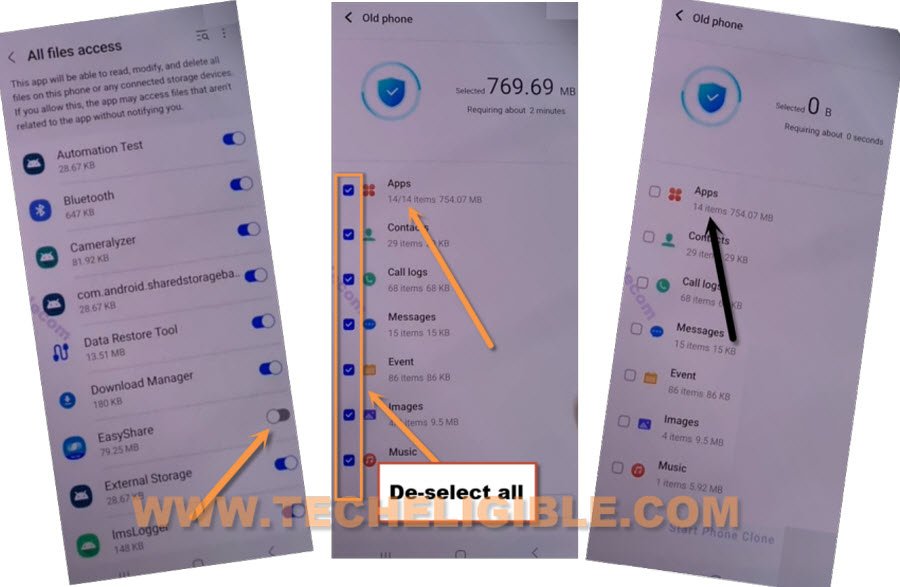
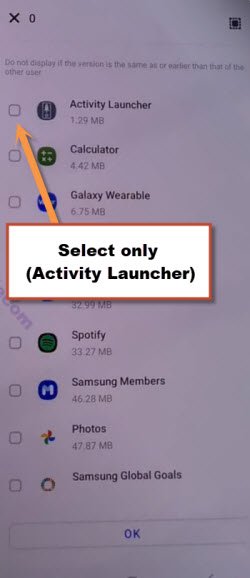
-Select only “Activity Launcher”, and tap to “Ok”.
-Tap on “Start Phone Clone” button, now wait until this transferring app process is done.
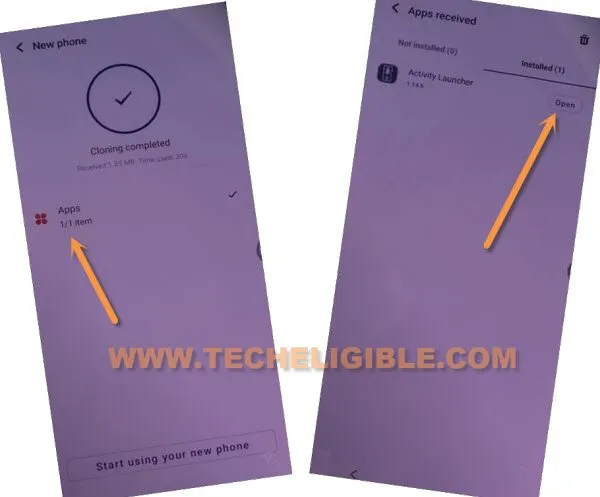
-Once you see “Cloning Completed” in VIVO device, just tap on “Apps”.
-Hit on “Open” from activity launcher app, after that, hit on “OK”, now you will have there a “Loading” screen, just wait until this process is done.
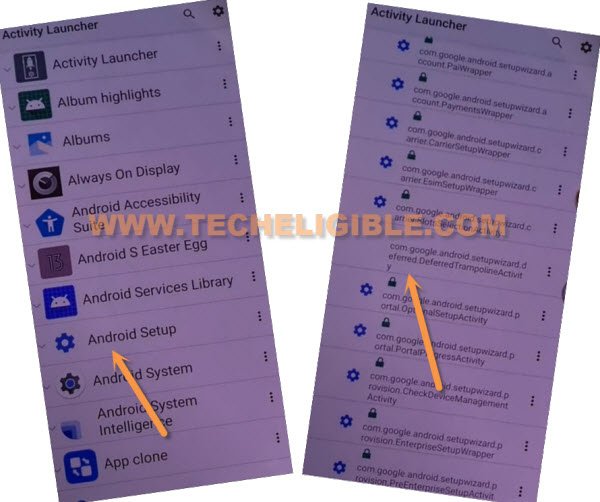
-Hit on “Android Setup”, you will see there a big list of too many android setup, just scroll down, and tap to “com.googel.android.setupwizard.deferredTramplineactivity” same as shown in below image.
-Tap to > Start > Skip > Next > Next > No Cable > Copy Without Cable.
-Hit on “Next”, this will show you (Verify pattern) screen, just tap on “Use my google account instead”, after that, go to > Next > Next.
Setup Device from Other Android Phone:
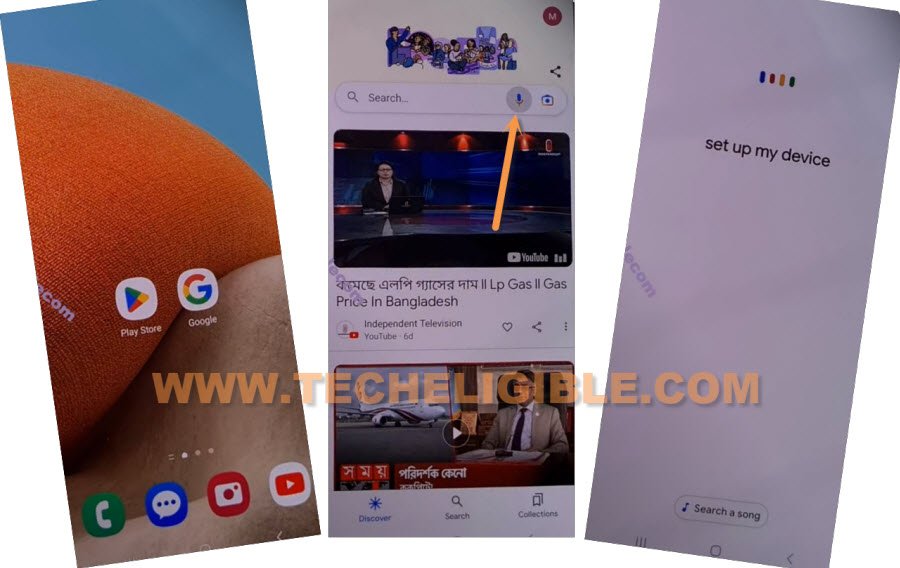
-Go to your other android phone.
-Open “Google” app, hit on “Mic icon”.
-Speak loudly “Setup my device”, after that, tap on > Next > Next > Copy.
-You will receive a (Verify its you) google screen in VIVO device, just sign in there with your same (Google Account) that is already logged-in in your other android phone.
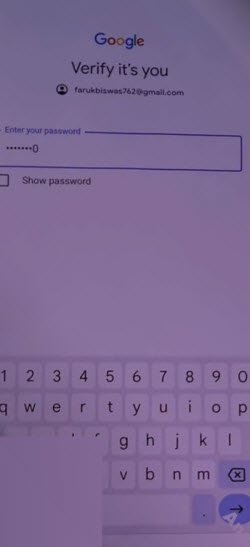
-Once you signed in completely, that means the FRP has been setup with new google account, let’s just finish setup wizard, and use your device without any restrictions.
-Now you are all done, you can easily complete initial setup to access your device normally, because new google account has been added successfully, and old one had been deleted completely, thanks for visiting us.
Read More: