Remove Google FRP Lenovo Vibe X3 Android 6 By Reset Method
If you are device owner, and lost access to your own device. You can apply steps from here to Remove Google FRP Lenovo Vibe X3 (Android 6) without any paid services. To gain access to your this device, you will have to access settings first directly through (Assist) option. After that, perform soft reset task from (Back up & reset) option.
Warning: Do not try this frp method on a stolen phone, this is a serious crime, if you are trying to bypass frp on a stolen phone, you may also be jailed, this process is for device owner and for educational purpose only.
Let’s Start to Remove Google FRP Lenovo Vibe X3:
-You are supposed to connect WiFi first before starting this process, otherwise, without internet, you won’t be able to bypass frp.
-After the WiFi is connected, get back to (Select WLAN network) screen. From there, tap to “Add another network”. Type any text in SSID field tab, and long hit on your typed text to get some options.
-Hit on > 3 dots > Assist.
-Hit on “No Thanks” option from google page.
-Type “Settings” in google search app, after that, tap to “Settings” gear icon from searched result.
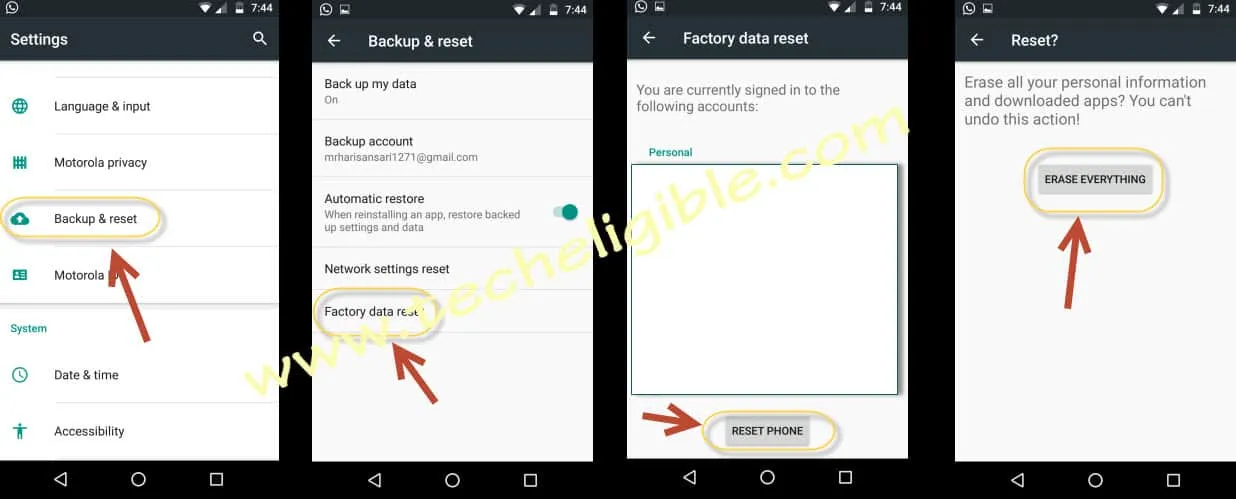
-We can now easily perform reset task from our device settings to Remove Google FRP Lenovo Vibe X3.
-Tap over > Backup & Reset > Factory data reset > Reset Phone > Erase everything.
-After that, the old google account will be removed completely, and you will gain full access to your device again.
Let’s complete setup wizard:
-Tap to “Next” form first Lenovo screen.
-From (Select WLAN network) page, just hit over > Skip > Skip Anyway.
-Tap again on > Skip > Skip Anyway > Next > Skip > Skip Anyway > Accept > No > Next > Start.
-Congrats, you are now inside your device main home-screen. This is how, you can easily bypass frp account on this phone. Thanks for visiting us.


